Cómo usar un LM35 para medir la temperatura en Celsius, Fahrenheit y Kelvin
En este tutorial, aprenderemos a usar el sensor de temperatura LM35 para medir la temperatura y mostrarla en Celsius, Fahrenheit y Kelvin en el monitor serial. El LM35 es un sensor simple pero efectivo que emite un voltaje proporcional a la temperatura, lo que permite lecturas y conversiones fáciles. Este proyecto es ideal para principiantes que buscan integrar la detección de temperatura en sus proyectos de Arduino. (en el video a las 01:00)

Hardware Explicado
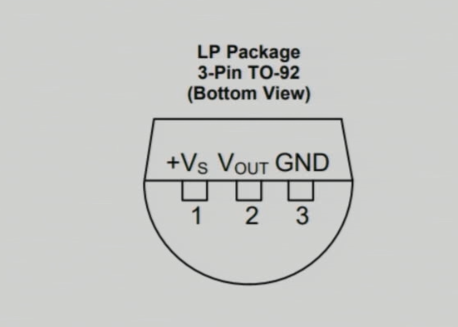
El sensor de temperatura LM35 es un dispositivo de precisión que proporciona una salida de voltaje analógico correspondiente a la temperatura en Celsius. El sensor opera en un rango de -55°C a 150°C con una precisión de ±0.5°C. Su bajo consumo de energía de 60 microamperios lo hace adecuado para dispositivos que funcionan con batería. La impedancia de salida del LM35 es baja, lo que le permite manejar una carga de manera efectiva sin una caída de voltaje significativa, lo cual es crucial para mantener lecturas precisas. El sensor suele estar encapsulado en un factor de forma TO-92, lo que facilita su integración en varios proyectos.
Detalles de la hoja de datos
| Fabricante | Texas Instruments |
|---|---|
| Número de parte | LM35 |
| Voltaje de lógica/entrada-salida | 4-30 V |
| Corriente de salida (típ.) | 60 µA |
| Rango de temperatura | -55 a 150 °C |
| Voltaje de salida | 10 mV/°C |
| Precisión (típ.) | ±0.5 °C (hasta 25 °C) |
| Paquete | TO-92 |
- Asegúrese de un suministro de energía adecuado entre 4V y 30V.
- Ten cuidado con la polaridad invertida en las conexiones de alimentación.
- Utilice una conexión a tierra estable para evitar ruidos en las lecturas.
- Mantenga el sensor alejado de fuentes de calor directas para prevenir lecturas erróneas.
- Considera un filtro pasabajos si estás experimentando fluctuaciones en la tensión de salida.
Instrucciones de cableado

Para cablear el sensor LM35, conecta el pin izquierdo (VCC) a la fuente de alimentación de 5V del Arduino. El pin derecho (GND) debe conectarse a la tierra (GND) del Arduino. El pin del medio (Salida) es donde leerás los datos de temperatura; conecta este pin al pin de entrada analógica.A0en el Arduino. Esta configuración permitirá que el Arduino lea la salida de voltaje del LM35, que corresponde a la temperatura.
Si necesitas ajustar el cableado para diferentes configuraciones, asegúrate de actualizar la referencia del pin analógico en el código para que coincida con tu nueva configuración. (en el video a las :15)
Ejemplos de código y guía paso a paso
Los siguientes fragmentos de código demuestran cómo leer la temperatura del LM35 y mostrarla en diferentes unidades. Primero, definimos el pin de entrada y el factor de conversión del LM35:
const int inPin = A0; // can change
const float LM35_FACTOR = 0.01; // do not change
En este fragmento,inPinrepresenta el pin analógico conectado a la salida del LM35, yLM35_FACTORdefine la conversión necesaria para convertir el voltaje a temperatura en Celsius.
A continuación, configuramos la comunicación en serie:
void setup() {
  Serial.begin(9600);
  Serial.println("Robojax LM35 for Arduino");
  delay(500);
}Aquí,Serial.begin(9600)inicializa la comunicación serie a una velocidad de baudios de 9600 bits por segundo, lo que nos permite enviar y recibir datos hacia y desde el monitor serie.
La función loop lee continuamente la temperatura y la imprime:
void loop() {
  printTemperature('C');
  printTemperature('F');
  printTemperature('K');
  delay(1000);
}
En este bucle, llamamos alprintTemperaturefunción para cada unidad (Celsius, Fahrenheit, Kelvin) para mostrar las respectivas temperaturas en el monitor serial.
Demostración / Qué Esperar
Cuando el LM35 está cableado correctamente, deberías ver las lecturas de temperatura mostradas en Celsius, Fahrenheit y Kelvin en el monitor serial. A medida que apliques calor al sensor, las lecturas aumentarán en consecuencia. Si notas valores aleatorios o erráticos, verifica tu cableado en busca de conexiones sueltas o asignaciones incorrectas de pines. (en el video a las 05:00)
Marcas de tiempo del video
- 00:00- Introducción
- 01:00- Descripción general del LM35
- 02:30- Instrucciones de cableado
- 03:15- Explicación del código
- 05:00- Demostración
Imágenes
/*
 * This Arduino sketch is to use LM35 to measure temperature
 * This code has two ways to get temperature
 * 1-To print the temperature either in C, F or K on the serial monitor
 * 2-To return the value in C, F and K
 *
 * Watch Video instruction for this code:https://youtu.be/S5IBc_epa1A
 *
 * Full explanation of this code and wiring diagram is available at
 * my Arduino Course at Udemy.com here: http://robojax.com/L/?id=62

 * Written by Ahmad Shamshiri on May 08, 2020 at 02:45 in Ajax, Ontario, Canada
 * in Ajax, Ontario, Canada. www.robojax.com
 *

 * Get this code and other Arduino codes from Robojax.com
Learn Arduino step by step in a structured course with all material, wiring diagrams and libraries
all in one place. Purchase My course on Udemy.com http://robojax.com/L/?id=62

If you found this tutorial helpful, please support me so I can continue creating
content like this.

or make a donation using PayPal http://robojax.com/L/?id=64

 *  * This code is "AS IS" without warranty or liability. Free to be used as long as you keep this note intact.*
 * This code has been downloaded from Robojax.com
    This program is free software: you can redistribute it and/or modify
    it under the terms of the GNU General Public License as published by
    the Free Software Foundation, either version 3 of the License, or
    (at your option) any later version.

    This program is distributed in the hope that it will be useful,
    but WITHOUT ANY WARRANTY; without even the implied warranty of
    MERCHANTABILITY or FITNESS FOR A PARTICULAR PURPOSE.  See the
    GNU General Public License for more details.

    You should have received a copy of the GNU General Public License
    along with this program.  If not, see <https://www.gnu.org/licenses/>.


*/

const int inPin =A0;//can change
const int iteration = 1000; //can change (see video)
const float LM35_FACTOR =0.01;// do not change

// the setup routine runs once when you press reset:
void setup() {
  // initialize serial communication at 9600 bits per second:
  Serial.begin(9600);
  Serial.println("Robojax LM35 for Arduino");
  delay(500);
}

// the loop routine runs over and over again forever:
void loop() {
 //robojax.com LM35 Code for Arduino
  printTemperature('C');
  Serial.println();
  printTemperature('F');
  Serial.println();
  printTemperature('K');
  Serial.println();
  Serial.println();
//  Serial.print(" Temperature: ");
//  printDegree();
//  Serial.print(getTemperature('C'));
if(getTemperature('C') >87)
{
 // do something here (watch video)
}
//  Serial.println();
  delay(1000);
}


/*
 * getTemperature()
 * @brief gets the average temperature
 * @param average temperature
 * @param "type" is character
 *     C = Celsius
 *     K = Kelvin
 *     F = Fahrenheit
 * @return returns one of the values above
 * Written by Ahmad Shamshiri for robojax.com
 * on May 08, 2020 at 02:36 in Ajax, Ontario, Canada
 */
float getTemperature(char type)
{
    float value;
    float averageTemperature =0;
    int sensorValue = analogRead(inPin);
    float voltage = sensorValue * (5.0 / 1023.0);
    float temperature = voltage / LM35_FACTOR;
    for(int i=0; i< iteration; i++)
    {
      averageTemperature += temperature;
    }

    averageTemperature /=iteration;
  if(type =='F')
   {
    value = averageTemperature *9/5 + 32;//convert to Fahrenheit
   }else if(type =='K')
   {
    value = averageTemperature + 273.15;//convert to Kelvin
   }else{
    value = averageTemperature;// return Celsius
   }
    return value ;
}//getTemperature()

/*
 * printTemperature()
 * @brief prints  temperature on serial monitor
 * @param character type
 * @param "type" is character
 *     C = Celsius
 *     K = Kelvin
 *     F = Fahrenheit
 * @return none
 * Written by Ahmad Shamshiri for robojax.com
 * on May 08, 2020 at 02:45 in Ajax, Ontario, Canada
 */
void printTemperature(char type)
{
    float value;
    float temp = getTemperature(type);
   Serial.print(temp);
    printDegree();
  if(type =='F')
   {
     Serial.print("F");
    }else if(type =='K')
   {
     Serial.print("K");
   }else{
     Serial.print("C");
   }

}//printTemperature()

/*
 * @brief prints degree symbol on serial monitor
 * @param none
 * @return returns nothing
 * Written by Ahmad Shamshiri on July 13, 2019
 * for Robojax Tutorial Robojax.com
 */
void printDegree()
{
    Serial.print("\\xC2");
    Serial.print("\\xB0");
}
Cosas que podrías necesitar
-
AmazonasCompra LM35 en Amazonamzn.to
-
eBayCompra LM35 en eBayebay.us
Recursos y referencias
-
Hoja de datosHoja de datos del LM35ti.com
Archivos📁
No hay archivos disponibles.