How to Use an LM35 to Measure Temperature in Celsius, Fahrenheit, and Kelvin
In this tutorial, we will learn how to use the LM35 temperature sensor to measure temperature and display it in Celsius, Fahrenheit, and Kelvin on the serial monitor. The LM35 is a simple yet effective sensor that outputs a voltage proportional to the temperature, allowing for easy readings and conversions. This project is ideal for beginners looking to integrate temperature sensing into their Arduino projects. (in video at 01:00)
Hardware Explained
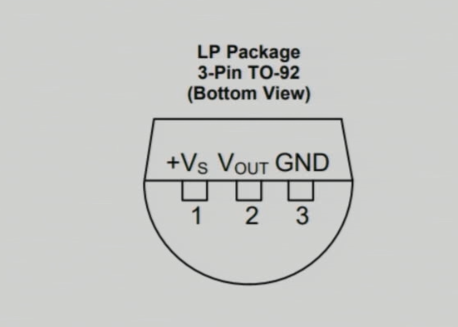
The LM35 temperature sensor is a precision device that provides an analog voltage output corresponding to the temperature in Celsius. The sensor operates in a range of -55°C to 150°C with an accuracy of ±0.5°C. Its low power consumption of 60 microamperes makes it suitable for battery-operated devices. The LM35's output impedance is low, allowing it to drive a load effectively without significant voltage drop, which is crucial for maintaining accurate readings. The sensor is often packaged in a TO-92 form factor, making it easy to integrate into various projects.Datasheet Details
| Manufacturer | Texas Instruments |
|---|---|
| Part number | LM35 |
| Logic/IO voltage | 4–30 V |
| Output current (typ.) | 60 µA |
| Temperature range | -55 to 150 °C |
| Output voltage | 10 mV/°C |
| Accuracy (typ.) | ±0.5 °C (up to 25 °C) |
| Package | TO-92 |
- Ensure proper power supply between 4V to 30V.
- Be cautious of reversed polarity on the power connections.
- Use a stable ground connection to avoid noise in readings.
- Keep the sensor away from direct heat sources to prevent erroneous readings.
- Consider a low-pass filter if you're experiencing fluctuations in the output voltage.
Wiring Instructions

A0 on the Arduino. This setup will allow the Arduino to read the voltage output from the LM35, which corresponds to the temperature.
If you need to adjust the wiring for different configurations, ensure you update the analog pin reference in the code to match your new setup. (in video at 03:15)
Code Examples & Walkthrough
The following code snippets demonstrate how to read the temperature from the LM35 and display it in different units. First, we define the input pin and the LM35 conversion factor:const int inPin = A0; // can change
const float LM35_FACTOR = 0.01; // do not changeinPin represents the analog pin connected to the LM35 output, and LM35_FACTOR defines the conversion needed to convert the voltage to temperature in Celsius.
Next, we set up the serial communication:
void setup() {
  Serial.begin(9600);
  Serial.println("Robojax LM35 for Arduino");
  delay(500);
}Serial.begin(9600) initializes the serial communication at a baud rate of 9600 bits per second, allowing us to send and receive data to and from the serial monitor.
The loop function continuously reads the temperature and prints it:
void loop() {
  printTemperature('C');
  printTemperature('F');
  printTemperature('K');
  delay(1000);
}printTemperature function for each unit (Celsius, Fahrenheit, Kelvin) to display the respective temperatures on the serial monitor.
Demonstration / What to Expect
When the LM35 is wired correctly, you should see the temperature readings displayed in Celsius, Fahrenheit, and Kelvin on the serial monitor. As you apply heat to the sensor, the readings will increase accordingly. If you notice any random or erratic values, check your wiring for loose connections or incorrect pin assignments. (in video at 05:00)Video Timestamps
- 00:00 - Introduction
- 01:00 - Overview of the LM35
- 02:30 - Wiring Instructions
- 03:15 - Code Explanation
- 05:00 - Demonstration
Images
LM35_basic_project
LM35_basic_wiring_bb
LM35_pinout
323-How to use an LM35 to measure temperature in Celsius, Fahrenheit, and Kelvin
Language: C++
/*
 * This Arduino sketch is to use LM35 to measure temperature
 * This code has two ways to get temperature
 * 1-To print the temperature either in C, F or K on the serial monitor
 * 2-To return the value in C, F and K
 *
 * Watch Video instruction for this code:https://youtu.be/S5IBc_epa1A
 *
 * Full explanation of this code and wiring diagram is available at
 * my Arduino Course at Udemy.com here: http://robojax.com/L/?id=62

 * Written by Ahmad Shamshiri on May 08, 2020 at 02:45 in Ajax, Ontario, Canada
 * in Ajax, Ontario, Canada. www.robojax.com
 *

 * Get this code and other Arduino codes from Robojax.com
Learn Arduino step by step in a structured course with all material, wiring diagrams and libraries
all in one place. Purchase My course on Udemy.com http://robojax.com/L/?id=62

If you found this tutorial helpful, please support me so I can continue creating
content like this.

or make a donation using PayPal http://robojax.com/L/?id=64

 *  * This code is "AS IS" without warranty or liability. Free to be used as long as you keep this note intact.*
 * This code has been downloaded from Robojax.com
    This program is free software: you can redistribute it and/or modify
    it under the terms of the GNU General Public License as published by
    the Free Software Foundation, either version 3 of the License, or
    (at your option) any later version.

    This program is distributed in the hope that it will be useful,
    but WITHOUT ANY WARRANTY; without even the implied warranty of
    MERCHANTABILITY or FITNESS FOR A PARTICULAR PURPOSE.  See the
    GNU General Public License for more details.

    You should have received a copy of the GNU General Public License
    along with this program.  If not, see <https://www.gnu.org/licenses/>.


*/

const int inPin =A0;//can change
const int iteration = 1000; //can change (see video)
const float LM35_FACTOR =0.01;// do not change

// the setup routine runs once when you press reset:
void setup() {
  // initialize serial communication at 9600 bits per second:
  Serial.begin(9600);
  Serial.println("Robojax LM35 for Arduino");
  delay(500);
}

// the loop routine runs over and over again forever:
void loop() {
 //robojax.com LM35 Code for Arduino
  printTemperature('C');
  Serial.println();
  printTemperature('F');
  Serial.println();
  printTemperature('K');
  Serial.println();
  Serial.println();
//  Serial.print(" Temperature: ");
//  printDegree();
//  Serial.print(getTemperature('C'));
if(getTemperature('C') >87)
{
 // do something here (watch video)
}
//  Serial.println();
  delay(1000);
}


/*
 * getTemperature()
 * @brief gets the average temperature
 * @param average temperature
 * @param "type" is character
 *     C = Celsius
 *     K = Kelvin
 *     F = Fahrenheit
 * @return returns one of the values above
 * Written by Ahmad Shamshiri for robojax.com
 * on May 08, 2020 at 02:36 in Ajax, Ontario, Canada
 */
float getTemperature(char type)
{
    float value;
    float averageTemperature =0;
    int sensorValue = analogRead(inPin);
    float voltage = sensorValue * (5.0 / 1023.0);
    float temperature = voltage / LM35_FACTOR;
    for(int i=0; i< iteration; i++)
    {
      averageTemperature += temperature;
    }

    averageTemperature /=iteration;
  if(type =='F')
   {
    value = averageTemperature *9/5 + 32;//convert to Fahrenheit
   }else if(type =='K')
   {
    value = averageTemperature + 273.15;//convert to Kelvin
   }else{
    value = averageTemperature;// return Celsius
   }
    return value ;
}//getTemperature()

/*
 * printTemperature()
 * @brief prints  temperature on serial monitor
 * @param character type
 * @param "type" is character
 *     C = Celsius
 *     K = Kelvin
 *     F = Fahrenheit
 * @return none
 * Written by Ahmad Shamshiri for robojax.com
 * on May 08, 2020 at 02:45 in Ajax, Ontario, Canada
 */
void printTemperature(char type)
{
    float value;
    float temp = getTemperature(type);
   Serial.print(temp);
    printDegree();
  if(type =='F')
   {
     Serial.print("F");
    }else if(type =='K')
   {
     Serial.print("K");
   }else{
     Serial.print("C");
   }

}//printTemperature()

/*
 * @brief prints degree symbol on serial monitor
 * @param none
 * @return returns nothing
 * Written by Ahmad Shamshiri on July 13, 2019
 * for Robojax Tutorial Robojax.com
 */
void printDegree()
{
    Serial.print("\\xC2");
    Serial.print("\\xB0");
}
Things you might need
-
AmazonPurchase LM35 from Amazonamzn.to
-
eBayPurchase LM35 from eBayebay.us
Resources & references
-
DatasheetLM35 Datasheetti.com
Files📁
No files available.