MAX7219 آرڈینو ماڈیول کا استعمال کرتے ہوئے 8x8 ایل ای ڈی میٹرکس
اس سبق میں، ہم سیکھیں گے کہ Arduino کے ساتھ MAX7219 ماڈیول کا استعمال کرتے ہوئے 8x8 LED میٹرکس کو کیسے کنٹرول کیا جائے۔ MAX7219 متعدد LEDs کے کنٹرول کو آسان بناتا ہے، جس سے ہمیں کردار اور پیٹرن کو آسانی سے دکھانے کی اجازت ملتی ہے۔ اس پروجیکٹ کے آخر تک، آپ میٹرکس پر "ROBOJAX" کا لفظ دکھانے کے قابل ہوں گے۔
اسے حاصل کرنے کے لیے، ہم LedControl لائبریری کا استعمال کریں گے، جو خاص طور پر MAX7219 کے ساتھ انٹرفیس کرنے کے لیے ڈیزائن کی گئی ہے۔ یہ لائبریری ہمیں کم سے کم کوشش کے ساتھ LED میٹرکس کو ڈیٹا بھیجنے کی اجازت دیتی ہے۔ اگر آپ وائرنگ اور کوڈ کی واضح تفہیم چاہتے ہیں تو متعلقہ ویڈیو (ویڈیو میں 0:30 پر) کو ضرور چیک کریں۔
ہارڈویئر کی وضاحت
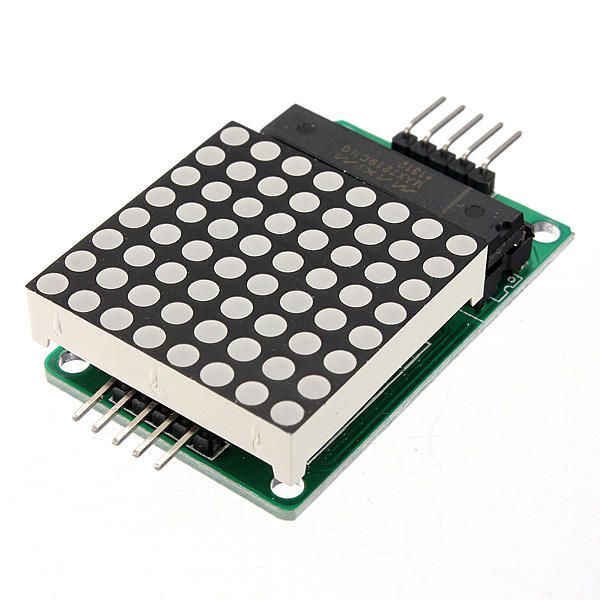
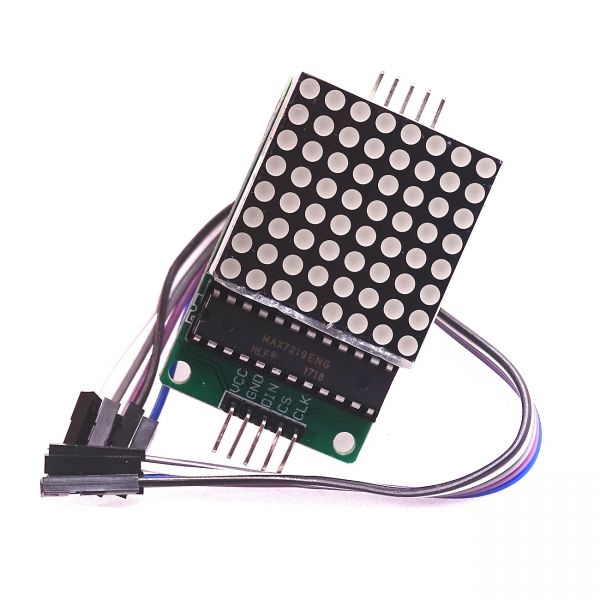
اس منصوبے کے بنیادی اجزاء میں MAX7219 ماڈیول اور 8x8 ایل ای ڈی میٹرکس شامل ہیں۔ MAX7219 ایک مربوط سرکٹ ہے جو ایل ای ڈیز کی نمائش کا انتظام کرتا ہے، آردوینو سے مواصلات اور کنٹرول سگنلز کو سنبھالتا ہے۔ یہ ایک سیریل انٹرفیس کا استعمال کرتا ہے، جس کا مطلب ہے کہ ہم صرف چند پنوں کے ذریعے بہت سے ایل ای ڈیز کو کنٹرول کر سکتے ہیں۔
8x8 ایل ای ڈی میٹرکس 64 انفرادی ایل ای ڈیز پر مشتمل ہے جو ایک گرڈ میں ترتیب دیے گئے ہیں۔ ہر ایل ای ڈی کو MAX7219 کے ذریعے مناسب کمانڈز بھیج کر آن یا آف کیا جا سکتا ہے۔ یہ میٹرکس پر مختلف کرداروں اور گرافکس کی نمائش کی اجازت دیتا ہے۔
ڈیٹا شیٹ کی تفصیلات
| کارخانہ دار | میکسیم انٹیگریٹڈ |
|---|---|
| حصہ نمبر | MAX7219 |
| منطق/آئی او وولٹیج | 3.3V سے 5.5V |
| سپلائی وولٹیج | 4.0V سے 5.5V |
| آؤٹ پٹ کرنٹ (فی چینل) | 40 ملی ایمی میکس |
| چوٹی کرنٹ (فی چینل) | 100 mA زیادہ سے زیادہ |
| PWM فریکوئنسی کی رہنمائی | 100 ہرٹز |
| ان پٹ منطقی حدیں | 2.0V (اعلی) / 0.8V (کم) |
| وولٹیج ڈراپ / RDS(on)/ سچوریشن | 0.2V عام |
| حرارتی حدود | 150°C |
| پیکج | 16-DIP |
| نوٹس / مختلف اقسام | عام اینوڈ کنفیگریشن |
- صحیح بجلی کی فراہمی کو یقینی بنائیں (4.0V سے 5.5V تک)۔
- ہر LED کے لیے موجودہ محدود کرنے والے مزاحمتی استعمال کریں تاکہ نقصان سے بچا جا سکے۔
- وائرنگ کو مختصر رکھیں تاکہ مداخلت سے بچا جا سکے۔
- گرمی کے اخراج کی نگرانی کریں؛ اگر ضروری ہو تو ہیٹ سنک کا استعمال کریں۔
- پن کنکشنز کو دوبارہ چیک کریں تاکہ غلط مواصلت سے بچا جا سکے۔
وائرنگ کی ہدایات
MAX7219 کو Arduino سے جوڑنے کے لیے، درج ذیل پنز کو جوڑیں:
- جوڑیں
VCCMAX7219 کا پن Arduino کے 5V سے۔ - جوڑیں
GNDآرڈوینو کے گراؤنڈ سے پن کو جوڑیں۔ - جوڑیں
DINڈیٹا ان کو آرڈینو پن 12 سے جوڑیں۔ - جوڑیں
CLKپن (گھڑی) کو آرڈینو پن 11 پر لگائیں۔ - جوڑیں
CSچپ (چپ منتخب) کو آرڈینو پن 10 پر۔
یہ یقینی بنائیں کہ سرکٹ کو آن کرنے سے پہلے تمام کنکشن محفوظ ہیں۔ وائرنگ سیدھی ہے، لیکن اگر آپ کو مسائل کا سامنا کرنا پڑے تو کنکشنز کو احتیاط سے دوبارہ دیکھیں (ویڈیو میں 1:45 پر)۔
کوڈ کی مثالیں اور رہنمائی
کوڈ میں، ہم LedControl لائبریری کو شامل کرنے سے شروع کرتے ہیں، جو MAX7219 کے ساتھ بات چیت کرنے کے لیے ضروری ہے۔ درج ذیل اقتباس LedControl آبجیکٹ کو شروع کرتا ہے:
LedControl lc=LedControl(12,11,10,1);یہ لائن ڈیٹا پن، گھڑی پن، چپ منتخب پن، اور آلات کی تعداد (اس صورت میں 1) کو سیٹ کرتی ہے۔ اس کے بعد، میںsetup()ہم MAX7219 کو بیدار کرتے ہیں اور ڈسپلے کی شدت کو سیٹ کرتے ہیں:
lc.shutdown(0,false);
lc.setIntensity(0,8);
lc.clearDisplay(0);
یہ یقینی بناتا ہے کہ ڈسپلے فعال ہے اور کردار دکھانے کے لیے تیار ہے۔ ڈسپلے کو چلانے والا بنیادی فنکشن یہ ہےwriteArduinoOnMatrix()جو متواتر طور پر میٹرکس کی قطاروں کو روشن کرتا ہے تاکہ حروف دکھائے جا سکیں۔
نمائش / کیا توقع کریں
جب سب کچھ وائرڈ ہو جائے اور کوڈ اپ لوڈ ہو جائے تو ایل ای ڈی میٹرکس کو "ROBOJAX" کا لفظ دکھانا چاہیے۔ اگر ڈسپلے کام نہیں کرتا تو ڈھیلے کنکشنز یا غلط پن کی تفویضات جیسے مسائل کی جانچ کریں۔ اس کے علاوہ، یہ یقینی بنائیں کہ بجلی کی فراہمی کافی ہے (ویڈیو میں 2:30 پر)۔
ابواب
- تعارف (0:00)
- ہارڈ ویئر کا جائزہ (0:30)
- وائرنگ کی ہدایات (1:45)
- کوڈ واک تھرو (2:15)
- ڈیمانسٹریشن (3:00)
تصاویر
/*
 * This video shows you how to use the MAX7219 module with an 8x8 LED matrix to display text or any characters on the LED.
 * Watch YouTube video: https://youtu.be/AAiDwBKs9uE
 *
 * Written by Ahmad Shamshiri for Robojax.com
 * on February 26, 2017 in Ajax, Ontario, Canada
 * Get this code and other Arduino codes from Robojax.com
 * Learn Arduino step by step in a structured course with all materials, wiring diagrams, and libraries
 * all in one place.

 ****************************
 * Get early access to my videos via Patreon and have your name mentioned at the end of every
 * video I publish on YouTube here: http://robojax.com/L/?id=63 (watch until the end of this video for a list of my Patrons)
 ****************************

 * Or make a donation using PayPal http://robojax.com/L/?id=64

 * This code is "AS IS" without warranty or liability. Free to be used as long as you keep this note intact.
 * This code has been downloaded from Robojax.com
    This program is free software: you can redistribute it and/or modify
    it under the terms of the GNU General Public License as published by
    the Free Software Foundation, either version 3 of the License, or
    (at your option) any later version.

    This program is distributed in the hope that it will be useful,
    but WITHOUT ANY WARRANTY; without even the implied warranty of
    MERCHANTABILITY or FITNESS FOR A PARTICULAR PURPOSE.  See the
    GNU General Public License for more details.

    You should have received a copy of the GNU General Public License
    along with this program.  If not, see <https://www.gnu.org/licenses/>.
*/


// We always have to include the library
// Based on a project posted https://github.com/wayoda/LedControl
#include "LedControl.h"

 /*
  Now we need a LedControl to work with.
  // Customized for RoboJax.com on February 26, 2017 in Ajax, Ontario, Canada.
  ***** These pin numbers will probably not work with your hardware *****
  pin 12 is connected to the DataIn
  pin 11 is connected to the CLK
  pin 10 is connected to CS
  We have only a single MAX72XX.
  */
 LedControl lc=LedControl(12,11,10,1);

 /* we always wait a bit between updates of the display */
 unsigned long delaytime=600;

 void setup() {
   /*
    The MAX72XX is in power-saving mode on startup,
    we have to do a wakeup call
    */
   lc.shutdown(0,false);
   /* Set the brightness to a medium value */
   lc.setIntensity(0,8);
   /* and clear the display */
   lc.clearDisplay(0);
 }

 /*
  This method will display the characters for the
  word "Arduino" one after the other on the matrix.
  (you need at least 5x7 LEDs to see the whole characters)
  */
 void writeArduinoOnMatrix() {
   /* here is the data for the characters */

   // K
   byte R[8]={B11111100,B10000100,B10000100,B11111000,B10100000,B10010000,B10001000,B10000100};
   byte O[8]={B00011000,B00100100,B01000010,B01000010,B01000010,B01000010,B00100100,B00011000};
   byte B[8]={B11111100,B10000100,B10000100,B11111000,B10001000,B10000100,B10000100,B11111100};
   byte J[8]={B00011110,B00000100,B00000100,B00000100,B10000100,B10000100,B01000100,B00111000};
   byte A[8]={B00111000,B01000100,B10000010,B11111110,B10000010,B10000010,B10000010,B10000010};
   byte X[8]={ B10000001,B01000010,B00100100,B00011000,B00011000,B00100100,B01000010,B10000001};
   byte love[8]={ B00000000,B01100110,B10011001,B10011001,B10000001,B01000010,B00100100,B00011000};


   /* Letter R */
   for (int i=0; i<8; i++){
   lc.setRow(0,i,R[i]);

   }

   delay(delaytime);
   for(int i=0; i<8; i++){
       lc.setRow(0,i,0);// this is for blank
   }
 //////////////// END of Letter R ///////

   /* Letter O */
   for (int i=0; i<8; i++){
   lc.setRow(0,i,O[i]);

   }

   delay(delaytime);
   for(int i=0; i<8; i++){
       lc.setRow(0,i,0);// this is for blank
   }
 //////////////// END of Letter O ///////


   /* Letter B */
   for (int i=0; i<8; i++){
   lc.setRow(0,i,B[i]);

   }

   delay(delaytime);
   for(int i=0; i<8; i++){
       lc.setRow(0,i,0);// this is for blank
   }
 //////////////// END of Letter B ///////

   /* Letter O */
   for (int i=0; i<8; i++){
   lc.setRow(0,i,O[i]);

   }

   delay(delaytime);
   for(int i=0; i<8; i++){
       lc.setRow(0,i,0);// this is for blank
   }
 //////////////// END of Letter O ///////

   /* Letter J */
   for (int i=0; i<8; i++){
   lc.setRow(0,i,J[i]);

   }

   delay(delaytime);
   for(int i=0; i<8; i++){
       lc.setRow(0,i,0);// this is for blank
   }
 //////////////// END of Letter J ///////

   /* Letter A */
   for (int i=0; i<8; i++){
   lc.setRow(0,i,A[i]);

   }

   delay(delaytime);
   for(int i=0; i<8; i++){
       lc.setRow(0,i,0);// this is for blank
   }
 //////////////// END of Letter A ///////

   /* Letter X */
   for (int i=0; i<8; i++){
   lc.setRow(0,i,X[i]);

   }

   delay(delaytime);
   for(int i=0; i<8; i++){
       lc.setRow(0,i,0);// this is for blank
   }
 //////////////// END of Letter X ///////


   /* love */
   for (int i=0; i<8; i++){
   lc.setRow(0,i,love[i]);

   }

   delay(delaytime);
   delay(delaytime);
   for(int i=0; i<8; i++){
       lc.setRow(0,i,0);// this is for blank
   }
 //////////////// END of Letter love ///////

 }// writeArduinoOnMatrix()  end


 void loop() {
   writeArduinoOnMatrix();

}/*
* This video shows you how to use the MAX7219 module with an 8x8 LED matrix to display text or any characters on the LED.
* Watch YouTube video: https://youtu.be/AAiDwBKs9uE
*
* Written by Ahmad S. for Robojax.com
* on February 26, 2017 in Ajax, Ontario, Canada
* Permission granted to share this code, given that this
* note is kept with the code.
* Disclaimer: This code is "AS IS" and for educational purposes only.
*/
// We always have to include the library
// Based on a project posted on https://github.com/wayoda/LedControl
#include "LedControl.h"
/*
Now we need a LedControl object to work with.
// Customized for RoboJax.com on February 26, 2017 in Ajax, Ontario, Canada.
***** These pin numbers will probably not work with your hardware *****
pin 1 is connected to the DataIn
pin 4 is connected to the CLK
pin 53 is connected to CS
We have only a single MAX72XX.
*/
LedControl lc=LedControl(1,4,53,1);// this line determines if this code can work with Arduino Mega or Arduino UNO
/* we always wait a bit between updates of the display */
unsigned long delaytime=600;
void setup() {
/*
The MAX72XX is in power-saving mode on startup,
we have to do a wakeup call
*/
lc.shutdown(0,false);
/* Set the brightness to a medium value */
lc.setIntensity(0,8);
/* and clear the display */
lc.clearDisplay(0);
}
/*
This method will display the characters for the
word "Arduino" one after the other on the matrix.
(you need at least 5x7 LEDs to see the whole characters)
*/
void writeArduinoOnMatrix() {
/* here is the data for the characters */
// K
byte R[8]={B11111100,B10000100,B10000100,B11111000,B10100000,B10010000,B10001000,B10000100};
byte O[8]={B00011000,B00100100,B01000010,B01000010,B01000010,B01000010,B00100100,B00011000};
byte B[8]={B11111100,B10000100,B10000100,B11111000,B10001000,B10000100,B10000100,B11111100};
byte J[8]={B00011110,B00000100,B00000100,B00000100,B10000100,B10000100,B01000100,B00111000};
byte A[8]={B00111000,B01000100,B10000010,B11111110,B10000010,B10000010,B10000010,B10000010};
byte X[8]={ B10000001,B01000010,B00100100,B00011000,B00011000,B00100100,B01000010,B10000001};
byte love[8]={ B00000000,B01100110,B10011001,B10011001,B10000001,B01000010,B00100100,B00011000};
/* Letter R */
for (int i=0; i<8; i++){
lc.setRow(0,i,R[i]);
}
delay(delaytime);
for(int i=0; i<8; i++){
lc.setRow(0,i,0);// this is for blank
}
/////////////// END of Letter R ///////
/* Letter O */
for (int i=0; i<8; i++){
lc.setRow(0,i,O[i]);
}
delay(delaytime);
for(int i=0; i<8; i++){
lc.setRow(0,i,0);// this is for blank
}
/////////////// END of Letter O ///////
/* Letter B */
for (int i=0; i<8; i++){
lc.setRow(0,i,B[i]);
}
delay(delaytime);
for(int i=0; i<8; i++){
lc.setRow(0,i,0);// this is for blank
}
/////////////// END of Letter B ///////
/* Letter O */
for (int i=0; i<8; i++){
lc.setRow(0,i,O[i]);
}
delay(delaytime);
for(int i=0; i<8; i++){
lc.setRow(0,i,0);// this is for blank
}
/////////////// END of Letter O ///////
/* Letter J */
for (int i=0; i<8; i++){
lc.setRow(0,i,J[i]);
}
delay(delaytime);
for(int i=0; i<8; i++){
lc.setRow(0,i,0);// this is for blank
}
/////////////// END of Letter J ///////
/* Letter A */
for (int i=0; i<8; i++){
lc.setRow(0,i,A[i]);
}
delay(delaytime);
for(int i=0; i<8; i++){
lc.setRow(0,i,0);// this is for blank
}
/////////////// END of Letter A ///////
/* Letter X */
for (int i=0; i<8; i++){
lc.setRow(0,i,X[i]);
}
delay(delaytime);
for(int i=0; i<8; i++){
lc.setRow(0,i,0);// this is for blank
}
/////////////// END of Letter X ///////
/* love */
for (int i=0; i<8; i++){
lc.setRow(0,i,love[i]);
}
delay(delaytime);
delay(delaytime);
for(int i=0; i<8; i++){
lc.setRow(0,i,0);// this is for blank
}
/////////////// END of love ///////
}// writeArduinoOnMatrix() end
void loop() {
writeArduinoOnMatrix();
}آپ کو جن چیزوں کی ضرورت ہو سکتی ہے
-
ایمیزونMax7219 8x8 Matrix on Amazonamzn.to
-
ای بےMax7219 8x8 Matrix on eBayebay.us
-
علی ایکسپریسMax7219 8x8 Matrix on AliExpresss.click.aliexpress.com
وسائل اور حوالہ جات
-
دستاویزاتView different board pin assignments for SPIarduino.cc
فائلیں📁
دیگر فائلیں
-
MAX7219 میٹرکس لائبریری رو بوجیکس سے
robojax-MAX7219-matrix.zip0.01 MB -
8-Digit LED Display Library (from Robojax.com)
robojax_MAX7291_8_digits.zip