MAX7219 Arduino Modülü ile 8x8 LED Matris
Bu eğitimde, bir Arduino ile MAX7219 modülü kullanarak 8x8 LED matrisini nasıl kontrol edeceğimizi öğreneceğiz. MAX7219, birden fazla LED'in kontrolünü basitleştirerek karakterleri ve desenleri kolayca göstermemizi sağlar. Bu projenin sonunda, matris üzerinde "ROBOJAX" kelimesini gösterebileceksiniz.
Bunu başarmak için, MAX7219 ile arayüz oluşturmak için özel olarak tasarlanmış LedControl kütüphanesini kullanacağız. Bu kütüphane, LED matrisine veri göndermemizi minimum çaba ile sağlar. Bağlantı ve kod hakkında daha net bir anlayışa sahip olmak istiyorsanız, ilgili videoyu kontrol etmeyi unutmayın (videoda :30).
Donanım Açıklandı
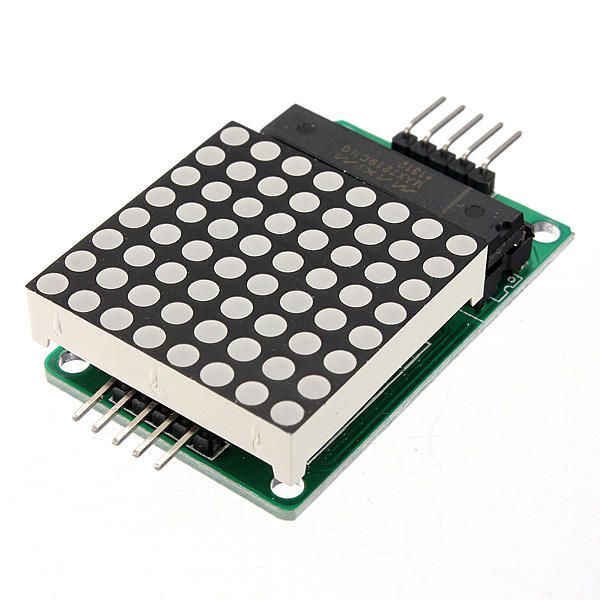
Bu projenin ana bileşenleri MAX7219 modülü ve 8x8 LED matrisidir. MAX7219, LED'lerin görüntülenmesini yöneten, Arduino'dan gelen iletişim ve kontrol sinyallerini işleyen bir entegre devredir. Seri bir arayüz kullanır, bu da birkaç pin ile birçok LED'i kontrol edebileceğimiz anlamına gelir.
8x8 LED matris, bir ızgara içinde düzenlenmiş 64 bireysel LED'den oluşur. Her bir LED, MAX7219 üzerinden uygun komutlar gönderilerek açılıp kapatılabilir. Bu, matris üzerinde çeşitli karakterlerin ve grafiklerin görüntülenmesini sağlar.
Veri Sayfası Detayları
| Üretici | Maxim Entegre |
|---|---|
| Parça numarası | MAX7219 |
| Mantık/Giriş-Çıkış voltajı | 3.3V'den 5.5V'ye |
| Besleme voltajı | 4.0V ile 5.5V |
| Çıkış akımı (kanal başına) | 40 mA maksimum |
| Zirve akımı (kanal başına) | 100 mA maksimum |
| PWM frekansı rehberi | 100 Hz |
| Giriş mantığı eşikleri | 2.0V (yüksek) / 0.8V (düşük) |
| Gerilim düşüşü / RDS(on)saturasyon | 0.2V tip. |
| Termal sınırlar | 150°C |
| Paket | 16-DIP |
| Notlar / varyantlar | Ortak anot konfigürasyonu |
- Uygun güç kaynağını sağlayın (4.0V ile 5.5V arası).
- Her LED için hasarı önlemek amacıyla akım sınırlayıcı dirençler kullanın.
- Kabloları kısa tutun, parazitlenmeyi önlemek için.
- Isı dağılımını izleyin; gerekirse bir soğutucu kullanın.
- Pin bağlantılarını yanlış iletişimi önlemek için tekrar kontrol edin.
Bağlantı Talimatları
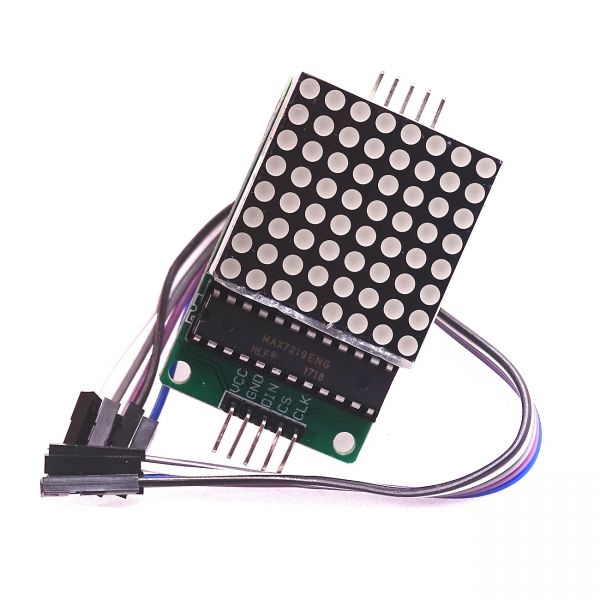
MAX7219'u Arduino'ya bağlamak için aşağıdaki pinleri bağlayın:
- Bağlayın
VCCMAX7219'un pinini Arduino'nun 5V'una bağlayın. - Bağlayın
GNDArduino'nun toprak pinine. - Bağlayın
DINArduino pin 12'ye pin (Veri Girişi) bağlayın. - Bağlayın
CLKArduino pin 11'e pin (Saat) bağlayın. - Bağlayın
CSpin (Çip Seçimi) Arduino pin 10'a.
Devreyi açmadan önce tüm bağlantıların güvenli olduğundan emin olun. Kablolama basittir, ancak sorunlarla karşılaşırsanız, bağlantıları dikkatlice gözden geçirin (videoda :45).
Kod Örnekleri ve Geçiş Rehberi
Kodu, MAX7219 ile iletişim kurmak için gerekli olan LedControl kütüphanesini dahil ederek başlıyoruz. Aşağıdaki alıntı, LedControl nesnesini başlatır:
LedControl lc=LedControl(12,11,10,1);Bu satır veri pinini, saat pinini, çip seçme pinini ve cihaz sayısını (bu durumda 1) ayarlar. Sonraki, içindesetup()fonksiyon, MAX7219'u uyandırıyoruz ve ekran yoğunluğunu ayarlıyoruz:
lc.shutdown(0,false);
lc.setIntensity(0,8);
lc.clearDisplay(0);
Bu, ekranın aktif olduğunu ve karakterleri göstermeye hazır olduğunu garanti eder. Ekranı yönlendiren ana işlev şudur:writeArduinoOnMatrix(), matrisin satırlarını sırayla aydınlatarak harfleri gösterir.
Gösterim / Ne Beklemeli
Her şey bağlandığında ve kod yüklendiğinde, LED matris "ROBOJAX" kelimesini göstermelidir. Ekran çalışmıyorsa, gevşek bağlantılar veya yanlış pin atamaları gibi sorunları kontrol edin. Ayrıca, güç kaynağının yeterli olduğundan emin olun (videoda 2:30'da).
Bölümler
- Giriş (0:00)
- Donanım Genel Görünümü (0:30)
- Bağlantı Talimatları (1:45)
- Kod Geçişi (2:15)
- Demonstrasyon (3:00)
Görseller
/*
 * This video shows you how to use the MAX7219 module with an 8x8 LED matrix to display text or any characters on the LED.
 * Watch YouTube video: https://youtu.be/AAiDwBKs9uE
 *
 * Written by Ahmad Shamshiri for Robojax.com
 * on February 26, 2017 in Ajax, Ontario, Canada
 * Get this code and other Arduino codes from Robojax.com
 * Learn Arduino step by step in a structured course with all materials, wiring diagrams, and libraries
 * all in one place.

 ****************************
 * Get early access to my videos via Patreon and have your name mentioned at the end of every
 * video I publish on YouTube here: http://robojax.com/L/?id=63 (watch until the end of this video for a list of my Patrons)
 ****************************

 * Or make a donation using PayPal http://robojax.com/L/?id=64

 * This code is "AS IS" without warranty or liability. Free to be used as long as you keep this note intact.
 * This code has been downloaded from Robojax.com
    This program is free software: you can redistribute it and/or modify
    it under the terms of the GNU General Public License as published by
    the Free Software Foundation, either version 3 of the License, or
    (at your option) any later version.

    This program is distributed in the hope that it will be useful,
    but WITHOUT ANY WARRANTY; without even the implied warranty of
    MERCHANTABILITY or FITNESS FOR A PARTICULAR PURPOSE.  See the
    GNU General Public License for more details.

    You should have received a copy of the GNU General Public License
    along with this program.  If not, see <https://www.gnu.org/licenses/>.
*/


// We always have to include the library
// Based on a project posted https://github.com/wayoda/LedControl
#include "LedControl.h"

 /*
  Now we need a LedControl to work with.
  // Customized for RoboJax.com on February 26, 2017 in Ajax, Ontario, Canada.
  ***** These pin numbers will probably not work with your hardware *****
  pin 12 is connected to the DataIn
  pin 11 is connected to the CLK
  pin 10 is connected to CS
  We have only a single MAX72XX.
  */
 LedControl lc=LedControl(12,11,10,1);

 /* we always wait a bit between updates of the display */
 unsigned long delaytime=600;

 void setup() {
   /*
    The MAX72XX is in power-saving mode on startup,
    we have to do a wakeup call
    */
   lc.shutdown(0,false);
   /* Set the brightness to a medium value */
   lc.setIntensity(0,8);
   /* and clear the display */
   lc.clearDisplay(0);
 }

 /*
  This method will display the characters for the
  word "Arduino" one after the other on the matrix.
  (you need at least 5x7 LEDs to see the whole characters)
  */
 void writeArduinoOnMatrix() {
   /* here is the data for the characters */

   // K
   byte R[8]={B11111100,B10000100,B10000100,B11111000,B10100000,B10010000,B10001000,B10000100};
   byte O[8]={B00011000,B00100100,B01000010,B01000010,B01000010,B01000010,B00100100,B00011000};
   byte B[8]={B11111100,B10000100,B10000100,B11111000,B10001000,B10000100,B10000100,B11111100};
   byte J[8]={B00011110,B00000100,B00000100,B00000100,B10000100,B10000100,B01000100,B00111000};
   byte A[8]={B00111000,B01000100,B10000010,B11111110,B10000010,B10000010,B10000010,B10000010};
   byte X[8]={ B10000001,B01000010,B00100100,B00011000,B00011000,B00100100,B01000010,B10000001};
   byte love[8]={ B00000000,B01100110,B10011001,B10011001,B10000001,B01000010,B00100100,B00011000};


   /* Letter R */
   for (int i=0; i<8; i++){
   lc.setRow(0,i,R[i]);

   }

   delay(delaytime);
   for(int i=0; i<8; i++){
       lc.setRow(0,i,0);// this is for blank
   }
 //////////////// END of Letter R ///////

   /* Letter O */
   for (int i=0; i<8; i++){
   lc.setRow(0,i,O[i]);

   }

   delay(delaytime);
   for(int i=0; i<8; i++){
       lc.setRow(0,i,0);// this is for blank
   }
 //////////////// END of Letter O ///////


   /* Letter B */
   for (int i=0; i<8; i++){
   lc.setRow(0,i,B[i]);

   }

   delay(delaytime);
   for(int i=0; i<8; i++){
       lc.setRow(0,i,0);// this is for blank
   }
 //////////////// END of Letter B ///////

   /* Letter O */
   for (int i=0; i<8; i++){
   lc.setRow(0,i,O[i]);

   }

   delay(delaytime);
   for(int i=0; i<8; i++){
       lc.setRow(0,i,0);// this is for blank
   }
 //////////////// END of Letter O ///////

   /* Letter J */
   for (int i=0; i<8; i++){
   lc.setRow(0,i,J[i]);

   }

   delay(delaytime);
   for(int i=0; i<8; i++){
       lc.setRow(0,i,0);// this is for blank
   }
 //////////////// END of Letter J ///////

   /* Letter A */
   for (int i=0; i<8; i++){
   lc.setRow(0,i,A[i]);

   }

   delay(delaytime);
   for(int i=0; i<8; i++){
       lc.setRow(0,i,0);// this is for blank
   }
 //////////////// END of Letter A ///////

   /* Letter X */
   for (int i=0; i<8; i++){
   lc.setRow(0,i,X[i]);

   }

   delay(delaytime);
   for(int i=0; i<8; i++){
       lc.setRow(0,i,0);// this is for blank
   }
 //////////////// END of Letter X ///////


   /* love */
   for (int i=0; i<8; i++){
   lc.setRow(0,i,love[i]);

   }

   delay(delaytime);
   delay(delaytime);
   for(int i=0; i<8; i++){
       lc.setRow(0,i,0);// this is for blank
   }
 //////////////// END of Letter love ///////

 }// writeArduinoOnMatrix()  end


 void loop() {
   writeArduinoOnMatrix();

}/*
* Bu video, MAX7219 modülünü 8x8 LED matris ile kullanarak LED'de metin veya herhangi bir karakterin nasıl görüntüleneceğini gösterir.
* YouTube videosunu izleyin: https://youtu.be/AAiDwBKs9uE
*
* Robojax.com için Ahmad S. tarafından yazılmıştır.
* 26 Şubat 2017, Ajax, Ontario, Kanada
* Bu not kodla birlikte saklanmak şartıyla kodun paylaşılmasına izin verilmiştir.
* Feragatname: Bu kod "OLDUĞU GİBİ" sunulmuştur ve yalnızca eğitim amaçlıdır.
*
* /
*
* // Kütüphaneyi her zaman eklemeliyiz
* // https://github.com/wayoda/LedControl adresinde paylaşılan bir projeye dayanmaktadır
*/
#include "LedControl.h"
/*
* Now we need a LedControl object to work with.
* // Customized for RoboJax.com on February 26, 2017 in Ajax, Ontario, Canada.
* **** These pin numbers will probably not work with your hardware *****
* pin 1 is connected to the DataIn
* pin 4 is connected to the CLK
* pin 53 is connected to CS
* We have only a single MAX72XX.
*/
LedControl lc=LedControl(1,4,53,1); // this line determines if this code can work with Arduino Mega or Arduino UNO
/*
* we always wait a bit between updates of the display */
* unsigned long delaytime=600;
*
* void setup() {
* /*
* The MAX72XX is in power-saving mode on startup,
* we have to do a wakeup call
*/
lc.shutdown(0,false);
/*
* Set the brightness to a medium value */
* lc.setIntensity(0,8);
* /* and clear the display
*/
lc.clearDisplay(0);
}
/*
* This method will display the characters for the
* word "Arduino" one after the other on the matrix.
* (you need at least 5x7 LEDs to see the whole characters)
*/
void writeArduinoOnMatrix() {
/*
* here is the data for the characters */
*
* // K
* byte R[8]={B11111100,B10000100,B10000100,B11111000,B10100000,B10010000,B10001000,B10000100};
* byte O[8]={B00011000,B00100100,B01000010,B01000010,B01000010,B01000010,B00100100,B00011000};
* byte B[8]={B11111100,B10000100,B10000100,B11111000,B10001000,B10000100,B10000100,B11111100};
* byte J[8]={B00011110,B00000100,B00000100,B00000100,B10000100,B10000100,B01000100,B00111000};
* byte A[8]={B00111000,B01000100,B10000010,B11111110,B10000010,B10000010,B10000010,B10000010};
* byte X[8]={ B10000001,B01000010,B00100100,B00011000,B00011000,B00100100,B01000010,B10000001};
* byte love[8]={ B00000000,B01100110,B10011001,B10011001,B10000001,B01000010,B00100100,B00011000};
*
*
* /* Letter R
*/
for (int i=0; i<8; i++){
lc.setRow(0,i,R[i]);
}
delay(delaytime);
for(int i=0; i<8; i++){
lc.setRow(0,i,0); // this is for blank
}
// ///////////// END of Letter R ///////
/*
* Letter O */
* for (int i=0; i<8; i++){
* lc.setRow(0,i,O[i]);
*
* }
*
* delay(delaytime);
* for(int i=0; i<8; i++){
* lc.setRow(0,i,0);// this is for blank
* }
* /////////////// END of Letter O ///////
*
*
* /* Letter B
*/
for (int i=0; i<8; i++){
lc.setRow(0,i,B[i]);
}
delay(delaytime);
for(int i=0; i<8; i++){
lc.setRow(0,i,0); // this is for blank
}
// ///////////// END of Letter B ///////
/*
* Letter O */
* for (int i=0; i<8; i++){
* lc.setRow(0,i,O[i]);
*
* }
*
* delay(delaytime);
* for(int i=0; i<8; i++){
* lc.setRow(0,i,0);// this is for blank
* }
* /////////////// END of Letter O ///////
*
* /* Letter J
*/
for (int i=0; i<8; i++){
lc.setRow(0,i,J[i]);
}
delay(delaytime);
for(int i=0; i<8; i++){
lc.setRow(0,i,0); // this is for blank
}
// ///////////// END of Letter J ///////
/*
* Letter A */
* for (int i=0; i<8; i++){
* lc.setRow(0,i,A[i]);
*
* }
*
* delay(delaytime);
* for(int i=0; i<8; i++){
* lc.setRow(0,i,0);// this is for blank
* }
* /////////////// END of Letter A ///////
*
* /* Letter X
*/
for (int i=0; i<8; i++){
lc.setRow(0,i,X[i]);
}
delay(delaytime);
for(int i=0; i<8; i++){
lc.setRow(0,i,0); // this is for blank
}
// ///////////// END of Letter X ///////
İhtiyacın olabileceğini düşünüyor
-
AmazonMax7219 8x8 Matrix on Amazonamzn.to
-
eBayMax7219 8x8 Matrix on eBayebay.us
-
AliExpressMax7219 8x8 Matrix on AliExpresss.click.aliexpress.com
Kaynaklar ve referanslar
-
Belgelendirme
Dosyalar📁
Diğer dosyalar
-
Robojax'tan MAX7219 Matris Kütüphanesi
robojax-MAX7219-matrix.zip0.01 MB -
8-Digit LED Display Library (from Robojax.com)
robojax_MAX7291_8_digits.zip