8x8 LED Matrix โดยใช้โมดูล MAX7219 Arduino
ในบทแนะนำนี้ เราจะเรียนรู้วิธีควบคุมแผง LED ขนาด 8x8 โดยใช้โมดูล MAX7219 ร่วมกับ Arduino โมดูล MAX7219 ทำให้การควบคุม LED หลายตัวเป็นเรื่องง่าย ช่วยให้เราสามารถแสดงตัวอักษรและลวดลายได้อย่างสะดวกสบาย เมื่อสิ้นสุดโครงการนี้ คุณจะสามารถแสดงคำว่า "ROBOJAX" บนแผงได้
เพื่อให้บรรลุเป้าหมายนี้ เราจะใช้ไลบรารี LedControl ซึ่งออกแบบมาโดยเฉพาะสำหรับการเชื่อมต่อกับ MAX7219 ไลบรารีนี้ช่วยให้เราสามารถส่งข้อมูลไปยัง LED matrix ได้อย่างง่ายดาย หากคุณต้องการความเข้าใจที่ชัดเจนเกี่ยวกับการเดินสายและโค้ด อย่าลืมตรวจสอบวิดีโอที่เกี่ยวข้อง (ในวิดีโอที่ 0:30)
อธิบายฮาร์ดแวร์
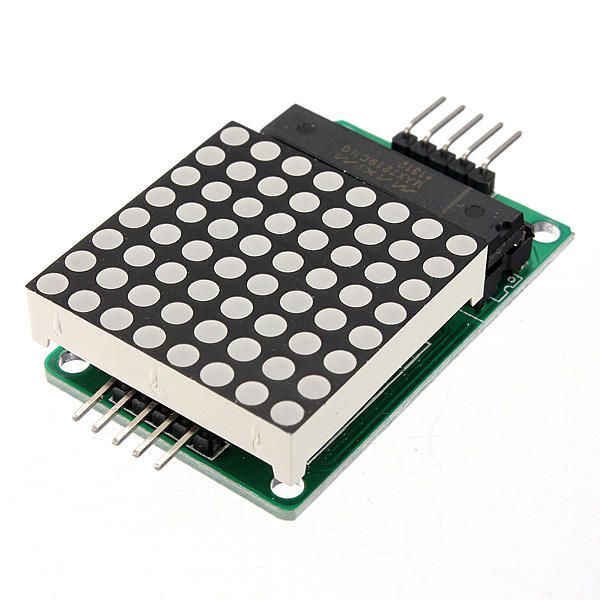
ส่วนประกอบหลักของโครงการนี้ประกอบด้วยโมดูล MAX7219 และตาราง LED ขนาด 8x8 MAX7219 เป็นวงจรรวมที่จัดการการแสดงผลของ LED โดยจัดการการสื่อสารและสัญญาณควบคุมจาก Arduino มันใช้การเชื่อมต่อแบบอนุกรม ซึ่งหมายความว่าเราสามารถควบคุม LED ได้หลายตัวด้วยขาเพียงไม่กี่ขาจาก Arduino
ตาราง LED ขนาด 8x8 ประกอบด้วย LED 64 ตัวที่จัดเรียงในรูปแบบตาราง แต่ละ LED สามารถเปิดหรือปิดได้โดยการส่งคำสั่งที่เหมาะสมผ่าน MAX7219 ซึ่งทำให้สามารถแสดงตัวอักษรและกราฟิกต่างๆ บนตารางได้
รายละเอียดแผ่นข้อมูล
| ผู้ผลิต | แม็กซิม อินทิเกรตเต็ด |
|---|---|
| หมายเลขชิ้นส่วน | MAX7219 |
| แรงดันไฟฟ้า Logic/IO | 3.3V ถึง 5.5V |
| แรงดันไฟฟ้าจ่าย | 4.0V ถึง 5.5V |
| กระแสไฟฟ้าเอาต์พุต (ต่อช่อง) | 40 mA สูงสุด |
| กระแสสูงสุด (ต่อช่อง) | 100 mA สูงสุด |
| คำแนะนำความถี่ PWM | 100 เฮิร์ตซ์ |
| เกณฑ์ตรรกะนำเข้า | 2.0V (สูง) / 0.8V (ต่ำ) |
| แรงดันไฟฟ้าตก / RDS(on)/ ความอิ่มตัว | 0.2V โดยทั่วไป |
| ขีดจำกัดทางความร้อน | 150°C |
| แพ็คเกจ | 16-DIP |
| หมายเหตุ / ตัวแปร | การกำหนดค่าขั้วบวกทั่วไป |
- ตรวจสอบให้แน่ใจว่ามีการจ่ายไฟที่เหมาะสม (4.0V ถึง 5.5V)
- ใช้ตัวต้านทานจำกัดกระแสสำหรับแต่ละ LED เพื่อป้องกันความเสียหาย
- ควรทำให้สายไฟสั้นเพื่อลดการรบกวน
- ตรวจสอบการกระจายความร้อน; ใช้ฮีตซิงค์หากจำเป็น
- ตรวจสอบการเชื่อมต่อพินอีกครั้งเพื่อหลีกเลี่ยงการสื่อสารผิดพลาด
คำแนะนำการเดินสาย
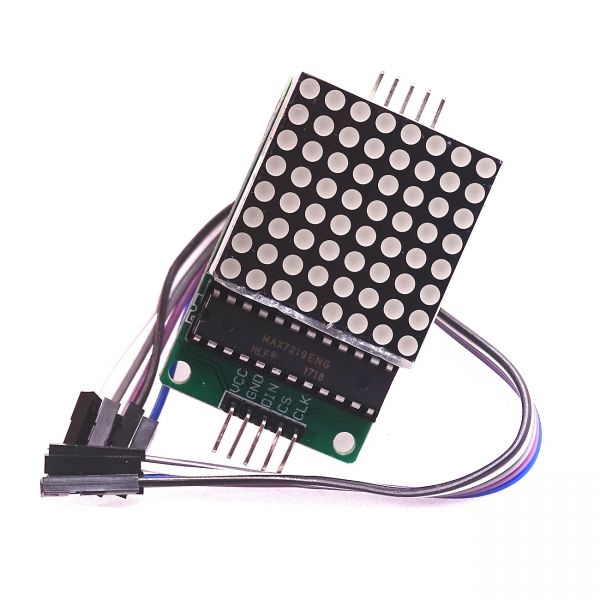
ในการเชื่อมต่อ MAX7219 กับ Arduino ให้เชื่อมต่อพินต่อไปนี้:
- เชื่อมต่อกับ
VCCขา MAX7219 ไปยัง 5V ของ Arduino - เชื่อมต่อกับ
GNDขาไปยังกราวด์ของ Arduino. - เชื่อมต่อกับ
DINเชื่อมพิน (ข้อมูลเข้า) ไปยังพิน 12 ของ Arduino. - เชื่อมต่อกับ
CLKเชื่อมพิน (นาฬิกา) เข้ากับพิน 11 ของ Arduino. - เชื่อมต่อกับ
CSขา pin (Chip Select) ไปยังขา Arduino หมายเลข 10.
ตรวจสอบให้แน่ใจว่าการเชื่อมต่อทั้งหมดแน่นหนาก่อนที่จะเปิดวงจร ไฟฟ้าจะมีความเรียบง่าย แต่หากคุณพบปัญหา ให้ตรวจสอบการเชื่อมต่ออย่างละเอียด (ในวิดีโอที่ 1:45)
ตัวอย่างโค้ดและการเดินทาง
ในโค้ด เราเริ่มต้นด้วยการรวมไลบรารี LedControl ซึ่งเป็นสิ่งจำเป็นสำหรับการสื่อสารกับ MAX7219 ส่วนที่ตามมาจะทำการเริ่มต้นวัตถุ LedControl:
LedControl lc=LedControl(12,11,10,1);บรรทัดนี้ตั้งค่าขาเชื่อมต่อข้อมูล ขาเวลา ขาเลือกชิป และจำนวนอุปกรณ์ (1 ในกรณีนี้) ถัดไป ในsetup()ฟังก์ชัน เราปลุก MAX7219 และตั้งค่าความเข้มของการแสดงผล:
lc.shutdown(0,false);
lc.setIntensity(0,8);
lc.clearDisplay(0);
สิ่งนี้ทำให้แน่ใจว่าการแสดงผลทำงานและพร้อมที่จะโชว์ตัวอักษร ฟังก์ชันหลักที่ขับเคลื่อนการแสดงผลคือwriteArduinoOnMatrix()ซึ่งจะเปิดไฟเรียงตามแถวของเมทริกซ์เพื่อแสดงตัวอักษร
การสาธิต / สิ่งที่คาดหวัง
เมื่อทุกอย่างถูกเชื่อมต่อและโค้ดถูกอัปโหลดแล้ว แผง LED ควรแสดงคำว่า "ROBOJAX" หากการแสดงผลไม่ทำงาน ให้ตรวจสอบปัญหาต่างๆ เช่น การเชื่อมต่อหลวม หรือการกำหนดพินที่ไม่ถูกต้อง นอกจากนี้ ให้แน่ใจว่าการจ่ายไฟเพียงพอ (ในวิดีโอที่ 2:30)
บทที่
- บทนำ (0:00)
- ภาพรวมฮาร์ดแวร์ (0:30)
- คำแนะนำการเดินสาย (1:45)
- การเดินผ่านโค้ด (2:15)
- การสาธิต (3:00)
ภาพ
/*
 * This video shows you how to use the MAX7219 module with an 8x8 LED matrix to display text or any characters on the LED.
 * Watch YouTube video: https://youtu.be/AAiDwBKs9uE
 *
 * Written by Ahmad Shamshiri for Robojax.com
 * on February 26, 2017 in Ajax, Ontario, Canada
 * Get this code and other Arduino codes from Robojax.com
 * Learn Arduino step by step in a structured course with all materials, wiring diagrams, and libraries
 * all in one place.

 ****************************
 * Get early access to my videos via Patreon and have your name mentioned at the end of every
 * video I publish on YouTube here: http://robojax.com/L/?id=63 (watch until the end of this video for a list of my Patrons)
 ****************************

 * Or make a donation using PayPal http://robojax.com/L/?id=64

 * This code is "AS IS" without warranty or liability. Free to be used as long as you keep this note intact.
 * This code has been downloaded from Robojax.com
    This program is free software: you can redistribute it and/or modify
    it under the terms of the GNU General Public License as published by
    the Free Software Foundation, either version 3 of the License, or
    (at your option) any later version.

    This program is distributed in the hope that it will be useful,
    but WITHOUT ANY WARRANTY; without even the implied warranty of
    MERCHANTABILITY or FITNESS FOR A PARTICULAR PURPOSE.  See the
    GNU General Public License for more details.

    You should have received a copy of the GNU General Public License
    along with this program.  If not, see <https://www.gnu.org/licenses/>.
*/


// We always have to include the library
// Based on a project posted https://github.com/wayoda/LedControl
#include "LedControl.h"

 /*
  Now we need a LedControl to work with.
  // Customized for RoboJax.com on February 26, 2017 in Ajax, Ontario, Canada.
  ***** These pin numbers will probably not work with your hardware *****
  pin 12 is connected to the DataIn
  pin 11 is connected to the CLK
  pin 10 is connected to CS
  We have only a single MAX72XX.
  */
 LedControl lc=LedControl(12,11,10,1);

 /* we always wait a bit between updates of the display */
 unsigned long delaytime=600;

 void setup() {
   /*
    The MAX72XX is in power-saving mode on startup,
    we have to do a wakeup call
    */
   lc.shutdown(0,false);
   /* Set the brightness to a medium value */
   lc.setIntensity(0,8);
   /* and clear the display */
   lc.clearDisplay(0);
 }

 /*
  This method will display the characters for the
  word "Arduino" one after the other on the matrix.
  (you need at least 5x7 LEDs to see the whole characters)
  */
 void writeArduinoOnMatrix() {
   /* here is the data for the characters */

   // K
   byte R[8]={B11111100,B10000100,B10000100,B11111000,B10100000,B10010000,B10001000,B10000100};
   byte O[8]={B00011000,B00100100,B01000010,B01000010,B01000010,B01000010,B00100100,B00011000};
   byte B[8]={B11111100,B10000100,B10000100,B11111000,B10001000,B10000100,B10000100,B11111100};
   byte J[8]={B00011110,B00000100,B00000100,B00000100,B10000100,B10000100,B01000100,B00111000};
   byte A[8]={B00111000,B01000100,B10000010,B11111110,B10000010,B10000010,B10000010,B10000010};
   byte X[8]={ B10000001,B01000010,B00100100,B00011000,B00011000,B00100100,B01000010,B10000001};
   byte love[8]={ B00000000,B01100110,B10011001,B10011001,B10000001,B01000010,B00100100,B00011000};


   /* Letter R */
   for (int i=0; i<8; i++){
   lc.setRow(0,i,R[i]);

   }

   delay(delaytime);
   for(int i=0; i<8; i++){
       lc.setRow(0,i,0);// this is for blank
   }
 //////////////// END of Letter R ///////

   /* Letter O */
   for (int i=0; i<8; i++){
   lc.setRow(0,i,O[i]);

   }

   delay(delaytime);
   for(int i=0; i<8; i++){
       lc.setRow(0,i,0);// this is for blank
   }
 //////////////// END of Letter O ///////


   /* Letter B */
   for (int i=0; i<8; i++){
   lc.setRow(0,i,B[i]);

   }

   delay(delaytime);
   for(int i=0; i<8; i++){
       lc.setRow(0,i,0);// this is for blank
   }
 //////////////// END of Letter B ///////

   /* Letter O */
   for (int i=0; i<8; i++){
   lc.setRow(0,i,O[i]);

   }

   delay(delaytime);
   for(int i=0; i<8; i++){
       lc.setRow(0,i,0);// this is for blank
   }
 //////////////// END of Letter O ///////

   /* Letter J */
   for (int i=0; i<8; i++){
   lc.setRow(0,i,J[i]);

   }

   delay(delaytime);
   for(int i=0; i<8; i++){
       lc.setRow(0,i,0);// this is for blank
   }
 //////////////// END of Letter J ///////

   /* Letter A */
   for (int i=0; i<8; i++){
   lc.setRow(0,i,A[i]);

   }

   delay(delaytime);
   for(int i=0; i<8; i++){
       lc.setRow(0,i,0);// this is for blank
   }
 //////////////// END of Letter A ///////

   /* Letter X */
   for (int i=0; i<8; i++){
   lc.setRow(0,i,X[i]);

   }

   delay(delaytime);
   for(int i=0; i<8; i++){
       lc.setRow(0,i,0);// this is for blank
   }
 //////////////// END of Letter X ///////


   /* love */
   for (int i=0; i<8; i++){
   lc.setRow(0,i,love[i]);

   }

   delay(delaytime);
   delay(delaytime);
   for(int i=0; i<8; i++){
       lc.setRow(0,i,0);// this is for blank
   }
 //////////////// END of Letter love ///////

 }// writeArduinoOnMatrix()  end


 void loop() {
   writeArduinoOnMatrix();

}/*
* This video shows you how to use the MAX7219 module with an 8x8 LED matrix to display text or any characters on the LED.
* Watch YouTube video: https://youtu.be/AAiDwBKs9uE
*
* Written by Ahmad S. for Robojax.com
* on February 26, 2017 in Ajax, Ontario, Canada
* Permission granted to share this code, given that this
* note is kept with the code.
* Disclaimer: This code is "AS IS" and for educational purposes only.
*/
// We always have to include the library
// Based on a project posted on https://github.com/wayoda/LedControl
#include "LedControl.h"
/*
Now we need a LedControl object to work with.
// Customized for RoboJax.com on February 26, 2017 in Ajax, Ontario, Canada.
***** These pin numbers will probably not work with your hardware *****
pin 1 is connected to the DataIn
pin 4 is connected to the CLK
pin 53 is connected to CS
We have only a single MAX72XX.
*/
LedControl lc=LedControl(1,4,53,1);// this line determines if this code can work with Arduino Mega or Arduino UNO
/* we always wait a bit between updates of the display */
unsigned long delaytime=600;
void setup() {
/*
The MAX72XX is in power-saving mode on startup,
we have to do a wakeup call
*/
lc.shutdown(0,false);
/* Set the brightness to a medium value */
lc.setIntensity(0,8);
/* and clear the display */
lc.clearDisplay(0);
}
/*
This method will display the characters for the
word "Arduino" one after the other on the matrix.
(you need at least 5x7 LEDs to see the whole characters)
*/
void writeArduinoOnMatrix() {
/* here is the data for the characters */
// K
byte R[8]={B11111100,B10000100,B10000100,B11111000,B10100000,B10010000,B10001000,B10000100};
byte O[8]={B00011000,B00100100,B01000010,B01000010,B01000010,B01000010,B00100100,B00011000};
byte B[8]={B11111100,B10000100,B10000100,B11111000,B10001000,B10000100,B10000100,B11111100};
byte J[8]={B00011110,B00000100,B00000100,B00000100,B10000100,B10000100,B01000100,B00111000};
byte A[8]={B00111000,B01000100,B10000010,B11111110,B10000010,B10000010,B10000010,B10000010};
byte X[8]={ B10000001,B01000010,B00100100,B00011000,B00011000,B00100100,B01000010,B10000001};
byte love[8]={ B00000000,B01100110,B10011001,B10011001,B10000001,B01000010,B00100100,B00011000};
/* Letter R */
for (int i=0; i<8; i++){
lc.setRow(0,i,R[i]);
}
delay(delaytime);
for(int i=0; i<8; i++){
lc.setRow(0,i,0);// this is for blank
}
/////////////// END of Letter R ///////
/* Letter O */
for (int i=0; i<8; i++){
lc.setRow(0,i,O[i]);
}
delay(delaytime);
for(int i=0; i<8; i++){
lc.setRow(0,i,0);// this is for blank
}
/////////////// END of Letter O ///////
/* Letter B */
for (int i=0; i<8; i++){
lc.setRow(0,i,B[i]);
}
delay(delaytime);
for(int i=0; i<8; i++){
lc.setRow(0,i,0);// this is for blank
}
/////////////// END of Letter B ///////
/* Letter O */
for (int i=0; i<8; i++){
lc.setRow(0,i,O[i]);
}
delay(delaytime);
for(int i=0; i<8; i++){
lc.setRow(0,i,0);// this is for blank
}
/////////////// END of Letter O ///////
/* Letter J */
for (int i=0; i<8; i++){
lc.setRow(0,i,J[i]);
}
delay(delaytime);
for(int i=0; i<8; i++){
lc.setRow(0,i,0);// this is for blank
}
/////////////// END of Letter J ///////
/* Letter A */
for (int i=0; i<8; i++){
lc.setRow(0,i,A[i]);
}
delay(delaytime);
for(int i=0; i<8; i++){
lc.setRow(0,i,0);// this is for blank
}
/////////////// END of Letter A ///////
/* Letter X */
for (int i=0; i<8; i++){
lc.setRow(0,i,X[i]);
}
delay(delaytime);
for(int i=0; i<8; i++){
lc.setRow(0,i,0);// this is for blank
}
/////////////// END of Letter X ///////
/* love */
for (int i=0; i<8; i++){
lc.setRow(0,i,love[i]);
}
delay(delaytime);
delay(delaytime);
for(int i=0; i<8; i++){
lc.setRow(0,i,0);// this is for blank
}
/////////////// END of love ///////
}// writeArduinoOnMatrix() end
void loop() {
writeArduinoOnMatrix();
}สิ่งที่คุณอาจต้องการ
-
อเมซอนMax7219 8x8 Matrix on Amazonamzn.to
-
อีเบย์Max7219 8x8 Matrix on eBayebay.us
-
อาลีเอ็กซ์เพรสMax7219 8x8 Matrix on AliExpresss.click.aliexpress.com
แหล่งข้อมูลและเอกสารอ้างอิง
-
เอกสารView different board pin assignments for SPIarduino.cc
-
ภายนอก
ไฟล์📁
ไฟล์อื่น ๆ
-
MAX7219 ไลบรารีแมทริกซ์จาก Robojax
robojax-MAX7219-matrix.zip0.01 MB -
8-Digit LED Display Library (from Robojax.com)
robojax_MAX7291_8_digits.zip