8x8 LED Matrix Isticmaalka MAX7219 Arduino Module
Casharakan, waxaan baran doonaa sida loo xakameeyo matriiska LED-ka 8x8 adigoo isticmaalaya module MAX7219 oo leh Arduino. MAX7219 wuxuu fududeeyaa xakameynta LED-yada badan, taasoo noo oggolaaneysa inaan si sahlan u muujino xarfo iyo qaabab. Dhamaadka mashruucan, waxaad awoodi doontaa inaad ku muujiso erayga "ROBOJAX" matriiska.
Si aad tan u gaadho, waxaanu isticmaali doonaa maktabadda LedControl, oo si gaar ah loogu talagalay in lagu xiro MAX7219. Maktabaddan waxay noo ogolaaneysaa inaan xog u dirno matrix-ka LED-ka iyadoo aan dadaal badan gelin. Haddii aad rabto inaad si fiican u fahanto xargaha iyo koodhka, hubi inaad eegto fiidiyowga la xiriira (fiidiyowga 0:30).
Qalabka la Sharxay
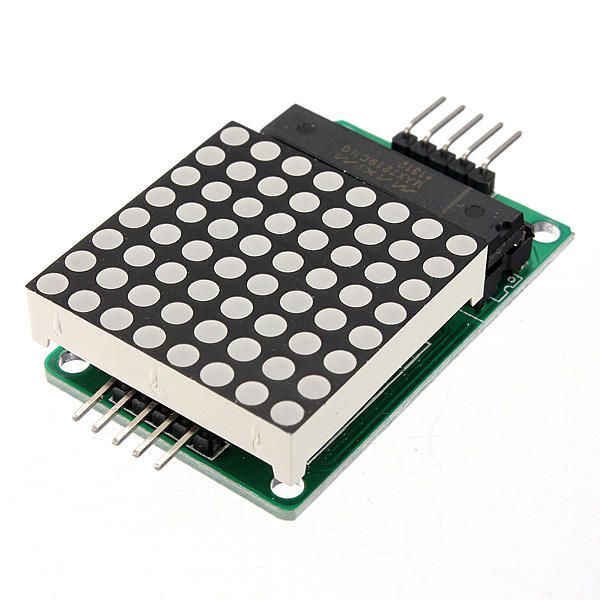
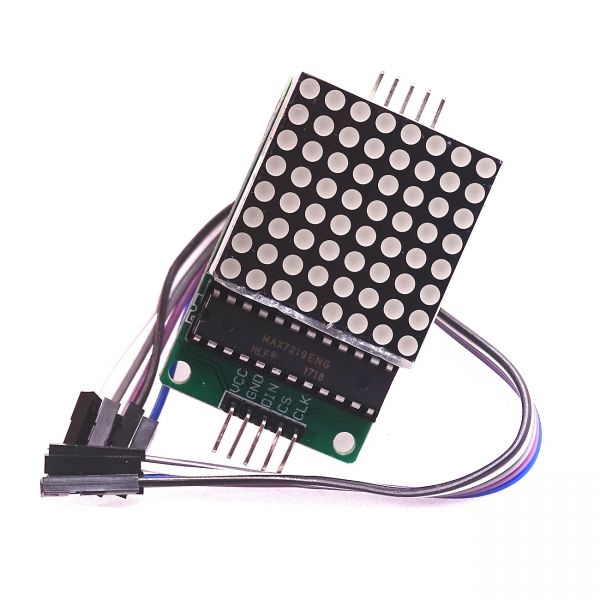
Qaybaha ugu muhiimsan ee mashruucan waxaa ka mid ah module-ka MAX7219 iyo matrix-ka LED 8x8. MAX7219 waa wareeg isku dhafan oo maamula soo bandhigida LEDs, isagoo ka shaqeynaya isgaadhsiinta iyo calaamadaha xakameynta ee ka yimaada Arduino. Waxay isticmaashaa interface silsilad ah, taasoo la micno ah inaan ku xakameyn karno LEDs badan oo kaliya iyadoo la adeegsanayo dhowr pins oo ka socda Arduino.
8x8 LED matrix-ka wuxuu ka kooban yahay 64 LED oo gooni ah oo lagu habeeyey shabakad. LED kasta waxaa la shidi karaa ama la dami karaa iyadoo la dirayo amarada ku habboon iyada oo loo marayo MAX7219. Tani waxay u oggolaaneysaa in lagu soo bandhigo xarfo iyo sawirro kala duwan matrix-ka.
Faahfaahinta Warqadda Data
| Soosaar | Maxim Integrated |
|---|---|
| Lambarka qaybta | MAX7219 |
| Voltage-ka loogiga/IO | 3.3V ilaa 5.5V |
| Koronto sahayada | 4.0V ilaa 5.5V |
| Hawada hadda (kanaal kasta) | 40 mA ugu badnaan |
| Culayska ugu sarreeya (kanaal kasta) | 100 mA ugu badnaan |
| Hagaha soo noqnoqoshada PWM | 100 Hz |
| Xadka loogaga talagalay gelinta | 2.0V (sare) / 0.8V (hoose) |
| Hoos u dhaca / RDS(on)/ buuxin | 0.2V caadi ah. |
| Xadidaheeda kulaylka | 150°C |
| Baakidhka | 16-DIP |
| Xusuusin / noocyo | Qaab anode caadi ah |
- Hubi in koronto sax ah la helo (4.0V ilaa 5.5V).
- Isticmaal iska caabinta xadka hadda ee LED kasta si aad uga hortagto waxyeello.
- Xidhiidhka gaaban ku hay si aad uga fogaato faragelinta.
- Kormeere kulaylka; isticmaal heatsink haddii loo baahdo.
- Laba laba hubi xiriirada pin si aad uga fogaato isgaarsiin khaldan.
Tilmaamaha Xadhigga
Si aad u xidhid MAX7219 Arduino, ku xidh pins-yada soo socda:
- Xidhiidhiyaha
VCCpin-ka MAX7219 ee 5V Arduino. - Xidhiidhiyaha
GNDku xirnaansho dhulka Arduino. - Xidhiidhiyaha
DINpin (Xogta Gudub) ku Arduino pin 12. - Xidhiidhiyaha
CLKkuus (Saac) kuus Arduino kuus 11. - Xidhiidhiyaha
CSpin (Xulashada Chip) ilaa pin Arduino 10.
Hubi inaad hubiso in dhammaan xiriiradu ay ammaan yihiin ka hor inta aanad korontada shidmin wareegga. Wayaheeda waa sahlan tahay, laakiin haddii aad la kulanto dhibaatooyin, dib u eeg xiriiradaha si taxadar leh (fiidiyowga 1:45).
Tusaalooyinka Koodhka & Socodka
Koodhka, waxaan ku bilaabaynaa inaan ku darno maktabadda LedControl, taasoo muhiim u ah isgaarsiinta la MAX7219. Qaybta soo socota waxay dejinaysaa shayga LedControl:
LedControl lc=LedControl(12,11,10,1);Kani waa xariiqda dejinaysa pin-ka xogta, pin-ka saacadda, pin-ka doorashada chip-ka, iyo tirada qalabka (1, kiiskan). Kadib, gudahasetup()hawl, waxaan toosinaa MAX7219 oo aan dejinaa iftiinka muujinta:
lc.shutdown(0,false);
lc.setIntensity(0,8);
lc.clearDisplay(0);
Tani waxay xaqiijineysaa in shaashadu ay firfircoon tahay oo diyaar u tahay inay muujiso xarfo. Hawsha ugu weyn ee kaxeeya shaashadda waawriteArduinoOnMatrix(), taasoo si tartiib ah u iftiimisa safafka matrix-ka si uu u muujiyo xarfaha.
Muuqaal / Waxa La Filayo
Marka wax walba la isku xiro oo koodhka la soo geliyo, matriiska LED-ka waa inuu muujiyo erayga "ROBOJAX". Haddii muujinta aysan shaqayn, hubi dhibaatooyinka sida xiriir la'aan ama qodobbada khaldan. Sidoo kale, xaqiiji in korontada ay ku filan tahay (fiidiyowga 2:30).
Cutubka
- Hordhac (0:00)
- Dulucda Qalabka (0:30)
- Tilmaamaha Xadhigga (1:45)
- Koodhka Socodka (2:15)
- Muuqaal (3:00)
Sawirro
/*
 * This video shows you how to use the MAX7219 module with an 8x8 LED matrix to display text or any characters on the LED.
 * Watch YouTube video: https://youtu.be/AAiDwBKs9uE
 *
 * Written by Ahmad Shamshiri for Robojax.com
 * on February 26, 2017 in Ajax, Ontario, Canada
 * Get this code and other Arduino codes from Robojax.com
 * Learn Arduino step by step in a structured course with all materials, wiring diagrams, and libraries
 * all in one place.

 ****************************
 * Get early access to my videos via Patreon and have your name mentioned at the end of every
 * video I publish on YouTube here: http://robojax.com/L/?id=63 (watch until the end of this video for a list of my Patrons)
 ****************************

 * Or make a donation using PayPal http://robojax.com/L/?id=64

 * This code is "AS IS" without warranty or liability. Free to be used as long as you keep this note intact.
 * This code has been downloaded from Robojax.com
    This program is free software: you can redistribute it and/or modify
    it under the terms of the GNU General Public License as published by
    the Free Software Foundation, either version 3 of the License, or
    (at your option) any later version.

    This program is distributed in the hope that it will be useful,
    but WITHOUT ANY WARRANTY; without even the implied warranty of
    MERCHANTABILITY or FITNESS FOR A PARTICULAR PURPOSE.  See the
    GNU General Public License for more details.

    You should have received a copy of the GNU General Public License
    along with this program.  If not, see <https://www.gnu.org/licenses/>.
*/


// We always have to include the library
// Based on a project posted https://github.com/wayoda/LedControl
#include "LedControl.h"

 /*
  Now we need a LedControl to work with.
  // Customized for RoboJax.com on February 26, 2017 in Ajax, Ontario, Canada.
  ***** These pin numbers will probably not work with your hardware *****
  pin 12 is connected to the DataIn
  pin 11 is connected to the CLK
  pin 10 is connected to CS
  We have only a single MAX72XX.
  */
 LedControl lc=LedControl(12,11,10,1);

 /* we always wait a bit between updates of the display */
 unsigned long delaytime=600;

 void setup() {
   /*
    The MAX72XX is in power-saving mode on startup,
    we have to do a wakeup call
    */
   lc.shutdown(0,false);
   /* Set the brightness to a medium value */
   lc.setIntensity(0,8);
   /* and clear the display */
   lc.clearDisplay(0);
 }

 /*
  This method will display the characters for the
  word "Arduino" one after the other on the matrix.
  (you need at least 5x7 LEDs to see the whole characters)
  */
 void writeArduinoOnMatrix() {
   /* here is the data for the characters */

   // K
   byte R[8]={B11111100,B10000100,B10000100,B11111000,B10100000,B10010000,B10001000,B10000100};
   byte O[8]={B00011000,B00100100,B01000010,B01000010,B01000010,B01000010,B00100100,B00011000};
   byte B[8]={B11111100,B10000100,B10000100,B11111000,B10001000,B10000100,B10000100,B11111100};
   byte J[8]={B00011110,B00000100,B00000100,B00000100,B10000100,B10000100,B01000100,B00111000};
   byte A[8]={B00111000,B01000100,B10000010,B11111110,B10000010,B10000010,B10000010,B10000010};
   byte X[8]={ B10000001,B01000010,B00100100,B00011000,B00011000,B00100100,B01000010,B10000001};
   byte love[8]={ B00000000,B01100110,B10011001,B10011001,B10000001,B01000010,B00100100,B00011000};


   /* Letter R */
   for (int i=0; i<8; i++){
   lc.setRow(0,i,R[i]);

   }

   delay(delaytime);
   for(int i=0; i<8; i++){
       lc.setRow(0,i,0);// this is for blank
   }
 //////////////// END of Letter R ///////

   /* Letter O */
   for (int i=0; i<8; i++){
   lc.setRow(0,i,O[i]);

   }

   delay(delaytime);
   for(int i=0; i<8; i++){
       lc.setRow(0,i,0);// this is for blank
   }
 //////////////// END of Letter O ///////


   /* Letter B */
   for (int i=0; i<8; i++){
   lc.setRow(0,i,B[i]);

   }

   delay(delaytime);
   for(int i=0; i<8; i++){
       lc.setRow(0,i,0);// this is for blank
   }
 //////////////// END of Letter B ///////

   /* Letter O */
   for (int i=0; i<8; i++){
   lc.setRow(0,i,O[i]);

   }

   delay(delaytime);
   for(int i=0; i<8; i++){
       lc.setRow(0,i,0);// this is for blank
   }
 //////////////// END of Letter O ///////

   /* Letter J */
   for (int i=0; i<8; i++){
   lc.setRow(0,i,J[i]);

   }

   delay(delaytime);
   for(int i=0; i<8; i++){
       lc.setRow(0,i,0);// this is for blank
   }
 //////////////// END of Letter J ///////

   /* Letter A */
   for (int i=0; i<8; i++){
   lc.setRow(0,i,A[i]);

   }

   delay(delaytime);
   for(int i=0; i<8; i++){
       lc.setRow(0,i,0);// this is for blank
   }
 //////////////// END of Letter A ///////

   /* Letter X */
   for (int i=0; i<8; i++){
   lc.setRow(0,i,X[i]);

   }

   delay(delaytime);
   for(int i=0; i<8; i++){
       lc.setRow(0,i,0);// this is for blank
   }
 //////////////// END of Letter X ///////


   /* love */
   for (int i=0; i<8; i++){
   lc.setRow(0,i,love[i]);

   }

   delay(delaytime);
   delay(delaytime);
   for(int i=0; i<8; i++){
       lc.setRow(0,i,0);// this is for blank
   }
 //////////////// END of Letter love ///////

 }// writeArduinoOnMatrix()  end


 void loop() {
   writeArduinoOnMatrix();

}/*
* This video shows you how to use the MAX7219 module with an 8x8 LED matrix to display text or any characters on the LED.
* Watch YouTube video: https://youtu.be/AAiDwBKs9uE
*
* Written by Ahmad S. for Robojax.com
* on February 26, 2017 in Ajax, Ontario, Canada
* Permission granted to share this code, given that this
* note is kept with the code.
* Disclaimer: This code is "AS IS" and for educational purposes only.
*/
// We always have to include the library
// Based on a project posted on https://github.com/wayoda/LedControl
#include "LedControl.h"
/*
Now we need a LedControl object to work with.
// Customized for RoboJax.com on February 26, 2017 in Ajax, Ontario, Canada.
***** These pin numbers will probably not work with your hardware *****
pin 1 is connected to the DataIn
pin 4 is connected to the CLK
pin 53 is connected to CS
We have only a single MAX72XX.
*/
LedControl lc=LedControl(1,4,53,1);// this line determines if this code can work with Arduino Mega or Arduino UNO
/* we always wait a bit between updates of the display */
unsigned long delaytime=600;
void setup() {
/*
The MAX72XX is in power-saving mode on startup,
we have to do a wakeup call
*/
lc.shutdown(0,false);
/* Set the brightness to a medium value */
lc.setIntensity(0,8);
/* and clear the display */
lc.clearDisplay(0);
}
/*
This method will display the characters for the
word "Arduino" one after the other on the matrix.
(you need at least 5x7 LEDs to see the whole characters)
*/
void writeArduinoOnMatrix() {
/* here is the data for the characters */
// K
byte R[8]={B11111100,B10000100,B10000100,B11111000,B10100000,B10010000,B10001000,B10000100};
byte O[8]={B00011000,B00100100,B01000010,B01000010,B01000010,B01000010,B00100100,B00011000};
byte B[8]={B11111100,B10000100,B10000100,B11111000,B10001000,B10000100,B10000100,B11111100};
byte J[8]={B00011110,B00000100,B00000100,B00000100,B10000100,B10000100,B01000100,B00111000};
byte A[8]={B00111000,B01000100,B10000010,B11111110,B10000010,B10000010,B10000010,B10000010};
byte X[8]={ B10000001,B01000010,B00100100,B00011000,B00011000,B00100100,B01000010,B10000001};
byte love[8]={ B00000000,B01100110,B10011001,B10011001,B10000001,B01000010,B00100100,B00011000};
/* Letter R */
for (int i=0; i<8; i++){
lc.setRow(0,i,R[i]);
}
delay(delaytime);
for(int i=0; i<8; i++){
lc.setRow(0,i,0);// this is for blank
}
/////////////// END of Letter R ///////
/* Letter O */
for (int i=0; i<8; i++){
lc.setRow(0,i,O[i]);
}
delay(delaytime);
for(int i=0; i<8; i++){
lc.setRow(0,i,0);// this is for blank
}
/////////////// END of Letter O ///////
/* Letter B */
for (int i=0; i<8; i++){
lc.setRow(0,i,B[i]);
}
delay(delaytime);
for(int i=0; i<8; i++){
lc.setRow(0,i,0);// this is for blank
}
/////////////// END of Letter B ///////
/* Letter O */
for (int i=0; i<8; i++){
lc.setRow(0,i,O[i]);
}
delay(delaytime);
for(int i=0; i<8; i++){
lc.setRow(0,i,0);// this is for blank
}
/////////////// END of Letter O ///////
/* Letter J */
for (int i=0; i<8; i++){
lc.setRow(0,i,J[i]);
}
delay(delaytime);
for(int i=0; i<8; i++){
lc.setRow(0,i,0);// this is for blank
}
/////////////// END of Letter J ///////
/* Letter A */
for (int i=0; i<8; i++){
lc.setRow(0,i,A[i]);
}
delay(delaytime);
for(int i=0; i<8; i++){
lc.setRow(0,i,0);// this is for blank
}
/////////////// END of Letter A ///////
/* Letter X */
for (int i=0; i<8; i++){
lc.setRow(0,i,X[i]);
}
delay(delaytime);
for(int i=0; i<8; i++){
lc.setRow(0,i,0);// this is for blank
}
/////////////// END of Letter X ///////
/* love */
for (int i=0; i<8; i++){
lc.setRow(0,i,love[i]);
}
delay(delaytime);
delay(delaytime);
for(int i=0; i<8; i++){
lc.setRow(0,i,0);// this is for blank
}
/////////////// END of love ///////
}// writeArduinoOnMatrix() end
void loop() {
writeArduinoOnMatrix();
}Waad u baahan tahay
-
AmaazonMax7219 8x8 Matrix on Amazonamzn.to
-
eBayMax7219 8x8 Matrix on eBayebay.us
-
AliExpressMax7219 8x8 Matrix on AliExpresss.click.aliexpress.com
Kheyraadka & Tixraacyada
-
DukumentiView different board pin assignments for SPIarduino.cc
-
Dibedda
Faylasha📁
Faylal kale
-
MAX7219 Maktabadda Matrix ee Robojax
robojax-MAX7219-matrix.zip0.01 MB -
8-Digit LED Display Library (from Robojax.com)
robojax_MAX7291_8_digits.zip




![Kashimura NTI-352 Step down Transformer AC220-240V to 100V [35W] Body plug C](https://i.ebayimg.com/images/g/z5sAAeSwUTlpIkzJ/s-l225.jpg)