8x8 LED matica s modulom MAX7219 pre Arduino
V tomto návode sa naučíme, ako ovládať 8x8 LED maticu pomocou modulu MAX7219 s Arduinom. MAX7219 zjednodušuje ovládanie viacerých LED, čo nám umožní ľahko zobrazovať znaky a vzory. Na konci tohto projektu budete schopní zobraziť slovo ROBOJAX na matici.
Na to použijeme knižnicu LedControl, ktorá je špeciálne navrhnutá pre komunikáciu s MAX7219. Táto knižnica nám umožňuje posielať dáta do LED matice s minimálnym úsilím. Ak chcete lepšie pochopiť zapojenie a kód, určite si pozrite súvisiace video (vo videu na 0:30).
Vysvetlenie hardvéru
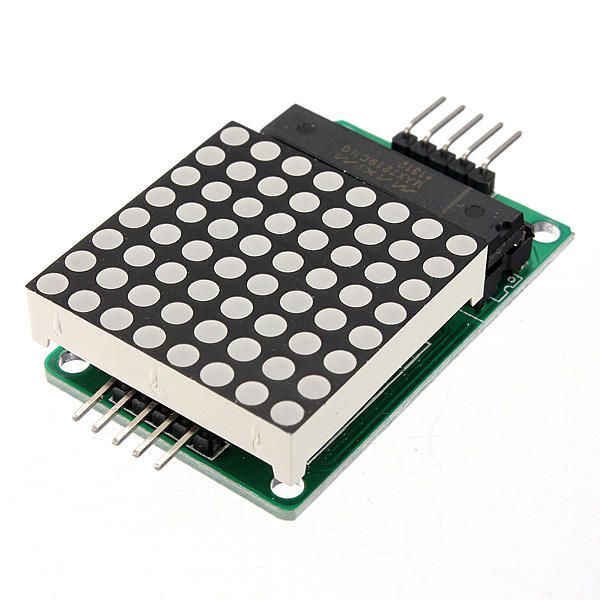
Hlavné komponenty tohto projektu zahŕňajú modul MAX7219 a 8x8 LED maticu. MAX7219 je integrovaný obvod, ktorý riadi zobrazovanie LED diód a spracúva komunikačné a riadiace signály z Arduina. Využíva sériové rozhranie, čo znamená, že môžeme ovládať veľa LED diód len pomocou niekoľkých pinov z Arduina.
8x8 LED matica pozostáva zo 64 samostatných LED diód usporiadaných v mriežke. Každú LED diódu je možné zapnúť alebo vypnúť odoslaním príslušných príkazov cez MAX7219. To umožňuje zobrazovanie rôznych znakov a grafiky na matici.
Podrobnosti dátového listu
| Výrobca | Maxim Integrated |
|---|---|
| Číslo dielu | MAX7219 |
| Logické/I/O napätie | 3,3 V až 5,5 V |
| Napájacie napätie | 4.0V až 5.5V |
| Výstupný prúd (na kanál) | max. 40 mA |
| Špičkový prúd (na kanál) | max. 100 mA |
| Pokyny k frekvencii PWM | 100 Hz |
| Vstupné logické prahy | 2.0V (vysoké) / 0.8V (nízke) |
| Napäťový úbytok / RDS(on)/ saturácia | 0.2V typ. |
| Tepelné limity | 150 °C |
| Balík | 16-pinový DIP |
| Poznámky / varianty | Konfigurácia so spoločnou anódou |
- Zabezpečte správne napájanie (4,0 V až 5,5 V).
- Použite rezistory obmedzujúce prúd pre každú LED diódu, aby ste predišli poškodeniu.
- Udržiavajte káble krátke, aby ste predišli rušeniu.
- Sledujte odvod tepla; v prípade potreby použite chladič.
- Dôkladne skontrolujte zapojenia pinov, aby ste predišli chybnej komunikácii.
Pokyny na zapojenie
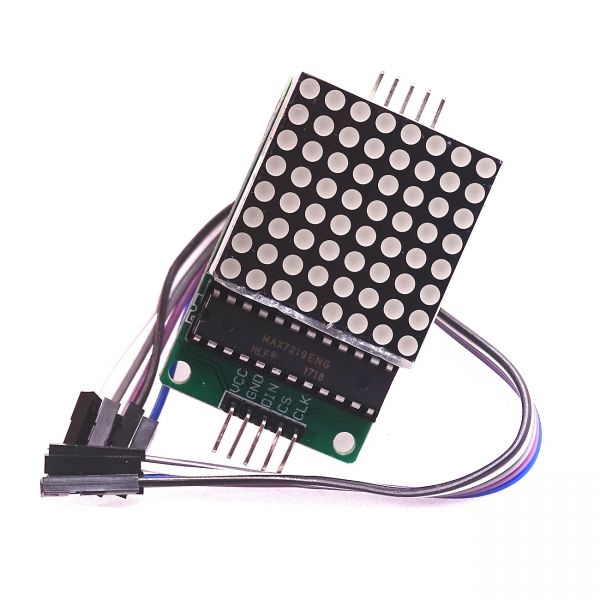
Na zapojenie MAX7219 k Arduinu pripojte nasledujúce piny:
- Pripojte
VCCpin MAX7219 na 5 V Arduina - Pripojte
GNDpin k zemi Arduina - Pripojte
DINPripojte pin (Data In) k pinu 12 Arduina. - Pripojte
CLKPripojte pin (Clock) k pinu 11 Arduina. - Pripojte
CSpin (Chip Select) na pin 10 Arduina
Uistite sa, že pred zapnutím obvodu skontrolujete, či sú všetky pripojenia pevné. Zapojenie je jednoduché, ale ak narazíte na problémy, dôkladne skontrolujte spojenia (vo videu na 1:45).
Príklady kódu a návod krok za krokom
V kóde začneme zahrnutím knižnice LedControl, ktorá je nevyhnutná na komunikáciu s MAX7219. Nasledujúci úryvok inicializuje objekt LedControl:
LedControl lc=LedControl(12,11,10,1);Tento riadok nastavuje dátový pin, hodinový pin, pin pre výber čipu a počet zariadení (1, v tomto prípade). Ďalej, vsetup()V tejto funkcii prebudíme MAX7219 a nastavíme intenzitu displeja:
lc.shutdown(0,false);
lc.setIntensity(0,8);
lc.clearDisplay(0);
Tým sa zabezpečí, že displej je aktívny a pripravený zobrazovať znaky. Hlavná funkcia, ktorá riadi displej, jewriteArduinoOnMatrix(), ktorý postupne rozsvetľuje riadky matice, aby zobrazoval písmená.
Demonštrácia / Čo očakávať
Akonáhle je všetko zapojené a kód nahratý, LED matica by mala zobraziť slovo ROBOJAX. Ak displej nefunguje, skontrolujte problémy, ako sú uvoľnené spojenia alebo nesprávne priradené piny. Okrem toho sa uistite, že napájanie je dostatočné (vo videu na 2:30).
Kapitoly
- Úvod (0:00)
- Prehľad hardvéru (0:30)
- Pokyny na zapojenie (1:45)
- Prehliadka kódu (2:15)
- Demonstrácia (3:00)
Images
/*
 * This video shows you how to use the MAX7219 module with an 8x8 LED matrix to display text or any characters on the LED.
 * Watch YouTube video: https://youtu.be/AAiDwBKs9uE
 *
 * Written by Ahmad Shamshiri for Robojax.com
 * on February 26, 2017 in Ajax, Ontario, Canada
 * Get this code and other Arduino codes from Robojax.com
 * Learn Arduino step by step in a structured course with all materials, wiring diagrams, and libraries
 * all in one place.

 ****************************
 * Get early access to my videos via Patreon and have your name mentioned at the end of every
 * video I publish on YouTube here: http://robojax.com/L/?id=63 (watch until the end of this video for a list of my Patrons)
 ****************************

 * Or make a donation using PayPal http://robojax.com/L/?id=64

 * This code is "AS IS" without warranty or liability. Free to be used as long as you keep this note intact.
 * This code has been downloaded from Robojax.com
    This program is free software: you can redistribute it and/or modify
    it under the terms of the GNU General Public License as published by
    the Free Software Foundation, either version 3 of the License, or
    (at your option) any later version.

    This program is distributed in the hope that it will be useful,
    but WITHOUT ANY WARRANTY; without even the implied warranty of
    MERCHANTABILITY or FITNESS FOR A PARTICULAR PURPOSE.  See the
    GNU General Public License for more details.

    You should have received a copy of the GNU General Public License
    along with this program.  If not, see <https://www.gnu.org/licenses/>.
*/


// We always have to include the library
// Based on a project posted https://github.com/wayoda/LedControl
#include "LedControl.h"

 /*
  Now we need a LedControl to work with.
  // Customized for RoboJax.com on February 26, 2017 in Ajax, Ontario, Canada.
  ***** These pin numbers will probably not work with your hardware *****
  pin 12 is connected to the DataIn
  pin 11 is connected to the CLK
  pin 10 is connected to CS
  We have only a single MAX72XX.
  */
 LedControl lc=LedControl(12,11,10,1);

 /* we always wait a bit between updates of the display */
 unsigned long delaytime=600;

 void setup() {
   /*
    The MAX72XX is in power-saving mode on startup,
    we have to do a wakeup call
    */
   lc.shutdown(0,false);
   /* Set the brightness to a medium value */
   lc.setIntensity(0,8);
   /* and clear the display */
   lc.clearDisplay(0);
 }

 /*
  This method will display the characters for the
  word "Arduino" one after the other on the matrix.
  (you need at least 5x7 LEDs to see the whole characters)
  */
 void writeArduinoOnMatrix() {
   /* here is the data for the characters */

   // K
   byte R[8]={B11111100,B10000100,B10000100,B11111000,B10100000,B10010000,B10001000,B10000100};
   byte O[8]={B00011000,B00100100,B01000010,B01000010,B01000010,B01000010,B00100100,B00011000};
   byte B[8]={B11111100,B10000100,B10000100,B11111000,B10001000,B10000100,B10000100,B11111100};
   byte J[8]={B00011110,B00000100,B00000100,B00000100,B10000100,B10000100,B01000100,B00111000};
   byte A[8]={B00111000,B01000100,B10000010,B11111110,B10000010,B10000010,B10000010,B10000010};
   byte X[8]={ B10000001,B01000010,B00100100,B00011000,B00011000,B00100100,B01000010,B10000001};
   byte love[8]={ B00000000,B01100110,B10011001,B10011001,B10000001,B01000010,B00100100,B00011000};


   /* Letter R */
   for (int i=0; i<8; i++){
   lc.setRow(0,i,R[i]);

   }

   delay(delaytime);
   for(int i=0; i<8; i++){
       lc.setRow(0,i,0);// this is for blank
   }
 //////////////// END of Letter R ///////

   /* Letter O */
   for (int i=0; i<8; i++){
   lc.setRow(0,i,O[i]);

   }

   delay(delaytime);
   for(int i=0; i<8; i++){
       lc.setRow(0,i,0);// this is for blank
   }
 //////////////// END of Letter O ///////


   /* Letter B */
   for (int i=0; i<8; i++){
   lc.setRow(0,i,B[i]);

   }

   delay(delaytime);
   for(int i=0; i<8; i++){
       lc.setRow(0,i,0);// this is for blank
   }
 //////////////// END of Letter B ///////

   /* Letter O */
   for (int i=0; i<8; i++){
   lc.setRow(0,i,O[i]);

   }

   delay(delaytime);
   for(int i=0; i<8; i++){
       lc.setRow(0,i,0);// this is for blank
   }
 //////////////// END of Letter O ///////

   /* Letter J */
   for (int i=0; i<8; i++){
   lc.setRow(0,i,J[i]);

   }

   delay(delaytime);
   for(int i=0; i<8; i++){
       lc.setRow(0,i,0);// this is for blank
   }
 //////////////// END of Letter J ///////

   /* Letter A */
   for (int i=0; i<8; i++){
   lc.setRow(0,i,A[i]);

   }

   delay(delaytime);
   for(int i=0; i<8; i++){
       lc.setRow(0,i,0);// this is for blank
   }
 //////////////// END of Letter A ///////

   /* Letter X */
   for (int i=0; i<8; i++){
   lc.setRow(0,i,X[i]);

   }

   delay(delaytime);
   for(int i=0; i<8; i++){
       lc.setRow(0,i,0);// this is for blank
   }
 //////////////// END of Letter X ///////


   /* love */
   for (int i=0; i<8; i++){
   lc.setRow(0,i,love[i]);

   }

   delay(delaytime);
   delay(delaytime);
   for(int i=0; i<8; i++){
       lc.setRow(0,i,0);// this is for blank
   }
 //////////////// END of Letter love ///////

 }// writeArduinoOnMatrix()  end


 void loop() {
   writeArduinoOnMatrix();

}/*
* This video shows you how to use the MAX7219 module with an 8x8 LED matrix to display text or any characters on the LED.
* Watch YouTube video: https://youtu.be/AAiDwBKs9uE
*
* Written by Ahmad S. for Robojax.com
* on February 26, 2017 in Ajax, Ontario, Canada
* Permission granted to share this code, given that this
* note is kept with the code.
* Disclaimer: This code is "AS IS" and for educational purposes only.
*/
// We always have to include the library
// Based on a project posted on https://github.com/wayoda/LedControl
#include "LedControl.h"
/*
Now we need a LedControl object to work with.
// Customized for RoboJax.com on February 26, 2017 in Ajax, Ontario, Canada.
***** These pin numbers will probably not work with your hardware *****
pin 1 is connected to the DataIn
pin 4 is connected to the CLK
pin 53 is connected to CS
We have only a single MAX72XX.
*/
LedControl lc=LedControl(1,4,53,1);// this line determines if this code can work with Arduino Mega or Arduino UNO
/* we always wait a bit between updates of the display */
unsigned long delaytime=600;
void setup() {
/*
The MAX72XX is in power-saving mode on startup,
we have to do a wakeup call
*/
lc.shutdown(0,false);
/* Set the brightness to a medium value */
lc.setIntensity(0,8);
/* and clear the display */
lc.clearDisplay(0);
}
/*
This method will display the characters for the
word "Arduino" one after the other on the matrix.
(you need at least 5x7 LEDs to see the whole characters)
*/
void writeArduinoOnMatrix() {
/* here is the data for the characters */
// K
byte R[8]={B11111100,B10000100,B10000100,B11111000,B10100000,B10010000,B10001000,B10000100};
byte O[8]={B00011000,B00100100,B01000010,B01000010,B01000010,B01000010,B00100100,B00011000};
byte B[8]={B11111100,B10000100,B10000100,B11111000,B10001000,B10000100,B10000100,B11111100};
byte J[8]={B00011110,B00000100,B00000100,B00000100,B10000100,B10000100,B01000100,B00111000};
byte A[8]={B00111000,B01000100,B10000010,B11111110,B10000010,B10000010,B10000010,B10000010};
byte X[8]={ B10000001,B01000010,B00100100,B00011000,B00011000,B00100100,B01000010,B10000001};
byte love[8]={ B00000000,B01100110,B10011001,B10011001,B10000001,B01000010,B00100100,B00011000};
/* Letter R */
for (int i=0; i<8; i++){
lc.setRow(0,i,R[i]);
}
delay(delaytime);
for(int i=0; i<8; i++){
lc.setRow(0,i,0);// this is for blank
}
/////////////// END of Letter R ///////
/* Letter O */
for (int i=0; i<8; i++){
lc.setRow(0,i,O[i]);
}
delay(delaytime);
for(int i=0; i<8; i++){
lc.setRow(0,i,0);// this is for blank
}
/////////////// END of Letter O ///////
/* Letter B */
for (int i=0; i<8; i++){
lc.setRow(0,i,B[i]);
}
delay(delaytime);
for(int i=0; i<8; i++){
lc.setRow(0,i,0);// this is for blank
}
/////////////// END of Letter B ///////
/* Letter O */
for (int i=0; i<8; i++){
lc.setRow(0,i,O[i]);
}
delay(delaytime);
for(int i=0; i<8; i++){
lc.setRow(0,i,0);// this is for blank
}
/////////////// END of Letter O ///////
/* Letter J */
for (int i=0; i<8; i++){
lc.setRow(0,i,J[i]);
}
delay(delaytime);
for(int i=0; i<8; i++){
lc.setRow(0,i,0);// this is for blank
}
/////////////// END of Letter J ///////
/* Letter A */
for (int i=0; i<8; i++){
lc.setRow(0,i,A[i]);
}
delay(delaytime);
for(int i=0; i<8; i++){
lc.setRow(0,i,0);// this is for blank
}
/////////////// END of Letter A ///////
/* Letter X */
for (int i=0; i<8; i++){
lc.setRow(0,i,X[i]);
}
delay(delaytime);
for(int i=0; i<8; i++){
lc.setRow(0,i,0);// this is for blank
}
/////////////// END of Letter X ///////
/* love */
for (int i=0; i<8; i++){
lc.setRow(0,i,love[i]);
}
delay(delaytime);
delay(delaytime);
for(int i=0; i<8; i++){
lc.setRow(0,i,0);// this is for blank
}
/////////////// END of love ///////
}// writeArduinoOnMatrix() end
void loop() {
writeArduinoOnMatrix();
}Things you might need
-
AmazonMax7219 8x8 Matrix on Amazonamzn.to
-
eBayMax7219 8x8 Matrix on eBayebay.us
-
AliExpressMax7219 8x8 Matrix on AliExpresss.click.aliexpress.com
Resources & references
-
DocumentationView different board pin assignments for SPIarduino.cc
-
External
Files📁
Other files
-
MAX7219 Matrix Library from Robojax
robojax-MAX7219-matrix.zip0.01 MB -
8-Digit LED Display Library (from Robojax.com)
robojax_MAX7291_8_digits.zip