د 8x8 LED میټرکس د MAX7219 Arduino ماډل په کارولو سره
په دې ټیوټوریل کې به موږ زده کړو چې څنګه د MAX7219 ماډل په کارولو سره د آردوینو سره د 8x8 LED میټرکس کنټرول کړو. MAX7219 د ډیری LEDs کنټرول ساده کوي، چې موږ ته اجازه راکوي چې توري او نمونې په اسانۍ سره ښکاره کړو. د دې پروژې په پای کې به تاسو وکولی شئ چې د "ROBOJAX" کلمه په میټرکس باندې ښکاره کړئ.
د دې ترلاسه کولو لپاره به موږ د LedControl کتابتون څخه ګټه پورته کړو، کوم چې په ځانګړي ډول د MAX7219 سره د اړیکو لپاره ډیزاین شوی. دا کتابتون موږ ته اجازه راکوي چې لږ هڅې سره LED میټرکس ته معلومات واستوو. که تاسو د تارونو او کوډ روښانه پوهه غواړئ، نو ډاډه اوسئ چې اړونده ویډیو وګورئ (په ویډیو کې په 0:30).
هارډویر تشریح شوی
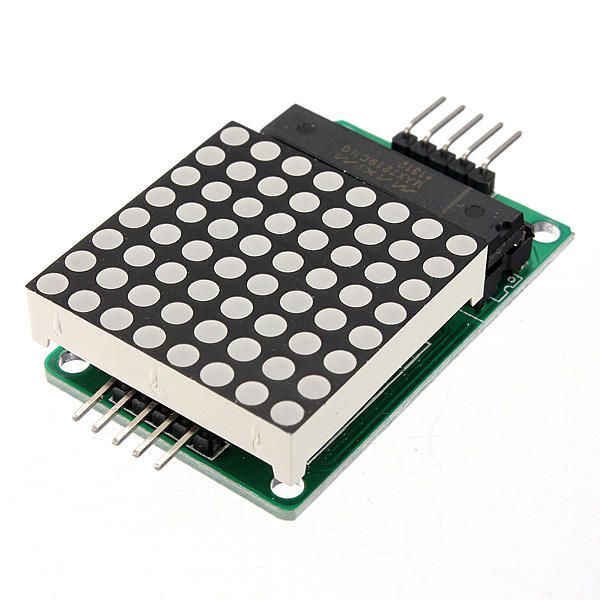
د دې پروژې لومړني اجزا د MAX7219 ماډل او د 8x8 LED میټرکس شامل دي. MAX7219 یو مدغم سرکټ دی چې د LEDs ښودنه اداره کوي، د آردوینو څخه د اړیکو او کنټرول سیګنالونه اداره کوي. دا یو سیریل انٹرفیس کاروي، چې معنی یې دا ده چې موږ کولی شو د آردوینو څخه یوازې څو پنونو سره ډیری LEDs کنټرول کړو.
د 8x8 LED میټرکس د 64 انفرادي LEDs څخه جوړ دی چې په یوه گرډ کې تنظیم شوي. هر LED د MAX7219 له لارې د مناسب کمانډونو په لیږلو سره چالان یا بند کیدی شي. دا د میټرکس باندې د مختلفو تورو او ګرافیکونو ښودلو اجازه ورکوي.
ډیټاشیټ تفصیلات
| جوړونکی | Maxim Integrated |
|---|---|
| د پرزې شمېره | MAX7219 |
| د منطق/IO ولټاژ | 3.3V څخه تر 5.5V |
| د برېښنا ولټاژ | 4.0V څخه تر 5.5V |
| د تولید جریان (په هر چینل) | 40 mA اعظمي |
| د لوړ جریان (په هر چینل) | 100 mA اعظمي |
| د PWM فریکونسي لارښود | 100 Hz |
| د منطق داخلیدو حدونه | 2.0V (لوړ) / 0.8V (ټیټ) |
| د ولټاژ کمښت / RDS(on) / سنتریشن | 0.2V معمول |
| حرارتي حدونه | 150°C |
| بسته بندي | 16-DIP |
| یادښتونه / ډولونه | عام انوډ ترتیب |
- مناسب برېښنا رسول ډاډمن کړئ (4.0V څخه تر 5.5V).
- د هر LED لپاره د جریان محدودونکي ریزسټرونه وکاروئ ترڅو زیان مخنیوی وشي.
- د مداخلې مخنیوي لپاره تارونه لنډ وساتئ.
- د تودوخې خپریدل وڅارئ؛ که اړتیا وي د تودوخې سنک وکاروئ.
- د غلط اړیکو مخنیوي لپاره د پن اړیکې دوه ځله وګورئ.
د تارونو لارښوونې
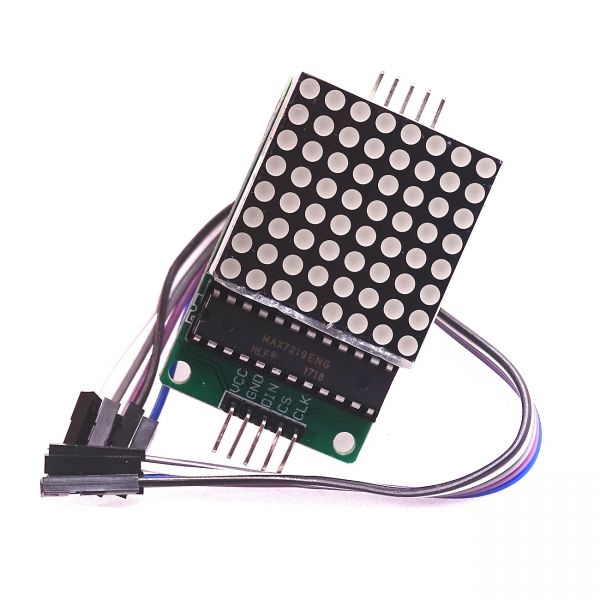
د MAX7219 د آردوینو سره د تارولو لپاره، لاندې پنونه وصل کړئ:
- د MAX7219 د
VCCپن د آردوینو 5V سره وصل کړئ. - د
GNDپن د آردوینو ځمکې سره وصل کړئ. - د
DINپن (ډیټا داخل) د آردوینو پن 12 سره وصل کړئ. - د
CLKپن (کلاک) د آردوینو پن 11 سره وصل کړئ. - د
CSپن (چپ انتخاب) د آردوینو پن 10 سره وصل کړئ.
ډاډه اوسئ چې د سرکټ د چالانولو دمخه ټولې اړیکې خوندي دي. تارونه ساده دي، مګر که تاسو ستونزې سره مخ شئ، اړیکې په دقت سره وڅیړئ (په ویډیو کې په 1:45).
د کوډ مثالونه او تشریح
په کوډ کې، موږ د LedControl کتابتون په شاملولو سره پیل کوو، کوم چې د MAX7219 سره د اړیکو لپاره اړین دی. لاندې برخه د LedControl اعتراض پیلوي:
LedControl lc=LedControl(12,11,10,1);دا کرښه د ډیټا پن، کلاک پن، چپ انتخاب پن، او د وسیلو شمېره (په دې حالت کې 1) ټاکي. بیا، په setup() فنکشن کې، موږ MAX7219 راویښ کوو او د ښودنې شدت ټاکو:
lc.shutdown(0,false);
lc.setIntensity(0,8);
lc.clearDisplay(0);
دا ډاډ ورکوي چې ښودنه فعاله ده او د تورو ښودلو لپاره چمتو ده. اصلي فنکشن چې ښودنه پرمخ وړي writeArduinoOnMatrix() دی، کوم چې په ترتیب سره د میټرکس قطارونه روښانه کوي ترڅو توري ښکاره کړي.
ښودنه / څه تمه وکړو
یوځل چې هرڅه تار شي او کوډ اپلوډ شي، د LED میټرکس باید د "ROBOJAX" کلمه ښکاره کړي. که ښودنه کار ونکړي، د ستونزو لکه نرمو اړیکو یا غلط پن ټاکلو لپاره وګورئ. سربیره پردې، ډاډه اوسئ چې برېښنا رسول کافي دی (په ویډیو کې په 2:30).
فصلونه
- پیژندنه (0:00)
- هارډویر کتنه (0:30)
- د تارونو لارښوونې (1:45)
- د کوډ تشریح (2:15)
- ښودنه (3:00)
انځورونه
/*
 * This video shows you how to use the MAX7219 module with an 8x8 LED matrix to display text or any characters on the LED.
 * Watch YouTube video: https://youtu.be/AAiDwBKs9uE
 *
 * Written by Ahmad Shamshiri for Robojax.com
 * on February 26, 2017 in Ajax, Ontario, Canada
 * Get this code and other Arduino codes from Robojax.com
 * Learn Arduino step by step in a structured course with all materials, wiring diagrams, and libraries
 * all in one place.

 ****************************
 * Get early access to my videos via Patreon and have your name mentioned at the end of every
 * video I publish on YouTube here: http://robojax.com/L/?id=63 (watch until the end of this video for a list of my Patrons)
 ****************************

 * Or make a donation using PayPal http://robojax.com/L/?id=64

 * This code is "AS IS" without warranty or liability. Free to be used as long as you keep this note intact.
 * This code has been downloaded from Robojax.com
    This program is free software: you can redistribute it and/or modify
    it under the terms of the GNU General Public License as published by
    the Free Software Foundation, either version 3 of the License, or
    (at your option) any later version.

    This program is distributed in the hope that it will be useful,
    but WITHOUT ANY WARRANTY; without even the implied warranty of
    MERCHANTABILITY or FITNESS FOR A PARTICULAR PURPOSE.  See the
    GNU General Public License for more details.

    You should have received a copy of the GNU General Public License
    along with this program.  If not, see <https://www.gnu.org/licenses/>.
*/


// We always have to include the library
// Based on a project posted https://github.com/wayoda/LedControl
#include "LedControl.h"

 /*
  Now we need a LedControl to work with.
  // Customized for RoboJax.com on February 26, 2017 in Ajax, Ontario, Canada.
  ***** These pin numbers will probably not work with your hardware *****
  pin 12 is connected to the DataIn
  pin 11 is connected to the CLK
  pin 10 is connected to CS
  We have only a single MAX72XX.
  */
 LedControl lc=LedControl(12,11,10,1);

 /* we always wait a bit between updates of the display */
 unsigned long delaytime=600;

 void setup() {
   /*
    The MAX72XX is in power-saving mode on startup,
    we have to do a wakeup call
    */
   lc.shutdown(0,false);
   /* Set the brightness to a medium value */
   lc.setIntensity(0,8);
   /* and clear the display */
   lc.clearDisplay(0);
 }

 /*
  This method will display the characters for the
  word "Arduino" one after the other on the matrix.
  (you need at least 5x7 LEDs to see the whole characters)
  */
 void writeArduinoOnMatrix() {
   /* here is the data for the characters */

   // K
   byte R[8]={B11111100,B10000100,B10000100,B11111000,B10100000,B10010000,B10001000,B10000100};
   byte O[8]={B00011000,B00100100,B01000010,B01000010,B01000010,B01000010,B00100100,B00011000};
   byte B[8]={B11111100,B10000100,B10000100,B11111000,B10001000,B10000100,B10000100,B11111100};
   byte J[8]={B00011110,B00000100,B00000100,B00000100,B10000100,B10000100,B01000100,B00111000};
   byte A[8]={B00111000,B01000100,B10000010,B11111110,B10000010,B10000010,B10000010,B10000010};
   byte X[8]={ B10000001,B01000010,B00100100,B00011000,B00011000,B00100100,B01000010,B10000001};
   byte love[8]={ B00000000,B01100110,B10011001,B10011001,B10000001,B01000010,B00100100,B00011000};


   /* Letter R */
   for (int i=0; i<8; i++){
   lc.setRow(0,i,R[i]);

   }

   delay(delaytime);
   for(int i=0; i<8; i++){
       lc.setRow(0,i,0);// this is for blank
   }
 //////////////// END of Letter R ///////

   /* Letter O */
   for (int i=0; i<8; i++){
   lc.setRow(0,i,O[i]);

   }

   delay(delaytime);
   for(int i=0; i<8; i++){
       lc.setRow(0,i,0);// this is for blank
   }
 //////////////// END of Letter O ///////


   /* Letter B */
   for (int i=0; i<8; i++){
   lc.setRow(0,i,B[i]);

   }

   delay(delaytime);
   for(int i=0; i<8; i++){
       lc.setRow(0,i,0);// this is for blank
   }
 //////////////// END of Letter B ///////

   /* Letter O */
   for (int i=0; i<8; i++){
   lc.setRow(0,i,O[i]);

   }

   delay(delaytime);
   for(int i=0; i<8; i++){
       lc.setRow(0,i,0);// this is for blank
   }
 //////////////// END of Letter O ///////

   /* Letter J */
   for (int i=0; i<8; i++){
   lc.setRow(0,i,J[i]);

   }

   delay(delaytime);
   for(int i=0; i<8; i++){
       lc.setRow(0,i,0);// this is for blank
   }
 //////////////// END of Letter J ///////

   /* Letter A */
   for (int i=0; i<8; i++){
   lc.setRow(0,i,A[i]);

   }

   delay(delaytime);
   for(int i=0; i<8; i++){
       lc.setRow(0,i,0);// this is for blank
   }
 //////////////// END of Letter A ///////

   /* Letter X */
   for (int i=0; i<8; i++){
   lc.setRow(0,i,X[i]);

   }

   delay(delaytime);
   for(int i=0; i<8; i++){
       lc.setRow(0,i,0);// this is for blank
   }
 //////////////// END of Letter X ///////


   /* love */
   for (int i=0; i<8; i++){
   lc.setRow(0,i,love[i]);

   }

   delay(delaytime);
   delay(delaytime);
   for(int i=0; i<8; i++){
       lc.setRow(0,i,0);// this is for blank
   }
 //////////////// END of Letter love ///////

 }// writeArduinoOnMatrix()  end


 void loop() {
   writeArduinoOnMatrix();

}/*
* This video shows you how to use the MAX7219 module with an 8x8 LED matrix to display text or any characters on the LED.
* Watch YouTube video: https://youtu.be/AAiDwBKs9uE
*
* Written by Ahmad S. for Robojax.com
* on February 26, 2017 in Ajax, Ontario, Canada
* Permission granted to share this code, given that this
* note is kept with the code.
* Disclaimer: This code is "AS IS" and for educational purposes only.
*/
// We always have to include the library
// Based on a project posted on https://github.com/wayoda/LedControl
#include "LedControl.h"
/*
Now we need a LedControl object to work with.
// Customized for RoboJax.com on February 26, 2017 in Ajax, Ontario, Canada.
***** These pin numbers will probably not work with your hardware *****
pin 1 is connected to the DataIn
pin 4 is connected to the CLK
pin 53 is connected to CS
We have only a single MAX72XX.
*/
LedControl lc=LedControl(1,4,53,1);// this line determines if this code can work with Arduino Mega or Arduino UNO
/* we always wait a bit between updates of the display */
unsigned long delaytime=600;
void setup() {
/*
The MAX72XX is in power-saving mode on startup,
we have to do a wakeup call
*/
lc.shutdown(0,false);
/* Set the brightness to a medium value */
lc.setIntensity(0,8);
/* and clear the display */
lc.clearDisplay(0);
}
/*
This method will display the characters for the
word "Arduino" one after the other on the matrix.
(you need at least 5x7 LEDs to see the whole characters)
*/
void writeArduinoOnMatrix() {
/* here is the data for the characters */
// K
byte R[8]={B11111100,B10000100,B10000100,B11111000,B10100000,B10010000,B10001000,B10000100};
byte O[8]={B00011000,B00100100,B01000010,B01000010,B01000010,B01000010,B00100100,B00011000};
byte B[8]={B11111100,B10000100,B10000100,B11111000,B10001000,B10000100,B10000100,B11111100};
byte J[8]={B00011110,B00000100,B00000100,B00000100,B10000100,B10000100,B01000100,B00111000};
byte A[8]={B00111000,B01000100,B10000010,B11111110,B10000010,B10000010,B10000010,B10000010};
byte X[8]={ B10000001,B01000010,B00100100,B00011000,B00011000,B00100100,B01000010,B10000001};
byte love[8]={ B00000000,B01100110,B10011001,B10011001,B10000001,B01000010,B00100100,B00011000};
/* Letter R */
for (int i=0; i<8; i++){
lc.setRow(0,i,R[i]);
}
delay(delaytime);
for(int i=0; i<8; i++){
lc.setRow(0,i,0);// this is for blank
}
/////////////// END of Letter R ///////
/* Letter O */
for (int i=0; i<8; i++){
lc.setRow(0,i,O[i]);
}
delay(delaytime);
for(int i=0; i<8; i++){
lc.setRow(0,i,0);// this is for blank
}
/////////////// END of Letter O ///////
/* Letter B */
for (int i=0; i<8; i++){
lc.setRow(0,i,B[i]);
}
delay(delaytime);
for(int i=0; i<8; i++){
lc.setRow(0,i,0);// this is for blank
}
/////////////// END of Letter B ///////
/* Letter O */
for (int i=0; i<8; i++){
lc.setRow(0,i,O[i]);
}
delay(delaytime);
for(int i=0; i<8; i++){
lc.setRow(0,i,0);// this is for blank
}
/////////////// END of Letter O ///////
/* Letter J */
for (int i=0; i<8; i++){
lc.setRow(0,i,J[i]);
}
delay(delaytime);
for(int i=0; i<8; i++){
lc.setRow(0,i,0);// this is for blank
}
/////////////// END of Letter J ///////
/* Letter A */
for (int i=0; i<8; i++){
lc.setRow(0,i,A[i]);
}
delay(delaytime);
for(int i=0; i<8; i++){
lc.setRow(0,i,0);// this is for blank
}
/////////////// END of Letter A ///////
/* Letter X */
for (int i=0; i<8; i++){
lc.setRow(0,i,X[i]);
}
delay(delaytime);
for(int i=0; i<8; i++){
lc.setRow(0,i,0);// this is for blank
}
/////////////// END of Letter X ///////
/* love */
for (int i=0; i<8; i++){
lc.setRow(0,i,love[i]);
}
delay(delaytime);
delay(delaytime);
for(int i=0; i<8; i++){
lc.setRow(0,i,0);// this is for blank
}
/////////////// END of love ///////
}// writeArduinoOnMatrix() end
void loop() {
writeArduinoOnMatrix();
}هغه شیان چې تاسو ورته اړتیا لرئ
-
امازونMax7219 8x8 Matrix on Amazonamzn.to
-
ای بیMax7219 8x8 Matrix on eBayebay.us
-
علی ایکسپریسMax7219 8x8 Matrix on AliExpresss.click.aliexpress.com
سرچینې او حوالې
-
اسنادView different board pin assignments for SPIarduino.cc
-
بهرنی
فایلونه📁
نور فایلونه
-
MAX7219 Matrix Library from Robojax
robojax-MAX7219-matrix.zip0.01 MB -
8-Digit LED Display Library (from Robojax.com)
robojax_MAX7291_8_digits.zip