8x8 LED Matrice na kutumia Moduli ya MAX7219 ya Arduino
Na tutoria, tozokola momwe mungayendere 8x8 LED matrix pogwiritsa ntchito module ya MAX7219 ndi Arduino. MAX7219 imapangitsa kukhala kosavuta kuyendetsa ma LED ambiri, kutipatsa mwayi wopanga mawu ndi mitundu mosavuta. Pomaliza pa projekitiyi, mudzatha kuwonetsa mawu "ROBOJAX" pa matrix.
Para lograr esto, utilizaremos la biblioteca LedControl, que está diseñada específicamente para interactuar con el MAX7219. Esta biblioteca nos permite enviar datos a la matriz de LED con un esfuerzo mínimo. Si deseas una comprensión más clara del cableado y el código, asegúrate de revisar el video asociado (en el video a las 0:30).
Hardware na Mvanga
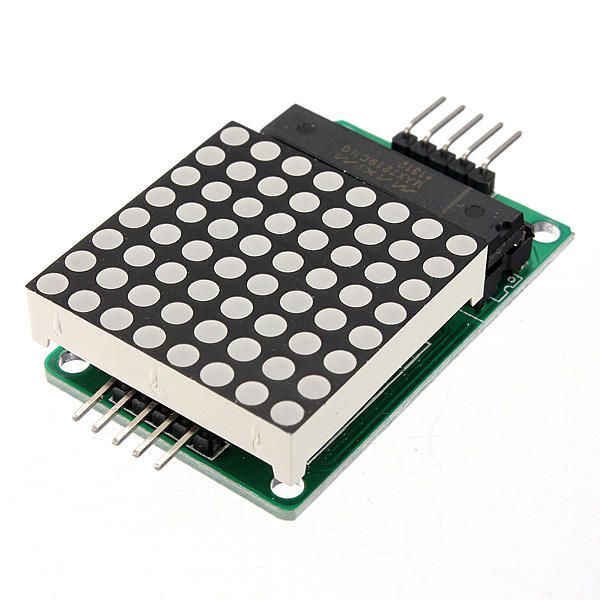
Mabala a mantlhaneng a projeke ena ke mohlala wa MAX7219 le 8x8 LED matrix. MAX7219 ke sebopeho se amanang le motlakase se laolang ponahalo ya LED, se sebetsanang le puisano le matshwao a taolo a tsoang ho Arduino. E sebelisa sehokelo sa serial, ho bolelang hore re ka laola LED tse ngata ka pins tse 'maloa ho tloha ho Arduino.
8x8 LED matirisi 64 bireysel LED'den oluşur ve bir ızgara şeklinde düzenlenmiştir. Her bir LED, MAX7219 aracılığıyla uygun komutlar gönderilerek açılıp kapatılabilir. Bu, matris üzerinde çeşitli karakterler ve grafiklerin görüntülenmesini sağlar.
Mokolo a Datasheet
| Mokonzi | Maxim Intégré |
|---|---|
| Nombro de parto | MAX7219 |
| Voltage ya Logic/IO | 3.3V na 5.5V |
| Voltage de fourniture | 4.0V na 5.5V |
| Mokolo ya ntlheng (ka kanale) | 40 mA max |
| Mokolo ya ntlheng (ka kanale) | 100 mA max |
| Guidance sur la fréquence PWM | 100 Hz |
| Ekuvanga ya logic ya input | 2.0V (mbala) / 0.8V (basi) |
| Mokolo ya voltage / RDS(on)/ saturation | 0.2V typ. |
| Limites térmicos | 150°C |
| Paket | 16-DIP |
| Notes / variants | Configuration d'anode commune |
- Kangura mfuwa ya ng'anda (4.0V mpaka 5.5V).
- Tshimbila ba resistors ya kutalika ya mposo ya LED nyonso kupeka kuponya.
- Bika wiring ya moke mpo na kolongola interférence.
- Kangula kutulika kwa joto; tumia heatsink ikiwa ni lazima.
- Kang'ang'a pin connections kuzuya miscommunication.
Instructions de câblage
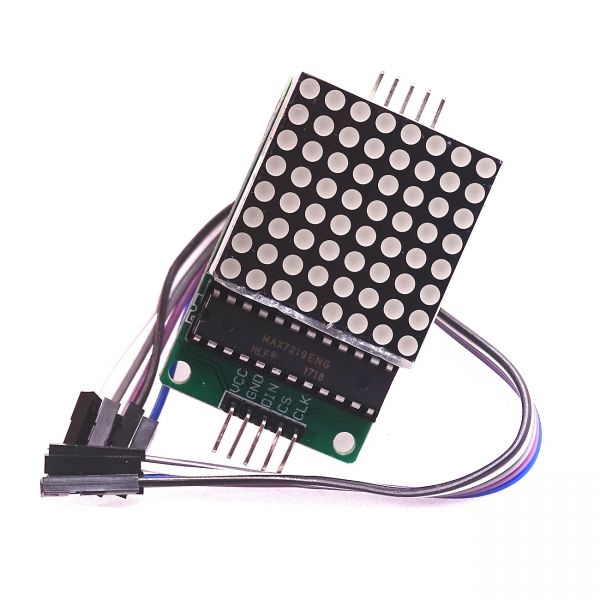
Pour câbler le MAX7219 à l'Arduino, connectez les broches suivantes :
- Connect the
VCCpin ya MAX7219 ku 5V ya Arduino. - Connect the
GNDpin na nganga ya Arduino. - Connect the
DINpin (Données d'entrée) au pin 12 de l'Arduino. - Connect the
CLKpin (Clock) na pin 11 ya Arduino. - Connect the
CSpin (Chip Select) na pin 10 ya Arduino.
Asegúrate de verificar que todas las conexiones estén seguras antes de encender el circuito. El cableado es sencillo, pero si encuentras problemas, revisa las conexiones cuidadosamente (en el video a las 1:45).
Kód Příkladů a Průvodce
Na kód, to tanga na kuingiza maktaba ya LedControl, ambayo ni muhimu kwa mawasiliano na MAX7219. Sehemu ifuatayo inaanzisha kituo cha LedControl:
LedControl lc=LedControl(12,11,10,1);Cette ligne définit la broche de données, la broche d'horloge, la broche de sélection de puce et le nombre d'appareils (1, dans ce cas). Ensuite, dans lesetup()fonction, nous réveillons le MAX7219 et réglons l'intensité d'affichage :
lc.shutdown(0,false);
lc.setIntensity(0,8);
lc.clearDisplay(0);
Cela garantit que l'affichage est actif et prêt à montrer des caractères. La fonction principale qui anime l'affichage estwriteArduinoOnMatrix(), oyo eza na nzela ya kokanga ba row ya matrix mpo na kolakisa ba littre.
Demonstration / Nini ya Kutegemea
Una vez que todo esté cableado y el código esté cargado, la matriz de LED debería mostrar la palabra "ROBOJAX". Si la pantalla no funciona, verifica problemas como conexiones sueltas o asignaciones de pines incorrectas. Además, asegúrate de que la fuente de alimentación sea adecuada (en el video a las 2:30).
Chapitres
- Introducción (0:00)
- Hardware Overview (0:30)
- Wiring Instructions (1:45)
- Código de recorrido (2:15)
- Demonstration (3:00)
Images
/*
 * This video shows you how to use the MAX7219 module with an 8x8 LED matrix to display text or any characters on the LED.
 * Watch YouTube video: https://youtu.be/AAiDwBKs9uE
 *
 * Written by Ahmad Shamshiri for Robojax.com
 * on February 26, 2017 in Ajax, Ontario, Canada
 * Get this code and other Arduino codes from Robojax.com
 * Learn Arduino step by step in a structured course with all materials, wiring diagrams, and libraries
 * all in one place.

 ****************************
 * Get early access to my videos via Patreon and have your name mentioned at the end of every
 * video I publish on YouTube here: http://robojax.com/L/?id=63 (watch until the end of this video for a list of my Patrons)
 ****************************

 * Or make a donation using PayPal http://robojax.com/L/?id=64

 * This code is "AS IS" without warranty or liability. Free to be used as long as you keep this note intact.
 * This code has been downloaded from Robojax.com
    This program is free software: you can redistribute it and/or modify
    it under the terms of the GNU General Public License as published by
    the Free Software Foundation, either version 3 of the License, or
    (at your option) any later version.

    This program is distributed in the hope that it will be useful,
    but WITHOUT ANY WARRANTY; without even the implied warranty of
    MERCHANTABILITY or FITNESS FOR A PARTICULAR PURPOSE.  See the
    GNU General Public License for more details.

    You should have received a copy of the GNU General Public License
    along with this program.  If not, see <https://www.gnu.org/licenses/>.
*/


// We always have to include the library
// Based on a project posted https://github.com/wayoda/LedControl
#include "LedControl.h"

 /*
  Now we need a LedControl to work with.
  // Customized for RoboJax.com on February 26, 2017 in Ajax, Ontario, Canada.
  ***** These pin numbers will probably not work with your hardware *****
  pin 12 is connected to the DataIn
  pin 11 is connected to the CLK
  pin 10 is connected to CS
  We have only a single MAX72XX.
  */
 LedControl lc=LedControl(12,11,10,1);

 /* we always wait a bit between updates of the display */
 unsigned long delaytime=600;

 void setup() {
   /*
    The MAX72XX is in power-saving mode on startup,
    we have to do a wakeup call
    */
   lc.shutdown(0,false);
   /* Set the brightness to a medium value */
   lc.setIntensity(0,8);
   /* and clear the display */
   lc.clearDisplay(0);
 }

 /*
  This method will display the characters for the
  word "Arduino" one after the other on the matrix.
  (you need at least 5x7 LEDs to see the whole characters)
  */
 void writeArduinoOnMatrix() {
   /* here is the data for the characters */

   // K
   byte R[8]={B11111100,B10000100,B10000100,B11111000,B10100000,B10010000,B10001000,B10000100};
   byte O[8]={B00011000,B00100100,B01000010,B01000010,B01000010,B01000010,B00100100,B00011000};
   byte B[8]={B11111100,B10000100,B10000100,B11111000,B10001000,B10000100,B10000100,B11111100};
   byte J[8]={B00011110,B00000100,B00000100,B00000100,B10000100,B10000100,B01000100,B00111000};
   byte A[8]={B00111000,B01000100,B10000010,B11111110,B10000010,B10000010,B10000010,B10000010};
   byte X[8]={ B10000001,B01000010,B00100100,B00011000,B00011000,B00100100,B01000010,B10000001};
   byte love[8]={ B00000000,B01100110,B10011001,B10011001,B10000001,B01000010,B00100100,B00011000};


   /* Letter R */
   for (int i=0; i<8; i++){
   lc.setRow(0,i,R[i]);

   }

   delay(delaytime);
   for(int i=0; i<8; i++){
       lc.setRow(0,i,0);// this is for blank
   }
 //////////////// END of Letter R ///////

   /* Letter O */
   for (int i=0; i<8; i++){
   lc.setRow(0,i,O[i]);

   }

   delay(delaytime);
   for(int i=0; i<8; i++){
       lc.setRow(0,i,0);// this is for blank
   }
 //////////////// END of Letter O ///////


   /* Letter B */
   for (int i=0; i<8; i++){
   lc.setRow(0,i,B[i]);

   }

   delay(delaytime);
   for(int i=0; i<8; i++){
       lc.setRow(0,i,0);// this is for blank
   }
 //////////////// END of Letter B ///////

   /* Letter O */
   for (int i=0; i<8; i++){
   lc.setRow(0,i,O[i]);

   }

   delay(delaytime);
   for(int i=0; i<8; i++){
       lc.setRow(0,i,0);// this is for blank
   }
 //////////////// END of Letter O ///////

   /* Letter J */
   for (int i=0; i<8; i++){
   lc.setRow(0,i,J[i]);

   }

   delay(delaytime);
   for(int i=0; i<8; i++){
       lc.setRow(0,i,0);// this is for blank
   }
 //////////////// END of Letter J ///////

   /* Letter A */
   for (int i=0; i<8; i++){
   lc.setRow(0,i,A[i]);

   }

   delay(delaytime);
   for(int i=0; i<8; i++){
       lc.setRow(0,i,0);// this is for blank
   }
 //////////////// END of Letter A ///////

   /* Letter X */
   for (int i=0; i<8; i++){
   lc.setRow(0,i,X[i]);

   }

   delay(delaytime);
   for(int i=0; i<8; i++){
       lc.setRow(0,i,0);// this is for blank
   }
 //////////////// END of Letter X ///////


   /* love */
   for (int i=0; i<8; i++){
   lc.setRow(0,i,love[i]);

   }

   delay(delaytime);
   delay(delaytime);
   for(int i=0; i<8; i++){
       lc.setRow(0,i,0);// this is for blank
   }
 //////////////// END of Letter love ///////

 }// writeArduinoOnMatrix()  end


 void loop() {
   writeArduinoOnMatrix();

}/*
* This video shows you how to use the MAX7219 module with an 8x8 LED matrix to display text or any characters on the LED.
* Watch YouTube video: https://youtu.be/AAiDwBKs9uE
*
* Written by Ahmad S. for Robojax.com
* on February 26, 2017 in Ajax, Ontario, Canada
* Permission granted to share this code, given that this
* note is kept with the code.
* Disclaimer: This code is "AS IS" and for educational purposes only.
*/
// We always have to include the library
// Based on a project posted on https://github.com/wayoda/LedControl
#include "LedControl.h"
/*
Now we need a LedControl object to work with.
// Customized for RoboJax.com on February 26, 2017 in Ajax, Ontario, Canada.
***** These pin numbers will probably not work with your hardware *****
pin 1 is connected to the DataIn
pin 4 is connected to the CLK
pin 53 is connected to CS
We have only a single MAX72XX.
*/
LedControl lc=LedControl(1,4,53,1);// this line determines if this code can work with Arduino Mega or Arduino UNO
/* we always wait a bit between updates of the display */
unsigned long delaytime=600;
void setup() {
/*
The MAX72XX is in power-saving mode on startup,
we have to do a wakeup call
*/
lc.shutdown(0,false);
/* Set the brightness to a medium value */
lc.setIntensity(0,8);
/* and clear the display */
lc.clearDisplay(0);
}
/*
This method will display the characters for the
word "Arduino" one after the other on the matrix.
(you need at least 5x7 LEDs to see the whole characters)
*/
void writeArduinoOnMatrix() {
/* here is the data for the characters */
// K
byte R[8]={B11111100,B10000100,B10000100,B11111000,B10100000,B10010000,B10001000,B10000100};
byte O[8]={B00011000,B00100100,B01000010,B01000010,B01000010,B01000010,B00100100,B00011000};
byte B[8]={B11111100,B10000100,B10000100,B11111000,B10001000,B10000100,B10000100,B11111100};
byte J[8]={B00011110,B00000100,B00000100,B00000100,B10000100,B10000100,B01000100,B00111000};
byte A[8]={B00111000,B01000100,B10000010,B11111110,B10000010,B10000010,B10000010,B10000010};
byte X[8]={ B10000001,B01000010,B00100100,B00011000,B00011000,B00100100,B01000010,B10000001};
byte love[8]={ B00000000,B01100110,B10011001,B10011001,B10000001,B01000010,B00100100,B00011000};
/* Letter R */
for (int i=0; i<8; i++){
lc.setRow(0,i,R[i]);
}
delay(delaytime);
for(int i=0; i<8; i++){
lc.setRow(0,i,0);// this is for blank
}
/////////////// END of Letter R ///////
/* Letter O */
for (int i=0; i<8; i++){
lc.setRow(0,i,O[i]);
}
delay(delaytime);
for(int i=0; i<8; i++){
lc.setRow(0,i,0);// this is for blank
}
/////////////// END of Letter O ///////
/* Letter B */
for (int i=0; i<8; i++){
lc.setRow(0,i,B[i]);
}
delay(delaytime);
for(int i=0; i<8; i++){
lc.setRow(0,i,0);// this is for blank
}
/////////////// END of Letter B ///////
/* Letter O */
for (int i=0; i<8; i++){
lc.setRow(0,i,O[i]);
}
delay(delaytime);
for(int i=0; i<8; i++){
lc.setRow(0,i,0);// this is for blank
}
/////////////// END of Letter O ///////
/* Letter J */
for (int i=0; i<8; i++){
lc.setRow(0,i,J[i]);
}
delay(delaytime);
for(int i=0; i<8; i++){
lc.setRow(0,i,0);// this is for blank
}
/////////////// END of Letter J ///////
/* Letter A */
for (int i=0; i<8; i++){
lc.setRow(0,i,A[i]);
}
delay(delaytime);
for(int i=0; i<8; i++){
lc.setRow(0,i,0);// this is for blank
}
/////////////// END of Letter A ///////
/* Letter X */
for (int i=0; i<8; i++){
lc.setRow(0,i,X[i]);
}
delay(delaytime);
for(int i=0; i<8; i++){
lc.setRow(0,i,0);// this is for blank
}
/////////////// END of Letter X ///////
/* love */
for (int i=0; i<8; i++){
lc.setRow(0,i,love[i]);
}
delay(delaytime);
delay(delaytime);
for(int i=0; i<8; i++){
lc.setRow(0,i,0);// this is for blank
}
/////////////// END of love ///////
}// writeArduinoOnMatrix() end
void loop() {
writeArduinoOnMatrix();
}Nko o na nki.
-
AmazonMax7219 8x8 Matrix on Amazonamzn.to
-
eBayMax7219 8x8 Matrix on eBayebay.us
-
AliExpressMax7219 8x8 Matrix on AliExpresss.click.aliexpress.com
Mokili na bisika
-
DokumentasiView different board pin assignments for SPIarduino.cc
-
L'extérieur
Fichiers📁
Mabala a mangwe
-
MAX7219 Matrice Bibliothèque de Robojax
robojax-MAX7219-matrix.zip0.01 MB -
8-Digit LED Display Library (from Robojax.com)
robojax_MAX7291_8_digits.zip