MAX7219 Arduino модулі арқылы 8x8 LED матрицасы
Бұл оқулықта біз Arduino-мен MAX7219 модулін пайдаланып 8x8 LED матрицасын қалай басқаруды үйренеміз. MAX7219 бірнеше LED-терді басқаруды жеңілдетеді, бізге символдар мен үлгілерді оңай көрсетуге мүмкіндік береді. Осы жобаның соңында сіз матрицада "ROBOJAX" сөзін көрсете алатын боласыз.
Оны жүзеге асыру үшін біз MAX7219-пен интерфейс жасауға арнайы әзірленген LedControl кітапханасын пайдаланамыз. Бұл кітапхана бізге LED матрицасына деректерді минималды күшпен жіберуге мүмкіндік береді. Егер сымдарды және кодты жақсырақ түсінгіңіз келсе, байланысты видеоға (видеода :30) назар аударыңыз.
Аппараттық құралдар түсіндірілді
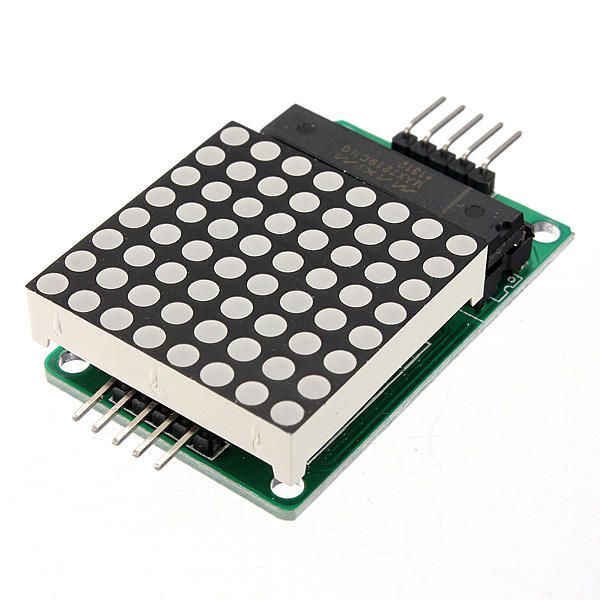
Бұл жобаның негізгі компоненттері MAX7219 модулі және 8x8 LED матрицасы болып табылады. MAX7219 - бұл LED дисплейін басқаруға арналған интегралды схема, ол Arduino-дан келетін байланыс және басқару сигналдарын өңдейді. Ол тізбекті интерфейсті пайдаланады, яғни біз Arduino-дан бірнеше пинмен көптеген LED-дерді басқара аламыз.
8x8 LED матрицасы 64 жеке LED-ден тұрады, олар тор түрінде орналастырылған. Әр LED-ді MAX7219 арқылы тиісті командаларды жіберу арқылы қосуға немесе өшіруге болады. Бұл матрицада әртүрлі таңбалар мен графикаларды көрсетуге мүмкіндік береді.
Техникалық сипаттама мәліметтері
| Өндіруші | Maxim Integrated |
|---|---|
| Бөлшек нөмірі | MAX7219 |
| Логика/Кернеу | 3.3В-тан 5.5В-қа |
| Жабдықтау кернеуі | 4.0В-тан 5.5В-қа |
| Шығыс ток (арна бойынша) | 40 мА макс |
| Шың ток (арна бойынша) | 100 мА макс |
| PWM жиілігі бойынша нұсқаулық | 100 Гц |
| Кіріс логика шектер | 2.0В (жоғары) / 0.8В (төмен) |
| Кернеу түсуі / RDS(қосулы)жарқындық | 0.2В тип. |
| Жылу шектеулері | 150°C |
| Пакет | 16-DIP |
| Ескертпелер / нұсқалар | Жалпы анод конфигурациясы |
- Дұрыс қуат көзін қамтамасыз етіңіз (4.0В-тан 5.5В-қа дейін).
- Әр LED үшін зақымдануды болдырмау мақсатында ток шектеуші резисторларды пайдаланыңыз.
- Сымдарды қысқа ұстаңыз, кедергілерді болдырмау үшін.
- Жылу таралуын бақылаңыз; қажет болса, жылу өткізгішті пайдаланыңыз.
- Пин қосылымдарын қайта тексеріңіз, байланыс қателіктерін болдырмау үшін.
Сымдарды қосу нұсқаулары
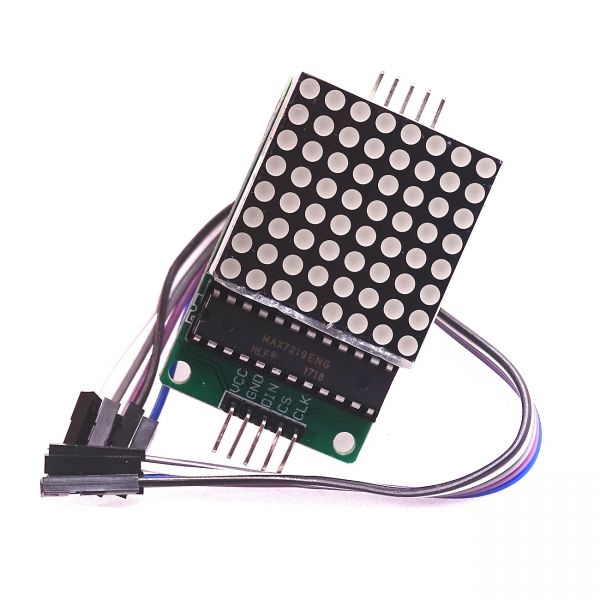
MAX7219-ды Arduino-ға қосу үшін келесі пиндерді қосыңыз:
- Байланыстырыңыз
VCCMAX7219-дың пинін Arduino-ның 5V-ына. - Байланыстырыңыз
GNDArduino-ның жеріне пин. - Байланыстырыңыз
DINArduino 12 пиніне (Деректер кірісі) пин. - Байланыстырыңыз
CLKпин (Сағат) Arduino пин 11-ге. - Байланыстырыңыз
CSпин (Чипті таңдау) Arduino пин 10-ға.
Схеманы қосар алдында барлық қосылымдардың сенімді екеніне көз жеткізіңіз. Сымдарды қосу оңай, бірақ егер қиындықтарға тап болсаңыз, қосылымдарды мұқият тексеріңіз (бейнемен 1:45).
Код мысалдары мен нұсқаулықтар
Кодта біз MAX7219-пен байланысу үшін маңызды LedControl кітапханасын қосудан бастаймыз. Келесі үзінді LedControl объектісін инициализациялайды:
LedControl lc=LedControl(12,11,10,1);Бұл жол деректер пинін, сағат пинін, чипті таңдау пинін және құрылғылардың санын (бұл жағдайда 1) орнатады. Келесі, вsetup()функция, біз MAX7219-ды оятады және дисплейдің жарықтығын орнатамыз:
lc.shutdown(0,false);
lc.setIntensity(0,8);
lc.clearDisplay(0);
Бұл дисплейдің белсенді екенін және таңбаларды көрсетуге дайын екенін қамтамасыз етеді. Дисплейді басқарудың негізгі функциясыwriteArduinoOnMatrix(), матрицаның қатарларын кезекпен жарықтандырып, әріптерді көрсетеді.
Көрсетілім / Не күту керек
Барлығы сыммен жалғанып, код жүктелгеннен кейін, LED матрицасы "ROBOJAX" сөзін көрсетуі керек. Егер дисплей жұмыс істемесе, бос қосылымдар немесе дұрыс емес пин тағайындаулары сияқты мәселелерді тексеріңіз. Сонымен қатар, қуат көзінің жеткілікті екеніне көз жеткізіңіз (бейнемен 2:30-да).
Бөлімдер
- Кіріспе (0:00)
- Аппараттық шолу (0:30)
- Сымдарды қосу нұсқаулары (1:45)
- Кодты қарау (2:15)
- Демонстрация (3:00)
Суреттер
/*
 * This video shows you how to use the MAX7219 module with an 8x8 LED matrix to display text or any characters on the LED.
 * Watch YouTube video: https://youtu.be/AAiDwBKs9uE
 *
 * Written by Ahmad Shamshiri for Robojax.com
 * on February 26, 2017 in Ajax, Ontario, Canada
 * Get this code and other Arduino codes from Robojax.com
 * Learn Arduino step by step in a structured course with all materials, wiring diagrams, and libraries
 * all in one place.

 ****************************
 * Get early access to my videos via Patreon and have your name mentioned at the end of every
 * video I publish on YouTube here: http://robojax.com/L/?id=63 (watch until the end of this video for a list of my Patrons)
 ****************************

 * Or make a donation using PayPal http://robojax.com/L/?id=64

 * This code is "AS IS" without warranty or liability. Free to be used as long as you keep this note intact.
 * This code has been downloaded from Robojax.com
    This program is free software: you can redistribute it and/or modify
    it under the terms of the GNU General Public License as published by
    the Free Software Foundation, either version 3 of the License, or
    (at your option) any later version.

    This program is distributed in the hope that it will be useful,
    but WITHOUT ANY WARRANTY; without even the implied warranty of
    MERCHANTABILITY or FITNESS FOR A PARTICULAR PURPOSE.  See the
    GNU General Public License for more details.

    You should have received a copy of the GNU General Public License
    along with this program.  If not, see <https://www.gnu.org/licenses/>.
*/


// We always have to include the library
// Based on a project posted https://github.com/wayoda/LedControl
#include "LedControl.h"

 /*
  Now we need a LedControl to work with.
  // Customized for RoboJax.com on February 26, 2017 in Ajax, Ontario, Canada.
  ***** These pin numbers will probably not work with your hardware *****
  pin 12 is connected to the DataIn
  pin 11 is connected to the CLK
  pin 10 is connected to CS
  We have only a single MAX72XX.
  */
 LedControl lc=LedControl(12,11,10,1);

 /* we always wait a bit between updates of the display */
 unsigned long delaytime=600;

 void setup() {
   /*
    The MAX72XX is in power-saving mode on startup,
    we have to do a wakeup call
    */
   lc.shutdown(0,false);
   /* Set the brightness to a medium value */
   lc.setIntensity(0,8);
   /* and clear the display */
   lc.clearDisplay(0);
 }

 /*
  This method will display the characters for the
  word "Arduino" one after the other on the matrix.
  (you need at least 5x7 LEDs to see the whole characters)
  */
 void writeArduinoOnMatrix() {
   /* here is the data for the characters */

   // K
   byte R[8]={B11111100,B10000100,B10000100,B11111000,B10100000,B10010000,B10001000,B10000100};
   byte O[8]={B00011000,B00100100,B01000010,B01000010,B01000010,B01000010,B00100100,B00011000};
   byte B[8]={B11111100,B10000100,B10000100,B11111000,B10001000,B10000100,B10000100,B11111100};
   byte J[8]={B00011110,B00000100,B00000100,B00000100,B10000100,B10000100,B01000100,B00111000};
   byte A[8]={B00111000,B01000100,B10000010,B11111110,B10000010,B10000010,B10000010,B10000010};
   byte X[8]={ B10000001,B01000010,B00100100,B00011000,B00011000,B00100100,B01000010,B10000001};
   byte love[8]={ B00000000,B01100110,B10011001,B10011001,B10000001,B01000010,B00100100,B00011000};


   /* Letter R */
   for (int i=0; i<8; i++){
   lc.setRow(0,i,R[i]);

   }

   delay(delaytime);
   for(int i=0; i<8; i++){
       lc.setRow(0,i,0);// this is for blank
   }
 //////////////// END of Letter R ///////

   /* Letter O */
   for (int i=0; i<8; i++){
   lc.setRow(0,i,O[i]);

   }

   delay(delaytime);
   for(int i=0; i<8; i++){
       lc.setRow(0,i,0);// this is for blank
   }
 //////////////// END of Letter O ///////


   /* Letter B */
   for (int i=0; i<8; i++){
   lc.setRow(0,i,B[i]);

   }

   delay(delaytime);
   for(int i=0; i<8; i++){
       lc.setRow(0,i,0);// this is for blank
   }
 //////////////// END of Letter B ///////

   /* Letter O */
   for (int i=0; i<8; i++){
   lc.setRow(0,i,O[i]);

   }

   delay(delaytime);
   for(int i=0; i<8; i++){
       lc.setRow(0,i,0);// this is for blank
   }
 //////////////// END of Letter O ///////

   /* Letter J */
   for (int i=0; i<8; i++){
   lc.setRow(0,i,J[i]);

   }

   delay(delaytime);
   for(int i=0; i<8; i++){
       lc.setRow(0,i,0);// this is for blank
   }
 //////////////// END of Letter J ///////

   /* Letter A */
   for (int i=0; i<8; i++){
   lc.setRow(0,i,A[i]);

   }

   delay(delaytime);
   for(int i=0; i<8; i++){
       lc.setRow(0,i,0);// this is for blank
   }
 //////////////// END of Letter A ///////

   /* Letter X */
   for (int i=0; i<8; i++){
   lc.setRow(0,i,X[i]);

   }

   delay(delaytime);
   for(int i=0; i<8; i++){
       lc.setRow(0,i,0);// this is for blank
   }
 //////////////// END of Letter X ///////


   /* love */
   for (int i=0; i<8; i++){
   lc.setRow(0,i,love[i]);

   }

   delay(delaytime);
   delay(delaytime);
   for(int i=0; i<8; i++){
       lc.setRow(0,i,0);// this is for blank
   }
 //////////////// END of Letter love ///////

 }// writeArduinoOnMatrix()  end


 void loop() {
   writeArduinoOnMatrix();

}/*
* This video shows you how to use the MAX7219 module with an 8x8 LED matrix to display text or any characters on the LED.
* Watch YouTube video: https://youtu.be/AAiDwBKs9uE
*
* Written by Ahmad S. for Robojax.com
* on February 26, 2017 in Ajax, Ontario, Canada
* Permission granted to share this code, given that this
* note is kept with the code.
* Disclaimer: This code is "AS IS" and for educational purposes only.
*/
// We always have to include the library
// Based on a project posted on https://github.com/wayoda/LedControl
#include "LedControl.h"
/*
Now we need a LedControl object to work with.
// Customized for RoboJax.com on February 26, 2017 in Ajax, Ontario, Canada.
***** These pin numbers will probably not work with your hardware *****
pin 1 is connected to the DataIn
pin 4 is connected to the CLK
pin 53 is connected to CS
We have only a single MAX72XX.
*/
LedControl lc=LedControl(1,4,53,1);// this line determines if this code can work with Arduino Mega or Arduino UNO
/* we always wait a bit between updates of the display */
unsigned long delaytime=600;
void setup() {
/*
The MAX72XX is in power-saving mode on startup,
we have to do a wakeup call
*/
lc.shutdown(0,false);
/* Set the brightness to a medium value */
lc.setIntensity(0,8);
/* and clear the display */
lc.clearDisplay(0);
}
/*
This method will display the characters for the
word "Arduino" one after the other on the matrix.
(you need at least 5x7 LEDs to see the whole characters)
*/
void writeArduinoOnMatrix() {
/* here is the data for the characters */
// K
byte R[8]={B11111100,B10000100,B10000100,B11111000,B10100000,B10010000,B10001000,B10000100};
byte O[8]={B00011000,B00100100,B01000010,B01000010,B01000010,B01000010,B00100100,B00011000};
byte B[8]={B11111100,B10000100,B10000100,B11111000,B10001000,B10000100,B10000100,B11111100};
byte J[8]={B00011110,B00000100,B00000100,B00000100,B10000100,B10000100,B01000100,B00111000};
byte A[8]={B00111000,B01000100,B10000010,B11111110,B10000010,B10000010,B10000010,B10000010};
byte X[8]={ B10000001,B01000010,B00100100,B00011000,B00011000,B00100100,B01000010,B10000001};
byte love[8]={ B00000000,B01100110,B10011001,B10011001,B10000001,B01000010,B00100100,B00011000};
/* Letter R */
for (int i=0; i<8; i++){
lc.setRow(0,i,R[i]);
}
delay(delaytime);
for(int i=0; i<8; i++){
lc.setRow(0,i,0);// this is for blank
}
/////////////// END of Letter R ///////
/* Letter O */
for (int i=0; i<8; i++){
lc.setRow(0,i,O[i]);
}
delay(delaytime);
for(int i=0; i<8; i++){
lc.setRow(0,i,0);// this is for blank
}
/////////////// END of Letter O ///////
/* Letter B */
for (int i=0; i<8; i++){
lc.setRow(0,i,B[i]);
}
delay(delaytime);
for(int i=0; i<8; i++){
lc.setRow(0,i,0);// this is for blank
}
/////////////// END of Letter B ///////
/* Letter O */
for (int i=0; i<8; i++){
lc.setRow(0,i,O[i]);
}
delay(delaytime);
for(int i=0; i<8; i++){
lc.setRow(0,i,0);// this is for blank
}
/////////////// END of Letter O ///////
/* Letter J */
for (int i=0; i<8; i++){
lc.setRow(0,i,J[i]);
}
delay(delaytime);
for(int i=0; i<8; i++){
lc.setRow(0,i,0);// this is for blank
}
/////////////// END of Letter J ///////
/* Letter A */
for (int i=0; i<8; i++){
lc.setRow(0,i,A[i]);
}
delay(delaytime);
for(int i=0; i<8; i++){
lc.setRow(0,i,0);// this is for blank
}
/////////////// END of Letter A ///////
/* Letter X */
for (int i=0; i<8; i++){
lc.setRow(0,i,X[i]);
}
delay(delaytime);
for(int i=0; i<8; i++){
lc.setRow(0,i,0);// this is for blank
}
/////////////// END of Letter X ///////
/* love */
for (int i=0; i<8; i++){
lc.setRow(0,i,love[i]);
}
delay(delaytime);
delay(delaytime);
for(int i=0; i<8; i++){
lc.setRow(0,i,0);// this is for blank
}
/////////////// END of love ///////
}// writeArduinoOnMatrix() end
void loop() {
writeArduinoOnMatrix();
}Сізге қажет болуы мүмкін нәрселер
-
АмазонкаMax7219 8x8 Matrix on Amazonamzn.to
-
eBayMax7219 8x8 Matrix on eBayebay.us
-
AliExpressMax7219 8x8 Matrix on AliExpresss.click.aliexpress.com
Ресурстар мен сілтемелер
-
ҚұжаттамаView different board pin assignments for SPIarduino.cc
-
Сыртқы
Файлдар📁
Басқа файлдар
-
Robojax-тан MAX7219 матрица кітапханасы
robojax-MAX7219-matrix.zip0.01 MB -
8-Digit LED Display Library (from Robojax.com)
robojax_MAX7291_8_digits.zip