MAX7219 아두이노 모듈을 이용한 8x8 LED 매트릭스
이 튜토리얼에서는 Arduino와 함께 MAX7219 모듈을 사용하여 8x8 LED 매트릭스를 제어하는 방법을 배울 것입니다. MAX7219는 여러 개의 LED 제어를 간소화하여 문자와 패턴을 쉽게 표시할 수 있게 해줍니다. 이 프로젝트가 끝나면 매트릭스에 "ROBOJAX"라는 단어를 표시할 수 있게 될 것입니다.
이를 달성하기 위해 우리는 MAX7219와 인터페이스하기 위해 특별히 설계된 LedControl 라이브러리를 활용할 것입니다. 이 라이브러리를 사용하면 최소한의 노력으로 LED 매트릭스에 데이터를 전송할 수 있습니다. 배선 및 코드에 대한 더 명확한 이해를 원하신다면 관련 비디오(비디오 0:30)를 꼭 확인하세요.
하드웨어 설명
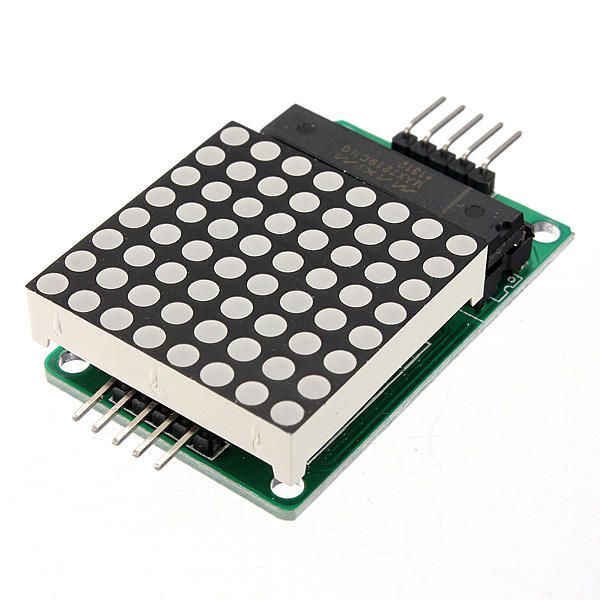
이 프로젝트의 주요 구성 요소는 MAX7219 모듈과 8x8 LED 매트릭스입니다. MAX7219는 LED의 디스플레이를 관리하는 집적 회로로, Arduino로부터의 통신 및 제어 신호를 처리합니다. 이는 직렬 인터페이스를 사용하므로, Arduino의 몇 개 핀만으로도 많은 LED를 제어할 수 있습니다.
8x8 LED 매트릭스는 그리드에 배열된 64개의 개별 LED로 구성되어 있습니다. 각 LED는 MAX7219를 통해 적절한 명령을 전송하여 켜거나 끌 수 있습니다. 이를 통해 매트릭스에 다양한 문자와 그래픽을 표시할 수 있습니다.
데이터시트 세부정보
| 제조업체 | 맥심 인터그레이티드 |
|---|---|
| 부품 번호 | MAX7219 |
| 로직/입출력 전압 | 3.3V에서 5.5V |
| 공급 전압 | 4.0V에서 5.5V까지 |
| 출력 전류 (채널당) | 최대 40 mA |
| 채널당 피크 전류 | 100 mA 최대 |
| PWM 주파수 안내 | 100 헤르츠 |
| 입력 논리 임계값 | 2.0V (높음) / 0.8V (낮음) |
| 전압 강하 / RDS(온)/ 포화 | 0.2V 전형. |
| 열 한계 | 150°C |
| 패키지 | 16-DIP |
| 노트 / 변형 | 공통 애노드 구성 |
- 적절한 전원 공급(4.0V에서 5.5V까지)을 보장하십시오.
- 각 LED에 대한 전류 제한 저항을 사용하여 손상을 방지하십시오.
- 간섭을 피하기 위해 배선을 짧게 유지하세요.
- 열 방출을 모니터링하고 필요시 방열판을 사용하십시오.
- 핀 연결을 재확인하여 오통신을 피하십시오.
배선 지침
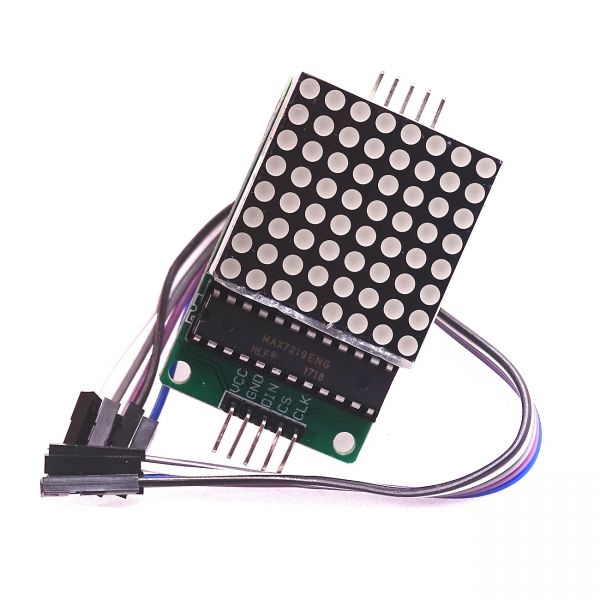
MAX7219를 Arduino에 연결하려면 다음 핀을 연결하세요:
- 연결하다
VCCMAX7219의 핀을 Arduino의 5V에 연결합니다. - 연결하다
GND아두이노의 접지에 핀을 연결하세요. - 연결하다
DIN핀 (데이터 입력)을 아두이노 핀 12에 연결합니다. - 연결하다
CLK핀(시계)을 아두이노 핀 11에 연결합니다. - 연결하다
CS핀(칩 선택)을 아두이노 핀 10에 연결합니다.
회로의 전원을 켜기 전에 모든 연결이 안전한지 확인하세요. 배선은 간단하지만 문제가 발생하면 연결을 주의 깊게 검토하세요 (비디오에서 1:45).
코드 예제 및 안내
코드에서는 MAX7219와 통신하는 데 필수적인 LedControl 라이브러리를 포함하는 것으로 시작합니다. 다음 발췌는 LedControl 객체를 초기화합니다:
LedControl lc=LedControl(12,11,10,1);이 줄은 데이터 핀, 클럭 핀, 칩 선택 핀 및 장치 수(이 경우 1)를 설정합니다. 다음으로, setup()함수, 우리는 MAX7219를 깨우고 디스플레이 밝기를 설정합니다:
lc.shutdown(0,false);
lc.setIntensity(0,8);
lc.clearDisplay(0);
이것은 디스플레이가 활성화되어 문자 표시를 준비하고 있음을 보장합니다. 디스플레이를 구동하는 주요 기능은writeArduinoOnMatrix()행렬의 행을 순차적으로 밝히며 문자를 표시합니다.
시연 / 기대할 사항
모든 것이 연결되고 코드가 업로드되면 LED 매트릭스는 "ROBOJAX"라는 단어를 표시해야 합니다. 디스플레이가 작동하지 않으면 느슨한 연결이나 잘못된 핀 할당과 같은 문제를 확인하세요. 또한 전원 공급이 충분한지 확인하세요 (비디오에서 2:30).
장들
- 소개 (0:00)
- 하드웨어 개요 (0:30)
- 배선 지침 (1:45)
- 코드 워크스루 (2:15)
- 시연 (3:00)
이미지
/*
 * This video shows you how to use the MAX7219 module with an 8x8 LED matrix to display text or any characters on the LED.
 * Watch YouTube video: https://youtu.be/AAiDwBKs9uE
 *
 * Written by Ahmad Shamshiri for Robojax.com
 * on February 26, 2017 in Ajax, Ontario, Canada
 * Get this code and other Arduino codes from Robojax.com
 * Learn Arduino step by step in a structured course with all materials, wiring diagrams, and libraries
 * all in one place.

 ****************************
 * Get early access to my videos via Patreon and have your name mentioned at the end of every
 * video I publish on YouTube here: http://robojax.com/L/?id=63 (watch until the end of this video for a list of my Patrons)
 ****************************

 * Or make a donation using PayPal http://robojax.com/L/?id=64

 * This code is "AS IS" without warranty or liability. Free to be used as long as you keep this note intact.
 * This code has been downloaded from Robojax.com
    This program is free software: you can redistribute it and/or modify
    it under the terms of the GNU General Public License as published by
    the Free Software Foundation, either version 3 of the License, or
    (at your option) any later version.

    This program is distributed in the hope that it will be useful,
    but WITHOUT ANY WARRANTY; without even the implied warranty of
    MERCHANTABILITY or FITNESS FOR A PARTICULAR PURPOSE.  See the
    GNU General Public License for more details.

    You should have received a copy of the GNU General Public License
    along with this program.  If not, see <https://www.gnu.org/licenses/>.
*/


// We always have to include the library
// Based on a project posted https://github.com/wayoda/LedControl
#include "LedControl.h"

 /*
  Now we need a LedControl to work with.
  // Customized for RoboJax.com on February 26, 2017 in Ajax, Ontario, Canada.
  ***** These pin numbers will probably not work with your hardware *****
  pin 12 is connected to the DataIn
  pin 11 is connected to the CLK
  pin 10 is connected to CS
  We have only a single MAX72XX.
  */
 LedControl lc=LedControl(12,11,10,1);

 /* we always wait a bit between updates of the display */
 unsigned long delaytime=600;

 void setup() {
   /*
    The MAX72XX is in power-saving mode on startup,
    we have to do a wakeup call
    */
   lc.shutdown(0,false);
   /* Set the brightness to a medium value */
   lc.setIntensity(0,8);
   /* and clear the display */
   lc.clearDisplay(0);
 }

 /*
  This method will display the characters for the
  word "Arduino" one after the other on the matrix.
  (you need at least 5x7 LEDs to see the whole characters)
  */
 void writeArduinoOnMatrix() {
   /* here is the data for the characters */

   // K
   byte R[8]={B11111100,B10000100,B10000100,B11111000,B10100000,B10010000,B10001000,B10000100};
   byte O[8]={B00011000,B00100100,B01000010,B01000010,B01000010,B01000010,B00100100,B00011000};
   byte B[8]={B11111100,B10000100,B10000100,B11111000,B10001000,B10000100,B10000100,B11111100};
   byte J[8]={B00011110,B00000100,B00000100,B00000100,B10000100,B10000100,B01000100,B00111000};
   byte A[8]={B00111000,B01000100,B10000010,B11111110,B10000010,B10000010,B10000010,B10000010};
   byte X[8]={ B10000001,B01000010,B00100100,B00011000,B00011000,B00100100,B01000010,B10000001};
   byte love[8]={ B00000000,B01100110,B10011001,B10011001,B10000001,B01000010,B00100100,B00011000};


   /* Letter R */
   for (int i=0; i<8; i++){
   lc.setRow(0,i,R[i]);

   }

   delay(delaytime);
   for(int i=0; i<8; i++){
       lc.setRow(0,i,0);// this is for blank
   }
 //////////////// END of Letter R ///////

   /* Letter O */
   for (int i=0; i<8; i++){
   lc.setRow(0,i,O[i]);

   }

   delay(delaytime);
   for(int i=0; i<8; i++){
       lc.setRow(0,i,0);// this is for blank
   }
 //////////////// END of Letter O ///////


   /* Letter B */
   for (int i=0; i<8; i++){
   lc.setRow(0,i,B[i]);

   }

   delay(delaytime);
   for(int i=0; i<8; i++){
       lc.setRow(0,i,0);// this is for blank
   }
 //////////////// END of Letter B ///////

   /* Letter O */
   for (int i=0; i<8; i++){
   lc.setRow(0,i,O[i]);

   }

   delay(delaytime);
   for(int i=0; i<8; i++){
       lc.setRow(0,i,0);// this is for blank
   }
 //////////////// END of Letter O ///////

   /* Letter J */
   for (int i=0; i<8; i++){
   lc.setRow(0,i,J[i]);

   }

   delay(delaytime);
   for(int i=0; i<8; i++){
       lc.setRow(0,i,0);// this is for blank
   }
 //////////////// END of Letter J ///////

   /* Letter A */
   for (int i=0; i<8; i++){
   lc.setRow(0,i,A[i]);

   }

   delay(delaytime);
   for(int i=0; i<8; i++){
       lc.setRow(0,i,0);// this is for blank
   }
 //////////////// END of Letter A ///////

   /* Letter X */
   for (int i=0; i<8; i++){
   lc.setRow(0,i,X[i]);

   }

   delay(delaytime);
   for(int i=0; i<8; i++){
       lc.setRow(0,i,0);// this is for blank
   }
 //////////////// END of Letter X ///////


   /* love */
   for (int i=0; i<8; i++){
   lc.setRow(0,i,love[i]);

   }

   delay(delaytime);
   delay(delaytime);
   for(int i=0; i<8; i++){
       lc.setRow(0,i,0);// this is for blank
   }
 //////////////// END of Letter love ///////

 }// writeArduinoOnMatrix()  end


 void loop() {
   writeArduinoOnMatrix();

}/*
* This video shows you how to use the MAX7219 module with an 8x8 LED matrix to display text or any characters on the LED.
* Watch YouTube video: https://youtu.be/AAiDwBKs9uE
*
* Written by Ahmad S. for Robojax.com
* on February 26, 2017 in Ajax, Ontario, Canada
* Permission granted to share this code, given that this
* note is kept with the code.
* Disclaimer: This code is "AS IS" and for educational purposes only.
*/
// We always have to include the library
// Based on a project posted on https://github.com/wayoda/LedControl
#include "LedControl.h"
/*
Now we need a LedControl object to work with.
// Customized for RoboJax.com on February 26, 2017 in Ajax, Ontario, Canada.
***** These pin numbers will probably not work with your hardware *****
pin 1 is connected to the DataIn
pin 4 is connected to the CLK
pin 53 is connected to CS
We have only a single MAX72XX.
*/
LedControl lc=LedControl(1,4,53,1);// this line determines if this code can work with Arduino Mega or Arduino UNO
/* we always wait a bit between updates of the display */
unsigned long delaytime=600;
void setup() {
/*
The MAX72XX is in power-saving mode on startup,
we have to do a wakeup call
*/
lc.shutdown(0,false);
/* Set the brightness to a medium value */
lc.setIntensity(0,8);
/* and clear the display */
lc.clearDisplay(0);
}
/*
This method will display the characters for the
word "Arduino" one after the other on the matrix.
(you need at least 5x7 LEDs to see the whole characters)
*/
void writeArduinoOnMatrix() {
/* here is the data for the characters */
// K
byte R[8]={B11111100,B10000100,B10000100,B11111000,B10100000,B10010000,B10001000,B10000100};
byte O[8]={B00011000,B00100100,B01000010,B01000010,B01000010,B01000010,B00100100,B00011000};
byte B[8]={B11111100,B10000100,B10000100,B11111000,B10001000,B10000100,B10000100,B11111100};
byte J[8]={B00011110,B00000100,B00000100,B00000100,B10000100,B10000100,B01000100,B00111000};
byte A[8]={B00111000,B01000100,B10000010,B11111110,B10000010,B10000010,B10000010,B10000010};
byte X[8]={ B10000001,B01000010,B00100100,B00011000,B00011000,B00100100,B01000010,B10000001};
byte love[8]={ B00000000,B01100110,B10011001,B10011001,B10000001,B01000010,B00100100,B00011000};
/* Letter R */
for (int i=0; i<8; i++){
lc.setRow(0,i,R[i]);
}
delay(delaytime);
for(int i=0; i<8; i++){
lc.setRow(0,i,0);// this is for blank
}
/////////////// END of Letter R ///////
/* Letter O */
for (int i=0; i<8; i++){
lc.setRow(0,i,O[i]);
}
delay(delaytime);
for(int i=0; i<8; i++){
lc.setRow(0,i,0);// this is for blank
}
/////////////// END of Letter O ///////
/* Letter B */
for (int i=0; i<8; i++){
lc.setRow(0,i,B[i]);
}
delay(delaytime);
for(int i=0; i<8; i++){
lc.setRow(0,i,0);// this is for blank
}
/////////////// END of Letter B ///////
/* Letter O */
for (int i=0; i<8; i++){
lc.setRow(0,i,O[i]);
}
delay(delaytime);
for(int i=0; i<8; i++){
lc.setRow(0,i,0);// this is for blank
}
/////////////// END of Letter O ///////
/* Letter J */
for (int i=0; i<8; i++){
lc.setRow(0,i,J[i]);
}
delay(delaytime);
for(int i=0; i<8; i++){
lc.setRow(0,i,0);// this is for blank
}
/////////////// END of Letter J ///////
/* Letter A */
for (int i=0; i<8; i++){
lc.setRow(0,i,A[i]);
}
delay(delaytime);
for(int i=0; i<8; i++){
lc.setRow(0,i,0);// this is for blank
}
/////////////// END of Letter A ///////
/* Letter X */
for (int i=0; i<8; i++){
lc.setRow(0,i,X[i]);
}
delay(delaytime);
for(int i=0; i<8; i++){
lc.setRow(0,i,0);// this is for blank
}
/////////////// END of Letter X ///////
/* love */
for (int i=0; i<8; i++){
lc.setRow(0,i,love[i]);
}
delay(delaytime);
delay(delaytime);
for(int i=0; i<8; i++){
lc.setRow(0,i,0);// this is for blank
}
/////////////// END of love ///////
}// writeArduinoOnMatrix() end
void loop() {
writeArduinoOnMatrix();
}필요할 수 있는 것들
-
아마존Max7219 8x8 Matrix on Amazonamzn.to
-
이베이Max7219 8x8 Matrix on eBayebay.us
-
알리익스프레스Max7219 8x8 Matrix on AliExpresss.click.aliexpress.com
자원 및 참고자료
-
문서화View different board pin assignments for SPIarduino.cc
-
외부
파일📁
다른 파일들
-
로보잭스의 MAX7219 매트릭스 라이브러리
robojax-MAX7219-matrix.zip0.01 MB -
8-Digit LED Display Library (from Robojax.com)
robojax_MAX7291_8_digits.zip