8x8 LED Matrix Tare da MAX7219 Arduino Module
A cikin wannan koyarwar, za mu koyi yadda za a sarrafa matrix LED na 8x8 ta amfani da module MAX7219 tare da Arduino. MAX7219 yana sauƙaƙa sarrafa LEDs da yawa, yana ba mu damar nuna haruffa da zane-zane cikin sauƙi. A ƙarshen wannan aikin, za ku iya nuna kalmar "ROBOJAX" a kan matrix.
Don samun wannan, za mu yi amfani da laburaren LedControl, wanda aka tsara musamman don haɗawa da MAX7219. Wannan laburaren yana ba mu damar aikawa da bayanai zuwa matrix LED tare da ƙoƙari kaɗan. Idan kana son samun fahimta mafi kyau game da wayar da lambar, ka tabbata ka duba bidiyon da aka haɗa (a cikin bidiyo a 0:30).
Kayan Aiki An Bayyana
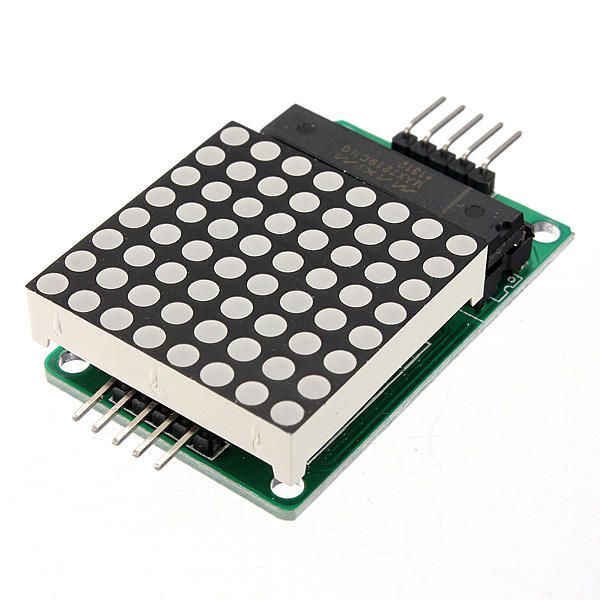
Babban abubuwan da wannan aikin ya ƙunsa sun haɗa da MAX7219 module da 8x8 LED matrix. MAX7219 na'ura ce mai haɗaka wacce ke kula da nunin LEDs, tana sarrafa sadarwa da siginar kulawa daga Arduino. Yana amfani da hanyar sadarwa ta jeri, wanda ke nufin za mu iya sarrafa LEDs da yawa tare da 'yan pins kaɗan daga Arduino.
Matrix LED 8x8 yana dauke da LEDs 64 masu zaman kansu da aka tsara a cikin grid. Ana iya kunna kowanne LED ko kashe shi ta hanyar aikawa da umarni masu dacewa ta hanyar MAX7219. Wannan yana ba da damar nuna haruffa da zane-zane daban-daban a kan matrix.
Bayanan Takardu
| Mai masana'anta | Maxim Integrated |
|---|---|
| Lambar sashi | MAX7219 |
| Lojik/IO wutar lantarki | 3.3V zuwa 5.5V |
| Wutar samar | 4.0V zuwa 5.5V |
| Fitar da yanzu (kowane tashar) | 40 mA mafi |
| Matsakaicin yanzu (kowane tashar) | 100 mA mafi |
| Jagoran frekwensin PWM | 100 Hz |
| Ka'idodin shigarwa | 2.0V (mai) / 0.8V (kasa) |
| Rashin wutar lantarki / RDS(on)/ saturation | 0.2V na yau da kullum. |
| Iyakokin zafi | 150°C |
| Kunshin | 16-DIP |
| Littattafai / nau'ikan | Tsarin anode na gama gari |
- Tabbatar da ingantaccen wutar lantarki (4.0V zuwa 5.5V).
- Yi amfani da resistors masu iyakance yawan yanzu ga kowanne LED don hana lalacewa.
- Ka daure wayoyi gajere don guje wa tsangwama.
- Kula zafin jiki; yi amfani da heatsink idan ya zama dole.
- Duba haɗin pin don guje wa rashin fahimta.
Umarni Waya
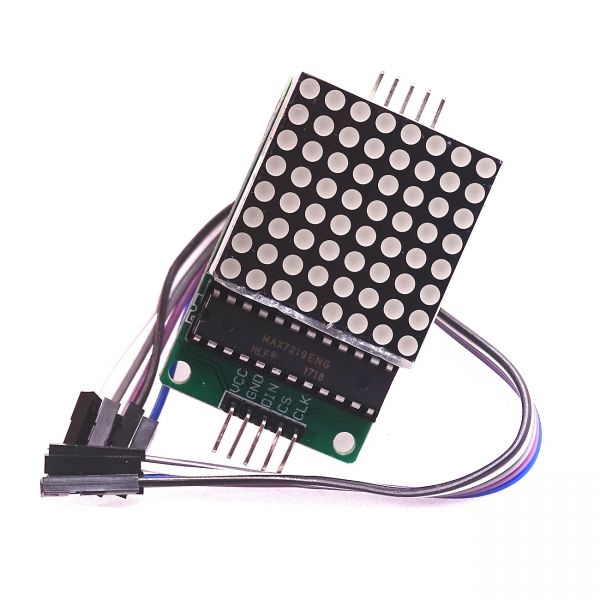
Don haɗa MAX7219 da Arduino, haɗa waɗannan ƙwayoyin:
- haɗa da
VCCpin na MAX7219 zuwa 5V na Arduino. - haɗa da
GNDsaka zuwa ƙasa na Arduino. - Haɗa da
DINpin (Bayanan Shiga) zuwa pin 12 na Arduino. - haɗa da
CLKsaka (Agogo) zuwa pin Arduino 11. - Haɗa da
CSpin (Zaɓin Chip) zuwa pin Arduino 10.
Tabbatar da cewa duk haɗin kai suna da ƙarfi kafin ka kunna tsarin. Wutar tana da sauƙi, amma idan ka fuskanci matsaloli, duba haɗin kai da kyau (a cikin bidiyo a :45).
Misalan Lamba & Jagora
A cikin lambar, muna fara da haɗa ɗakin karatu na LedControl, wanda yake da mahimmanci don sadarwa da MAX7219. Wannan ɓangaren yana farawa da ƙirƙirar abu na LedControl:
LedControl lc=LedControl(12,11,10,1);Layin nan yana saita pin bayanai, pin agogo, pin zaɓin chip, da adadin na'urori (1, a wannan yanayin). Na gaba, a cikinsetup()aiki, muna tashi MAX7219 kuma muna saita karfin haske na nuni:
lc.shutdown(0,false);
lc.setIntensity(0,8);
lc.clearDisplay(0);
Wannan yana tabbatar da cewa nunin yana aiki kuma yana shirye don nuna haruffa. Babban aikin da ke motsa nunin shinewriteArduinoOnMatrix(), wanda ke kunna layukan matrix ɗin a jere don nuna haruffa.
Nuna / Abin da za a yi tsammani
Da zarar an haɗa komai kuma an loda lambar, matattarar LED ya kamata ta nuna kalmar "ROBOJAX". Idan nunin bai yi aiki ba, duba matsaloli kamar haɗin da ba su da kyau ko kuma kuskuren sanya pins. Hakanan, tabbatar da cewa wutar tana da kyau (a cikin bidiyon a 2:30).
Babi
- Gabatarwa (0:00)
- Bayanan Kayan Aiki (0:30)
- Umarnin Waya (1:45)
- Binciken Lambar (2:15)
- Nuna (3:00)
Hotuna
/*
 * This video shows you how to use the MAX7219 module with an 8x8 LED matrix to display text or any characters on the LED.
 * Watch YouTube video: https://youtu.be/AAiDwBKs9uE
 *
 * Written by Ahmad Shamshiri for Robojax.com
 * on February 26, 2017 in Ajax, Ontario, Canada
 * Get this code and other Arduino codes from Robojax.com
 * Learn Arduino step by step in a structured course with all materials, wiring diagrams, and libraries
 * all in one place.

 ****************************
 * Get early access to my videos via Patreon and have your name mentioned at the end of every
 * video I publish on YouTube here: http://robojax.com/L/?id=63 (watch until the end of this video for a list of my Patrons)
 ****************************

 * Or make a donation using PayPal http://robojax.com/L/?id=64

 * This code is "AS IS" without warranty or liability. Free to be used as long as you keep this note intact.
 * This code has been downloaded from Robojax.com
    This program is free software: you can redistribute it and/or modify
    it under the terms of the GNU General Public License as published by
    the Free Software Foundation, either version 3 of the License, or
    (at your option) any later version.

    This program is distributed in the hope that it will be useful,
    but WITHOUT ANY WARRANTY; without even the implied warranty of
    MERCHANTABILITY or FITNESS FOR A PARTICULAR PURPOSE.  See the
    GNU General Public License for more details.

    You should have received a copy of the GNU General Public License
    along with this program.  If not, see <https://www.gnu.org/licenses/>.
*/


// We always have to include the library
// Based on a project posted https://github.com/wayoda/LedControl
#include "LedControl.h"

 /*
  Now we need a LedControl to work with.
  // Customized for RoboJax.com on February 26, 2017 in Ajax, Ontario, Canada.
  ***** These pin numbers will probably not work with your hardware *****
  pin 12 is connected to the DataIn
  pin 11 is connected to the CLK
  pin 10 is connected to CS
  We have only a single MAX72XX.
  */
 LedControl lc=LedControl(12,11,10,1);

 /* we always wait a bit between updates of the display */
 unsigned long delaytime=600;

 void setup() {
   /*
    The MAX72XX is in power-saving mode on startup,
    we have to do a wakeup call
    */
   lc.shutdown(0,false);
   /* Set the brightness to a medium value */
   lc.setIntensity(0,8);
   /* and clear the display */
   lc.clearDisplay(0);
 }

 /*
  This method will display the characters for the
  word "Arduino" one after the other on the matrix.
  (you need at least 5x7 LEDs to see the whole characters)
  */
 void writeArduinoOnMatrix() {
   /* here is the data for the characters */

   // K
   byte R[8]={B11111100,B10000100,B10000100,B11111000,B10100000,B10010000,B10001000,B10000100};
   byte O[8]={B00011000,B00100100,B01000010,B01000010,B01000010,B01000010,B00100100,B00011000};
   byte B[8]={B11111100,B10000100,B10000100,B11111000,B10001000,B10000100,B10000100,B11111100};
   byte J[8]={B00011110,B00000100,B00000100,B00000100,B10000100,B10000100,B01000100,B00111000};
   byte A[8]={B00111000,B01000100,B10000010,B11111110,B10000010,B10000010,B10000010,B10000010};
   byte X[8]={ B10000001,B01000010,B00100100,B00011000,B00011000,B00100100,B01000010,B10000001};
   byte love[8]={ B00000000,B01100110,B10011001,B10011001,B10000001,B01000010,B00100100,B00011000};


   /* Letter R */
   for (int i=0; i<8; i++){
   lc.setRow(0,i,R[i]);

   }

   delay(delaytime);
   for(int i=0; i<8; i++){
       lc.setRow(0,i,0);// this is for blank
   }
 //////////////// END of Letter R ///////

   /* Letter O */
   for (int i=0; i<8; i++){
   lc.setRow(0,i,O[i]);

   }

   delay(delaytime);
   for(int i=0; i<8; i++){
       lc.setRow(0,i,0);// this is for blank
   }
 //////////////// END of Letter O ///////


   /* Letter B */
   for (int i=0; i<8; i++){
   lc.setRow(0,i,B[i]);

   }

   delay(delaytime);
   for(int i=0; i<8; i++){
       lc.setRow(0,i,0);// this is for blank
   }
 //////////////// END of Letter B ///////

   /* Letter O */
   for (int i=0; i<8; i++){
   lc.setRow(0,i,O[i]);

   }

   delay(delaytime);
   for(int i=0; i<8; i++){
       lc.setRow(0,i,0);// this is for blank
   }
 //////////////// END of Letter O ///////

   /* Letter J */
   for (int i=0; i<8; i++){
   lc.setRow(0,i,J[i]);

   }

   delay(delaytime);
   for(int i=0; i<8; i++){
       lc.setRow(0,i,0);// this is for blank
   }
 //////////////// END of Letter J ///////

   /* Letter A */
   for (int i=0; i<8; i++){
   lc.setRow(0,i,A[i]);

   }

   delay(delaytime);
   for(int i=0; i<8; i++){
       lc.setRow(0,i,0);// this is for blank
   }
 //////////////// END of Letter A ///////

   /* Letter X */
   for (int i=0; i<8; i++){
   lc.setRow(0,i,X[i]);

   }

   delay(delaytime);
   for(int i=0; i<8; i++){
       lc.setRow(0,i,0);// this is for blank
   }
 //////////////// END of Letter X ///////


   /* love */
   for (int i=0; i<8; i++){
   lc.setRow(0,i,love[i]);

   }

   delay(delaytime);
   delay(delaytime);
   for(int i=0; i<8; i++){
       lc.setRow(0,i,0);// this is for blank
   }
 //////////////// END of Letter love ///////

 }// writeArduinoOnMatrix()  end


 void loop() {
   writeArduinoOnMatrix();

}/*
* This video shows you how to use the MAX7219 module with an 8x8 LED matrix to display text or any characters on the LED.
* Watch YouTube video: https://youtu.be/AAiDwBKs9uE
*
* Written by Ahmad S. for Robojax.com
* on February 26, 2017 in Ajax, Ontario, Canada
* Permission granted to share this code, given that this
* note is kept with the code.
* Disclaimer: This code is "AS IS" and for educational purposes only.
*/
// We always have to include the library
// Based on a project posted on https://github.com/wayoda/LedControl
#include "LedControl.h"
/*
Now we need a LedControl object to work with.
// Customized for RoboJax.com on February 26, 2017 in Ajax, Ontario, Canada.
***** These pin numbers will probably not work with your hardware *****
pin 1 is connected to the DataIn
pin 4 is connected to the CLK
pin 53 is connected to CS
We have only a single MAX72XX.
*/
LedControl lc=LedControl(1,4,53,1);// this line determines if this code can work with Arduino Mega or Arduino UNO
/* we always wait a bit between updates of the display */
unsigned long delaytime=600;
void setup() {
/*
The MAX72XX is in power-saving mode on startup,
we have to do a wakeup call
*/
lc.shutdown(0,false);
/* Set the brightness to a medium value */
lc.setIntensity(0,8);
/* and clear the display */
lc.clearDisplay(0);
}
/*
This method will display the characters for the
word "Arduino" one after the other on the matrix.
(you need at least 5x7 LEDs to see the whole characters)
*/
void writeArduinoOnMatrix() {
/* here is the data for the characters */
// K
byte R[8]={B11111100,B10000100,B10000100,B11111000,B10100000,B10010000,B10001000,B10000100};
byte O[8]={B00011000,B00100100,B01000010,B01000010,B01000010,B01000010,B00100100,B00011000};
byte B[8]={B11111100,B10000100,B10000100,B11111000,B10001000,B10000100,B10000100,B11111100};
byte J[8]={B00011110,B00000100,B00000100,B00000100,B10000100,B10000100,B01000100,B00111000};
byte A[8]={B00111000,B01000100,B10000010,B11111110,B10000010,B10000010,B10000010,B10000010};
byte X[8]={ B10000001,B01000010,B00100100,B00011000,B00011000,B00100100,B01000010,B10000001};
byte love[8]={ B00000000,B01100110,B10011001,B10011001,B10000001,B01000010,B00100100,B00011000};
/* Letter R */
for (int i=0; i<8; i++){
lc.setRow(0,i,R[i]);
}
delay(delaytime);
for(int i=0; i<8; i++){
lc.setRow(0,i,0);// this is for blank
}
/////////////// END of Letter R ///////
/* Letter O */
for (int i=0; i<8; i++){
lc.setRow(0,i,O[i]);
}
delay(delaytime);
for(int i=0; i<8; i++){
lc.setRow(0,i,0);// this is for blank
}
/////////////// END of Letter O ///////
/* Letter B */
for (int i=0; i<8; i++){
lc.setRow(0,i,B[i]);
}
delay(delaytime);
for(int i=0; i<8; i++){
lc.setRow(0,i,0);// this is for blank
}
/////////////// END of Letter B ///////
/* Letter O */
for (int i=0; i<8; i++){
lc.setRow(0,i,O[i]);
}
delay(delaytime);
for(int i=0; i<8; i++){
lc.setRow(0,i,0);// this is for blank
}
/////////////// END of Letter O ///////
/* Letter J */
for (int i=0; i<8; i++){
lc.setRow(0,i,J[i]);
}
delay(delaytime);
for(int i=0; i<8; i++){
lc.setRow(0,i,0);// this is for blank
}
/////////////// END of Letter J ///////
/* Letter A */
for (int i=0; i<8; i++){
lc.setRow(0,i,A[i]);
}
delay(delaytime);
for(int i=0; i<8; i++){
lc.setRow(0,i,0);// this is for blank
}
/////////////// END of Letter A ///////
/* Letter X */
for (int i=0; i<8; i++){
lc.setRow(0,i,X[i]);
}
delay(delaytime);
for(int i=0; i<8; i++){
lc.setRow(0,i,0);// this is for blank
}
/////////////// END of Letter X ///////
/* love */
for (int i=0; i<8; i++){
lc.setRow(0,i,love[i]);
}
delay(delaytime);
delay(delaytime);
for(int i=0; i<8; i++){
lc.setRow(0,i,0);// this is for blank
}
/////////////// END of love ///////
}// writeArduinoOnMatrix() end
void loop() {
writeArduinoOnMatrix();
}Abin da zaka iya bukata
-
AmazonMax7219 8x8 Matrix on Amazonamzn.to
-
eBayMax7219 8x8 Matrix on eBayebay.us
-
AliExpressMax7219 8x8 Matrix on AliExpresss.click.aliexpress.com
Albarkatun da kuma shafukan da za a duba
-
TakarduView different board pin assignments for SPIarduino.cc
Fayiloli📁
Sauran fayiloli
-
MAX7219 Matrix Library daga Robojax
robojax-MAX7219-matrix.zip0.01 MB -
8-Digit LED Display Library (from Robojax.com)
robojax_MAX7291_8_digits.zip