8x8 LED matrica koristeći MAX7219 Arduino modul
U ovom tutorijalu, naučićemo kako da kontrolišemo 8x8 LED matricu koristeći MAX7219 modul sa Arduinom. MAX7219 pojednostavljuje kontrolu više LED dioda, omogućavajući nam da lako prikažemo karaktere i uzorke. Na kraju ovog projekta, bićete u mogućnosti da prikažete reč "ROBOJAX" na matrici.
Da bismo to postigli, koristićemo LedControl biblioteku, koja je posebno dizajnirana za interfacing sa MAX7219. Ova biblioteka nam omogućava da šaljemo podatke na LED matricu uz minimalan trud. Ako želite jasnije razumevanje o povezivanju i kodu, obavezno pogledajte prateći video (u videu na 0:30).
Objašnjena oprema
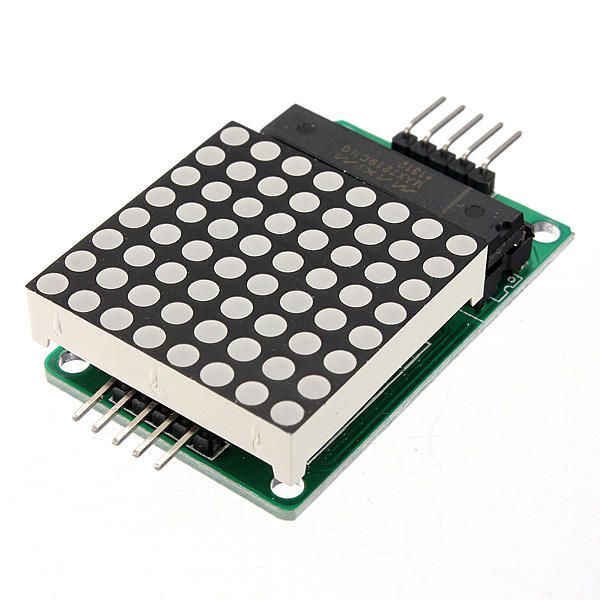
Glavni sastavni dijelovi ovog projekta uključuju MAX7219 modul i 8x8 LED matricu. MAX7219 je integrirani sklop koji upravlja prikazom LED dioda, obrađujući komunikacijske i kontrolne signale s Arduinom. Koristi serijsku sučelje, što znači da možemo kontrolirati mnogo LED dioda s samo nekoliko pinova s Arduinom.
8x8 LED matrica se sastoji od 64 pojedinačna LED-a raspoređena u mrežu. Svaki LED se može uključiti ili isključiti slanjem odgovarajućih komandi putem MAX7219. To omogućava prikaz raznih znakova i grafika na matrici.
Tehnički podaci
| Proizvođač | Maxim Integrated |
|---|---|
| Broj dijela | MAX7219 |
| Logika/IO napon | 3.3V do 5.5V |
| Napon napajanja | 4.0V do 5.5V |
| Izlazna struja (po kanalu) | 40 mA max |
| Vrhunska struja (po kanalu) | 100 mA max |
| Upute za PWM frekvenciju | 100 Hz |
| Ulazni logički pragovi | 2.0V (visoko) / 0.8V (nisko) |
| Napon pada / RDS(on)/ zasićenje | 0.2V tip. |
| Termalne granice | 150°C |
| Pakovanje | 16-DIP |
| Napomene / varijante | Zajednička anodna konfiguracija |
- Osigurajte odgovarajuće napajanje (4.0V do 5.5V).
- Koristite otpornike za ograničavanje struje za svaku LED diodu kako biste sprečili oštećenje.
- Držite žice kratke kako biste izbjegli smetnje.
- Pratite disipaciju toplote; koristite hladnjak ako je potrebno.
- Dvostruko provjerite pin veze kako biste izbjegli nesporazum.
Uputstva za povezivanje
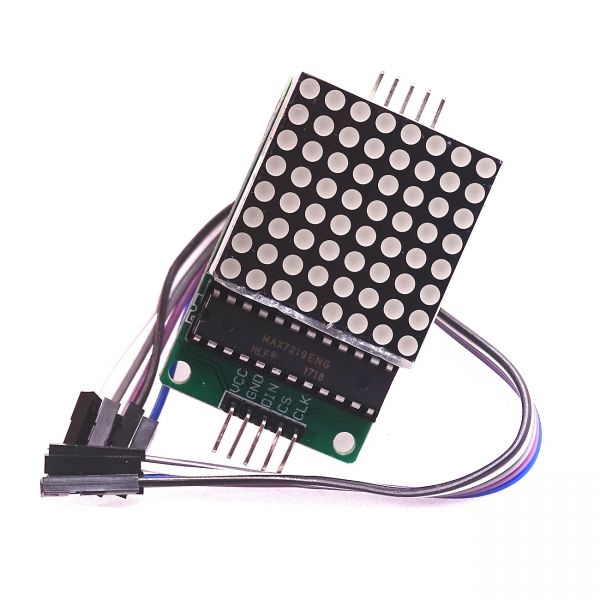
Da biste povezali MAX7219 sa Arduinom, povežite sljedeće pinove:
- Povežite
VCCpin MAX7219 na 5V Arduina. - Povežite
GNDpriključite na Arduinoovu masu. - Povežite
DINpin (Podaci ulaz) na Arduino pin 12. - Povežite
CLKpriključite (sat) na Arduino pin 11. - Povežite
CSpin (Chip Select) na Arduino pin 10.
Provjerite da su sve veze sigurne prije nego što uključite krug. Ožičenje je jednostavno, ali ako naiđete na probleme, pažljivo pregledajte veze (u videu na 1:45).
Primjeri koda i vodič
U kodu počinjemo uključivanjem LedControl biblioteke, koja je ključna za komunikaciju s MAX7219. Sljedeći izvadak inicijalizira LedControl objekt:
LedControl lc=LedControl(12,11,10,1);Ova linija postavlja podatkovni pin, satni pin, pin za odabir čipa i broj uređaja (1, u ovom slučaju). Zatim, usetup()funkcija, budimo MAX7219 i postavljamo intenzitet prikaza:
lc.shutdown(0,false);
lc.setIntensity(0,8);
lc.clearDisplay(0);
Ovo osigurava da je ekran aktivan i spreman za prikazivanje znakova. Glavna funkcija koja pokreće ekran jewriteArduinoOnMatrix(), koji redom osvjetljava redove matrice kako bi prikazao slova.
Demonstracija / Šta očekivati
Kada je sve povezano i kod je otpremljen, LED matrica treba da prikaže reč "ROBOJAX". Ako prikaz ne radi, proverite probleme kao što su labavi konektori ili pogrešna dodela pinova. Takođe, osigurajte da je napajanje adekvatno (u videu na 2:30).
Poglavlja
- Uvod (0:00)
- Pregled hardvera (0:30)
- Uputstva za povezivanje (1:45)
- Kodna šetnja (2:15)
- Demonstracija (3:00)
Images
/*
 * This video shows you how to use the MAX7219 module with an 8x8 LED matrix to display text or any characters on the LED.
 * Watch YouTube video: https://youtu.be/AAiDwBKs9uE
 *
 * Written by Ahmad Shamshiri for Robojax.com
 * on February 26, 2017 in Ajax, Ontario, Canada
 * Get this code and other Arduino codes from Robojax.com
 * Learn Arduino step by step in a structured course with all materials, wiring diagrams, and libraries
 * all in one place.

 ****************************
 * Get early access to my videos via Patreon and have your name mentioned at the end of every
 * video I publish on YouTube here: http://robojax.com/L/?id=63 (watch until the end of this video for a list of my Patrons)
 ****************************

 * Or make a donation using PayPal http://robojax.com/L/?id=64

 * This code is "AS IS" without warranty or liability. Free to be used as long as you keep this note intact.
 * This code has been downloaded from Robojax.com
    This program is free software: you can redistribute it and/or modify
    it under the terms of the GNU General Public License as published by
    the Free Software Foundation, either version 3 of the License, or
    (at your option) any later version.

    This program is distributed in the hope that it will be useful,
    but WITHOUT ANY WARRANTY; without even the implied warranty of
    MERCHANTABILITY or FITNESS FOR A PARTICULAR PURPOSE.  See the
    GNU General Public License for more details.

    You should have received a copy of the GNU General Public License
    along with this program.  If not, see <https://www.gnu.org/licenses/>.
*/


// We always have to include the library
// Based on a project posted https://github.com/wayoda/LedControl
#include "LedControl.h"

 /*
  Now we need a LedControl to work with.
  // Customized for RoboJax.com on February 26, 2017 in Ajax, Ontario, Canada.
  ***** These pin numbers will probably not work with your hardware *****
  pin 12 is connected to the DataIn
  pin 11 is connected to the CLK
  pin 10 is connected to CS
  We have only a single MAX72XX.
  */
 LedControl lc=LedControl(12,11,10,1);

 /* we always wait a bit between updates of the display */
 unsigned long delaytime=600;

 void setup() {
   /*
    The MAX72XX is in power-saving mode on startup,
    we have to do a wakeup call
    */
   lc.shutdown(0,false);
   /* Set the brightness to a medium value */
   lc.setIntensity(0,8);
   /* and clear the display */
   lc.clearDisplay(0);
 }

 /*
  This method will display the characters for the
  word "Arduino" one after the other on the matrix.
  (you need at least 5x7 LEDs to see the whole characters)
  */
 void writeArduinoOnMatrix() {
   /* here is the data for the characters */

   // K
   byte R[8]={B11111100,B10000100,B10000100,B11111000,B10100000,B10010000,B10001000,B10000100};
   byte O[8]={B00011000,B00100100,B01000010,B01000010,B01000010,B01000010,B00100100,B00011000};
   byte B[8]={B11111100,B10000100,B10000100,B11111000,B10001000,B10000100,B10000100,B11111100};
   byte J[8]={B00011110,B00000100,B00000100,B00000100,B10000100,B10000100,B01000100,B00111000};
   byte A[8]={B00111000,B01000100,B10000010,B11111110,B10000010,B10000010,B10000010,B10000010};
   byte X[8]={ B10000001,B01000010,B00100100,B00011000,B00011000,B00100100,B01000010,B10000001};
   byte love[8]={ B00000000,B01100110,B10011001,B10011001,B10000001,B01000010,B00100100,B00011000};


   /* Letter R */
   for (int i=0; i<8; i++){
   lc.setRow(0,i,R[i]);

   }

   delay(delaytime);
   for(int i=0; i<8; i++){
       lc.setRow(0,i,0);// this is for blank
   }
 //////////////// END of Letter R ///////

   /* Letter O */
   for (int i=0; i<8; i++){
   lc.setRow(0,i,O[i]);

   }

   delay(delaytime);
   for(int i=0; i<8; i++){
       lc.setRow(0,i,0);// this is for blank
   }
 //////////////// END of Letter O ///////


   /* Letter B */
   for (int i=0; i<8; i++){
   lc.setRow(0,i,B[i]);

   }

   delay(delaytime);
   for(int i=0; i<8; i++){
       lc.setRow(0,i,0);// this is for blank
   }
 //////////////// END of Letter B ///////

   /* Letter O */
   for (int i=0; i<8; i++){
   lc.setRow(0,i,O[i]);

   }

   delay(delaytime);
   for(int i=0; i<8; i++){
       lc.setRow(0,i,0);// this is for blank
   }
 //////////////// END of Letter O ///////

   /* Letter J */
   for (int i=0; i<8; i++){
   lc.setRow(0,i,J[i]);

   }

   delay(delaytime);
   for(int i=0; i<8; i++){
       lc.setRow(0,i,0);// this is for blank
   }
 //////////////// END of Letter J ///////

   /* Letter A */
   for (int i=0; i<8; i++){
   lc.setRow(0,i,A[i]);

   }

   delay(delaytime);
   for(int i=0; i<8; i++){
       lc.setRow(0,i,0);// this is for blank
   }
 //////////////// END of Letter A ///////

   /* Letter X */
   for (int i=0; i<8; i++){
   lc.setRow(0,i,X[i]);

   }

   delay(delaytime);
   for(int i=0; i<8; i++){
       lc.setRow(0,i,0);// this is for blank
   }
 //////////////// END of Letter X ///////


   /* love */
   for (int i=0; i<8; i++){
   lc.setRow(0,i,love[i]);

   }

   delay(delaytime);
   delay(delaytime);
   for(int i=0; i<8; i++){
       lc.setRow(0,i,0);// this is for blank
   }
 //////////////// END of Letter love ///////

 }// writeArduinoOnMatrix()  end


 void loop() {
   writeArduinoOnMatrix();

}/*
* This video shows you how to use the MAX7219 module with an 8x8 LED matrix to display text or any characters on the LED.
* Watch YouTube video: https://youtu.be/AAiDwBKs9uE
*
* Written by Ahmad S. for Robojax.com
* on February 26, 2017 in Ajax, Ontario, Canada
* Permission granted to share this code, given that this
* note is kept with the code.
* Disclaimer: This code is "AS IS" and for educational purposes only.
*/
// We always have to include the library
// Based on a project posted on https://github.com/wayoda/LedControl
#include "LedControl.h"
/*
Now we need a LedControl object to work with.
// Customized for RoboJax.com on February 26, 2017 in Ajax, Ontario, Canada.
***** These pin numbers will probably not work with your hardware *****
pin 1 is connected to the DataIn
pin 4 is connected to the CLK
pin 53 is connected to CS
We have only a single MAX72XX.
*/
LedControl lc=LedControl(1,4,53,1);// this line determines if this code can work with Arduino Mega or Arduino UNO
/* we always wait a bit between updates of the display */
unsigned long delaytime=600;
void setup() {
/*
The MAX72XX is in power-saving mode on startup,
we have to do a wakeup call
*/
lc.shutdown(0,false);
/* Set the brightness to a medium value */
lc.setIntensity(0,8);
/* and clear the display */
lc.clearDisplay(0);
}
/*
This method will display the characters for the
word "Arduino" one after the other on the matrix.
(you need at least 5x7 LEDs to see the whole characters)
*/
void writeArduinoOnMatrix() {
/* here is the data for the characters */
// K
byte R[8]={B11111100,B10000100,B10000100,B11111000,B10100000,B10010000,B10001000,B10000100};
byte O[8]={B00011000,B00100100,B01000010,B01000010,B01000010,B01000010,B00100100,B00011000};
byte B[8]={B11111100,B10000100,B10000100,B11111000,B10001000,B10000100,B10000100,B11111100};
byte J[8]={B00011110,B00000100,B00000100,B00000100,B10000100,B10000100,B01000100,B00111000};
byte A[8]={B00111000,B01000100,B10000010,B11111110,B10000010,B10000010,B10000010,B10000010};
byte X[8]={ B10000001,B01000010,B00100100,B00011000,B00011000,B00100100,B01000010,B10000001};
byte love[8]={ B00000000,B01100110,B10011001,B10011001,B10000001,B01000010,B00100100,B00011000};
/* Letter R */
for (int i=0; i<8; i++){
lc.setRow(0,i,R[i]);
}
delay(delaytime);
for(int i=0; i<8; i++){
lc.setRow(0,i,0);// this is for blank
}
/////////////// END of Letter R ///////
/* Letter O */
for (int i=0; i<8; i++){
lc.setRow(0,i,O[i]);
}
delay(delaytime);
for(int i=0; i<8; i++){
lc.setRow(0,i,0);// this is for blank
}
/////////////// END of Letter O ///////
/* Letter B */
for (int i=0; i<8; i++){
lc.setRow(0,i,B[i]);
}
delay(delaytime);
for(int i=0; i<8; i++){
lc.setRow(0,i,0);// this is for blank
}
/////////////// END of Letter B ///////
/* Letter O */
for (int i=0; i<8; i++){
lc.setRow(0,i,O[i]);
}
delay(delaytime);
for(int i=0; i<8; i++){
lc.setRow(0,i,0);// this is for blank
}
/////////////// END of Letter O ///////
/* Letter J */
for (int i=0; i<8; i++){
lc.setRow(0,i,J[i]);
}
delay(delaytime);
for(int i=0; i<8; i++){
lc.setRow(0,i,0);// this is for blank
}
/////////////// END of Letter J ///////
/* Letter A */
for (int i=0; i<8; i++){
lc.setRow(0,i,A[i]);
}
delay(delaytime);
for(int i=0; i<8; i++){
lc.setRow(0,i,0);// this is for blank
}
/////////////// END of Letter A ///////
/* Letter X */
for (int i=0; i<8; i++){
lc.setRow(0,i,X[i]);
}
delay(delaytime);
for(int i=0; i<8; i++){
lc.setRow(0,i,0);// this is for blank
}
/////////////// END of Letter X ///////
/* love */
for (int i=0; i<8; i++){
lc.setRow(0,i,love[i]);
}
delay(delaytime);
delay(delaytime);
for(int i=0; i<8; i++){
lc.setRow(0,i,0);// this is for blank
}
/////////////// END of love ///////
}// writeArduinoOnMatrix() end
void loop() {
writeArduinoOnMatrix();
}Things you might need
-
AmazonMax7219 8x8 Matrix on Amazonamzn.to
-
eBayMax7219 8x8 Matrix on eBayebay.us
-
AliExpressMax7219 8x8 Matrix on AliExpresss.click.aliexpress.com
Resources & references
-
DocumentationView different board pin assignments for SPIarduino.cc
-
External
Files📁
Other files
-
MAX7219 Matrix Library from Robojax
robojax-MAX7219-matrix.zip0.01 MB -
8-Digit LED Display Library (from Robojax.com)
robojax_MAX7291_8_digits.zip