MAX7219 আরডুইনো মডিউল ব্যবহার করে 8x8 LED ম্যাট্রিক্স
এই টিউটোরিয়ালে, আমরা একটি MAX7219 মডিউল ব্যবহার করে Arduino এর সাহায্যে একটি 8x8 LED ম্যাট্রিক্স নিয়ন্ত্রণ করা শিখব। MAX7219 একাধিক LED নিয়ন্ত্রণকে সহজ করে, যা আমাদের অক্ষর এবং প্যাটার্ন সহজে প্রদর্শন করতে দেয়। এই প্রকল্পের শেষে, আপনি ম্যাট্রিক্সে "ROBOJAX" শব্দটি প্রদর্শন করতে সক্ষম হবেন।
এটি অর্জন করতে, আমরা LedControl লাইব্রেরি ব্যবহার করব, যা বিশেষভাবে MAX7219 এর সাথে ইন্টারফেস করার জন্য ডিজাইন করা হয়েছে। এই লাইব্রেরিটি আমাদেরকে LED ম্যাট্রিক্সে ডেটা পাঠাতে সর্বনিম্ন প্রচেষ্টায় সহায়তা করে। যদি আপনি তারের সংযোগ এবং কোড সম্পর্কে আরও পরিষ্কার ধারণা পেতে চান, তাহলে সংশ্লিষ্ট ভিডিওটি দেখুন (ভিডিওতে 0:30)।
হার্ডওয়্যার ব্যাখ্যা করা
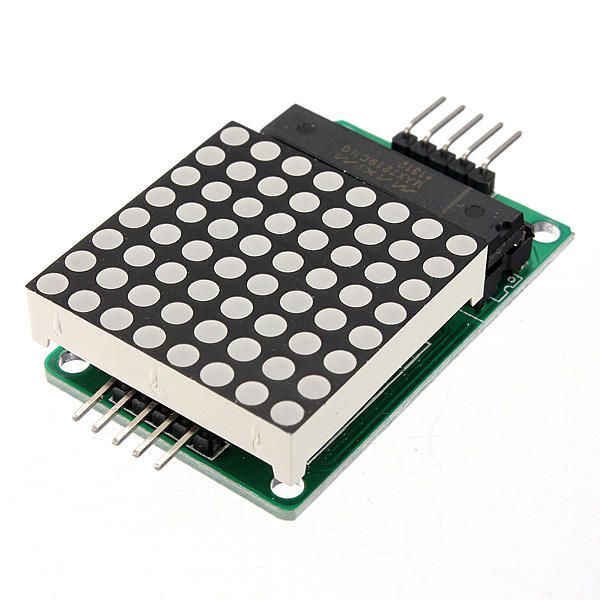
এই প্রকল্পের প্রধান উপাদানগুলির মধ্যে MAX7219 মডিউল এবং 8x8 LED ম্যাট্রিক্স অন্তর্ভুক্ত রয়েছে। MAX7219 একটি একীভূত সার্কিট যা LEDs এর প্রদর্শন পরিচালনা করে, Arduino থেকে যোগাযোগ এবং নিয়ন্ত্রণ সংকেতগুলি পরিচালনা করে। এটি একটি সিরিয়াল ইন্টারফেস ব্যবহার করে, যার মানে আমরা Arduino থেকে মাত্র কয়েকটি পিন ব্যবহার করে অনেক LEDs নিয়ন্ত্রণ করতে পারি।
8x8 এলইডি ম্যাট্রিক্স 64টি পৃথক এলইডি নিয়ে গঠিত যা একটি গ্রিডে সাজানো হয়েছে। প্রতিটি এলইডি MAX7219 এর মাধ্যমে উপযুক্ত কমান্ড পাঠিয়ে চালু বা বন্ধ করা যেতে পারে। এটি ম্যাট্রিক্সে বিভিন্ন অক্ষর এবং গ্রাফিক্স প্রদর্শনের অনুমতি দেয়।
ডেটাশিটের বিস্তারিত
| উৎপাদক | ম্যাক্সিম ইন্টিগ্রেটেড |
|---|---|
| পার্ট নম্বর | MAX7219 |
| লজিক/আইও ভোল্টেজ | ৩.৩V থেকে ৫.৫V |
| সরবরাহ ভোল্টেজ | ৪.০V থেকে ৫.৫V |
| আউটপুট কারেন্ট (প্রতি চ্যানেল) | ৪০ মি.এ. সর্বাধিক |
| পিক কারেন্ট (প্রতি চ্যানেল) | ১০০ মি.এ. সর্বাধিক |
| পিডব্লিউএম ফ্রিকোয়েন্সি নির্দেশিকা | ১০০ হার্জ |
| ইনপুট লজিক থ্রেশহোল্ডস | ২.০ভি (উচ্চ) / ০.৮ভি (নিম্ন) |
| ভোল্টেজ ড্রপ / আরডিএস(অন)/ স্যাচুরেশন | ০.২ভি সাধারণত। |
| তাপীয় সীমা | ১৫০°C |
| প্যাকেজ | ১৬-ডিআইপি |
| নোট / ভ্যারিয়েন্টস | সাধারণ অ্যানোড কনফিগারেশন |
- সঠিক পাওয়ার সরবরাহ নিশ্চিত করুন (৪.০V থেকে ৫.৫V)।
- প্রতিটি LED এর জন্য বর্তমান সীমাবদ্ধকারী প্রতিরোধক ব্যবহার করুন যাতে ক্ষতি প্রতিরোধ করা যায়।
- সংযোগের তারগুলি সংক্ষিপ্ত রাখুন যাতে হস্তক্ষেপ এড়ানো যায়।
- তাপ বিচ্ছুরণ পর্যবেক্ষণ করুন; প্রয়োজন হলে একটি হিটসিঙ্ক ব্যবহার করুন।
- পিন সংযোগগুলি দ্বিগুণ পরীক্ষা করুন যাতে ভুল যোগাযোগ এড়ানো যায়।
তারযুক্ত নির্দেশাবলী
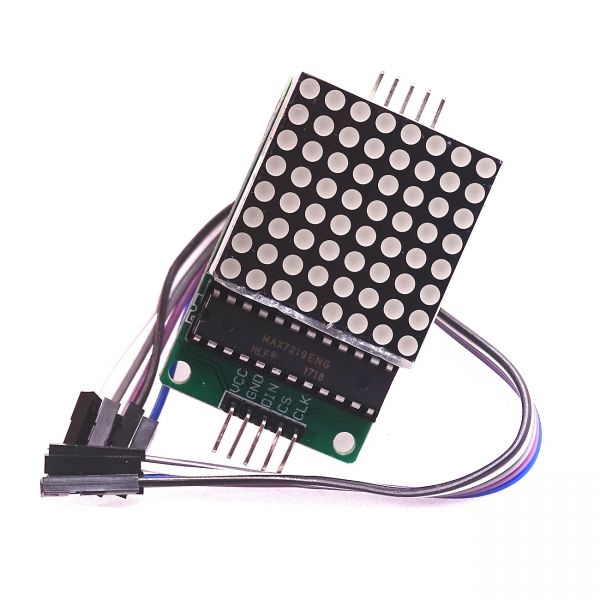
MAX7219 কে Arduino এর সাথে সংযুক্ত করতে, নিম্নলিখিত পিনগুলো সংযুক্ত করুন:
- সংযোগ করুন
VCCMAX7219 এর পিনটি আরডুইনোর 5V-তে। - সংযোগ করুন
GNDআর্ডুইনোর গ্রাউন্ডে পিনটি সংযুক্ত করুন। - সংযোগ করুন
DINডেটা ইন পিনটি আরডুইনো পিন ১২-এ সংযুক্ত করুন। - সংযোগ করুন
CLKপিন (ঘড়ি) আরডুইনো পিন ১১-এ। - সংযোগ করুন
CSপিন (চিপ সিলেক্ট) আরডুইনো পিন ১০-এ।
সার্কিট চালু করার আগে সমস্ত সংযোগ সুরক্ষিত কিনা তা নিশ্চিত করতে ভুলবেন না। তারগুলি সরল, তবে যদি আপনি সমস্যার সম্মুখীন হন, তবে সংযোগগুলি মনোযোগ সহকারে পর্যালোচনা করুন (ভিডিওতে 1:45)।
কোড উদাহরণ ও পদক্ষেপ নির্দেশিকা
কোডে, আমরা LedControl লাইব্রেরি অন্তর্ভুক্ত করার মাধ্যমে শুরু করি, যা MAX7219 এর সাথে যোগাযোগ করার জন্য অপরিহার্য। নিম্নলিখিত অংশটি LedControl অবজেক্টটি প্রাথমিককরণ করে:
LedControl lc=LedControl(12,11,10,1);এই লাইনটি ডেটা পিন, ক্লক পিন, চিপ সিলেক্ট পিন এবং ডিভাইসের সংখ্যা (এই ক্ষেত্রে ১) সেট করে। পরবর্তীতে, setup()ফাংশন, আমরা MAX7219 কে জাগিয়ে তুলি এবং ডিসপ্লে তীব্রতা সেট করি:
lc.shutdown(0,false);
lc.setIntensity(0,8);
lc.clearDisplay(0);
এটি নিশ্চিত করে যে ডিসপ্লেটি সক্রিয় এবং অক্ষর প্রদর্শনের জন্য প্রস্তুত। ডিসপ্লেটি চালিত করার প্রধান ফাংশন হলwriteArduinoOnMatrix()যা ক্রমাগত ম্যাট্রিক্সের সারিগুলি আলোকিত করে অক্ষর প্রদর্শন করে।
প্রদর্শনী / কী আশা করবেন
একবার সবকিছু সংযুক্ত হলে এবং কোড আপলোড হলে, LED ম্যাট্রিক্সে "ROBOJAX" শব্দটি প্রদর্শিত হওয়া উচিত। যদি ডিসপ্লেটি কাজ না করে, তবে ঢিলা সংযোগ বা ভুল পিন নিয়োগের মতো সমস্যাগুলি পরীক্ষা করুন। এছাড়াও, নিশ্চিত করুন যে পাওয়ার সাপ্লাই যথেষ্ট (ভিডিওতে ২:৩০)।
অধ্যায়সমূহ
- ভূমিকা (0:00)
- হার্ডওয়্যার ওভারভিউ (0:30)
- ওয়্যারিং নির্দেশাবলী (1:45)
- কোড ওয়াকথ্রু (২:১৫)
- ডেমোনস্ট্রেশন (৩:০০)
ছবি
/*
 * This video shows you how to use the MAX7219 module with an 8x8 LED matrix to display text or any characters on the LED.
 * Watch YouTube video: https://youtu.be/AAiDwBKs9uE
 *
 * Written by Ahmad Shamshiri for Robojax.com
 * on February 26, 2017 in Ajax, Ontario, Canada
 * Get this code and other Arduino codes from Robojax.com
 * Learn Arduino step by step in a structured course with all materials, wiring diagrams, and libraries
 * all in one place.

 ****************************
 * Get early access to my videos via Patreon and have your name mentioned at the end of every
 * video I publish on YouTube here: http://robojax.com/L/?id=63 (watch until the end of this video for a list of my Patrons)
 ****************************

 * Or make a donation using PayPal http://robojax.com/L/?id=64

 * This code is "AS IS" without warranty or liability. Free to be used as long as you keep this note intact.
 * This code has been downloaded from Robojax.com
    This program is free software: you can redistribute it and/or modify
    it under the terms of the GNU General Public License as published by
    the Free Software Foundation, either version 3 of the License, or
    (at your option) any later version.

    This program is distributed in the hope that it will be useful,
    but WITHOUT ANY WARRANTY; without even the implied warranty of
    MERCHANTABILITY or FITNESS FOR A PARTICULAR PURPOSE.  See the
    GNU General Public License for more details.

    You should have received a copy of the GNU General Public License
    along with this program.  If not, see <https://www.gnu.org/licenses/>.
*/


// We always have to include the library
// Based on a project posted https://github.com/wayoda/LedControl
#include "LedControl.h"

 /*
  Now we need a LedControl to work with.
  // Customized for RoboJax.com on February 26, 2017 in Ajax, Ontario, Canada.
  ***** These pin numbers will probably not work with your hardware *****
  pin 12 is connected to the DataIn
  pin 11 is connected to the CLK
  pin 10 is connected to CS
  We have only a single MAX72XX.
  */
 LedControl lc=LedControl(12,11,10,1);

 /* we always wait a bit between updates of the display */
 unsigned long delaytime=600;

 void setup() {
   /*
    The MAX72XX is in power-saving mode on startup,
    we have to do a wakeup call
    */
   lc.shutdown(0,false);
   /* Set the brightness to a medium value */
   lc.setIntensity(0,8);
   /* and clear the display */
   lc.clearDisplay(0);
 }

 /*
  This method will display the characters for the
  word "Arduino" one after the other on the matrix.
  (you need at least 5x7 LEDs to see the whole characters)
  */
 void writeArduinoOnMatrix() {
   /* here is the data for the characters */

   // K
   byte R[8]={B11111100,B10000100,B10000100,B11111000,B10100000,B10010000,B10001000,B10000100};
   byte O[8]={B00011000,B00100100,B01000010,B01000010,B01000010,B01000010,B00100100,B00011000};
   byte B[8]={B11111100,B10000100,B10000100,B11111000,B10001000,B10000100,B10000100,B11111100};
   byte J[8]={B00011110,B00000100,B00000100,B00000100,B10000100,B10000100,B01000100,B00111000};
   byte A[8]={B00111000,B01000100,B10000010,B11111110,B10000010,B10000010,B10000010,B10000010};
   byte X[8]={ B10000001,B01000010,B00100100,B00011000,B00011000,B00100100,B01000010,B10000001};
   byte love[8]={ B00000000,B01100110,B10011001,B10011001,B10000001,B01000010,B00100100,B00011000};


   /* Letter R */
   for (int i=0; i<8; i++){
   lc.setRow(0,i,R[i]);

   }

   delay(delaytime);
   for(int i=0; i<8; i++){
       lc.setRow(0,i,0);// this is for blank
   }
 //////////////// END of Letter R ///////

   /* Letter O */
   for (int i=0; i<8; i++){
   lc.setRow(0,i,O[i]);

   }

   delay(delaytime);
   for(int i=0; i<8; i++){
       lc.setRow(0,i,0);// this is for blank
   }
 //////////////// END of Letter O ///////


   /* Letter B */
   for (int i=0; i<8; i++){
   lc.setRow(0,i,B[i]);

   }

   delay(delaytime);
   for(int i=0; i<8; i++){
       lc.setRow(0,i,0);// this is for blank
   }
 //////////////// END of Letter B ///////

   /* Letter O */
   for (int i=0; i<8; i++){
   lc.setRow(0,i,O[i]);

   }

   delay(delaytime);
   for(int i=0; i<8; i++){
       lc.setRow(0,i,0);// this is for blank
   }
 //////////////// END of Letter O ///////

   /* Letter J */
   for (int i=0; i<8; i++){
   lc.setRow(0,i,J[i]);

   }

   delay(delaytime);
   for(int i=0; i<8; i++){
       lc.setRow(0,i,0);// this is for blank
   }
 //////////////// END of Letter J ///////

   /* Letter A */
   for (int i=0; i<8; i++){
   lc.setRow(0,i,A[i]);

   }

   delay(delaytime);
   for(int i=0; i<8; i++){
       lc.setRow(0,i,0);// this is for blank
   }
 //////////////// END of Letter A ///////

   /* Letter X */
   for (int i=0; i<8; i++){
   lc.setRow(0,i,X[i]);

   }

   delay(delaytime);
   for(int i=0; i<8; i++){
       lc.setRow(0,i,0);// this is for blank
   }
 //////////////// END of Letter X ///////


   /* love */
   for (int i=0; i<8; i++){
   lc.setRow(0,i,love[i]);

   }

   delay(delaytime);
   delay(delaytime);
   for(int i=0; i<8; i++){
       lc.setRow(0,i,0);// this is for blank
   }
 //////////////// END of Letter love ///////

 }// writeArduinoOnMatrix()  end


 void loop() {
   writeArduinoOnMatrix();

}/*
* This video shows you how to use the MAX7219 module with an 8x8 LED matrix to display text or any characters on the LED.
* Watch YouTube video: https://youtu.be/AAiDwBKs9uE
*
* Written by Ahmad S. for Robojax.com
* on February 26, 2017 in Ajax, Ontario, Canada
* Permission granted to share this code, given that this
* note is kept with the code.
* Disclaimer: This code is "AS IS" and for educational purposes only.
*/
// We always have to include the library
// Based on a project posted on https://github.com/wayoda/LedControl
#include "LedControl.h"
/*
Now we need a LedControl object to work with.
// Customized for RoboJax.com on February 26, 2017 in Ajax, Ontario, Canada.
***** These pin numbers will probably not work with your hardware *****
pin 1 is connected to the DataIn
pin 4 is connected to the CLK
pin 53 is connected to CS
We have only a single MAX72XX.
*/
LedControl lc=LedControl(1,4,53,1);// this line determines if this code can work with Arduino Mega or Arduino UNO
/* we always wait a bit between updates of the display */
unsigned long delaytime=600;
void setup() {
/*
The MAX72XX is in power-saving mode on startup,
we have to do a wakeup call
*/
lc.shutdown(0,false);
/* Set the brightness to a medium value */
lc.setIntensity(0,8);
/* and clear the display */
lc.clearDisplay(0);
}
/*
This method will display the characters for the
word "Arduino" one after the other on the matrix.
(you need at least 5x7 LEDs to see the whole characters)
*/
void writeArduinoOnMatrix() {
/* here is the data for the characters */
// K
byte R[8]={B11111100,B10000100,B10000100,B11111000,B10100000,B10010000,B10001000,B10000100};
byte O[8]={B00011000,B00100100,B01000010,B01000010,B01000010,B01000010,B00100100,B00011000};
byte B[8]={B11111100,B10000100,B10000100,B11111000,B10001000,B10000100,B10000100,B11111100};
byte J[8]={B00011110,B00000100,B00000100,B00000100,B10000100,B10000100,B01000100,B00111000};
byte A[8]={B00111000,B01000100,B10000010,B11111110,B10000010,B10000010,B10000010,B10000010};
byte X[8]={ B10000001,B01000010,B00100100,B00011000,B00011000,B00100100,B01000010,B10000001};
byte love[8]={ B00000000,B01100110,B10011001,B10011001,B10000001,B01000010,B00100100,B00011000};
/* Letter R */
for (int i=0; i<8; i++){
lc.setRow(0,i,R[i]);
}
delay(delaytime);
for(int i=0; i<8; i++){
lc.setRow(0,i,0);// this is for blank
}
/////////////// END of Letter R ///////
/* Letter O */
for (int i=0; i<8; i++){
lc.setRow(0,i,O[i]);
}
delay(delaytime);
for(int i=0; i<8; i++){
lc.setRow(0,i,0);// this is for blank
}
/////////////// END of Letter O ///////
/* Letter B */
for (int i=0; i<8; i++){
lc.setRow(0,i,B[i]);
}
delay(delaytime);
for(int i=0; i<8; i++){
lc.setRow(0,i,0);// this is for blank
}
/////////////// END of Letter B ///////
/* Letter O */
for (int i=0; i<8; i++){
lc.setRow(0,i,O[i]);
}
delay(delaytime);
for(int i=0; i<8; i++){
lc.setRow(0,i,0);// this is for blank
}
/////////////// END of Letter O ///////
/* Letter J */
for (int i=0; i<8; i++){
lc.setRow(0,i,J[i]);
}
delay(delaytime);
for(int i=0; i<8; i++){
lc.setRow(0,i,0);// this is for blank
}
/////////////// END of Letter J ///////
/* Letter A */
for (int i=0; i<8; i++){
lc.setRow(0,i,A[i]);
}
delay(delaytime);
for(int i=0; i<8; i++){
lc.setRow(0,i,0);// this is for blank
}
/////////////// END of Letter A ///////
/* Letter X */
for (int i=0; i<8; i++){
lc.setRow(0,i,X[i]);
}
delay(delaytime);
for(int i=0; i<8; i++){
lc.setRow(0,i,0);// this is for blank
}
/////////////// END of Letter X ///////
/* love */
for (int i=0; i<8; i++){
lc.setRow(0,i,love[i]);
}
delay(delaytime);
delay(delaytime);
for(int i=0; i<8; i++){
lc.setRow(0,i,0);// this is for blank
}
/////////////// END of love ///////
}// writeArduinoOnMatrix() end
void loop() {
writeArduinoOnMatrix();
}আপনাকে যা প্রয়োজন হতে পারে
-
অ্যামাজনMax7219 8x8 Matrix on Amazonamzn.to
-
ইবেMax7219 8x8 Matrix on eBayebay.us
-
অলি এক্সপ্রেসMax7219 8x8 Matrix on AliExpresss.click.aliexpress.com
সম্পদ ও রেফারেন্সসমূহ
-
ডকুমেন্টেশনView different board pin assignments for SPIarduino.cc
-
অভ্যন্তরীণ
ফাইলসমূহ📁
অন্যান্য ফাইলগুলি
-
রোবোজ্যাক্সের MAX7219 ম্যাট্রিক্স লাইব্রেরি
robojax-MAX7219-matrix.zip0.01 MB -
8-Digit LED Display Library (from Robojax.com)
robojax_MAX7291_8_digits.zip