搜索代码

Arduino Code and Video for SSD1306 OLED 128 x 64 Display

Arduino Code and Video for SSD1306 OLED 128 x 64 Display

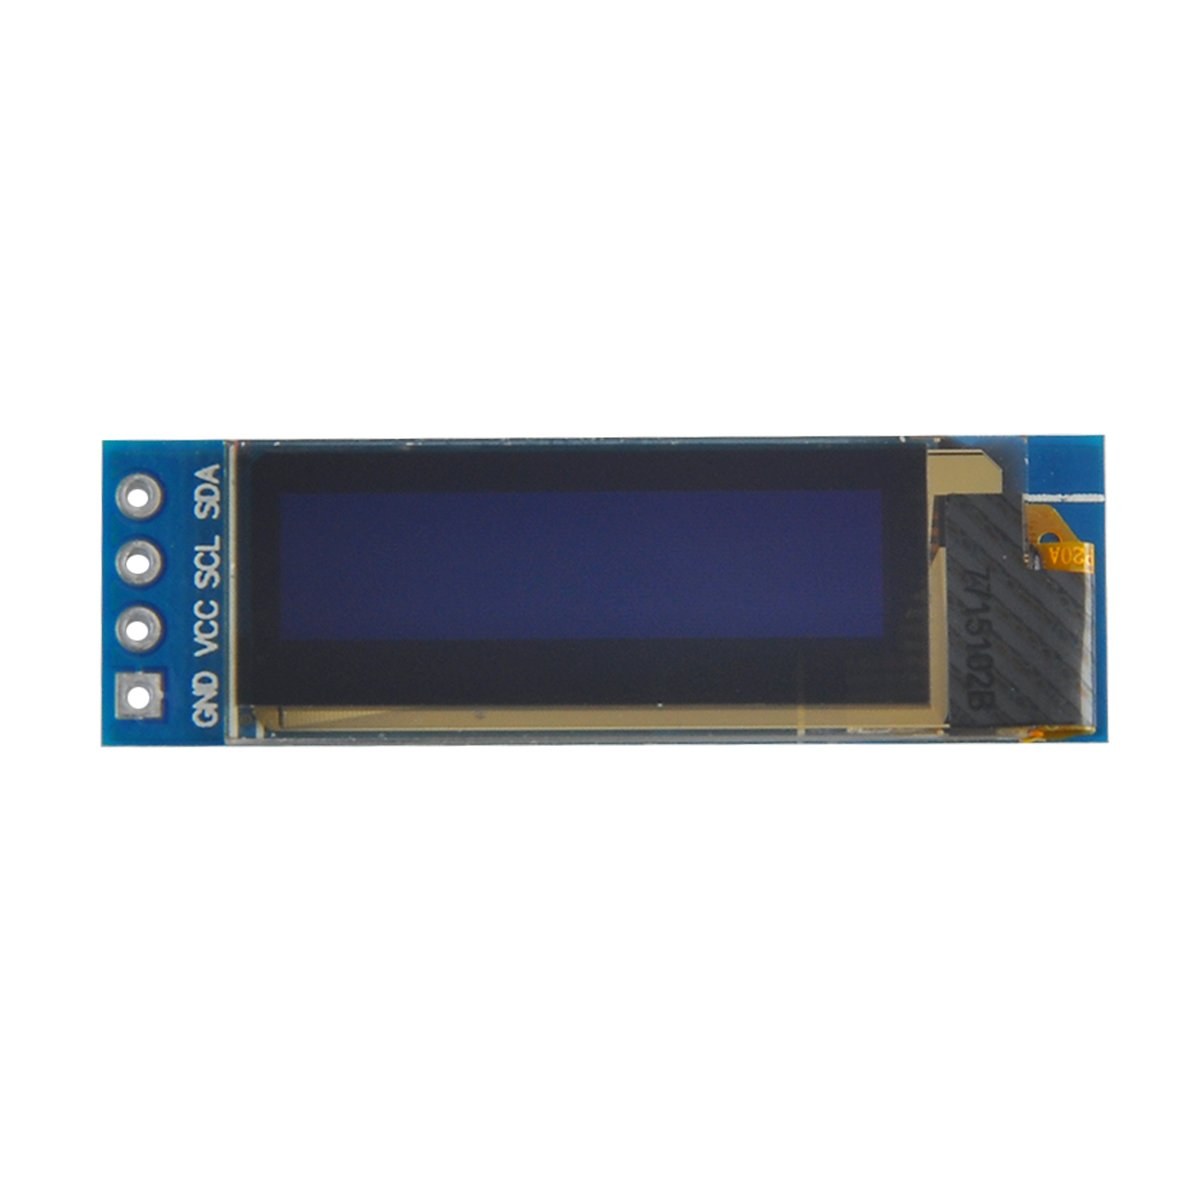
In this tutorial, we will explore how to use the SSD1306 OLED 128 x 64 display with an Arduino. The SSD1306 is a versatile display that allows you to show text, graphics, and various shapes easily. By the end of this article, you will be able to set up the display and run code that demonstrates its capabilities.

SSD1306 OLED displaying text

We will guide you through the necessary hardware connections and provide code snippets to help you understand the key identifiers used in the program. For a more visual explanation, be sure to watch the associated video (in video at 00:00).

Hardware Explained

The main components of this project include the Arduino board and the SSD1306 OLED display module. The SSD1306 display utilizes the I2C communication protocol, which simplifies wiring by requiring just two data lines: SDA for data and SCL for the clock signal. The display operates at voltages between 3.3V and 5V, making it compatible with most Arduino boards.

In addition to the display, you will need jumper wires to connect the module to your Arduino. The connections include VCC to power, GND for ground, SDA to the Arduino's data pin, and SCL to the clock pin. This setup allows for easy communication between the Arduino and the OLED display.

Datasheet Details

ManufacturerAdafruit
Part numberSSD1306
Logic/IO voltage3.3 V - 5 V
Supply voltage3.3 V - 5 V
Display resolution128 x 64 pixels
I2C address0x3C
InterfaceI2C
PackageModule

  • Ensure proper wiring: VCC to 3.3V or 5V, GND to ground, SDA to A4, SCL to A5 (for Arduino Uno).
  • The display requires pull-up resistors on the SDA and SCL lines if not already included.
  • Verify the I2C address is set correctly in the code, typically 0x3C for this display.
  • Use a suitable library such as Adafruit_SSD1306 for easy integration.
  • Clear the display before drawing new graphics to avoid overlapping artifacts.

Wiring Instructions

Arduino wiring for SSD1306 OLED

To wire the SSD1306 OLED display to your Arduino, follow these steps:

Connect the VCC pin of the OLED display to the 5V (or 3.3V) pin on the Arduino. Next, connect the GND pin of the display to the ground pin on the Arduino. For the I2C communication, connect the SDA pin of the display to the A4 pin on the Arduino and the SCL pin to the A5 pin. This setup will enable the Arduino to communicate with the OLED display using the I2C protocol.

Make sure that all connections are secure, and double-check that you are using the correct voltage for your specific display model. If you are using a different Arduino model, the SDA and SCL pins may vary (e.g., for Arduino Mega, SDA is on pin 20 and SCL is on pin 21).

Code Examples & Walkthrough

In the code, we initialize the display and set up the parameters like I2C address and dimensions. One key identifier is display, which represents the instance of the SSD1306 display. Here’s a snippet from the setup function:

void setup() {                
  Serial.begin(9600);
  display.begin(SSD1306_SWITCHCAPVCC, 0x3C);  // initialize with the I2C addr 0x3C
}

In this snippet, the display.begin function initializes the display with the specified I2C address. It is essential to match the address with your display to ensure proper communication.

Next, in the loop function, we use the display.clearDisplay() method to clear the screen before drawing new content. We can set the text size and position using the setTextSize and setCursor methods:

void loop() {
  display.clearDisplay();
  display.setTextSize(2);
  display.setCursor(2,1); // set cursor at top left corner
  display.println("Robojax"); // display text
}

Here, the text "Robojax" is displayed at the coordinates (2,1) on the screen. This allows for precise placement of text on the OLED display.

Finally, to render the changes on the display, we call display.display(). This function sends all the buffered commands to the display to update its content:

display.display();

This should be the last line in your loop function to ensure that all drawing commands are executed. If you forget this step, nothing will appear on the display.

Remember, the full code loads below the article for your reference.

Demonstration / What to Expect

After uploading the code to your Arduino, you should see the text "Robojax" displayed on the OLED screen. The code also demonstrates scrolling text and drawing lines, shapes, and other graphics on the display. Watch for any common pitfalls, such as incorrect wiring or mismatched I2C addresses, which can prevent the display from functioning correctly (in video at 10:00).

Video Timestamps

  • 00:00 - Introduction to SSD1306 OLED Display
  • 02:30 - Wiring the Display
  • 05:00 - Code Walkthrough
  • 08:00 - Demonstration of Display Features
  • 10:00 - Common Issues and Troubleshooting

图像

SSD1306 OLED screen 128x32 module
SSD1306 OLED displaying text
Arduino wiring for SSD1306 OLED
38-This is the Arduino code for the PCA9685 16-channel 12-bit servo controller.
语言: C++
/*
 * Original source: https://github.com/adafruit/Adafruit_SSD1306
 * This is the Arduino code for the SSD1306 OLED 128 x 64 Display.
 * Watch the video for details and demo: http://youtu.be/UmYiHTOz-5k
 * This code has been modified to print specific elements such as text, lines, circles, rectangles, etc.
 * I have added a custom method to make printing text easy.
 
 If you get the error: Adafruit_GFX.h not found, download the Adafruit-GFX Library from:
 https://github.com/adafruit/Adafruit-GFX-Library

 Purchase this OLED module from Amazon: https://amzn.to/36zFvTb

 *  * 
 * Written by Ahmad Shamshiri for Robojax Video channel, www.Robojax.com
 * Date: December 17, 2017, in Ajax, Ontario, Canada
 * Permission granted to share this code, provided that this
 * note is kept with the code.
 * Disclaimer: This code is "AS IS" and for educational purposes only.
 * This code has been downloaded from https://robojax.com
 * 
 */

/*********************************************************************
This is an example for our monochrome OLEDs based on SSD1306 drivers.

  Pick one up today in the Adafruit shop!
  ------> http://www.adafruit.com/category/63_98

This example is for a 128x64 size display using I2C to communicate.
3 pins are required to interface (2 I2C and one reset).

Adafruit invests time and resources providing this open source code, 
please support Adafruit and open-source hardware by purchasing 
products from Adafruit!

Written by Limor Fried/Ladyada for Adafruit Industries.  
BSD license, check license.txt for more information.
All text above, and the splash screen must be included in any redistribution.
*********************************************************************/

#include <SPI.h>
#include <Wire.h>
#include <Adafruit_GFX.h>
#include <Adafruit_SSD1306.h>

#define OLED_RESET 4
Adafruit_SSD1306 display(OLED_RESET);

#define NUMFLAKES 10
#define XPOS 0
#define YPOS 1
#define DELTAY 2


#define LOGO16_GLCD_HEIGHT 16 // do not change this. Error in video
#define LOGO16_GLCD_WIDTH  16 // do not change this. Error in video
static const unsigned char PROGMEM logo16_glcd_bmp[] =
{ B00000000, B11000000,
  B00000001, B11000000,
  B00000001, B11000000,
  B00000011, B11100000,
  B11110011, B11100000,
  B11111110, B11111000,
  B01111110, B11111111,
  B00110011, B10011111,
  B00011111, B11111100,
  B00001101, B01110000,
  B00011011, B10100000,
  B00111111, B11100000,
  B00111111, B11110000,
  B01111100, B11110000,
  B01110000, B01110000,
  B00000000, B00110000 };

    // look at line 27 to 30 of Adafruit_SSD1306.h inside the library to select the dimensions
#if (SSD1306_LCDHEIGHT != 64)
#error("Height incorrect, please fix Adafruit_SSD1306.h!");
#endif

void setup()   {                
  Serial.begin(9600);

  // by default, we'll generate the high voltage from the 3.3v line internally! (neat!)
  display.begin(SSD1306_SWITCHCAPVCC, 0x3C);  // initialize with the I2C addr 0x3D (for the 128x64)
  // init done
  
}


void loop() {
 display.clearDisplay();
  robojaxText("Values", 3, 0, 2, false);
  robojaxText("V: 41v", 3, 22, 2, false);
  robojaxText("Temperature: 32C", 4, 45, 1, true);
  display.drawLine(1, 37, 100, 37, WHITE);
  display.drawRect(1, 20, 100,40, WHITE);
  //display.drawCircle(63,31, 31, WHITE);
   //display.startscrollright(0x00, 0x0F);
  display.display();
   delay(20000);
}

/*
 * robojaxText(String text, int x, int y, int size, boolean d)
 * text is the text string to be printed.
 * x is the integer x position of the text.
 * y is the integer y position of the text.
 * size is the text size (1, 2, 3, etc.).
 * d is a boolean value (true or false).  Its purpose is unclear, use true.
 */
void robojaxText(String text, int x, int y,int size, boolean d) {

  display.setTextSize(size);
  display.setTextColor(WHITE);
  display.setCursor(x,y);
  display.println(text);
  if(d){
    display.display();
  }
  
  delay(100);
}
39-This is Arduino code for an SSD1306 OLED 128 x 64 display without custom methods.
语言: C++
/*
 * Original source: https://github.com/adafruit/Adafruit_SSD1306
 * This is the Arduino code for the SSD1306 OLED 128 x 64 Display
 * watch the video for details and demo http://youtu.be/UmYiHTOz-5k
 * This code has been modified to print specific elements such as text, lines, circles, rectangles, etc.
 *  * 
 *  * 
 * Written by Ahmad Shamshiri for Robojax Video channel www.Robojax.com
 * Date: December 15, 2017, in Ajax, Ontario, Canada
 * Permission granted to share this code given that this
 * note is kept with the code.
 * Disclaimer: this code is "AS IS" and for educational purposes only.
 * This code has been downloaded from https://robojax.com
 * 
 */
/*********************************************************************
This is an example for our Monochrome OLEDs based on SSD1306 drivers

  Pick one up today in the Adafruit shop!
  ------> http://www.adafruit.com/category/63_98

This example is for a 128x64 size display using I2C to communicate.
3 pins are required to interface (2 I2C and one reset).

Adafruit invests time and resources providing this open source code, 
please support Adafruit and open-source hardware by purchasing 
products from Adafruit!

Written by Limor Fried/Ladyada  for Adafruit Industries.  
BSD license, check license.txt for more information
All text above, and the splash screen must be included in any redistribution
*********************************************************************/

#include <SPI.h>
#include <Wire.h>
#include <Adafruit_GFX.h>
#include <Adafruit_SSD1306.h>

#define OLED_RESET 4
Adafruit_SSD1306 display(OLED_RESET);

#define NUMFLAKES 10
#define XPOS 0
#define YPOS 1
#define DELTAY 2


#define LOGO16_GLCD_HEIGHT 16 // do not change this. Error in video
#define LOGO16_GLCD_WIDTH  16 // do not change this. Error in video
static const unsigned char PROGMEM logo16_glcd_bmp[] =
{ B00000000, B11000000,
  B00000001, B11000000,
  B00000001, B11000000,
  B00000011, B11100000,
  B11110011, B11100000,
  B11111110, B11111000,
  B01111110, B11111111,
  B00110011, B10011111,
  B00011111, B11111100,
  B00001101, B01110000,
  B00011011, B10100000,
  B00111111, B11100000,
  B00111111, B11110000,
  B01111100, B11110000,
  B01110000, B01110000,
  B00000000, B00110000 };

    // look at line 27 to 30 of Adafruit_SSD1306.h inside the library to select the dimensions
#if (SSD1306_LCDHEIGHT != 64)
#error("Height incorrect, please fix Adafruit_SSD1306.h!");
#endif

void setup()   {                
  Serial.begin(9600);

  // by default, we'll generate the high voltage from the 3.3v line internally! (neat!)
  display.begin(SSD1306_SWITCHCAPVCC, 0x3C);  // initialize with the I2C addr 0x3D (for the 128x64)
  // init done


}


void loop() {
 display.clearDisplay();
 
  display.setTextSize(2);
  display.setTextColor(WHITE);
  display.setCursor(2,1);// set the cursor at x=2, y=1 which is top left corner of display
  display.println("Robojax");// the actual text

  display.setCursor(2,18);
  display.println("YouTube");// set the cursor at x=2, y=18 which is top left under the first text line

 
 display.drawLine(0,16, display.width()-1, 16, WHITE); // drawing from the point x=0, y=16 to x=64-1 y=16
 
   display.display();
  display.startscrollright(0x00, 0x0F);
  delay(2000);
  display.stopscroll();
  delay(1000);
  display.startscrollleft(0x00, 0x0F);
  delay(2000);
  display.stopscroll();
  delay(1000);    
  display.startscrolldiagright(0x00, 0x07);
  delay(2000);
  display.startscrolldiagleft(0x00, 0x07);
  delay(2000);
  display.stopscroll();
   delay(10000);
}
40-This is the Arduino code for the SSD1306 OLED 128 x 64 display without custom methods.
语言: C++
/*********************************************************************
Original source: http://playground.arduino.cc/Main/I2cScanner

This program will find the I2C address on the I2C device.  Just upload the code into your Arduino
and open the serial monitor and wait. It will display the I2C address as 0x3C or similar.

 * Please view other RoboJax codes and videos at http://robojax.com/learn/arduino
 * If you are sharing this code, you must keep this copyright note.
 * 
*********************************************************************/


#include <Wire.h>
 
 
void setup()
{
  Wire.begin();
 
  Serial.begin(9600);
  while (!Serial);             // Leonardo: wait for serial monitor
  Serial.println("\nI2C Scanner");
}
 
 
void loop()
{
  byte error, address;
  int nDevices;
 
  Serial.println("Scanning...");
 
  nDevices = 0;
  for(address = 1; address < 127; address++ )
  {
    // The i2c_scanner uses the return value of
    // the Wire.endTransmission to see if
    // a device did acknowledge the address.
    Wire.beginTransmission(address);
    error = Wire.endTransmission();
 
    if (error == 0)
    {
      Serial.print("I2C device found at address 0x");
      if (address<16)
        Serial.print("0");
      Serial.print(address,HEX);
      Serial.println("  !");
 
      nDevices++;
    }
    else if (error==4)
    {
      Serial.print("Unknown error at address 0x");
      if (address<16)
        Serial.print("0");
      Serial.println(address,HEX);
    }    
  }
  if (nDevices == 0)
    Serial.println("No I2C devices found\n");
  else
    Serial.println("done\n");
 
  delay(5000);           // wait 5 seconds for next scan
}

文件📁

没有可用的文件。