آرڈوینو کوڈ اور ویڈیو SSD1306 OLED 128 x 64 ڈسپلے کے لیے
اس ٹیوٹوریل میں، ہم دریافت کریں گے کہ Arduino کے ساتھ SSD1306 OLED 128 x 64 ڈسپلے کیسے استعمال کریں۔ SSD1306 ایک ورسٹائل ڈسپلے ہے جو آپ کو آسانی سے متن، گرافکس، اور مختلف اشکال دکھانے کی اجازت دیتا ہے۔ اس مضمون کے اختتام تک، آپ ڈسپلے کو ترتیب دینے اور کوڈ چلانے کے قابل ہو جائیں گے جو اس کی صلاحیتوں کو ظاہر کرتا ہے۔
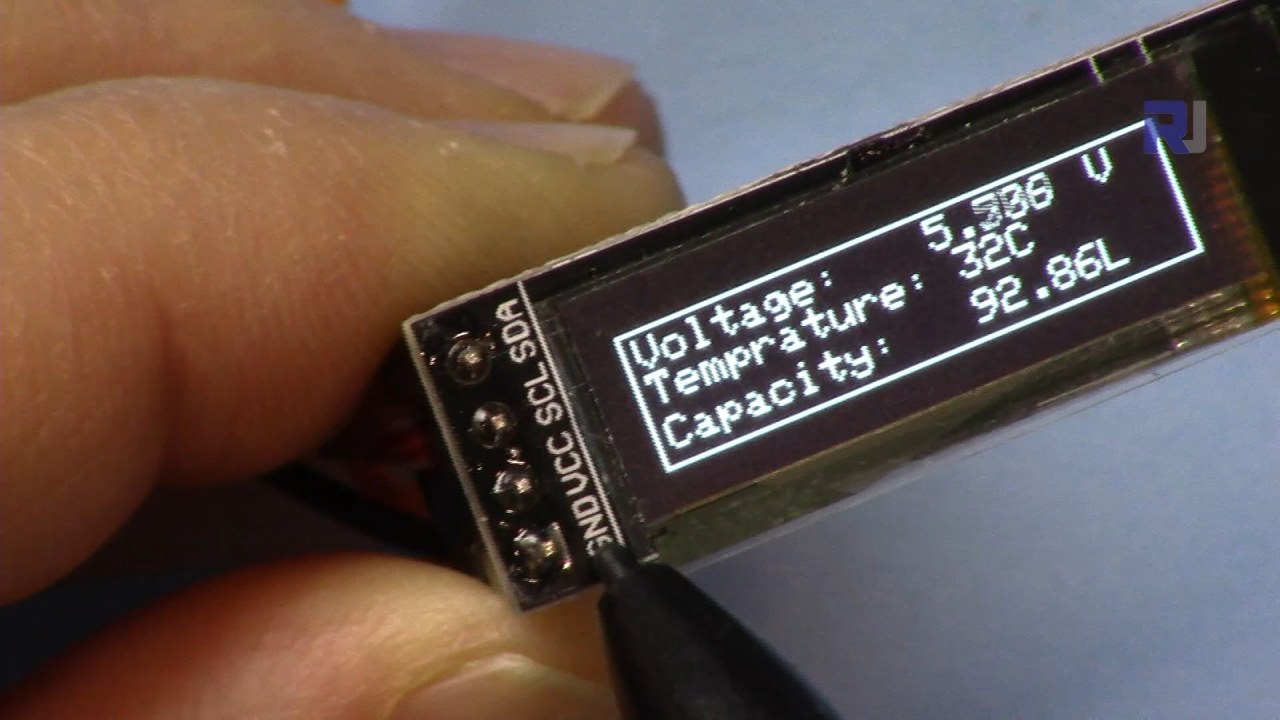
ہم آپ کو ضروری ہارڈویئر کنکشنز کے ذریعے رہنمائی کریں گے اور کوڈ سنیپٹس فراہم کریں گے تاکہ آپ پروگرام میں استعمال ہونے والے کلیدی شناخت کنندگان کو سمجھ سکیں۔ مزید بصری وضاحت کے لیے، متعلقہ ویڈیو (ویڈیو میں 00:00 پر) ضرور دیکھیں۔
ہارڈویئر کی وضاحت
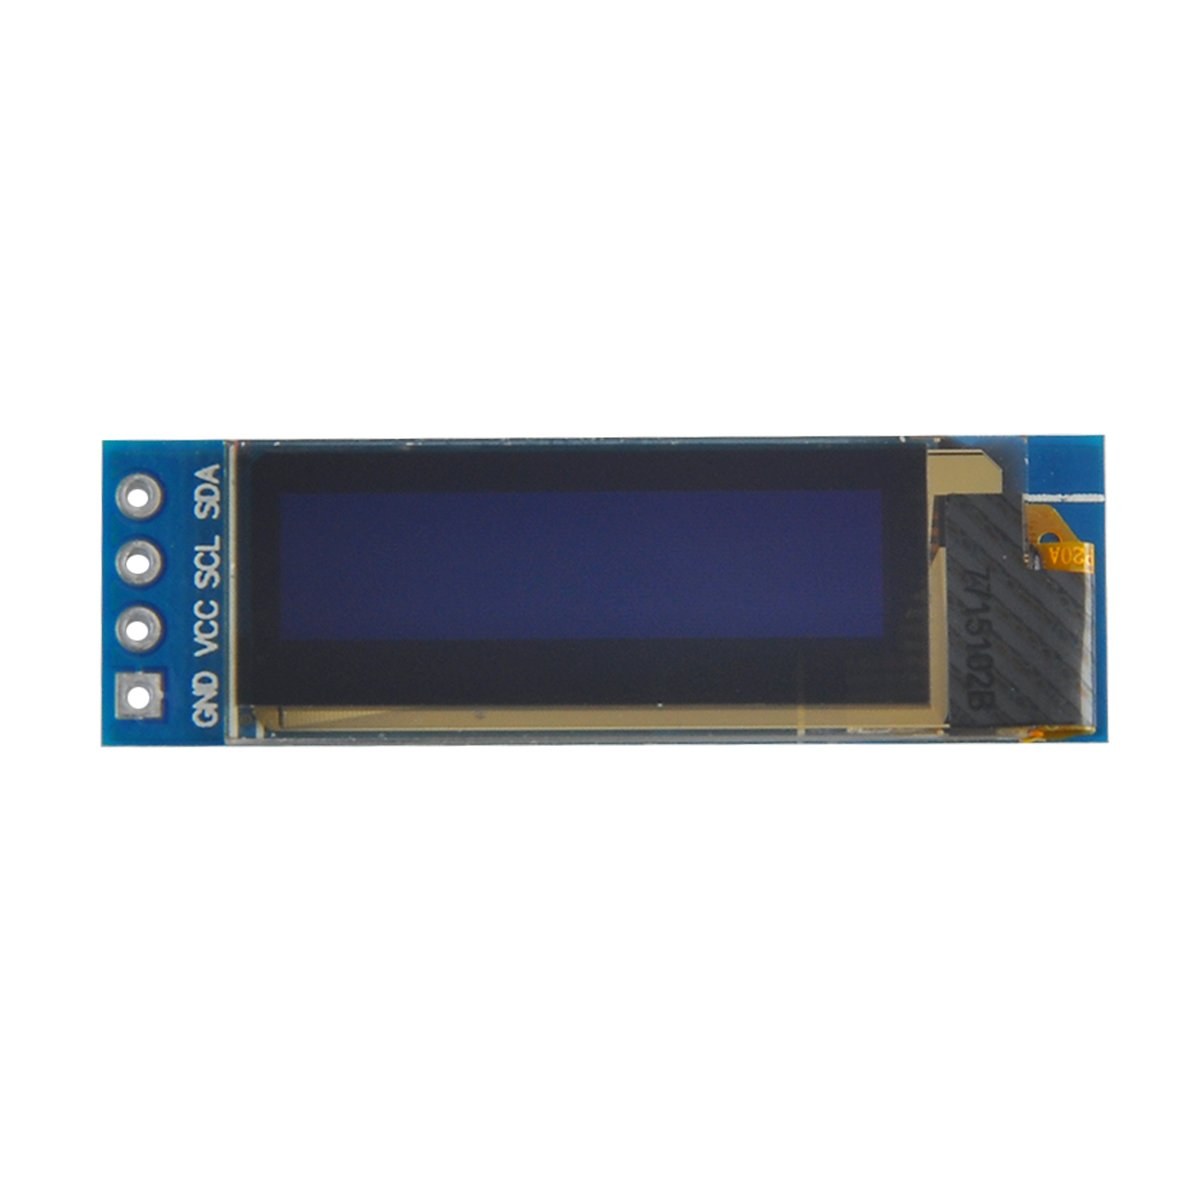
اس پروجیکٹ کے اہم اجزاء میں Arduino بورڈ اور SSD1306 OLED ڈسپلے ماجیول شامل ہیں۔ SSD1306 ڈسپلے I2C کمیونیکیشن پروٹوکول استعمال کرتا ہے، جو صرف دو ڈیٹا لائنوں کی ضرورت کے ساتھ وائرنگ کو آسان بناتا ہے: ڈیٹا کے لیے SDA اور کلاک سگنل کے لیے SCL۔ ڈسپلے 3.3V اور 5V کے درمیان وولٹیج پر کام کرتا ہے، جو اسے زیادہ تر Arduino بورڈز کے ساتھ مطابقت رکھتا ہے۔
ڈسپلے کے علاوہ، آپ کو ماجیول کو اپنے Arduino سے جوڑنے کے لیے جمپر تاروں کی ضرورت ہوگی۔ کنکشنز میں VCC پاور کے لیے، GND گراؤنڈ کے لیے، SDA Arduino کے ڈیٹا پن سے، اور SCL کلاک پن سے شامل ہیں۔ یہ سیٹ اپ Arduino اور OLED ڈسپلے کے درمیان آسان کمیونیکیشن کی اجازت دیتا ہے۔
ڈیٹاشیٹ تفصیلات
| مینوفیکچرر | Adafruit |
|---|---|
| پارٹ نمبر | SSD1306 |
| لاجک/آئی او وولٹیج | 3.3 V - 5 V |
| سپلائی وولٹیج | 3.3 V - 5 V |
| ڈسپلے ریزولوشن | 128 x 64 پکسلز |
| I2C ایڈریس | 0x3C |
| انٹرفیس | I2C |
| پیکیج | ماجیول |
- مناسب وائرنگ کو یقینی بنائیں: VCC کو 3.3V یا 5V سے، GND کو گراؤنڈ سے، SDA کو A4 سے، SCL کو A5 سے (Arduino Uno کے لیے)۔
- ڈسپلے کو SDA اور SCL لائنوں پر پل-اپ ریزسٹرس کی ضرورت ہوتی ہے اگر پہلے سے شامل نہ ہوں۔
- تصدیق کریں کہ I2C ایڈریس کوڈ میں درست طریقے سے سیٹ ہے، عام طور پر اس ڈسپلے کے لیے 0x3C۔
- آسان انٹیگریشن کے لیے Adafruit_SSD1306 جیسی مناسب لائبریری استعمال کریں۔
- نئی گرافکس بنانے سے پہلے ڈسپلے کو صاف کریں تاکہ اوورلیپنگ آرٹیفیکٹس سے بچا جا سکے۔
وائرنگ ہدایات
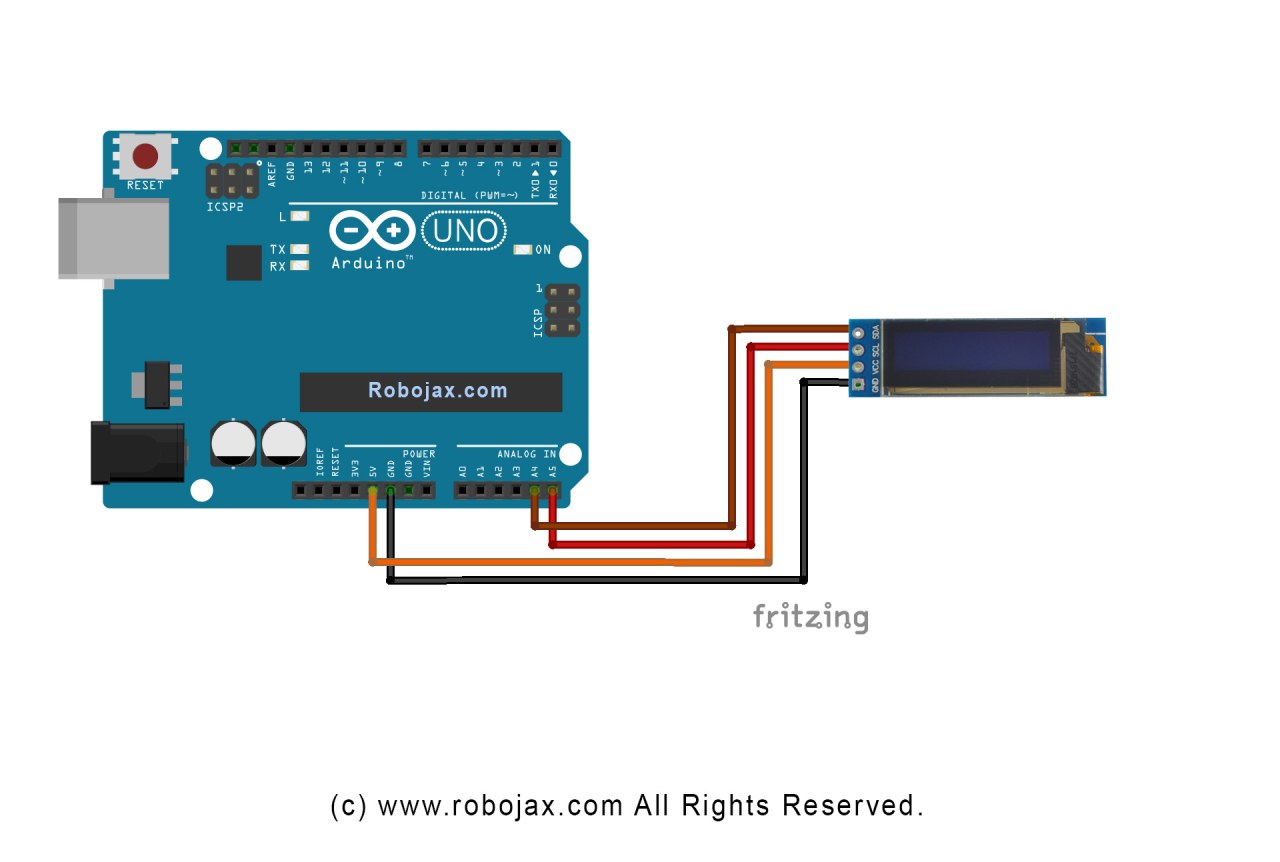
SSD1306 OLED ڈسپلے کو اپنے Arduino سے وائر کرنے کے لیے، ان مراحل پر عمل کریں:
OLED ڈسپلے کے VCC پن کو Arduino پر 5V (یا 3.3V) پن سے جوڑیں۔ اگلا، ڈسپلے کے GND پن کو Arduino کے گراؤنڈ پن سے جوڑیں۔ I2C کمیونیکیشن کے لیے، ڈسپلے کے SDA پن کو Arduino کے A4 پن سے اور SCL پن کو A5 پن سے جوڑیں۔ یہ سیٹ اپ Arduino کو I2C پروٹوکول کا استعمال کرتے ہوئے OLED ڈسپلے کے ساتھ بات چیت کرنے کے قابل بنائے گا۔
یقینی بنائیں کہ تمام کنکشنز محفوظ ہیں، اور دوبارہ چیک کریں کہ آپ اپنے مخصوص ڈسپلے ماڈل کے لیے درست وولٹیج استعمال کر رہے ہیں۔ اگر آپ مختلف Arduino ماڈل استعمال کر رہے ہیں، تو SDA اور SCL پن مختلف ہو سکتے ہیں (مثال کے طور پر، Arduino Mega کے لیے، SDA پن 20 پر ہے اور SCL پن 21 پر ہے)۔
کوڈ مثالیں اور واک تھرو
کوڈ میں، ہم ڈسپلے کو انیشیالائز کرتے ہیں اور I2C ایڈریس اور طول و عرض جیسے پیرامیٹرز سیٹ کرتے ہیں۔ ایک اہم شناخت کنندہ display ہے، جو SSD1306 ڈسپلے کے انسٹنس کی نمائندگی کرتا ہے۔ سیٹ اپ فنکشن سے ایک سنیپٹ یہ ہے:
void setup() {
  Serial.begin(9600);
  display.begin(SSD1306_SWITCHCAPVCC, 0x3C);  // I2C ایڈریس 0x3C کے ساتھ انیشیالائز کریں
}
اس سنیپٹ میں، display.begin فنکشن مخصوص I2C ایڈریس کے ساتھ ڈسپلے کو انیشیالائز کرتا ہے۔ مناسب کمیونیکیشن کو یقینی بنانے کے لیے ایڈریس کو اپنے ڈسپلے سے ملانا ضروری ہے۔
اگلا، لوپ فنکشن میں، ہم نئے مواد کو بنانے سے پہلے اسکرین کو صاف کرنے کے لیے display.clearDisplay() طریقہ استعمال کرتے ہیں۔ ہم setTextSize اور setCursor طریقوں کا استعمال کرتے ہوئے متن کا سائز اور پوزیشن سیٹ کر سکتے ہیں:
void loop() {
  display.clearDisplay();
  display.setTextSize(2);
  display.setCursor(2,1); // کرسر کو اوپر بائیں کونے پر سیٹ کریں
  display.println("Robojax"); // متن دکھائیں
}
یہاں، متن "Robojax" اسکرین پر کوآرڈینیٹس (2,1) پر دکھایا گیا ہے۔ یہ OLED ڈسپلے پر متن کی درست جگہ کی اجازت دیتا ہے۔
آخر میں، ڈسپلے پر تبدیلیاں رینڈر کرنے کے لیے، ہم display.display() کہتے ہیں۔ یہ فنکشن اپنے مواد کو اپڈیٹ کرنے کے لیے تمام بفرڈ کمانڈز کو ڈسپلے پر بھیجتا ہے:
display.display();یہ آپ کے لوپ فنکشن میں آخری لائن ہونی چاہیے تاکہ یہ یقینی بنایا جا سکے کہ تمام ڈرائنگ کمانڈز عمل میں آئیں۔ اگر آپ یہ مرحلہ بھول جائیں تو ڈسپلے پر کچھ نظر نہیں آئے گا۔
یاد رکھیں، مکمل کوڈ مضمون کے نیچے آپ کے حوالے کے لیے لوڈ ہوتا ہے۔
ڈیمونسٹریشن / کیا توقع کریں
کوڈ کو اپنے Arduino پر اپ لوڈ کرنے کے بعد، آپ کو OLED اسکرین پر متن "Robojax" دکھائی دینا چاہیے۔ کوڈ اسکرولنگ ٹیکسٹ اور ڈسپلے پر لکیریں، اشکال، اور دیگر گرافکس بنانے کا بھی مظاہرہ کرتا ہے۔ کسی بھی عام نقصانات پر نظر رکھیں، جیسے غلط وائرنگ یا مماثل I2C ایڈریسز، جو ڈسپلے کو صحیح طریقے سے کام کرنے سے روک سکتے ہیں (ویڈیو میں 10:00 پر)۔
ویڈیو ٹائم اسٹیمپس
- 00:00 - SSD1306 OLED ڈسپلے کا تعارف
- 02:30 - ڈسپلے کی وائرنگ
- 05:00 - کوڈ واک تھرو
- 08:00 - ڈسپلے کی خصوصیات کا مظاہرہ
- 10:00 - عام مسائل اور ٹربل شوٹنگ
تصاویر

/*
 * Original source: https://github.com/adafruit/Adafruit_SSD1306
 * This is the Arduino code for the SSD1306 OLED 128 x 64 Display.
 * Watch the video for details and demo: http://youtu.be/UmYiHTOz-5k
 * This code has been modified to print specific elements such as text, lines, circles, rectangles, etc.
 * I have added a custom method to make printing text easy.

 If you get the error: Adafruit_GFX.h not found, download the Adafruit-GFX Library from:
 https://github.com/adafruit/Adafruit-GFX-Library

 Purchase this OLED module from Amazon: https://amzn.to/36zFvTb

 *  *
 * Written by Ahmad Shamshiri for Robojax Video channel, www.Robojax.com
 * Date: December 17, 2017, in Ajax, Ontario, Canada
 * Permission granted to share this code, provided that this
 * note is kept with the code.
 * Disclaimer: This code is "AS IS" and for educational purposes only.
 * This code has been downloaded from https://robojax.com
 *
 */

/*********************************************************************
This is an example for our monochrome OLEDs based on SSD1306 drivers.

  Pick one up today in the Adafruit shop!
  ------> http://www.adafruit.com/category/63_98

This example is for a 128x64 size display using I2C to communicate.
3 pins are required to interface (2 I2C and one reset).

Adafruit invests time and resources providing this open source code,
please support Adafruit and open-source hardware by purchasing
products from Adafruit!

Written by Limor Fried/Ladyada for Adafruit Industries.
BSD license, check license.txt for more information.
All text above, and the splash screen must be included in any redistribution.
*********************************************************************/

#include <SPI.h>
#include <Wire.h>
#include <Adafruit_GFX.h>
#include <Adafruit_SSD1306.h>

#define OLED_RESET 4
Adafruit_SSD1306 display(OLED_RESET);

#define NUMFLAKES 10
#define XPOS 0
#define YPOS 1
#define DELTAY 2


#define LOGO16_GLCD_HEIGHT 16 // do not change this. Error in video
#define LOGO16_GLCD_WIDTH  16 // do not change this. Error in video
static const unsigned char PROGMEM logo16_glcd_bmp[] =
{ B00000000, B11000000,
  B00000001, B11000000,
  B00000001, B11000000,
  B00000011, B11100000,
  B11110011, B11100000,
  B11111110, B11111000,
  B01111110, B11111111,
  B00110011, B10011111,
  B00011111, B11111100,
  B00001101, B01110000,
  B00011011, B10100000,
  B00111111, B11100000,
  B00111111, B11110000,
  B01111100, B11110000,
  B01110000, B01110000,
  B00000000, B00110000 };

    // look at line 27 to 30 of Adafruit_SSD1306.h inside the library to select the dimensions
#if (SSD1306_LCDHEIGHT != 64)
#error("Height incorrect, please fix Adafruit_SSD1306.h!");
#endif

void setup()   {
  Serial.begin(9600);

  // by default, we'll generate the high voltage from the 3.3v line internally! (neat!)
  display.begin(SSD1306_SWITCHCAPVCC, 0x3C);  // initialize with the I2C addr 0x3D (for the 128x64)
  // init done

}


void loop() {
 display.clearDisplay();
  robojaxText("Values", 3, 0, 2, false);
  robojaxText("V: 41v", 3, 22, 2, false);
  robojaxText("Temperature: 32C", 4, 45, 1, true);
  display.drawLine(1, 37, 100, 37, WHITE);
  display.drawRect(1, 20, 100,40, WHITE);
  //display.drawCircle(63,31, 31, WHITE);
   //display.startscrollright(0x00, 0x0F);
  display.display();
   delay(20000);
}

/*
 * robojaxText(String text, int x, int y, int size, boolean d)
 * text is the text string to be printed.
 * x is the integer x position of the text.
 * y is the integer y position of the text.
 * size is the text size (1, 2, 3, etc.).
 * d is a boolean value (true or false).  Its purpose is unclear, use true.
 */
void robojaxText(String text, int x, int y,int size, boolean d) {

  display.setTextSize(size);
  display.setTextColor(WHITE);
  display.setCursor(x,y);
  display.println(text);
  if(d){
    display.display();
  }

  delay(100);
}/*
* Original source: https://github.com/adafruit/Adafruit_SSD1306
* This is the Arduino code for the SSD1306 OLED 128 x 64 Display
* watch the video for details and demo http://youtu.be/UmYiHTOz-5k
* This code has been modified to print specific elements such as text, lines, circles, rectangles, etc.
* *
* *
* Written by Ahmad Shamshiri for Robojax Video channel www.Robojax.com
* Date: December 15, 2017, in Ajax, Ontario, Canada
* Permission granted to share this code given that this
* note is kept with the code.
* Disclaimer: this code is "AS IS" and for educational purposes only.
* This code has been downloaded from https://robojax.com
*
*/
/*********************************************************************
This is an example for our Monochrome OLEDs based on SSD1306 drivers
Pick one up today in the Adafruit shop!
------> http://www.adafruit.com/category/63_98
This example is for a 128x64 size display using I2C to communicate.
3 pins are required to interface (2 I2C and one reset).
Adafruit invests time and resources providing this open source code,
please support Adafruit and open-source hardware by purchasing
products from Adafruit!
Written by Limor Fried/Ladyada for Adafruit Industries.
BSD license, check license.txt for more information
All text above, and the splash screen must be included in any redistribution
*********************************************************************/
#include <SPI.h>
#include <Wire.h>
#include <Adafruit_GFX.h>
#include <Adafruit_SSD1306.h>
#define OLED_RESET 4
Adafruit_SSD1306 display(OLED_RESET);
#define NUMFLAKES 10
#define XPOS 0
#define YPOS 1
#define DELTAY 2
#define LOGO16_GLCD_HEIGHT 16 // do not change this. Error in video
#define LOGO16_GLCD_WIDTH 16 // do not change this. Error in video
static const unsigned char PROGMEM logo16_glcd_bmp[] =
{ B00000000, B11000000,
B00000001, B11000000,
B00000001, B11000000,
B00000011, B11100000,
B11110011, B11100000,
B11111110, B11111000,
B01111110, B11111111,
B00110011, B10011111,
B00011111, B11111100,
B00001101, B01110000,
B00011011, B10100000,
B00111111, B11100000,
B00111111, B11110000,
B01111100, B11110000,
B01110000, B01110000,
B00000000, B00110000 };
// look at line 27 to 30 of Adafruit_SSD1306.h inside the library to select the dimensions
#if (SSD1306_LCDHEIGHT != 64)
#error("Height incorrect, please fix Adafruit_SSD1306.h!");
#endif
void setup() {
Serial.begin(9600);
// by default, we'll generate the high voltage from the 3.3v line internally! (neat!)
display.begin(SSD1306_SWITCHCAPVCC, 0x3C); // initialize with the I2C addr 0x3D (for the 128x64)
// init done
}
void loop() {
display.clearDisplay();
display.setTextSize(2);
display.setTextColor(WHITE);
display.setCursor(2,1);// set the cursor at x=2, y=1 which is top left corner of display
display.println("Robojax");// the actual text
display.setCursor(2,18);
display.println("YouTube");// set the cursor at x=2, y=18 which is top left under the first text line
display.drawLine(0,16, display.width()-1, 16, WHITE); // drawing from the point x=0, y=16 to x=64-1 y=16
display.display();
display.startscrollright(0x00, 0x0F);
delay(2000);
display.stopscroll();
delay(1000);
display.startscrollleft(0x00, 0x0F);
delay(2000);
display.stopscroll();
delay(1000);
display.startscrolldiagright(0x00, 0x07);
delay(2000);
display.startscrolldiagleft(0x00, 0x07);
delay(2000);
display.stopscroll();
delay(10000);
}/*********************************************************************
Original source: http://playground.arduino.cc/Main/I2cScanner
This program will find the I2C address on the I2C device. Just upload the code into your Arduino
and open the serial monitor and wait. It will display the I2C address as 0x3C or similar.
* Please view other RoboJax codes and videos at http://robojax.com/learn/arduino
* If you are sharing this code, you must keep this copyright note.
*
*********************************************************************/
#include <Wire.h>
void setup()
{
Wire.begin();
Serial.begin(9600);
while (!Serial); // Leonardo: wait for serial monitor
Serial.println("\nI2C Scanner");
}
void loop()
{
byte error, address;
int nDevices;
Serial.println("Scanning...");
nDevices = 0;
for(address = 1; address < 127; address++ )
{
// The i2c_scanner uses the return value of
// the Wire.endTransmission to see if
// a device did acknowledge the address.
Wire.beginTransmission(address);
error = Wire.endTransmission();
if (error == 0)
{
Serial.print("I2C device found at address 0x");
if (address<16)
Serial.print("0");
Serial.print(address,HEX);
Serial.println(" !");
nDevices++;
}
else if (error==4)
{
Serial.print("Unknown error at address 0x");
if (address<16)
Serial.print("0");
Serial.println(address,HEX);
}
}
if (nDevices == 0)
Serial.println("No I2C devices found\n");
else
Serial.println("done\n");
delay(5000); // wait 5 seconds for next scan
}وسائل اور حوالہ جات
فائلیں📁
ڈیٹا شیٹ (پی ڈی ایف)
-
SSD1306 display datasheetSSD1306 is a single-chip CMOS OLED/PLED driver with controller for organic / polymer light emitting diode dot-matrix graphic display system. It consists of 128 segments and 64commons. This IC is designed for Common Cathode type OLED panel. The SSD1306 embeds with contrast control, display RAM and oscillator, which reduces the number of external components and power consumption. It has 256-step brightness control. Data/Commands are sent from general MCU through the hardware selectable 6800/8000 series compatible Parallel Interface, I2C interface or Serial Peripheral Interface. It is suitable for many compact portable applications, such as mobile phone sub-display, MP3 player and calculator, etc.
SSD1306_display_datasheet.pdf1.79 MB