Arduino kód a video pre SSD1306 OLED 128 x 64 displej
V tomto návode si ukážeme, ako používať SSD1306 OLED 128 x 64 displej s Arduinom. SSD1306 je všestranný displej, ktorý vám umožňuje jednoducho zobrazovať text, grafiku a rôzne tvary. Na konci tohto článku budete schopní nastaviť displej a spustiť kód, ktorý demonštruje jeho možnosti.
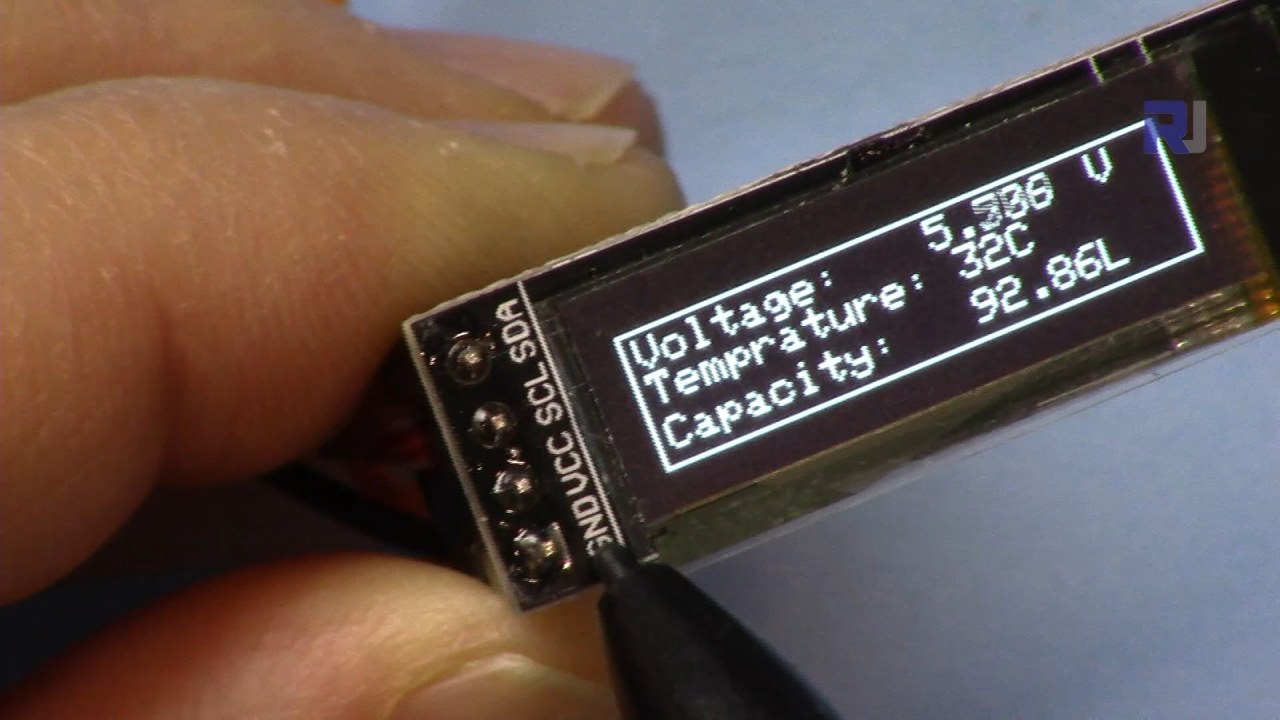
Prevedieme vás potrebnými hardvérovými zapojeniami a poskytneme ukážky kódu, ktoré vám pomôžu pochopiť kľúčové identifikátory použité v programe. Pre vizuálnejšie vysvetlenie si určite pozrite priložené video (vo videu o 00:00).
Vysvetlenie hardvéru
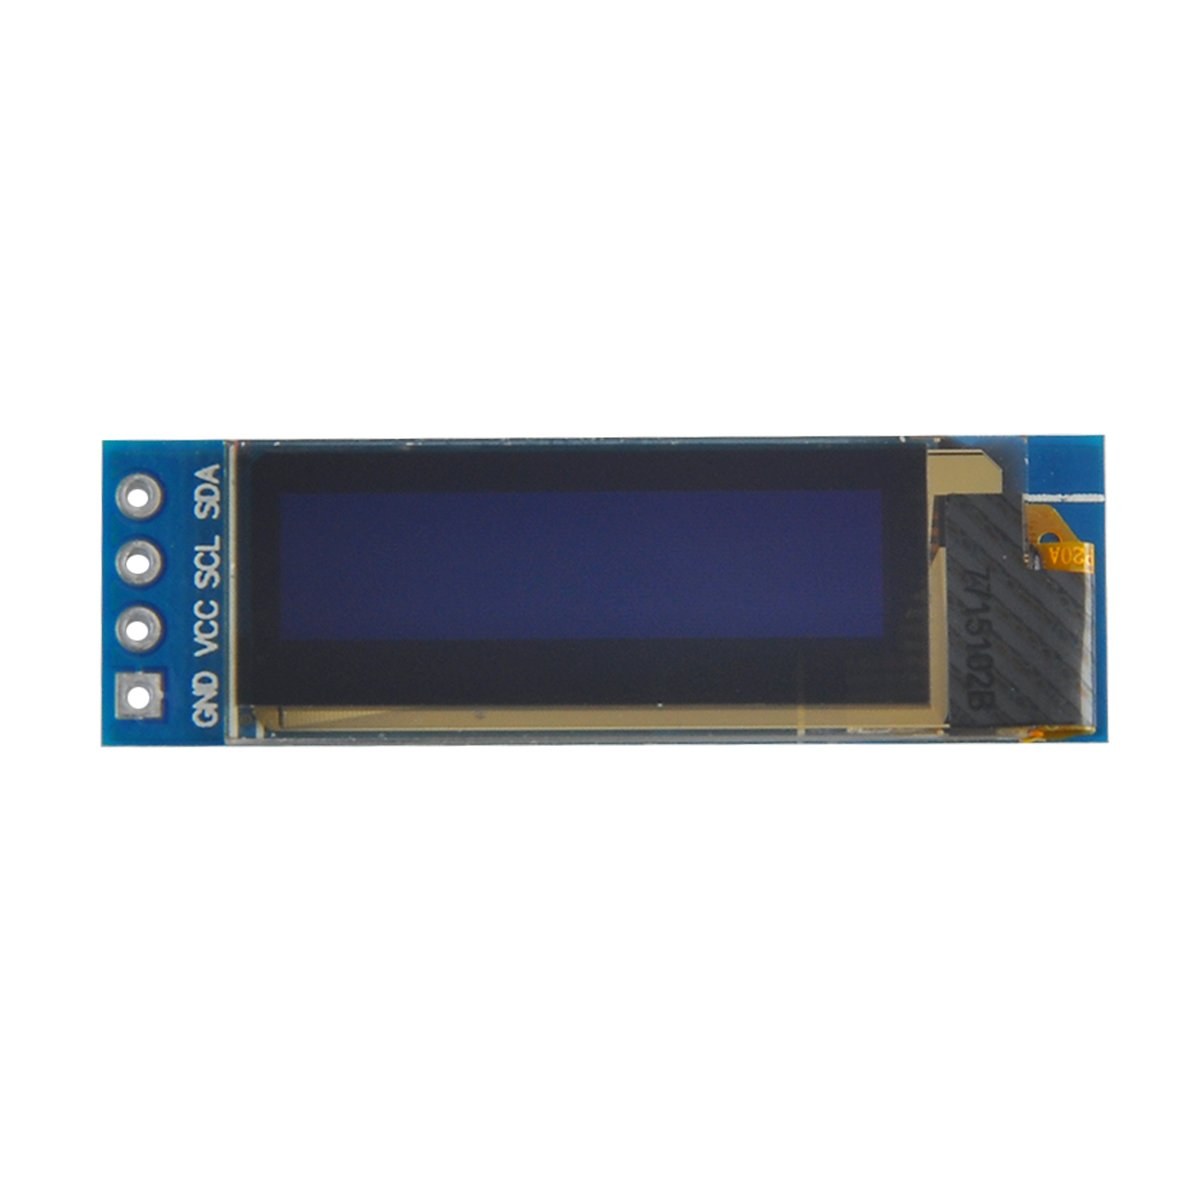
Hlavné komponenty tohto projektu zahŕňajú dosku Arduino a modul OLED displeja SSD1306. Displej SSD1306 využíva komunikačný protokol I2C, ktorý zjednodušuje zapojenie tým, že vyžaduje iba dva dátové vodiče: SDA pre dáta a SCL pre hodinový signál. Displej pracuje pri napätiach medzi 3,3 V a 5 V, vďaka čomu je kompatibilný s väčšinou dosiek Arduino.
Okrem displeja budete potrebovať prepojovacie vodiče na pripojenie modulu k Arduinu. Zapojenia zahŕňajú VCC na napájanie, GND na uzemnenie, SDA na dátový pin Arduina a SCL na hodinový pin. Toto nastavenie umožňuje jednoduchú komunikáciu medzi Arduinom a OLED displejom.
Podrobnosti z datasheetu
| Výrobca | Adafruit |
|---|---|
| Označenie dielu | SSD1306 |
| Logické/I-O napätie | 3,3 V - 5 V |
| Napájacie napätie | 3,3 V - 5 V |
| Rozlíšenie displeja | 128 x 64 pixelov |
| I2C adresa | 0x3C |
| Rozhranie | I2C |
| Balenie | Modul |
- Zabezpečte správne zapojenie: VCC na 3,3 V alebo 5 V, GND na uzemnenie, SDA na A4, SCL na A5 (pre Arduino Uno).
- Displej vyžaduje pull-up rezistory na linkách SDA a SCL, ak nie sú už zahrnuté.
- Overte, či je I2C adresa v kóde nastavená správne, zvyčajne 0x3C pre tento displej.
- Použite vhodnú knižnicu, ako je Adafruit_SSD1306, pre jednoduchú integráciu.
- Pred kreslením novej grafiky vyčistite displej, aby ste predišli prekrývajúcim sa artefaktom.
Pokyny na zapojenie
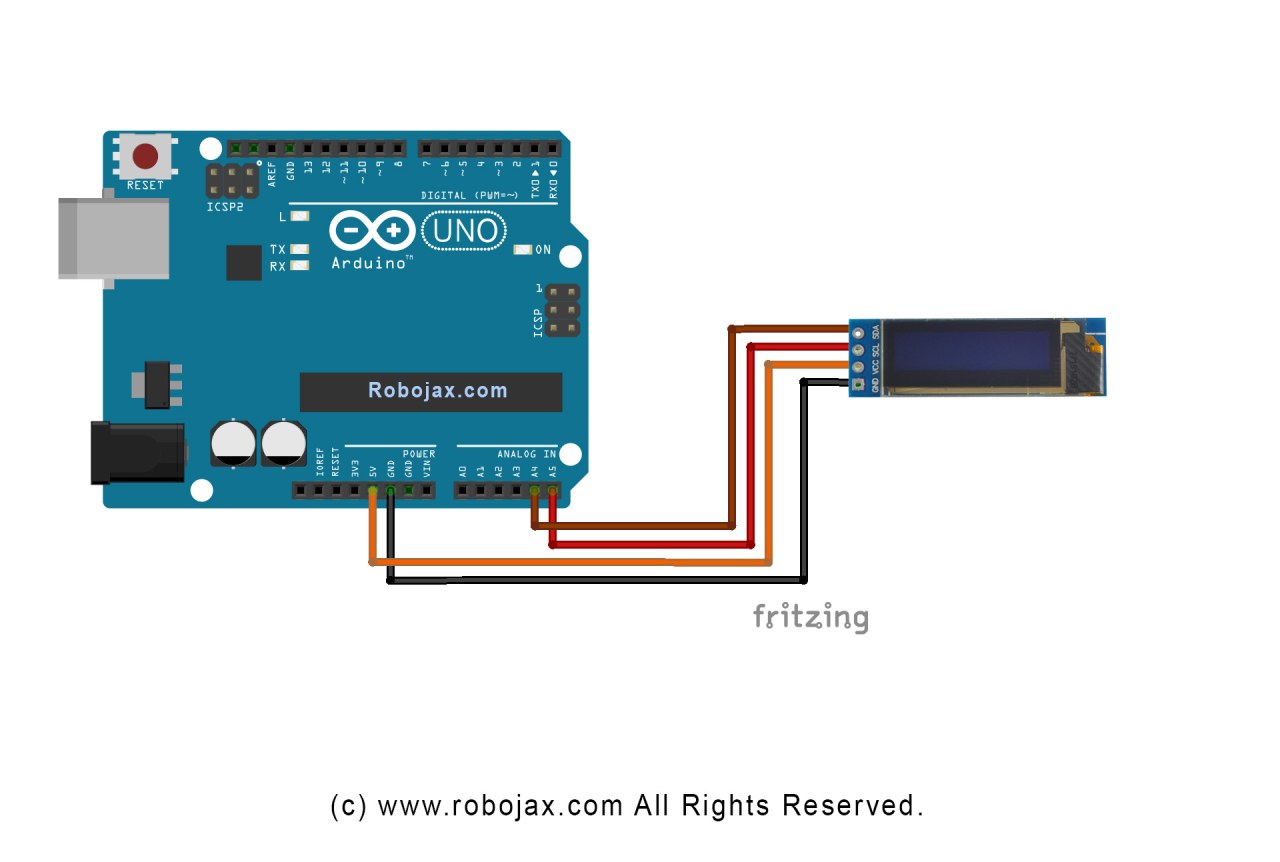
Na zapojenie SSD1306 OLED displeja k Arduinu postupujte podľa týchto krokov:
Pripojte pin VCC OLED displeja na pin 5V (alebo 3,3V) na Arduine. Ďalej pripojte pin GND displeja na uzemňovací pin na Arduine. Pre komunikáciu I2C pripojte pin SDA displeja na pin A4 na Arduine a pin SCL na pin A5. Toto nastavenie umožní Arduinu komunikovať s OLED displejom pomocou protokolu I2C.
Uistite sa, že všetky spojenia sú pevné, a dvakrát skontrolujte, či používate správne napätie pre váš konkrétny model displeja. Ak používate iný model Arduina, piny SDA a SCL sa môžu líšiť (napr. pre Arduino Mega je SDA na pinoch 20 a SCL na pinoch 21).
Príklady kódu a vysvetlenie
V kóde inicializujeme displej a nastavíme parametre, ako je I2C adresa a rozmery. Jedným kľúčovým identifikátorom je display, ktorý predstavuje inštanciu SSD1306 displeja. Tu je ukážka z funkcie setup:
void setup() {
  Serial.begin(9600);
  display.begin(SSD1306_SWITCHCAPVCC, 0x3C);  // inicializácia s I2C adresou 0x3C
}
V tejto ukážke funkcia display.begin inicializuje displej so zadanou I2C adresou. Je nevyhnutné, aby adresa zodpovedala vášmu displeju, aby bola zabezpečená správna komunikácia.
Ďalej vo funkcii loop používame metódu display.clearDisplay() na vyčistenie obrazovky pred kreslením nového obsahu. Veľkosť textu a pozíciu môžeme nastaviť pomocou metód setTextSize a setCursor:
void loop() {
  display.clearDisplay();
  display.setTextSize(2);
  display.setCursor(2,1); // nastavenie kurzora do ľavého horného rohu
  display.println("Robojax"); // zobrazenie textu
}
Tu sa text "Robojax" zobrazí na súradniciach (2,1) na obrazovke. To umožňuje presné umiestnenie textu na OLED displeji.
Nakoniec na vykreslenie zmien na displeji zavoláme display.display(). Táto funkcia odošle všetky vyrovnávacie príkazy na displej, aby aktualizovala jeho obsah:
display.display();Toto by mal byť posledný riadok vo vašej funkcii loop, aby sa zabezpečilo vykonanie všetkých príkazov na kreslenie. Ak tento krok zabudnete, na displeji sa nič nezobrazí.
Pamätajte, že plný kód sa nachádza pod článkom pre vašu referenciu.
Demonštrácia / Čo očakávať
Po nahraní kódu do Arduina by ste mali vidieť text "Robojax" zobrazený na OLED obrazovke. Kód tiež demonštruje posúvanie textu a kreslenie čiar, tvarov a inej grafiky na displeji. Sledujte bežné nástrahy, ako je nesprávne zapojenie alebo nezhodné I2C adresy, ktoré môžu zabrániť správnemu fungovaniu displeja (vo videu o 10:00).
Časové značky videa
- 00:00 - Úvod k SSD1306 OLED displeju
- 02:30 - Zapojenie displeja
- 05:00 - Vysvetlenie kódu
- 08:00 - Demonštrácia funkcií displeja
- 10:00 - Bežné problémy a riešenie problémov
Obrázky

/*
 * Original source: https://github.com/adafruit/Adafruit_SSD1306
 * This is the Arduino code for the SSD1306 OLED 128 x 64 Display.
 * Watch the video for details and demo: http://youtu.be/UmYiHTOz-5k
 * This code has been modified to print specific elements such as text, lines, circles, rectangles, etc.
 * I have added a custom method to make printing text easy.

 If you get the error: Adafruit_GFX.h not found, download the Adafruit-GFX Library from:
 https://github.com/adafruit/Adafruit-GFX-Library

 Purchase this OLED module from Amazon: https://amzn.to/36zFvTb

 *  *
 * Written by Ahmad Shamshiri for Robojax Video channel, www.Robojax.com
 * Date: December 17, 2017, in Ajax, Ontario, Canada
 * Permission granted to share this code, provided that this
 * note is kept with the code.
 * Disclaimer: This code is "AS IS" and for educational purposes only.
 * This code has been downloaded from https://robojax.com
 *
 */

/*********************************************************************
This is an example for our monochrome OLEDs based on SSD1306 drivers.

  Pick one up today in the Adafruit shop!
  ------> http://www.adafruit.com/category/63_98

This example is for a 128x64 size display using I2C to communicate.
3 pins are required to interface (2 I2C and one reset).

Adafruit invests time and resources providing this open source code,
please support Adafruit and open-source hardware by purchasing
products from Adafruit!

Written by Limor Fried/Ladyada for Adafruit Industries.
BSD license, check license.txt for more information.
All text above, and the splash screen must be included in any redistribution.
*********************************************************************/

#include <SPI.h>
#include <Wire.h>
#include <Adafruit_GFX.h>
#include <Adafruit_SSD1306.h>

#define OLED_RESET 4
Adafruit_SSD1306 display(OLED_RESET);

#define NUMFLAKES 10
#define XPOS 0
#define YPOS 1
#define DELTAY 2


#define LOGO16_GLCD_HEIGHT 16 // do not change this. Error in video
#define LOGO16_GLCD_WIDTH  16 // do not change this. Error in video
static const unsigned char PROGMEM logo16_glcd_bmp[] =
{ B00000000, B11000000,
  B00000001, B11000000,
  B00000001, B11000000,
  B00000011, B11100000,
  B11110011, B11100000,
  B11111110, B11111000,
  B01111110, B11111111,
  B00110011, B10011111,
  B00011111, B11111100,
  B00001101, B01110000,
  B00011011, B10100000,
  B00111111, B11100000,
  B00111111, B11110000,
  B01111100, B11110000,
  B01110000, B01110000,
  B00000000, B00110000 };

    // look at line 27 to 30 of Adafruit_SSD1306.h inside the library to select the dimensions
#if (SSD1306_LCDHEIGHT != 64)
#error("Height incorrect, please fix Adafruit_SSD1306.h!");
#endif

void setup()   {
  Serial.begin(9600);

  // by default, we'll generate the high voltage from the 3.3v line internally! (neat!)
  display.begin(SSD1306_SWITCHCAPVCC, 0x3C);  // initialize with the I2C addr 0x3D (for the 128x64)
  // init done

}


void loop() {
 display.clearDisplay();
  robojaxText("Values", 3, 0, 2, false);
  robojaxText("V: 41v", 3, 22, 2, false);
  robojaxText("Temperature: 32C", 4, 45, 1, true);
  display.drawLine(1, 37, 100, 37, WHITE);
  display.drawRect(1, 20, 100,40, WHITE);
  //display.drawCircle(63,31, 31, WHITE);
   //display.startscrollright(0x00, 0x0F);
  display.display();
   delay(20000);
}

/*
 * robojaxText(String text, int x, int y, int size, boolean d)
 * text is the text string to be printed.
 * x is the integer x position of the text.
 * y is the integer y position of the text.
 * size is the text size (1, 2, 3, etc.).
 * d is a boolean value (true or false).  Its purpose is unclear, use true.
 */
void robojaxText(String text, int x, int y,int size, boolean d) {

  display.setTextSize(size);
  display.setTextColor(WHITE);
  display.setCursor(x,y);
  display.println(text);
  if(d){
    display.display();
  }

  delay(100);
}/*
* Original source: https://github.com/adafruit/Adafruit_SSD1306
* This is the Arduino code for the SSD1306 OLED 128 x 64 Display
* watch the video for details and demo http://youtu.be/UmYiHTOz-5k
* This code has been modified to print specific elements such as text, lines, circles, rectangles, etc.
* *
* *
* Written by Ahmad Shamshiri for Robojax Video channel www.Robojax.com
* Date: December 15, 2017, in Ajax, Ontario, Canada
* Permission granted to share this code given that this
* note is kept with the code.
* Disclaimer: this code is "AS IS" and for educational purposes only.
* This code has been downloaded from https://robojax.com
*
*/
/*********************************************************************
This is an example for our Monochrome OLEDs based on SSD1306 drivers
Pick one up today in the Adafruit shop!
------> http://www.adafruit.com/category/63_98
This example is for a 128x64 size display using I2C to communicate.
3 pins are required to interface (2 I2C and one reset).
Adafruit invests time and resources providing this open source code,
please support Adafruit and open-source hardware by purchasing
products from Adafruit!
Written by Limor Fried/Ladyada for Adafruit Industries.
BSD license, check license.txt for more information
All text above, and the splash screen must be included in any redistribution
*********************************************************************/
#include <SPI.h>
#include <Wire.h>
#include <Adafruit_GFX.h>
#include <Adafruit_SSD1306.h>
#define OLED_RESET 4
Adafruit_SSD1306 display(OLED_RESET);
#define NUMFLAKES 10
#define XPOS 0
#define YPOS 1
#define DELTAY 2
#define LOGO16_GLCD_HEIGHT 16 // do not change this. Error in video
#define LOGO16_GLCD_WIDTH 16 // do not change this. Error in video
static const unsigned char PROGMEM logo16_glcd_bmp[] =
{ B00000000, B11000000,
B00000001, B11000000,
B00000001, B11000000,
B00000011, B11100000,
B11110011, B11100000,
B11111110, B11111000,
B01111110, B11111111,
B00110011, B10011111,
B00011111, B11111100,
B00001101, B01110000,
B00011011, B10100000,
B00111111, B11100000,
B00111111, B11110000,
B01111100, B11110000,
B01110000, B01110000,
B00000000, B00110000 };
// look at line 27 to 30 of Adafruit_SSD1306.h inside the library to select the dimensions
#if (SSD1306_LCDHEIGHT != 64)
#error("Height incorrect, please fix Adafruit_SSD1306.h!");
#endif
void setup() {
Serial.begin(9600);
// by default, we'll generate the high voltage from the 3.3v line internally! (neat!)
display.begin(SSD1306_SWITCHCAPVCC, 0x3C); // initialize with the I2C addr 0x3D (for the 128x64)
// init done
}
void loop() {
display.clearDisplay();
display.setTextSize(2);
display.setTextColor(WHITE);
display.setCursor(2,1);// set the cursor at x=2, y=1 which is top left corner of display
display.println("Robojax");// the actual text
display.setCursor(2,18);
display.println("YouTube");// set the cursor at x=2, y=18 which is top left under the first text line
display.drawLine(0,16, display.width()-1, 16, WHITE); // drawing from the point x=0, y=16 to x=64-1 y=16
display.display();
display.startscrollright(0x00, 0x0F);
delay(2000);
display.stopscroll();
delay(1000);
display.startscrollleft(0x00, 0x0F);
delay(2000);
display.stopscroll();
delay(1000);
display.startscrolldiagright(0x00, 0x07);
delay(2000);
display.startscrolldiagleft(0x00, 0x07);
delay(2000);
display.stopscroll();
delay(10000);
}/*********************************************************************
Original source: http://playground.arduino.cc/Main/I2cScanner
This program will find the I2C address on the I2C device. Just upload the code into your Arduino
and open the serial monitor and wait. It will display the I2C address as 0x3C or similar.
* Please view other RoboJax codes and videos at http://robojax.com/learn/arduino
* If you are sharing this code, you must keep this copyright note.
*
*********************************************************************/
#include <Wire.h>
void setup()
{
Wire.begin();
Serial.begin(9600);
while (!Serial); // Leonardo: wait for serial monitor
Serial.println("\nI2C Scanner");
}
void loop()
{
byte error, address;
int nDevices;
Serial.println("Scanning...");
nDevices = 0;
for(address = 1; address < 127; address++ )
{
// The i2c_scanner uses the return value of
// the Wire.endTransmission to see if
// a device did acknowledge the address.
Wire.beginTransmission(address);
error = Wire.endTransmission();
if (error == 0)
{
Serial.print("I2C device found at address 0x");
if (address<16)
Serial.print("0");
Serial.print(address,HEX);
Serial.println(" !");
nDevices++;
}
else if (error==4)
{
Serial.print("Unknown error at address 0x");
if (address<16)
Serial.print("0");
Serial.println(address,HEX);
}
}
if (nDevices == 0)
Serial.println("No I2C devices found\n");
else
Serial.println("done\n");
delay(5000); // wait 5 seconds for next scan
}Zdroje a referencie
Súbory📁
Datasheet (pdf)
-
SSD1306 display datasheetSSD1306 is a single-chip CMOS OLED/PLED driver with controller for organic / polymer light emitting diode dot-matrix graphic display system. It consists of 128 segments and 64commons. This IC is designed for Common Cathode type OLED panel. The SSD1306 embeds with contrast control, display RAM and oscillator, which reduces the number of external components and power consumption. It has 256-step brightness control. Data/Commands are sent from general MCU through the hardware selectable 6800/8000 series compatible Parallel Interface, I2C interface or Serial Peripheral Interface. It is suitable for many compact portable applications, such as mobile phone sub-display, MP3 player and calculator, etc.
SSD1306_display_datasheet.pdf1.79 MB