د آردوینو کوډ او ویډیو د SSD1306 OLED 128 x 64 ښودونکي لپاره
په دې ټیوټوریل کې به موږ وپلټو چې څنګه د SSD1306 OLED 128 x 64 ډسپلې د Arduino سره وکاروو. SSD1306 یو څو اړخیز ډسپلې دی چې تاسو ته اجازه درکوي متن، ګرافیکونه، او مختلف شکلونه په اسانۍ سره وښیئ. د دې مقالې په پای کې به تاسو وکولای شئ ډسپلې تنظیم کړئ او کوډ پرمخ یوسئ چې د هغې وړتیاوې ښیې.
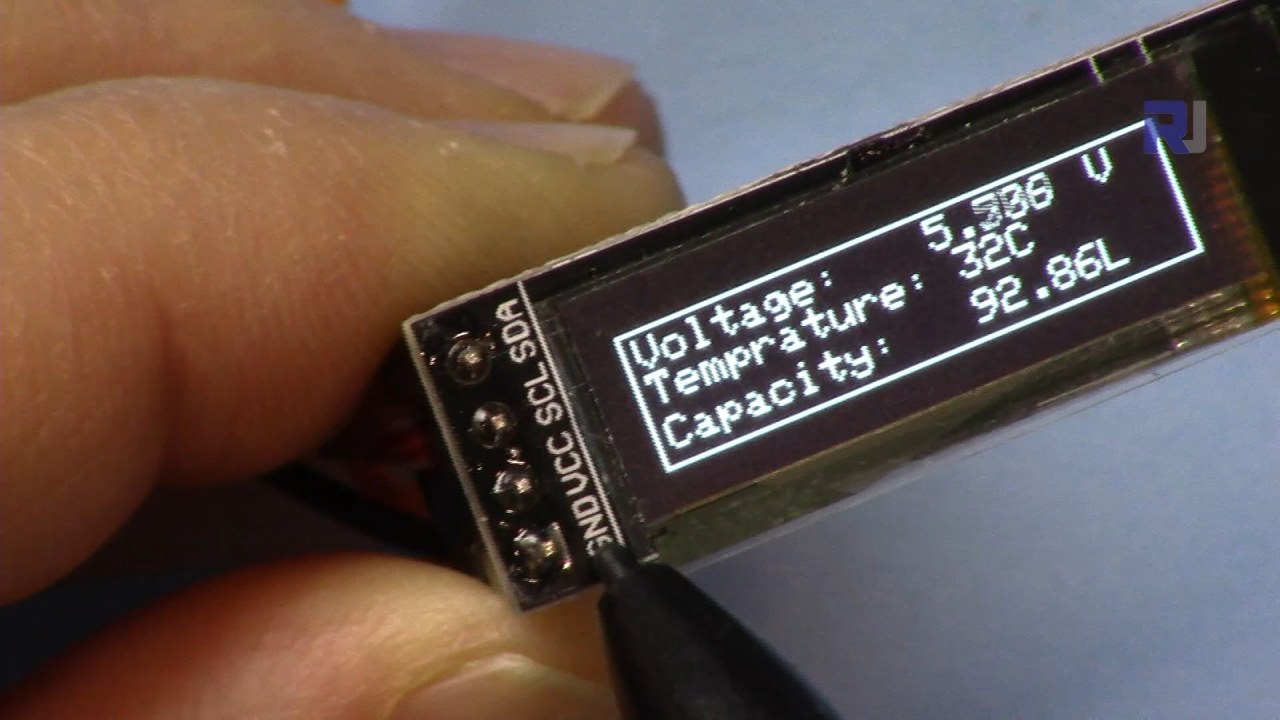
موږ به تاسو ته د اړینو هارډویر اړیکو له لارې لارښوونه وکړو او د کوډ برخې به چمتو کړو ترڅو تاسو سره د پروګرام کې کارول شوي کلیدي پیژندونکو په پوهیدو کې مرسته وکړي. د لا زیات بصري توضیح لپاره، ډاډ ترلاسه کړئ چې اړونده ویډیو وګورئ (په ویډیو کې په 00:00).
هارډویر تشریح شوی
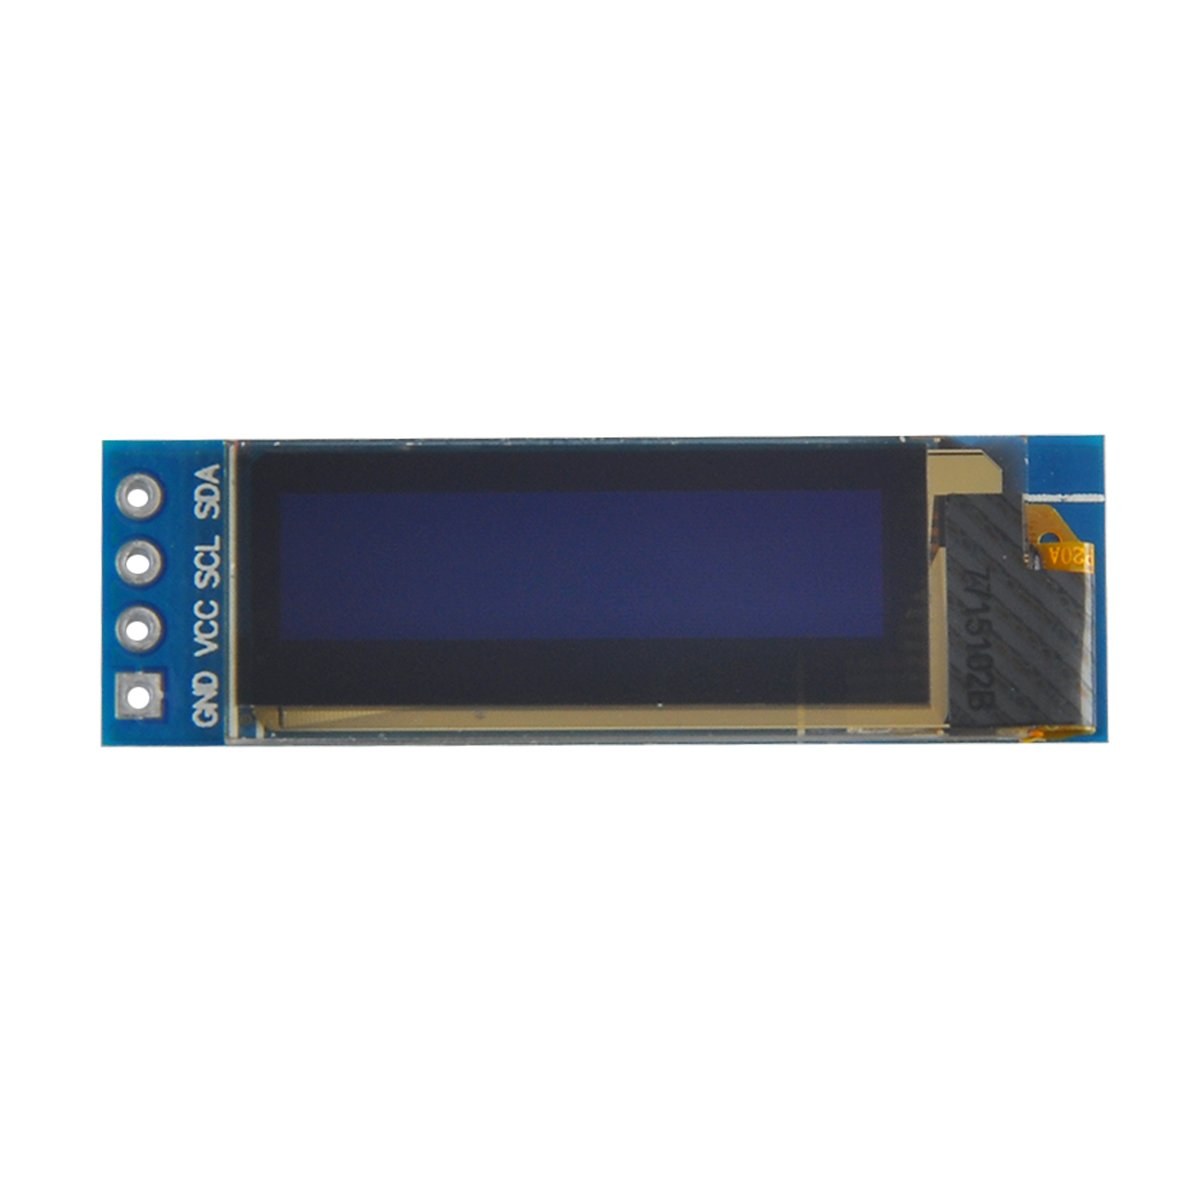
د دې پروژې اصلي برخې د Arduino بورډ او د SSD1306 OLED ډسپلې ماډل شامل دي. د SSD1306 ډسپلې د I2C اړیکو پروتوکول کاروي، کوم چې د یوازې دوه ډیټا لینونو په اړتیا سره تارونه ساده کوي: د ډیټا لپاره SDA او د ساعت سیګنال لپاره SCL. ډسپلې د 3.3V او 5V ترمنځ په ولټاژونو کې کار کوي، چې دا د ډیری Arduino بورډونو سره مطابقت لري.
د ډسپلې سربیره، تاسو به د ماډل د Arduino سره نښلولو لپاره جمپر تارونو ته اړتیا ولرئ. اړیکې شاملې دي VCC د بریښنا لپاره، GND د ځمکې لپاره، SDA د Arduino د ډیټا پن ته، او SCL د ساعت پن ته. دا ترتیب د Arduino او OLED ډسپلې ترمنځ اسانه اړیکه فعالوي.
د ډیټاشیټ تفصیلات
| جوړونکی | Adafruit |
|---|---|
| د پرزې شمېره | SSD1306 |
| منطق/IO ولټاژ | 3.3 V - 5 V |
| د بریښنا ولټاژ | 3.3 V - 5 V |
| د ډسپلې ریزولوشن | 128 x 64 پکسلز |
| د I2C پته | 0x3C |
| انټرفیس | I2C |
| بسته | ماډل |
- مناسب تارونه ډاډمن کړئ: VCC ته 3.3V یا 5V، GND ته ځمکه، SDA ته A4، SCL ته A5 (د Arduino Uno لپاره).
- ډسپلې په SDA او SCL لینونو کې پل-اپ ریزسټرونو ته اړتیا لري که چیرې دمخه شامل نه وي.
- ډاډ ترلاسه کړئ چې د I2C پته په کوډ کې په سمه توګه ټاکل شوې ده، معمولا د دې ډسپلې لپاره 0x3C.
- د اسانه ادغام لپاره یو مناسب کتابتون لکه Adafruit_SSD1306 وکاروئ.
- د نوي ګرافیکونو رسمولو دمخه ډسپلې پاک کړئ ترڅو د nakahلیو اغیزو څخه مخنیوی وشي.
د تارونو لارښوونې
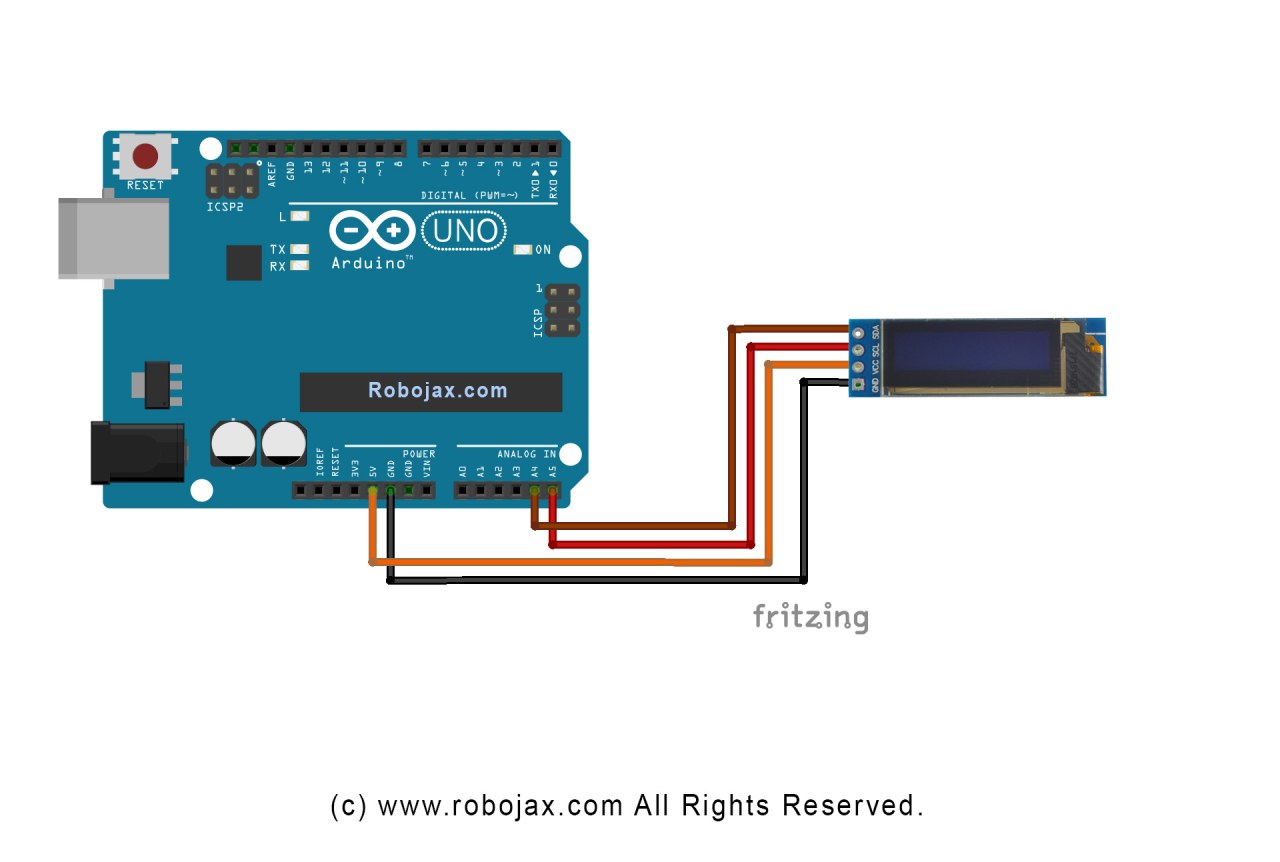
د SSD1306 OLED ډسپلې د خپل Arduino سره د تارولو لپاره، دا ګامونه تعقیب کړئ:
د OLED ډسپلې د VCC پن د Arduino په 5V (یا 3.3V) پن سره وصل کړئ. بیا، د ډسپلې د GND پن د Arduino په ځمکني پن سره وصل کړئ. د I2C اړیکو لپاره، د ډسپلې د SDA پن د Arduino په A4 پن سره او د SCL پن د A5 پن سره وصل کړئ. دا ترتیب به Arduino ته دا وړتیا ورکړي چې د I2C پروتوکول په کارولو سره د OLED ډسپلې سره اړیکه ونیسي.
ډاډ ترلاسه کړئ چې ټولې اړیکې خوندي دي، او دوه ځله وګورئ چې تاسو د خپل ځانګړي ډسپلې ماډل لپاره سم ولټاژ کاروئ. که تاسو د Arduino بل ماډل کاروئ، د SDA او SCL پنونه ممکن توپیر ولري (د مثال په توګه، د Arduino Mega لپاره، SDA په پن 20 کې دی او SCL په پن 21 کې دی).
د کوډ مثالونه او واک ترو
په کوډ کې، موږ ډسپلې پیل کوو او پیرامیټرې لکه د I2C پته او ابعاد تنظیم کوو. یو کلیدي پیژندونکی display دی، کوم چې د SSD1306 ډسپلې استازی دی. دلته د setup فنکشن څخه یوه برخه ده:
void setup() {
  Serial.begin(9600);
  display.begin(SSD1306_SWITCHCAPVCC, 0x3C);  // د I2C addr 0x3C سره پیل کړئ
}
په دې برخه کې، د display.begin فنکشن ډسپلې د ټاکل شوي I2C پتې سره پیل کوي. دا اړینه ده چې پته د خپل ډسپلې سره سمون ولري ترڅو سمه اړیکه ډاډمنه شي.
بیا، په loop فنکشن کې، موږ د display.clearDisplay() میتود کاروو ترڅو د نوي مینځپانګې رسمولو دمخه سکرین پاک کړو. موږ کولای شو د متن اندازه او موقعیت د setTextSize او setCursor میتودونو په کارولو سره تنظیم کړو:
void loop() {
  display.clearDisplay();
  display.setTextSize(2);
  display.setCursor(2,1); // کرسر په پورتنۍ کیڼ کونج کې وټاکئ
  display.println("Robojax"); // متن ښکاره کړئ
}
دلته، متن "Robojax" په سکرین کې په همغږیو (2,1) کې ښودل کیږي. دا په OLED ډسپلې کې د متن دقیق ځای پر ځای کولو اجازه ورکوي.
په پای کې، د ډسپلې په اړه بدلونونه ښکاره کولو لپاره، موږ display.display() ته زنګ وهو. دا فنکشن ټول بفر شوي حکمونه ډسپلې ته لیږي ترڅو د هغې مینځپانګه تازه کړي:
display.display();دا باید ستاسو په loop فنکشن کې وروستۍ کرښه وي ترڅو ډاډ ترلاسه شي چې ټول رسم کولو حکمونه اجرا کیږي. که تاسو دا ګام هیر کړئ، په ډسپلې کې به هیڅ نه ښکاري.
په یاد ولرئ، بشپړ کوډ د مقالې لاندې ستاسو د حوالې لپاره بار کیږي.
مظاهره / څه تمه وکړئ
د کوډ د خپل Arduino ته د اپلوډ کولو وروسته، تاسو باید په OLED سکرین کې متن "Robojax" وګورئ. کوډ د متن سکرول کول او د کرښو، شکلونو، او نورو ګرافیکونو رسمول هم ښیې. د عامو ستونزو لپاره وګورئ، لکه ناسم تارونه یا ناسمې I2C پتې، کوم چې کولای شي ډسپلې د سم فعالیت څخه مخنیوی وکړي (په ویډیو کې په 10:00).
د ویډیو وختونه
- 00:00 - د SSD1306 OLED ډسپلې پیژندنه
- 02:30 - د ډسپلې تارونه
- 05:00 - د کوډ واک ترو
- 08:00 - د ډسپلې ځانګړتیاوو مظاهره
- 10:00 - عامې ستونزې او حل لارې
Images

/*
 * Original source: https://github.com/adafruit/Adafruit_SSD1306
 * This is the Arduino code for the SSD1306 OLED 128 x 64 Display.
 * Watch the video for details and demo: http://youtu.be/UmYiHTOz-5k
 * This code has been modified to print specific elements such as text, lines, circles, rectangles, etc.
 * I have added a custom method to make printing text easy.

 If you get the error: Adafruit_GFX.h not found, download the Adafruit-GFX Library from:
 https://github.com/adafruit/Adafruit-GFX-Library

 Purchase this OLED module from Amazon: https://amzn.to/36zFvTb

 *  *
 * Written by Ahmad Shamshiri for Robojax Video channel, www.Robojax.com
 * Date: December 17, 2017, in Ajax, Ontario, Canada
 * Permission granted to share this code, provided that this
 * note is kept with the code.
 * Disclaimer: This code is "AS IS" and for educational purposes only.
 * This code has been downloaded from https://robojax.com
 *
 */

/*********************************************************************
This is an example for our monochrome OLEDs based on SSD1306 drivers.

  Pick one up today in the Adafruit shop!
  ------> http://www.adafruit.com/category/63_98

This example is for a 128x64 size display using I2C to communicate.
3 pins are required to interface (2 I2C and one reset).

Adafruit invests time and resources providing this open source code,
please support Adafruit and open-source hardware by purchasing
products from Adafruit!

Written by Limor Fried/Ladyada for Adafruit Industries.
BSD license, check license.txt for more information.
All text above, and the splash screen must be included in any redistribution.
*********************************************************************/

#include <SPI.h>
#include <Wire.h>
#include <Adafruit_GFX.h>
#include <Adafruit_SSD1306.h>

#define OLED_RESET 4
Adafruit_SSD1306 display(OLED_RESET);

#define NUMFLAKES 10
#define XPOS 0
#define YPOS 1
#define DELTAY 2


#define LOGO16_GLCD_HEIGHT 16 // do not change this. Error in video
#define LOGO16_GLCD_WIDTH  16 // do not change this. Error in video
static const unsigned char PROGMEM logo16_glcd_bmp[] =
{ B00000000, B11000000,
  B00000001, B11000000,
  B00000001, B11000000,
  B00000011, B11100000,
  B11110011, B11100000,
  B11111110, B11111000,
  B01111110, B11111111,
  B00110011, B10011111,
  B00011111, B11111100,
  B00001101, B01110000,
  B00011011, B10100000,
  B00111111, B11100000,
  B00111111, B11110000,
  B01111100, B11110000,
  B01110000, B01110000,
  B00000000, B00110000 };

    // look at line 27 to 30 of Adafruit_SSD1306.h inside the library to select the dimensions
#if (SSD1306_LCDHEIGHT != 64)
#error("Height incorrect, please fix Adafruit_SSD1306.h!");
#endif

void setup()   {
  Serial.begin(9600);

  // by default, we'll generate the high voltage from the 3.3v line internally! (neat!)
  display.begin(SSD1306_SWITCHCAPVCC, 0x3C);  // initialize with the I2C addr 0x3D (for the 128x64)
  // init done

}


void loop() {
 display.clearDisplay();
  robojaxText("Values", 3, 0, 2, false);
  robojaxText("V: 41v", 3, 22, 2, false);
  robojaxText("Temperature: 32C", 4, 45, 1, true);
  display.drawLine(1, 37, 100, 37, WHITE);
  display.drawRect(1, 20, 100,40, WHITE);
  //display.drawCircle(63,31, 31, WHITE);
   //display.startscrollright(0x00, 0x0F);
  display.display();
   delay(20000);
}

/*
 * robojaxText(String text, int x, int y, int size, boolean d)
 * text is the text string to be printed.
 * x is the integer x position of the text.
 * y is the integer y position of the text.
 * size is the text size (1, 2, 3, etc.).
 * d is a boolean value (true or false).  Its purpose is unclear, use true.
 */
void robojaxText(String text, int x, int y,int size, boolean d) {

  display.setTextSize(size);
  display.setTextColor(WHITE);
  display.setCursor(x,y);
  display.println(text);
  if(d){
    display.display();
  }

  delay(100);
}/*
* Original source: https://github.com/adafruit/Adafruit_SSD1306
* This is the Arduino code for the SSD1306 OLED 128 x 64 Display
* watch the video for details and demo http://youtu.be/UmYiHTOz-5k
* This code has been modified to print specific elements such as text, lines, circles, rectangles, etc.
* *
* *
* Written by Ahmad Shamshiri for Robojax Video channel www.Robojax.com
* Date: December 15, 2017, in Ajax, Ontario, Canada
* Permission granted to share this code given that this
* note is kept with the code.
* Disclaimer: this code is "AS IS" and for educational purposes only.
* This code has been downloaded from https://robojax.com
*
*/
/*********************************************************************
This is an example for our Monochrome OLEDs based on SSD1306 drivers
Pick one up today in the Adafruit shop!
------> http://www.adafruit.com/category/63_98
This example is for a 128x64 size display using I2C to communicate.
3 pins are required to interface (2 I2C and one reset).
Adafruit invests time and resources providing this open source code,
please support Adafruit and open-source hardware by purchasing
products from Adafruit!
Written by Limor Fried/Ladyada for Adafruit Industries.
BSD license, check license.txt for more information
All text above, and the splash screen must be included in any redistribution
*********************************************************************/
#include <SPI.h>
#include <Wire.h>
#include <Adafruit_GFX.h>
#include <Adafruit_SSD1306.h>
#define OLED_RESET 4
Adafruit_SSD1306 display(OLED_RESET);
#define NUMFLAKES 10
#define XPOS 0
#define YPOS 1
#define DELTAY 2
#define LOGO16_GLCD_HEIGHT 16 // do not change this. Error in video
#define LOGO16_GLCD_WIDTH 16 // do not change this. Error in video
static const unsigned char PROGMEM logo16_glcd_bmp[] =
{ B00000000, B11000000,
B00000001, B11000000,
B00000001, B11000000,
B00000011, B11100000,
B11110011, B11100000,
B11111110, B11111000,
B01111110, B11111111,
B00110011, B10011111,
B00011111, B11111100,
B00001101, B01110000,
B00011011, B10100000,
B00111111, B11100000,
B00111111, B11110000,
B01111100, B11110000,
B01110000, B01110000,
B00000000, B00110000 };
// look at line 27 to 30 of Adafruit_SSD1306.h inside the library to select the dimensions
#if (SSD1306_LCDHEIGHT != 64)
#error("Height incorrect, please fix Adafruit_SSD1306.h!");
#endif
void setup() {
Serial.begin(9600);
// by default, we'll generate the high voltage from the 3.3v line internally! (neat!)
display.begin(SSD1306_SWITCHCAPVCC, 0x3C); // initialize with the I2C addr 0x3D (for the 128x64)
// init done
}
void loop() {
display.clearDisplay();
display.setTextSize(2);
display.setTextColor(WHITE);
display.setCursor(2,1);// set the cursor at x=2, y=1 which is top left corner of display
display.println("Robojax");// the actual text
display.setCursor(2,18);
display.println("YouTube");// set the cursor at x=2, y=18 which is top left under the first text line
display.drawLine(0,16, display.width()-1, 16, WHITE); // drawing from the point x=0, y=16 to x=64-1 y=16
display.display();
display.startscrollright(0x00, 0x0F);
delay(2000);
display.stopscroll();
delay(1000);
display.startscrollleft(0x00, 0x0F);
delay(2000);
display.stopscroll();
delay(1000);
display.startscrolldiagright(0x00, 0x07);
delay(2000);
display.startscrolldiagleft(0x00, 0x07);
delay(2000);
display.stopscroll();
delay(10000);
}/*********************************************************************
Original source: http://playground.arduino.cc/Main/I2cScanner
This program will find the I2C address on the I2C device. Just upload the code into your Arduino
and open the serial monitor and wait. It will display the I2C address as 0x3C or similar.
* Please view other RoboJax codes and videos at http://robojax.com/learn/arduino
* If you are sharing this code, you must keep this copyright note.
*
*********************************************************************/
#include <Wire.h>
void setup()
{
Wire.begin();
Serial.begin(9600);
while (!Serial); // Leonardo: wait for serial monitor
Serial.println("\nI2C Scanner");
}
void loop()
{
byte error, address;
int nDevices;
Serial.println("Scanning...");
nDevices = 0;
for(address = 1; address < 127; address++ )
{
// The i2c_scanner uses the return value of
// the Wire.endTransmission to see if
// a device did acknowledge the address.
Wire.beginTransmission(address);
error = Wire.endTransmission();
if (error == 0)
{
Serial.print("I2C device found at address 0x");
if (address<16)
Serial.print("0");
Serial.print(address,HEX);
Serial.println(" !");
nDevices++;
}
else if (error==4)
{
Serial.print("Unknown error at address 0x");
if (address<16)
Serial.print("0");
Serial.println(address,HEX);
}
}
if (nDevices == 0)
Serial.println("No I2C devices found\n");
else
Serial.println("done\n");
delay(5000); // wait 5 seconds for next scan
}Resources & references
Files📁
Datasheet (pdf)
-
SSD1306 display datasheetSSD1306 is a single-chip CMOS OLED/PLED driver with controller for organic / polymer light emitting diode dot-matrix graphic display system. It consists of 128 segments and 64commons. This IC is designed for Common Cathode type OLED panel. The SSD1306 embeds with contrast control, display RAM and oscillator, which reduces the number of external components and power consumption. It has 256-step brightness control. Data/Commands are sent from general MCU through the hardware selectable 6800/8000 series compatible Parallel Interface, I2C interface or Serial Peripheral Interface. It is suitable for many compact portable applications, such as mobile phone sub-display, MP3 player and calculator, etc.
SSD1306_display_datasheet.pdf1.79 MB