Code Arduino mpe Video ya Affichage OLED SSD1306 128 x 64
Na boyekoli oyo, tokotalela ndenge ya kosalela SSD1306 OLED 128 x 64 display na Arduino. SSD1306 ezali display oyo esalelami mingi mpo na kolakisa maloba, bililingi, mpe bafilipo ndenge na ndenge na mpiko. Na suka ya lisolo oyo, okokoka kotia display mpe kotambwisa code oyo emonisi makoki na yango.
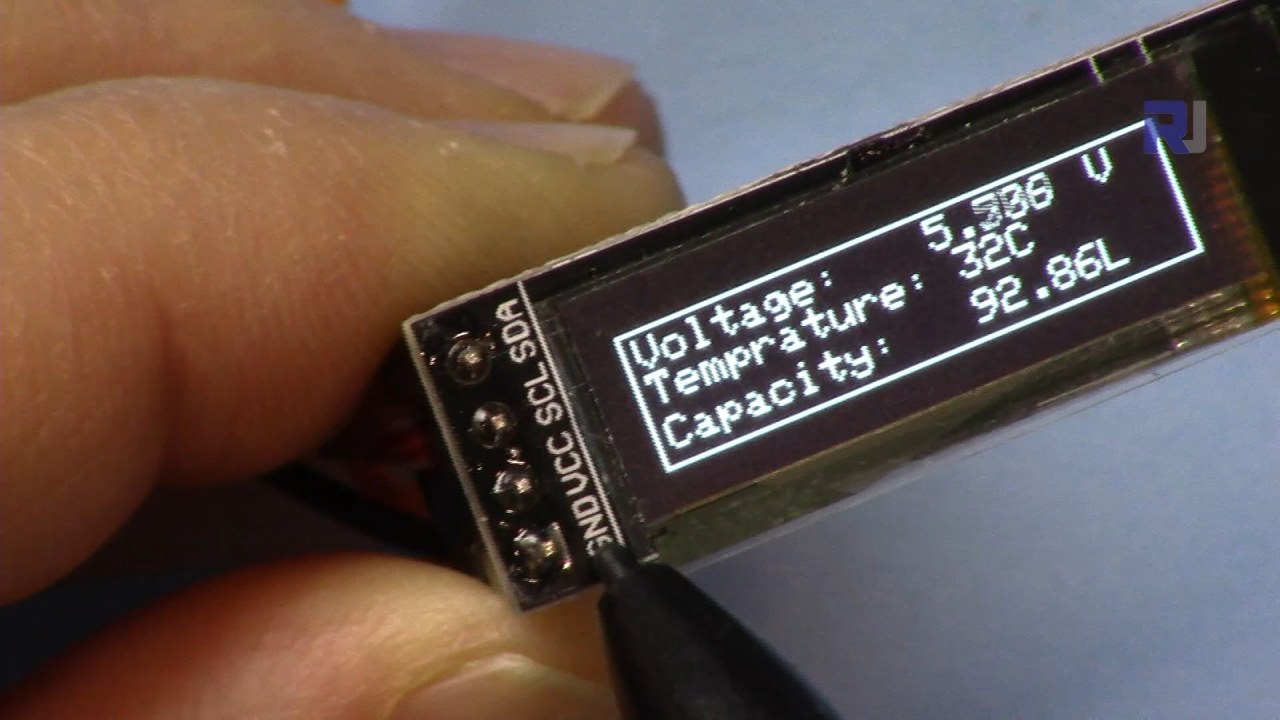
Tokotambwisa yo na ba connexions ya hardware oyo esengeli mpe tokopesa ba extraits ya code mpo na kosalisa yo kososola ba identifiants ya minene oyo esalelami na programme. Mpo na ndimbola ya komona mingi, tala video oyo elandi (na video na 00:00).
Hardware Explicado
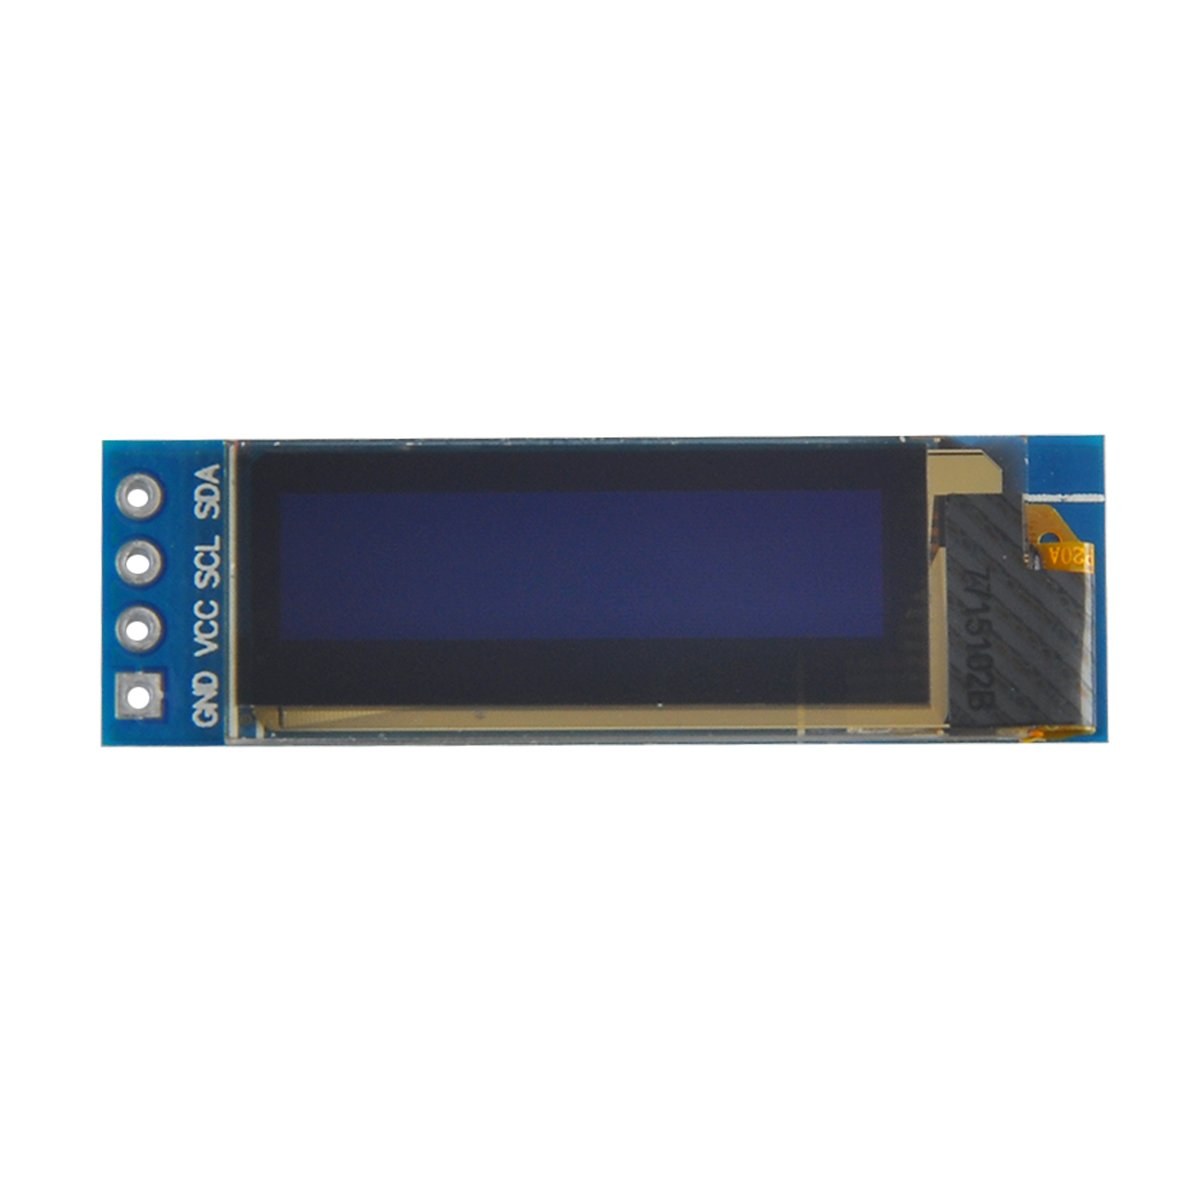
Ba composants ya minene ya projet oyo ezali na Arduino board mpe SSD1306 OLED display module. SSD1306 display esalelaka protocole ya communication I2C, oyo ekitisaka wiring na kotala kaka ba lignes mibale ya ba données: SDA mpo na données mpe SCL mpo na signal ya clock. Display esalaka na ba voltages kati na 3.3V mpe 5V, oyo esalaka ete ekokana na ba Arduino boards mingi.
Na libanda ya display, okokana na ba jumper wires mpo na kokangisa module na Arduino na yo. Ba connexions ezali na VCC mpo na puissance, GND mpo na terre, SDA na pin ya données ya Arduino, mpe SCL na pin ya clock. Configuration oyo esalaka ete communication ezala pete kati na Arduino mpe OLED display.
Ba Détails ya Datasheet
| Fabricant | Adafruit |
|---|---|
| Numéro ya partie | SSD1306 |
| Tension ya logique/IO | 3.3 V - 5 V |
| Tension ya alimentation | 3.3 V - 5 V |
| Résolution ya display | 128 x 64 pixels |
| Adresse I2C | 0x3C |
| Interface | I2C |
| Package | Module |
- Kokamba na ndenge ya malamu: VCC na 3.3V to 5V, GND na terre, SDA na A4, SCL na A5 (mpo na Arduino Uno).
- Display esengaka ba résistances ya traction na ba lignes SDA mpe SCL soki bakoki te.
- Vérifier ete adresse I2C esili kotiama na code, mingi mpe 0x3C mpo na display oyo.
- Salela bibliothèque oyo ekokani lokola Adafruit_SSD1306 mpo na intégration pete.
- Kopola display liboso ya kotia ba graphiques ya sika mpo na kokima ba artefacts oyo ekokutana.
Ba Instructions ya Wiring
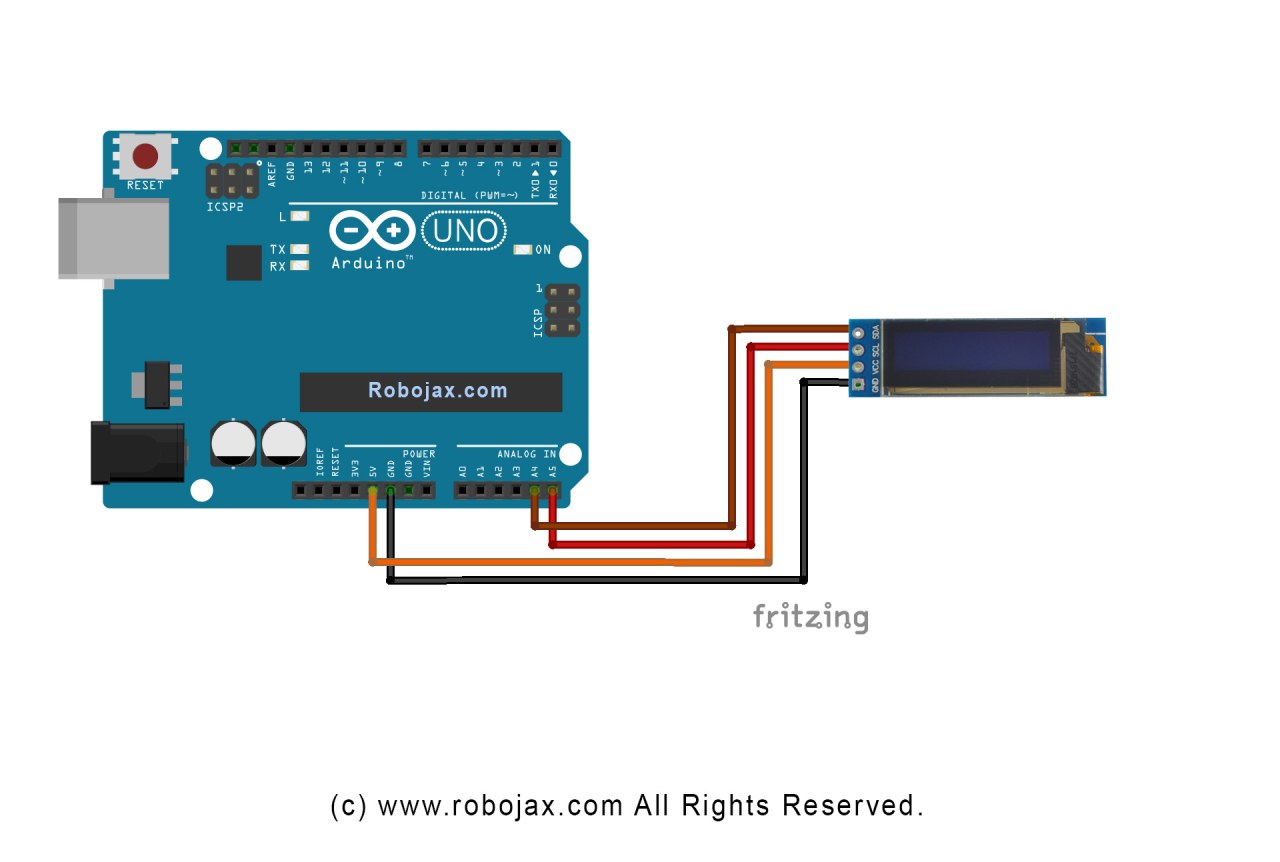
Mpo na kokangisa SSD1306 OLED display na Arduino na yo, landa ba étapes oyo:
Kokangisa pin VCC ya OLED display na pin 5V (to 3.3V) na Arduino. Na sima, kokangisa pin GND ya display na pin ya terre na Arduino. Mpo na communication I2C, kokangisa pin SDA ya display na pin A4 na Arduino mpe pin SCL na pin A5. Configuration oyo ekolakisa ete Arduino ekokoka kosolola na OLED display na protocole I2C.
Kokamba ete ba connexions nyonso ezala ya libanga, mpe tala lisusu ete ozali kosalela tension ya malamu mpo na modèle ya display na yo. Soki ozali kosalela modèle mosusu ya Arduino, ba pins SDA mpe SCL ekoki kokesana (na ndakisa, mpo na Arduino Mega, SDA ezali na pin 20 mpe SCL ezali na pin 21).
Ba Exemples ya Code & Explication
Na code, tokomisaka display na libanda mpe totiaka ba paramètres lokola adresse I2C mpe ba dimensions. Identifiant moko ya minene ezali display, oyo emonisi instance ya SSD1306 display. Tala extrait oyo longwa na fonction ya setup:
void setup() {
  Serial.begin(9600);
  display.begin(SSD1306_SWITCHCAPVCC, 0x3C);  // initialize with the I2C addr 0x3C
}
Na extrait oyo, fonction display.begin ekomisaka display na adresse I2C oyo epesami. Ezali ya liboke mpo na kokokisa adresse na display na yo mpo na communication ya malamu.
Na sima, na fonction ya loop, tosalelaka méthode display.clearDisplay() mpo na kopola écran liboso ya kotia makambo ya sika. Tokoki kotia taille ya texte mpe position na méthode setTextSize mpe setCursor:
void loop() {
  display.clearDisplay();
  display.setTextSize(2);
  display.setCursor(2,1); // set cursor at top left corner
  display.println("Robojax"); // display text
}
Awa, texte "Robojax" emonisamaka na coordonnées (2,1) na écran. Oyo esalaka ete texte etiama na esika ya malamu na OLED display.
Na suka, mpo na kopesa ba changements na display, tobengaka display.display(). Fonction oyo etindaka ba commandes nyonso oyo ebombamaki na display mpo na kobongola makambo na yango:
display.display();Oyo esengeli kozala ligne ya suka na fonction ya loop na yo mpo na kokamba ete ba commandes nyonso ya kotia ekomisama. Soki obosani étape oyo, eloko moko te ekomonana na display.
Kokanisa, code mobimba ezali na nse ya lisolo mpo na référence na yo.
Démonstration / Nini Okoki Kozela
Na sima ya kotia code na Arduino na yo, okomona texte "Robojax" emonisami na écran OLED. Code oyo emonisaka mpe texte oyo etambolaka mpe kotia ba lignes, ba formes, mpe ba graphiques mosusu na display. Tala mpo na ba pièges ya mbala mingi, lokola wiring ya mabe to ba adresses I2C oyo ekokani te, oyo ekoki kopekisa display ete esala malamu (na video na 10:00).
Ba Timestamps ya Vidéo
- 00:00 - Introduction na SSD1306 OLED Display
- 02:30 - Kokangisa Display
- 05:00 - Explication ya Code
- 08:00 - Démonstration ya Makoki ya Display
- 10:00 - Ba Problèmes ya Mbala Mingi mpe Ba Solutions
Images

/*
 * Original source: https://github.com/adafruit/Adafruit_SSD1306
 * This is the Arduino code for the SSD1306 OLED 128 x 64 Display.
 * Watch the video for details and demo: http://youtu.be/UmYiHTOz-5k
 * This code has been modified to print specific elements such as text, lines, circles, rectangles, etc.
 * I have added a custom method to make printing text easy.

 If you get the error: Adafruit_GFX.h not found, download the Adafruit-GFX Library from:
 https://github.com/adafruit/Adafruit-GFX-Library

 Purchase this OLED module from Amazon: https://amzn.to/36zFvTb

 *  *
 * Written by Ahmad Shamshiri for Robojax Video channel, www.Robojax.com
 * Date: December 17, 2017, in Ajax, Ontario, Canada
 * Permission granted to share this code, provided that this
 * note is kept with the code.
 * Disclaimer: This code is "AS IS" and for educational purposes only.
 * This code has been downloaded from https://robojax.com
 *
 */

/*********************************************************************
This is an example for our monochrome OLEDs based on SSD1306 drivers.

  Pick one up today in the Adafruit shop!
  ------> http://www.adafruit.com/category/63_98

This example is for a 128x64 size display using I2C to communicate.
3 pins are required to interface (2 I2C and one reset).

Adafruit invests time and resources providing this open source code,
please support Adafruit and open-source hardware by purchasing
products from Adafruit!

Written by Limor Fried/Ladyada for Adafruit Industries.
BSD license, check license.txt for more information.
All text above, and the splash screen must be included in any redistribution.
*********************************************************************/

#include <SPI.h>
#include <Wire.h>
#include <Adafruit_GFX.h>
#include <Adafruit_SSD1306.h>

#define OLED_RESET 4
Adafruit_SSD1306 display(OLED_RESET);

#define NUMFLAKES 10
#define XPOS 0
#define YPOS 1
#define DELTAY 2


#define LOGO16_GLCD_HEIGHT 16 // do not change this. Error in video
#define LOGO16_GLCD_WIDTH  16 // do not change this. Error in video
static const unsigned char PROGMEM logo16_glcd_bmp[] =
{ B00000000, B11000000,
  B00000001, B11000000,
  B00000001, B11000000,
  B00000011, B11100000,
  B11110011, B11100000,
  B11111110, B11111000,
  B01111110, B11111111,
  B00110011, B10011111,
  B00011111, B11111100,
  B00001101, B01110000,
  B00011011, B10100000,
  B00111111, B11100000,
  B00111111, B11110000,
  B01111100, B11110000,
  B01110000, B01110000,
  B00000000, B00110000 };

    // look at line 27 to 30 of Adafruit_SSD1306.h inside the library to select the dimensions
#if (SSD1306_LCDHEIGHT != 64)
#error("Height incorrect, please fix Adafruit_SSD1306.h!");
#endif

void setup()   {
  Serial.begin(9600);

  // by default, we'll generate the high voltage from the 3.3v line internally! (neat!)
  display.begin(SSD1306_SWITCHCAPVCC, 0x3C);  // initialize with the I2C addr 0x3D (for the 128x64)
  // init done

}


void loop() {
 display.clearDisplay();
  robojaxText("Values", 3, 0, 2, false);
  robojaxText("V: 41v", 3, 22, 2, false);
  robojaxText("Temperature: 32C", 4, 45, 1, true);
  display.drawLine(1, 37, 100, 37, WHITE);
  display.drawRect(1, 20, 100,40, WHITE);
  //display.drawCircle(63,31, 31, WHITE);
   //display.startscrollright(0x00, 0x0F);
  display.display();
   delay(20000);
}

/*
 * robojaxText(String text, int x, int y, int size, boolean d)
 * text is the text string to be printed.
 * x is the integer x position of the text.
 * y is the integer y position of the text.
 * size is the text size (1, 2, 3, etc.).
 * d is a boolean value (true or false).  Its purpose is unclear, use true.
 */
void robojaxText(String text, int x, int y,int size, boolean d) {

  display.setTextSize(size);
  display.setTextColor(WHITE);
  display.setCursor(x,y);
  display.println(text);
  if(d){
    display.display();
  }

  delay(100);
}/*
* Original source: https://github.com/adafruit/Adafruit_SSD1306
* This is the Arduino code for the SSD1306 OLED 128 x 64 Display
* watch the video for details and demo http://youtu.be/UmYiHTOz-5k
* This code has been modified to print specific elements such as text, lines, circles, rectangles, etc.
* *
* *
* Written by Ahmad Shamshiri for Robojax Video channel www.Robojax.com
* Date: December 15, 2017, in Ajax, Ontario, Canada
* Permission granted to share this code given that this
* note is kept with the code.
* Disclaimer: this code is "AS IS" and for educational purposes only.
* This code has been downloaded from https://robojax.com
*
*/
/*********************************************************************
This is an example for our Monochrome OLEDs based on SSD1306 drivers
Pick one up today in the Adafruit shop!
------> http://www.adafruit.com/category/63_98
This example is for a 128x64 size display using I2C to communicate.
3 pins are required to interface (2 I2C and one reset).
Adafruit invests time and resources providing this open source code,
please support Adafruit and open-source hardware by purchasing
products from Adafruit!
Written by Limor Fried/Ladyada for Adafruit Industries.
BSD license, check license.txt for more information
All text above, and the splash screen must be included in any redistribution
*********************************************************************/
#include <SPI.h>
#include <Wire.h>
#include <Adafruit_GFX.h>
#include <Adafruit_SSD1306.h>
#define OLED_RESET 4
Adafruit_SSD1306 display(OLED_RESET);
#define NUMFLAKES 10
#define XPOS 0
#define YPOS 1
#define DELTAY 2
#define LOGO16_GLCD_HEIGHT 16 // do not change this. Error in video
#define LOGO16_GLCD_WIDTH 16 // do not change this. Error in video
static const unsigned char PROGMEM logo16_glcd_bmp[] =
{ B00000000, B11000000,
B00000001, B11000000,
B00000001, B11000000,
B00000011, B11100000,
B11110011, B11100000,
B11111110, B11111000,
B01111110, B11111111,
B00110011, B10011111,
B00011111, B11111100,
B00001101, B01110000,
B00011011, B10100000,
B00111111, B11100000,
B00111111, B11110000,
B01111100, B11110000,
B01110000, B01110000,
B00000000, B00110000 };
// look at line 27 to 30 of Adafruit_SSD1306.h inside the library to select the dimensions
#if (SSD1306_LCDHEIGHT != 64)
#error("Height incorrect, please fix Adafruit_SSD1306.h!");
#endif
void setup() {
Serial.begin(9600);
// by default, we'll generate the high voltage from the 3.3v line internally! (neat!)
display.begin(SSD1306_SWITCHCAPVCC, 0x3C); // initialize with the I2C addr 0x3D (for the 128x64)
// init done
}
void loop() {
display.clearDisplay();
display.setTextSize(2);
display.setTextColor(WHITE);
display.setCursor(2,1);// set the cursor at x=2, y=1 which is top left corner of display
display.println("Robojax");// the actual text
display.setCursor(2,18);
display.println("YouTube");// set the cursor at x=2, y=18 which is top left under the first text line
display.drawLine(0,16, display.width()-1, 16, WHITE); // drawing from the point x=0, y=16 to x=64-1 y=16
display.display();
display.startscrollright(0x00, 0x0F);
delay(2000);
display.stopscroll();
delay(1000);
display.startscrollleft(0x00, 0x0F);
delay(2000);
display.stopscroll();
delay(1000);
display.startscrolldiagright(0x00, 0x07);
delay(2000);
display.startscrolldiagleft(0x00, 0x07);
delay(2000);
display.stopscroll();
delay(10000);
}/*********************************************************************
Original source: http://playground.arduino.cc/Main/I2cScanner
This program will find the I2C address on the I2C device. Just upload the code into your Arduino
and open the serial monitor and wait. It will display the I2C address as 0x3C or similar.
* Please view other RoboJax codes and videos at http://robojax.com/learn/arduino
* If you are sharing this code, you must keep this copyright note.
*
*********************************************************************/
#include <Wire.h>
void setup()
{
Wire.begin();
Serial.begin(9600);
while (!Serial); // Leonardo: wait for serial monitor
Serial.println("\nI2C Scanner");
}
void loop()
{
byte error, address;
int nDevices;
Serial.println("Scanning...");
nDevices = 0;
for(address = 1; address < 127; address++ )
{
// The i2c_scanner uses the return value of
// the Wire.endTransmission to see if
// a device did acknowledge the address.
Wire.beginTransmission(address);
error = Wire.endTransmission();
if (error == 0)
{
Serial.print("I2C device found at address 0x");
if (address<16)
Serial.print("0");
Serial.print(address,HEX);
Serial.println(" !");
nDevices++;
}
else if (error==4)
{
Serial.print("Unknown error at address 0x");
if (address<16)
Serial.print("0");
Serial.println(address,HEX);
}
}
if (nDevices == 0)
Serial.println("No I2C devices found\n");
else
Serial.println("done\n");
delay(5000); // wait 5 seconds for next scan
}Mokili na bisika
Fichiers📁
Fiche technique (pdf)
-
SSD1306 display datasheetSSD1306 is a single-chip CMOS OLED/PLED driver with controller for organic / polymer light emitting diode dot-matrix graphic display system. It consists of 128 segments and 64commons. This IC is designed for Common Cathode type OLED panel. The SSD1306 embeds with contrast control, display RAM and oscillator, which reduces the number of external components and power consumption. It has 256-step brightness control. Data/Commands are sent from general MCU through the hardware selectable 6800/8000 series compatible Parallel Interface, I2C interface or Serial Peripheral Interface. It is suitable for many compact portable applications, such as mobile phone sub-display, MP3 player and calculator, etc.
SSD1306_display_datasheet.pdf1.79 MB