شِفر (کود) و ویدئو آردوینو برای نمایشگر OLED SSD1306 با اندازه 128 x 64
در این آموزش، نحوه استفاده از نمایشگر SSD1306 OLED 128 x 64 با آردوینو را بررسی خواهیم کرد. SSD1306 یک نمایشگر چندمنظوره است که به شما امکان میدهد متن، گرافیک و اشکال مختلف را بهراحتی نمایش دهید. تا پایان این مقاله قادر خواهید بود نمایشگر را راهاندازی کرده و کدی را اجرا کنید که قابلیتهای آن را نشان میدهد.

ما شما را در انجام اتصالات سختافزاری لازم راهنمایی کرده و نمونهکدهایی ارائه میدهیم تا شناسههای کلیدی مورد استفاده در برنامه را بهتر درک کنید. برای توضیحی تصویریتر حتماً ویدیوی مرتبط را تماشا کنید (در ویدیو در 00:00).
سختافزار توضیح داده شده
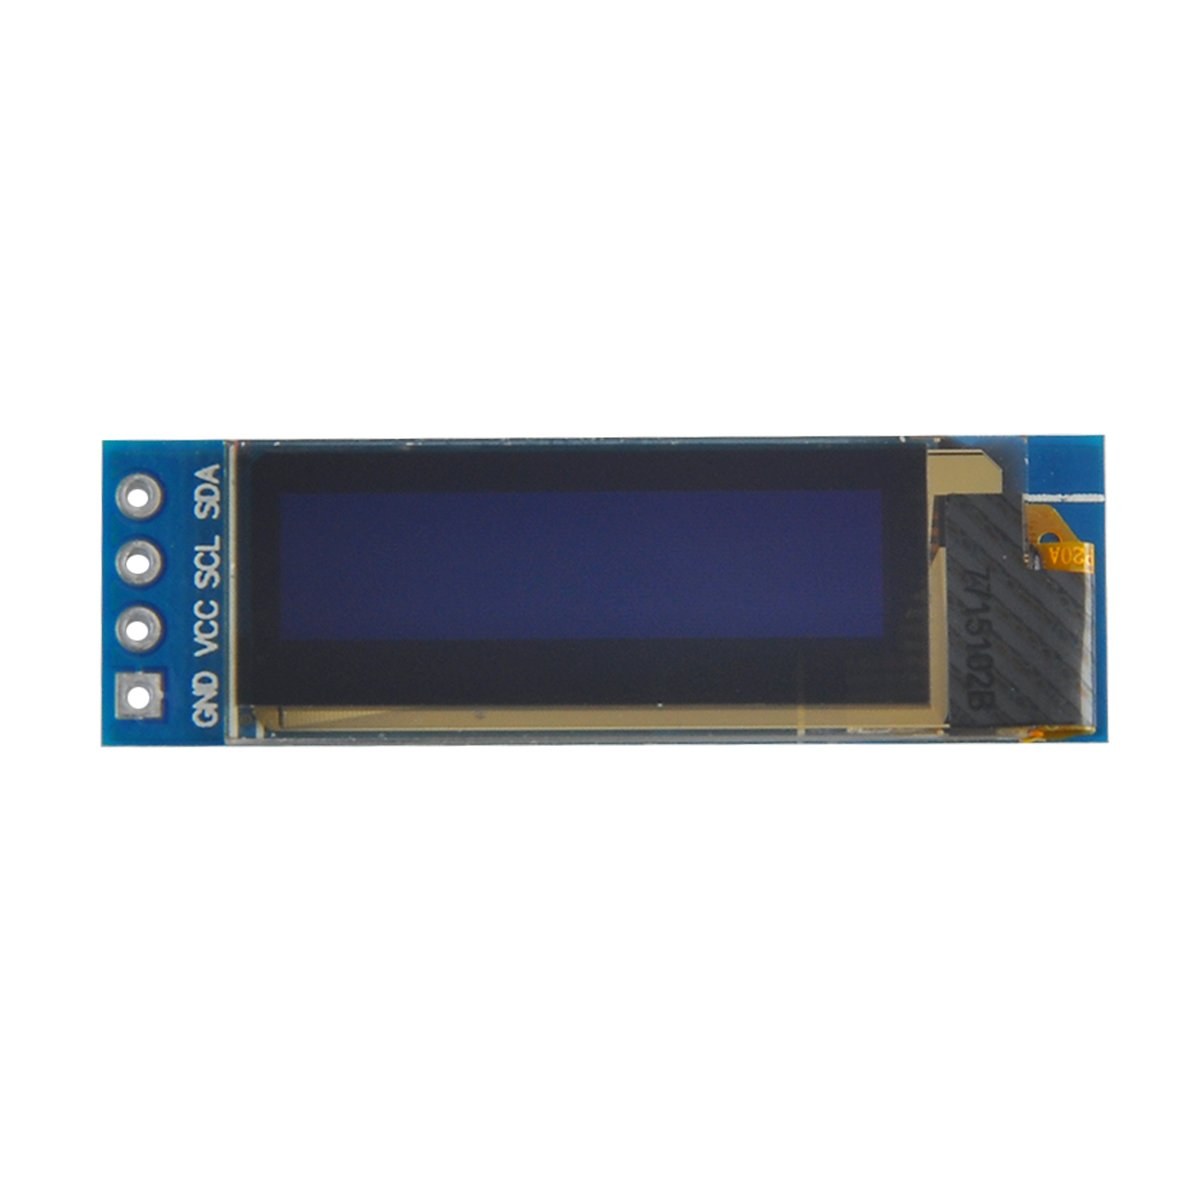
اجزای اصلی این پروژه برد آردوینو و ماجیول نمایشگر OLED مدل SSD1306 هستند. نمایشگر SSD1306 از پروتکل ارتباطی I2C استفاده میکند که با نیاز داشتن تنها دو خط داده سیمکشی را ساده میکند: SDA برای داده و SCL برای سیگنال ساعت. این نمایشگر در ولتاژهای بین 3.3V و 5V کار میکند، که آن را با اکثر بردهای آردوینو سازگار میسازد.
علاوه بر نمایشگر، به سیمهای جامپر نیاز خواهید داشت تا ماجیول را به آردوینو وصل کنید. اتصالات شامل VCC برای تغذیه، GND برای زمین، SDA به پایهٔ دادهٔ آردوینو و SCL به پایهٔ کلاک هستند. این تنظیم امکان ارتباط آسان بین آردوینو و نمایشگر OLED را فراهم میکند.
جزئیات مشخصات فنی
| تولیدکننده | آدافروت |
|---|---|
| شماره قطعه | SSD1306 |
| ولتاژ منطقی/ورودی-خروجی | 3.3 ولت تا 5 ولت |
| ولتاژ تغذیه | 3.3 ولت - 5 ولت |
| رزولوشن صفحه نمایش | 128 در 64 پیکسل |
| آدرس I2C | 0x3C |
| رابط | آی2سی |
| بسته | ماجیول |
- از سیمکشی صحیح اطمینان حاصل کنید: VCC به 3.3V یا 5V، GND به زمین، SDA به A4، SCL به A5 (برای Arduino Uno).
- نمایشگر به مقاومتهای pull-up روی خطوط SDA و SCL نیاز دارد، در صورتی که این مقاومتها قبلاً تعبیه نشده باشند.
- اطمینان حاصل کنید که آدرس I2C در شِفر (کود) بهدرستی تنظیم شده است؛ معمولاً برای این نمایشگر 0x3C است.
- برای یکپارچهسازی آسان از یک کتابخانهٔ مناسب مانند Adafruit_SSD1306 استفاده کنید.
- قبل از ترسیم گرافیکهای جدید، صفحهنمایش را پاک کنید تا از ایجاد آثار همپوشانی جلوگیری شود.
دستورالعملهای سیمکشی

برای سیمکشی نمایشگر OLED مدل SSD1306 به آردوینو خود، مراحل زیر را دنبال کنید:
پایه VCC نمایشگر OLED را به پایه 5V (یا 3.3V) روی آردوینو متصل کنید. سپس پایه GND نمایشگر را به پایه زمین روی آردوینو متصل کنید. برای ارتباط I2C، پایه SDA نمایشگر را به پایه A4 آردوینو و پایه SCL را به پایه A5 متصل کنید. این تنظیمات به آردوینو امکان میدهد از طریق پروتکل I2C با نمایشگر OLED ارتباط برقرار کند.
اطمینان حاصل کنید که همهٔ اتصالات محکم هستند و دوباره بررسی کنید که از ولتاژ صحیح برای مدل نمایشگر خاص خود استفاده میکنید. اگر از مدل دیگری از آردوینو استفاده میکنید، پایههای SDA و SCL ممکن است متفاوت باشند (مثلاً در آردوینو مگا، SDA روی پایه 20 و SCL روی پایه 21 قرار دارد).
نمونههای شِفر (کود) و راهنمای گامبهگام
در شِفر (کود)، نمایشگر را مقداردهی اولیه کرده و پارامترهایی مانند آدرس I2C و ابعاد را تنظیم میکنیم. یکی از شناسههای کلیدی عبارت است ازdisplay، که نمایانگر نمونهای از نمایشگر SSD1306 است. در اینجا قطعهای از تابع setup آمده است:
void setup() {
  Serial.begin(9600);
  display.begin(SSD1306_SWITCHCAPVCC, 0x3C);  // initialize with the I2C addr 0x3C
}
در این قطعه،display.beginتابع نمایشگر را با آدرس I2C مشخص مقداردهی اولیه میکند. ضروری است آدرس را با نمایشگر خود تطابق دهید تا ارتباط صحیح برقرار شود.
سپس، در تابع loop، ازdisplay.clearDisplay()روشی برای پاک کردن صفحه نمایش قبل از رسم محتوای جدید. میتوانیم اندازه و موقعیت متن را با استفاده ازsetTextSizeوsetCursorروشها:
void loop() {
  display.clearDisplay();
  display.setTextSize(2);
  display.setCursor(2,1); // set cursor at top left corner
  display.println("Robojax"); // display text
}
در اینجا متن "Robojax" در مختصات (2,1) روی صفحه نمایش نشان داده میشود. این امکان قرارگیری دقیق متن روی نمایشگر OLED را فراهم میکند.
در نهایت، برای رندر کردن تغییرات روی نمایشگر، آن را فراخوانی میکنیمdisplay.display(). این تابع همهٔ دستورات ذخیرهشده در بافر را به نمایشگر ارسال میکند تا محتوای آن را بهروزرسانی کند:
display.display();این باید آخرین خط در تابع loop شما باشد تا مطمئن شوید که تمام دستورات رسم اجرا میشوند. اگر این مرحله را فراموش کنید، هیچ چیزی روی نمایشگر ظاهر نخواهد شد.
فراموش نکنید که شِفر (کود) کامل برای مراجعهی شما در پایین مقاله بارگذاری شده است.
نمایش / چه انتظاری داشته باشید
پس از آپلود شِفر (کود) روی آردوینو، باید متن Robojax روی صفحه OLED نمایش داده شود. شِفر (کود) همچنین اسکرول کردن متن و رسم خطوط، اشکال و دیگر گرافیکها را روی نمایشگر نشان میدهد. مراقب خطاهای رایج باشید، مانند سیمکشی نادرست یا آدرسهای I2C ناهماهنگ که میتوانند مانع عملکرد صحیح نمایشگر شوند (در ویدیو، در 10:00).
برچسبهای زمانی ویدیو
- 00:00- مقدمهای بر نمایشگر OLED SSD1306
- 02:30- سیمکشی نمایشگر
- 05:00- مرور شِفر (کود)
- ساعت 08:00- نمایش قابلیتهای نمایشگر
- 10:00- مشکلات رایج و عیبیابی
تصاویر

/*
 * Original source: https://github.com/adafruit/Adafruit_SSD1306
 * This is the Arduino code for the SSD1306 OLED 128 x 64 Display.
 * Watch the video for details and demo: http://youtu.be/UmYiHTOz-5k
 * This code has been modified to print specific elements such as text, lines, circles, rectangles, etc.
 * I have added a custom method to make printing text easy.

 If you get the error: Adafruit_GFX.h not found, download the Adafruit-GFX Library from:
 https://github.com/adafruit/Adafruit-GFX-Library

 Purchase this OLED module from Amazon: https://amzn.to/36zFvTb

 *  *
 * Written by Ahmad Shamshiri for Robojax Video channel, www.Robojax.com
 * Date: December 17, 2017, in Ajax, Ontario, Canada
 * Permission granted to share this code, provided that this
 * note is kept with the code.
 * Disclaimer: This code is "AS IS" and for educational purposes only.
 * This code has been downloaded from https://robojax.com
 *
 */

/*********************************************************************
This is an example for our monochrome OLEDs based on SSD1306 drivers.

  Pick one up today in the Adafruit shop!
  ------> http://www.adafruit.com/category/63_98

This example is for a 128x64 size display using I2C to communicate.
3 pins are required to interface (2 I2C and one reset).

Adafruit invests time and resources providing this open source code,
please support Adafruit and open-source hardware by purchasing
products from Adafruit!

Written by Limor Fried/Ladyada for Adafruit Industries.
BSD license, check license.txt for more information.
All text above, and the splash screen must be included in any redistribution.
*********************************************************************/

#include <SPI.h>
#include <Wire.h>
#include <Adafruit_GFX.h>
#include <Adafruit_SSD1306.h>

#define OLED_RESET 4
Adafruit_SSD1306 display(OLED_RESET);

#define NUMFLAKES 10
#define XPOS 0
#define YPOS 1
#define DELTAY 2


#define LOGO16_GLCD_HEIGHT 16 // do not change this. Error in video
#define LOGO16_GLCD_WIDTH  16 // do not change this. Error in video
static const unsigned char PROGMEM logo16_glcd_bmp[] =
{ B00000000, B11000000,
  B00000001, B11000000,
  B00000001, B11000000,
  B00000011, B11100000,
  B11110011, B11100000,
  B11111110, B11111000,
  B01111110, B11111111,
  B00110011, B10011111,
  B00011111, B11111100,
  B00001101, B01110000,
  B00011011, B10100000,
  B00111111, B11100000,
  B00111111, B11110000,
  B01111100, B11110000,
  B01110000, B01110000,
  B00000000, B00110000 };

    // look at line 27 to 30 of Adafruit_SSD1306.h inside the library to select the dimensions
#if (SSD1306_LCDHEIGHT != 64)
#error("Height incorrect, please fix Adafruit_SSD1306.h!");
#endif

void setup()   {
  Serial.begin(9600);

  // by default, we'll generate the high voltage from the 3.3v line internally! (neat!)
  display.begin(SSD1306_SWITCHCAPVCC, 0x3C);  // initialize with the I2C addr 0x3D (for the 128x64)
  // init done

}


void loop() {
 display.clearDisplay();
  robojaxText("Values", 3, 0, 2, false);
  robojaxText("V: 41v", 3, 22, 2, false);
  robojaxText("Temperature: 32C", 4, 45, 1, true);
  display.drawLine(1, 37, 100, 37, WHITE);
  display.drawRect(1, 20, 100,40, WHITE);
  //display.drawCircle(63,31, 31, WHITE);
   //display.startscrollright(0x00, 0x0F);
  display.display();
   delay(20000);
}

/*
 * robojaxText(String text, int x, int y, int size, boolean d)
 * text is the text string to be printed.
 * x is the integer x position of the text.
 * y is the integer y position of the text.
 * size is the text size (1, 2, 3, etc.).
 * d is a boolean value (true or false).  Its purpose is unclear, use true.
 */
void robojaxText(String text, int x, int y,int size, boolean d) {

  display.setTextSize(size);
  display.setTextColor(WHITE);
  display.setCursor(x,y);
  display.println(text);
  if(d){
    display.display();
  }

  delay(100);
}/*
* Original source: https://github.com/adafruit/Adafruit_SSD1306
* This is the Arduino code for the SSD1306 OLED 128 x 64 Display
* watch the video for details and demo http://youtu.be/UmYiHTOz-5k
* This code has been modified to print specific elements such as text, lines, circles, rectangles, etc.
* *
* *
* Written by Ahmad Shamshiri for Robojax Video channel www.Robojax.com
* Date: December 15, 2017, in Ajax, Ontario, Canada
* Permission granted to share this code given that this
* note is kept with the code.
* Disclaimer: this code is "AS IS" and for educational purposes only.
* This code has been downloaded from https://robojax.com
*
*/
/*********************************************************************
This is an example for our Monochrome OLEDs based on SSD1306 drivers
Pick one up today in the Adafruit shop!
------> http://www.adafruit.com/category/63_98
This example is for a 128x64 size display using I2C to communicate.
3 pins are required to interface (2 I2C and one reset).
Adafruit invests time and resources providing this open source code,
please support Adafruit and open-source hardware by purchasing
products from Adafruit!
Written by Limor Fried/Ladyada for Adafruit Industries.
BSD license, check license.txt for more information
All text above, and the splash screen must be included in any redistribution
*********************************************************************/
#include <SPI.h>
#include <Wire.h>
#include <Adafruit_GFX.h>
#include <Adafruit_SSD1306.h>
#define OLED_RESET 4
Adafruit_SSD1306 display(OLED_RESET);
#define NUMFLAKES 10
#define XPOS 0
#define YPOS 1
#define DELTAY 2
#define LOGO16_GLCD_HEIGHT 16 // do not change this. Error in video
#define LOGO16_GLCD_WIDTH 16 // do not change this. Error in video
static const unsigned char PROGMEM logo16_glcd_bmp[] =
{ B00000000, B11000000,
B00000001, B11000000,
B00000001, B11000000,
B00000011, B11100000,
B11110011, B11100000,
B11111110, B11111000,
B01111110, B11111111,
B00110011, B10011111,
B00011111, B11111100,
B00001101, B01110000,
B00011011, B10100000,
B00111111, B11100000,
B00111111, B11110000,
B01111100, B11110000,
B01110000, B01110000,
B00000000, B00110000 };
// look at line 27 to 30 of Adafruit_SSD1306.h inside the library to select the dimensions
#if (SSD1306_LCDHEIGHT != 64)
#error("Height incorrect, please fix Adafruit_SSD1306.h!");
#endif
void setup() {
Serial.begin(9600);
// by default, we'll generate the high voltage from the 3.3v line internally! (neat!)
display.begin(SSD1306_SWITCHCAPVCC, 0x3C); // initialize with the I2C addr 0x3D (for the 128x64)
// init done
}
void loop() {
display.clearDisplay();
display.setTextSize(2);
display.setTextColor(WHITE);
display.setCursor(2,1);// set the cursor at x=2, y=1 which is top left corner of display
display.println("Robojax");// the actual text
display.setCursor(2,18);
display.println("YouTube");// set the cursor at x=2, y=18 which is top left under the first text line
display.drawLine(0,16, display.width()-1, 16, WHITE); // drawing from the point x=0, y=16 to x=64-1 y=16
display.display();
display.startscrollright(0x00, 0x0F);
delay(2000);
display.stopscroll();
delay(1000);
display.startscrollleft(0x00, 0x0F);
delay(2000);
display.stopscroll();
delay(1000);
display.startscrolldiagright(0x00, 0x07);
delay(2000);
display.startscrolldiagleft(0x00, 0x07);
delay(2000);
display.stopscroll();
delay(10000);
}/*********************************************************************
Original source: http://playground.arduino.cc/Main/I2cScanner
This program will find the I2C address on the I2C device. Just upload the code into your Arduino
and open the serial monitor and wait. It will display the I2C address as 0x3C or similar.
* Please view other RoboJax codes and videos at http://robojax.com/learn/arduino
* If you are sharing this code, you must keep this copyright note.
*
*********************************************************************/
#include <Wire.h>
void setup()
{
Wire.begin();
Serial.begin(9600);
while (!Serial); // Leonardo: wait for serial monitor
Serial.println("\nI2C Scanner");
}
void loop()
{
byte error, address;
int nDevices;
Serial.println("Scanning...");
nDevices = 0;
for(address = 1; address < 127; address++ )
{
// The i2c_scanner uses the return value of
// the Wire.endTransmission to see if
// a device did acknowledge the address.
Wire.beginTransmission(address);
error = Wire.endTransmission();
if (error == 0)
{
Serial.print("I2C device found at address 0x");
if (address<16)
Serial.print("0");
Serial.print(address,HEX);
Serial.println(" !");
nDevices++;
}
else if (error==4)
{
Serial.print("Unknown error at address 0x");
if (address<16)
Serial.print("0");
Serial.println(address,HEX);
}
}
if (nDevices == 0)
Serial.println("No I2C devices found\n");
else
Serial.println("done\n");
delay(5000); // wait 5 seconds for next scan
}منابع و مراجع
فایلها📁
هیچ فایلی موجود نیست.