Arduino kod i video za SSD1306 OLED 128 x 64 ekran
U ovom tutorijalu ćemo istražiti kako koristiti SSD1306 OLED 128 x 64 displej sa Arduino mikrokontrolerom. SSD1306 je svestran displej koji vam omogućava da jednostavno prikazujete tekst, grafiku i različite oblike. Do kraja ovog članka, moći ćete postaviti displej i pokrenuti kod koji demonstrira njegove mogućnosti.
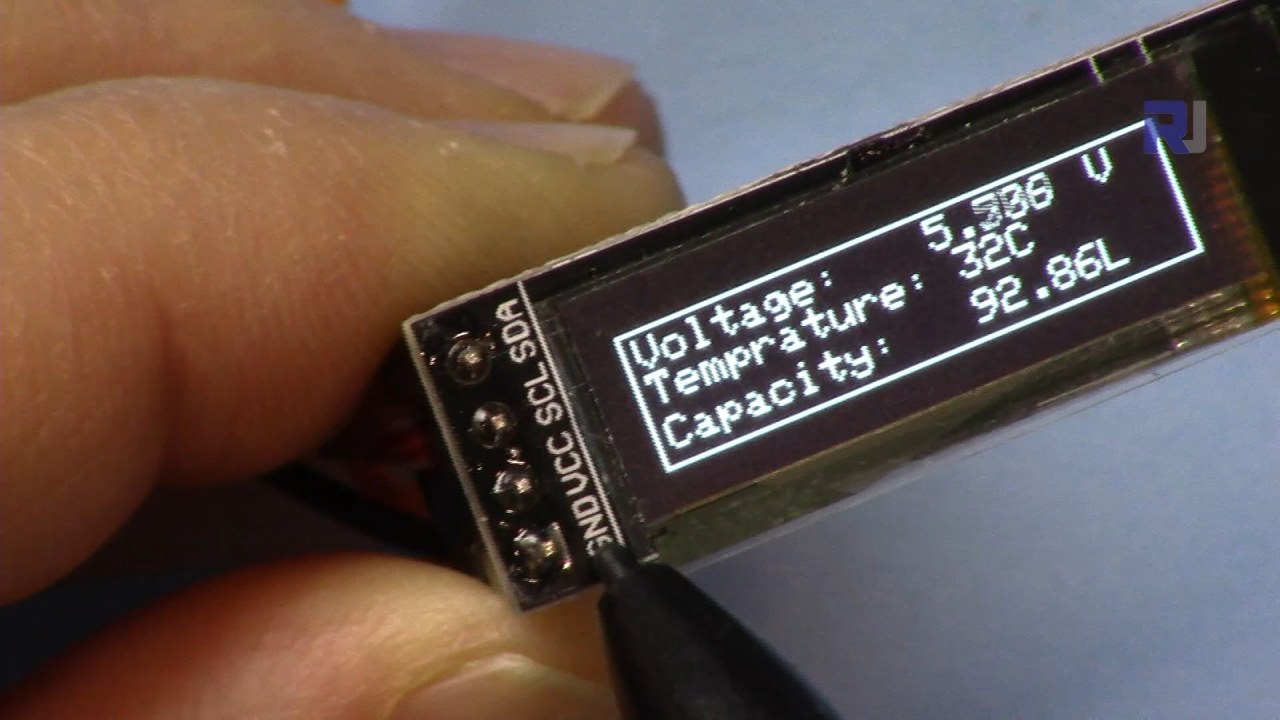
Provest ćemo vas kroz potrebne hardverske veze i pružiti isječke koda koji će vam pomoći da razumijete ključne identifikatore korištene u programu. Za vizualnije objašnjenje, svakako pogledajte povezani video (u videu na 00:00).
Hardver Objašnjen
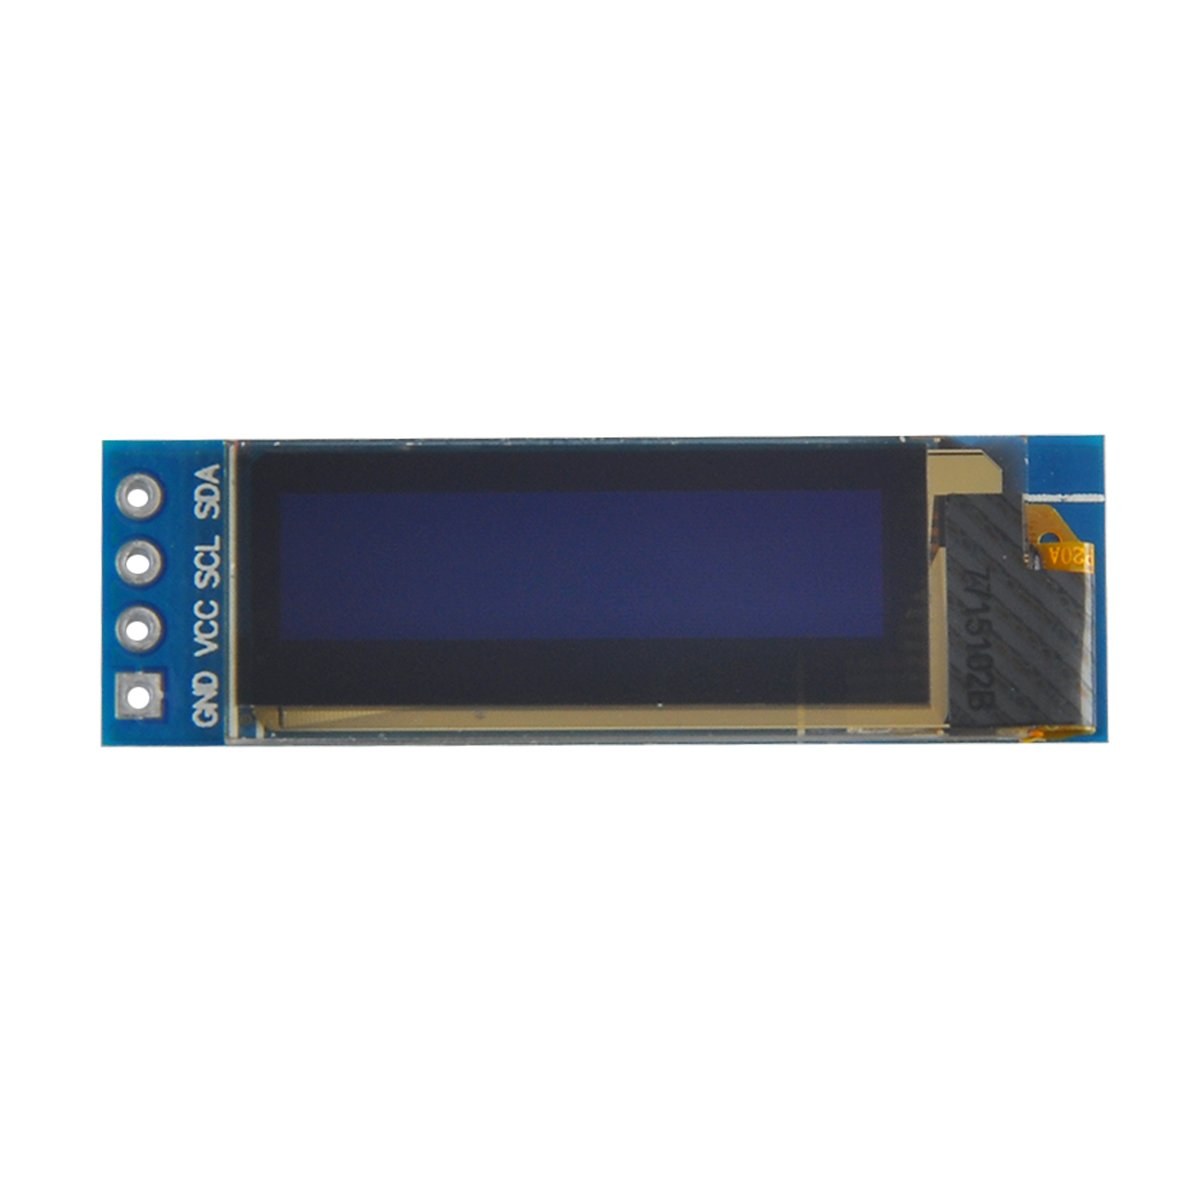
Glavne komponente ovog projekta uključuju Arduino ploču i SSD1306 OLED displej modul. SSD1306 displej koristi I2C komunikacijski protokol, što pojednostavljuje ožičenje zahtijevajući samo dvije podatkovne linije: SDA za podatke i SCL za signal takta. Displej radi na naponima između 3.3V i 5V, što ga čini kompatibilnim s većinom Arduino ploča.
Osim displeja, trebat će vam i žice za spajanje modula na vaš Arduino. Veze uključuju VCC na napajanje, GND na masu, SDA na Arduino podatkovni pin i SCL na pin takta. Ova postavka omogućava laku komunikaciju između Arduina i OLED displeja.
Detalji iz Tehničke Specifikacije
| Proizvođač | Adafruit |
|---|---|
| Broj dijela | SSD1306 |
| Logički/IO napon | 3.3 V - 5 V |
| Napon napajanja | 3.3 V - 5 V |
| Rezolucija displeja | 128 x 64 piksela |
| I2C adresa | 0x3C |
| Interfejs | I2C |
| Pakovanje | Modul |
- Osigurajte pravilno ožičenje: VCC na 3.3V ili 5V, GND na masu, SDA na A4, SCL na A5 (za Arduino Uno).
- Displej zahtijeva pull-up otpornike na SDA i SCL linijama ako već nisu uključeni.
- Provjerite da je I2C adresa ispravno postavljena u kodu, obično 0x3C za ovaj displej.
- Koristite odgovarajuću biblioteku kao što je Adafruit_SSD1306 za laku integraciju.
- Očistite displej prije crtanja nove grafike kako biste izbjegli preklapanje artefakata.
Upute za Ožičenje
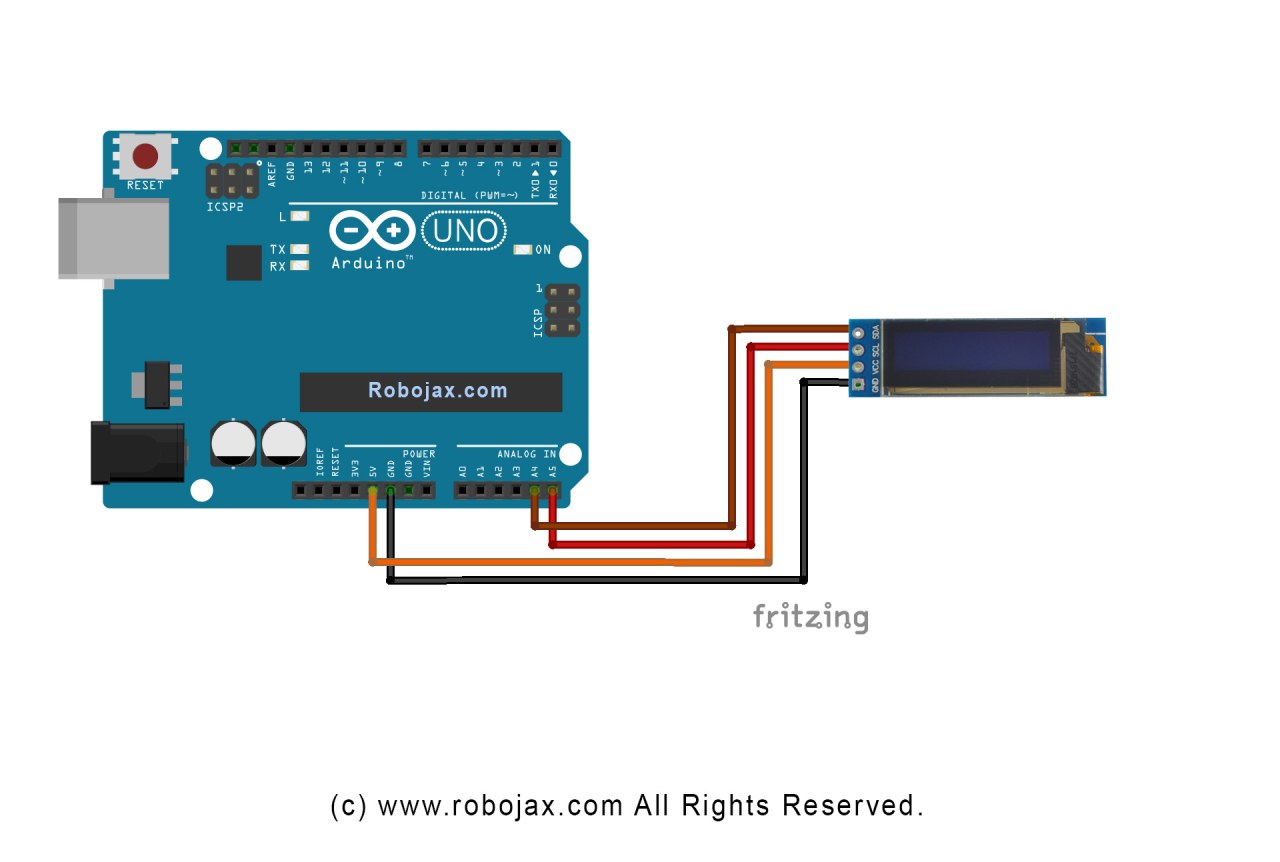
Da biste povezali SSD1306 OLED displej na vaš Arduino, slijedite ove korake:
Spojite VCC pin OLED displeja na 5V (ili 3.3V) pin na Arduinu. Zatim spojite GND pin displeja na pin mase na Arduinu. Za I2C komunikaciju, spojite SDA pin displeja na A4 pin na Arduinu i SCL pin na A5 pin. Ova postavka će omogućiti Arduinu da komunicira s OLED displejem koristeći I2C protokol.
Provjerite da su sve veze sigurne i još jednom provjerite da koristite ispravan napon za vaš specifični model displeja. Ako koristite drugačiji Arduino model, SDA i SCL pinovi mogu varirati (npr., za Arduino Mega, SDA je na pinu 20, a SCL na pinu 21).
Primjeri Koda i Objašnjenje
U kodu, inicijaliziramo displej i postavljamo parametre kao što su I2C adresa i dimenzije. Jedan ključni identifikator je display, koji predstavlja instancu SSD1306 displeja. Evo isječka iz setup funkcije:
void setup() {
  Serial.begin(9600);
  display.begin(SSD1306_SWITCHCAPVCC, 0x3C);  // inicijalizacija s I2C adresom 0x3C
}
U ovom isječku, funkcija display.begin inicijalizira displej s navedenom I2C adresom. Bitno je da adresa odgovara vašem displeju kako bi se osigurala pravilna komunikacija.
Zatim, u loop funkciji, koristimo metodu display.clearDisplay() za čišćenje ekrana prije crtanja novog sadržaja. Možemo postaviti veličinu teksta i poziciju koristeći metode setTextSize i setCursor:
void loop() {
  display.clearDisplay();
  display.setTextSize(2);
  display.setCursor(2,1); // postavljanje kursora u gornji lijevi ugao
  display.println("Robojax"); // prikaz teksta
}
Ovdje se tekst "Robojax" prikazuje na koordinatama (2,1) na ekranu. Ovo omogućava precizno pozicioniranje teksta na OLED displeju.
Konačno, da bismo prikazali promjene na displeju, pozivamo display.display(). Ova funkcija šalje sve baferovane komande na displej kako bi ažurirala njegov sadržaj:
display.display();Ovo bi trebala biti posljednja linija u vašoj loop funkciji kako bi se osiguralo da su sve komande za crtanje izvršene. Ako zaboravite ovaj korak, ništa se neće pojaviti na displeju.
Zapamtite, puni kod se učitava ispod članka za vašu referencu.
Demonstracija / Šta Očekivati
Nakon što prenesete kod na vaš Arduino, trebali biste vidjeti tekst "Robojax" prikazan na OLED ekranu. Kod također demonstrira pomicanje teksta i crtanje linija, oblika i druge grafike na displeju. Obratite pažnju na uobičajene zamke, kao što su pogrešno ožičenje ili neusklađene I2C adrese, koje mogu spriječiti displej da pravilno funkcionira (u videu na 10:00).
Vremenske Oznake Videa
- 00:00 - Uvod u SSD1306 OLED Displej
- 02:30 - Ožičenje Displeja
- 05:00 - Objašnjenje Koda
- 08:00 - Demonstracija Funkcija Displeja
- 10:00 - Uobičajeni Problemi i Rješavanje Grešaka
Slike

/*
 * Original source: https://github.com/adafruit/Adafruit_SSD1306
 * This is the Arduino code for the SSD1306 OLED 128 x 64 Display.
 * Watch the video for details and demo: http://youtu.be/UmYiHTOz-5k
 * This code has been modified to print specific elements such as text, lines, circles, rectangles, etc.
 * I have added a custom method to make printing text easy.

 If you get the error: Adafruit_GFX.h not found, download the Adafruit-GFX Library from:
 https://github.com/adafruit/Adafruit-GFX-Library

 Purchase this OLED module from Amazon: https://amzn.to/36zFvTb

 *  *
 * Written by Ahmad Shamshiri for Robojax Video channel, www.Robojax.com
 * Date: December 17, 2017, in Ajax, Ontario, Canada
 * Permission granted to share this code, provided that this
 * note is kept with the code.
 * Disclaimer: This code is "AS IS" and for educational purposes only.
 * This code has been downloaded from https://robojax.com
 *
 */

/*********************************************************************
This is an example for our monochrome OLEDs based on SSD1306 drivers.

  Pick one up today in the Adafruit shop!
  ------> http://www.adafruit.com/category/63_98

This example is for a 128x64 size display using I2C to communicate.
3 pins are required to interface (2 I2C and one reset).

Adafruit invests time and resources providing this open source code,
please support Adafruit and open-source hardware by purchasing
products from Adafruit!

Written by Limor Fried/Ladyada for Adafruit Industries.
BSD license, check license.txt for more information.
All text above, and the splash screen must be included in any redistribution.
*********************************************************************/

#include <SPI.h>
#include <Wire.h>
#include <Adafruit_GFX.h>
#include <Adafruit_SSD1306.h>

#define OLED_RESET 4
Adafruit_SSD1306 display(OLED_RESET);

#define NUMFLAKES 10
#define XPOS 0
#define YPOS 1
#define DELTAY 2


#define LOGO16_GLCD_HEIGHT 16 // do not change this. Error in video
#define LOGO16_GLCD_WIDTH  16 // do not change this. Error in video
static const unsigned char PROGMEM logo16_glcd_bmp[] =
{ B00000000, B11000000,
  B00000001, B11000000,
  B00000001, B11000000,
  B00000011, B11100000,
  B11110011, B11100000,
  B11111110, B11111000,
  B01111110, B11111111,
  B00110011, B10011111,
  B00011111, B11111100,
  B00001101, B01110000,
  B00011011, B10100000,
  B00111111, B11100000,
  B00111111, B11110000,
  B01111100, B11110000,
  B01110000, B01110000,
  B00000000, B00110000 };

    // look at line 27 to 30 of Adafruit_SSD1306.h inside the library to select the dimensions
#if (SSD1306_LCDHEIGHT != 64)
#error("Height incorrect, please fix Adafruit_SSD1306.h!");
#endif

void setup()   {
  Serial.begin(9600);

  // by default, we'll generate the high voltage from the 3.3v line internally! (neat!)
  display.begin(SSD1306_SWITCHCAPVCC, 0x3C);  // initialize with the I2C addr 0x3D (for the 128x64)
  // init done

}


void loop() {
 display.clearDisplay();
  robojaxText("Values", 3, 0, 2, false);
  robojaxText("V: 41v", 3, 22, 2, false);
  robojaxText("Temperature: 32C", 4, 45, 1, true);
  display.drawLine(1, 37, 100, 37, WHITE);
  display.drawRect(1, 20, 100,40, WHITE);
  //display.drawCircle(63,31, 31, WHITE);
   //display.startscrollright(0x00, 0x0F);
  display.display();
   delay(20000);
}

/*
 * robojaxText(String text, int x, int y, int size, boolean d)
 * text is the text string to be printed.
 * x is the integer x position of the text.
 * y is the integer y position of the text.
 * size is the text size (1, 2, 3, etc.).
 * d is a boolean value (true or false).  Its purpose is unclear, use true.
 */
void robojaxText(String text, int x, int y,int size, boolean d) {

  display.setTextSize(size);
  display.setTextColor(WHITE);
  display.setCursor(x,y);
  display.println(text);
  if(d){
    display.display();
  }

  delay(100);
}/*
* Original source: https://github.com/adafruit/Adafruit_SSD1306
* This is the Arduino code for the SSD1306 OLED 128 x 64 Display
* watch the video for details and demo http://youtu.be/UmYiHTOz-5k
* This code has been modified to print specific elements such as text, lines, circles, rectangles, etc.
* *
* *
* Written by Ahmad Shamshiri for Robojax Video channel www.Robojax.com
* Date: December 15, 2017, in Ajax, Ontario, Canada
* Permission granted to share this code given that this
* note is kept with the code.
* Disclaimer: this code is "AS IS" and for educational purposes only.
* This code has been downloaded from https://robojax.com
*
*/
/*********************************************************************
This is an example for our Monochrome OLEDs based on SSD1306 drivers
Pick one up today in the Adafruit shop!
------> http://www.adafruit.com/category/63_98
This example is for a 128x64 size display using I2C to communicate.
3 pins are required to interface (2 I2C and one reset).
Adafruit invests time and resources providing this open source code,
please support Adafruit and open-source hardware by purchasing
products from Adafruit!
Written by Limor Fried/Ladyada for Adafruit Industries.
BSD license, check license.txt for more information
All text above, and the splash screen must be included in any redistribution
*********************************************************************/
#include <SPI.h>
#include <Wire.h>
#include <Adafruit_GFX.h>
#include <Adafruit_SSD1306.h>
#define OLED_RESET 4
Adafruit_SSD1306 display(OLED_RESET);
#define NUMFLAKES 10
#define XPOS 0
#define YPOS 1
#define DELTAY 2
#define LOGO16_GLCD_HEIGHT 16 // do not change this. Error in video
#define LOGO16_GLCD_WIDTH 16 // do not change this. Error in video
static const unsigned char PROGMEM logo16_glcd_bmp[] =
{ B00000000, B11000000,
B00000001, B11000000,
B00000001, B11000000,
B00000011, B11100000,
B11110011, B11100000,
B11111110, B11111000,
B01111110, B11111111,
B00110011, B10011111,
B00011111, B11111100,
B00001101, B01110000,
B00011011, B10100000,
B00111111, B11100000,
B00111111, B11110000,
B01111100, B11110000,
B01110000, B01110000,
B00000000, B00110000 };
// look at line 27 to 30 of Adafruit_SSD1306.h inside the library to select the dimensions
#if (SSD1306_LCDHEIGHT != 64)
#error("Height incorrect, please fix Adafruit_SSD1306.h!");
#endif
void setup() {
Serial.begin(9600);
// by default, we'll generate the high voltage from the 3.3v line internally! (neat!)
display.begin(SSD1306_SWITCHCAPVCC, 0x3C); // initialize with the I2C addr 0x3D (for the 128x64)
// init done
}
void loop() {
display.clearDisplay();
display.setTextSize(2);
display.setTextColor(WHITE);
display.setCursor(2,1);// set the cursor at x=2, y=1 which is top left corner of display
display.println("Robojax");// the actual text
display.setCursor(2,18);
display.println("YouTube");// set the cursor at x=2, y=18 which is top left under the first text line
display.drawLine(0,16, display.width()-1, 16, WHITE); // drawing from the point x=0, y=16 to x=64-1 y=16
display.display();
display.startscrollright(0x00, 0x0F);
delay(2000);
display.stopscroll();
delay(1000);
display.startscrollleft(0x00, 0x0F);
delay(2000);
display.stopscroll();
delay(1000);
display.startscrolldiagright(0x00, 0x07);
delay(2000);
display.startscrolldiagleft(0x00, 0x07);
delay(2000);
display.stopscroll();
delay(10000);
}/*********************************************************************
Original source: http://playground.arduino.cc/Main/I2cScanner
This program will find the I2C address on the I2C device. Just upload the code into your Arduino
and open the serial monitor and wait. It will display the I2C address as 0x3C or similar.
* Please view other RoboJax codes and videos at http://robojax.com/learn/arduino
* If you are sharing this code, you must keep this copyright note.
*
*********************************************************************/
#include <Wire.h>
void setup()
{
Wire.begin();
Serial.begin(9600);
while (!Serial); // Leonardo: wait for serial monitor
Serial.println("\nI2C Scanner");
}
void loop()
{
byte error, address;
int nDevices;
Serial.println("Scanning...");
nDevices = 0;
for(address = 1; address < 127; address++ )
{
// The i2c_scanner uses the return value of
// the Wire.endTransmission to see if
// a device did acknowledge the address.
Wire.beginTransmission(address);
error = Wire.endTransmission();
if (error == 0)
{
Serial.print("I2C device found at address 0x");
if (address<16)
Serial.print("0");
Serial.print(address,HEX);
Serial.println(" !");
nDevices++;
}
else if (error==4)
{
Serial.print("Unknown error at address 0x");
if (address<16)
Serial.print("0");
Serial.println(address,HEX);
}
}
if (nDevices == 0)
Serial.println("No I2C devices found\n");
else
Serial.println("done\n");
delay(5000); // wait 5 seconds for next scan
}Resursi i reference
Datoteke📁
Tehnički list (pdf)
-
SSD1306 display datasheetSSD1306 is a single-chip CMOS OLED/PLED driver with controller for organic / polymer light emitting diode dot-matrix graphic display system. It consists of 128 segments and 64commons. This IC is designed for Common Cathode type OLED panel. The SSD1306 embeds with contrast control, display RAM and oscillator, which reduces the number of external components and power consumption. It has 256-step brightness control. Data/Commands are sent from general MCU through the hardware selectable 6800/8000 series compatible Parallel Interface, I2C interface or Serial Peripheral Interface. It is suitable for many compact portable applications, such as mobile phone sub-display, MP3 player and calculator, etc.
SSD1306_display_datasheet.pdf1.79 MB