Bu eğitim şunun parçasıdır: Dijital Bağıl Nem ve Sıcaklık Sensörü HTU21D
Dijital Bağıl Nem ve Sıcaklık Sensörü HTU21D ile ilgili videolar. Diğer videolara ait bağlantılar bu makalenin altında yer almaktadır.
Displaying Temperature from an HTU21D on an LCD
In this tutorial, we will learn how to display temperature readings from the HTU21D temperature and humidity sensor on an LCD. The outcome will be a functional setup where the temperature can be viewed in degrees Celsius, Fahrenheit, and Kelvin, along with the relative humidity displayed on the same screen. This project will give you practical experience with I2C communication and basic sensor data handling. For a detailed visual guide, be sure to watch the video (in video at 00:00).
Hardware Explained
The main components for this project include the HTU21D sensor and the LCD display. The HTU21D is a digital humidity and temperature sensor that communicates over the I2C protocol. It provides precise measurements of temperature in degrees Celsius or Fahrenheit and relative humidity as a percentage. The sensor operates typically at a voltage of 3.3V but can also work with 5V systems. The LCD display we will use is a 16x2 LCD with an I2C interface. This type of display requires only two wires for data communication, making it easier to connect with microcontrollers like Arduino. The I2C interface allows multiple devices to be connected on the same bus, simplifying wiring and reducing the number of pins used.Datasheet Details
| Manufacturer | Adafruit |
|---|---|
| Part number | HTU21D-F |
| Logic/IO voltage | 3.3 V (typ.) |
| Supply voltage | 1.5 V to 3.6 V |
| Output current | 0.5 mA (typ.) |
| Peak current | 1.5 mA (max.) |
| Temperature range | -40 to 125 °C |
| Humidity range | 0 to 100 %RH |
| Package | DFN-6 |
| Notes / variants | None |
- Ensure correct voltage levels to avoid damage to the sensor.
- Use pull-up resistors on the SDA and SCL lines if necessary.
- Check I2C address with a scanner to ensure correct configuration.
- Handle the sensor's output carefully to avoid reading errors.
- Keep the sensor away from heat sources when taking measurements.
Wiring Instructions
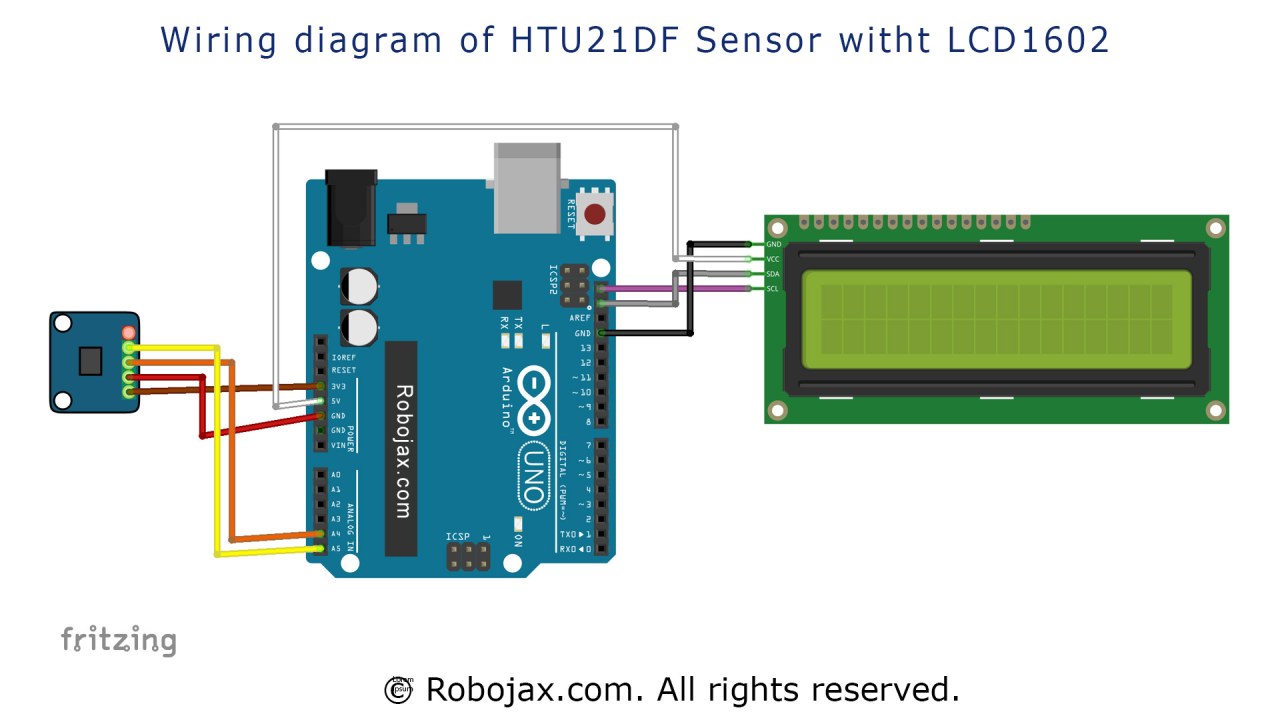
Code Examples & Walkthrough
In the code, we start by including the necessary libraries for the HTU21D sensor and the LCD:#include
#include "Adafruit_HTU21DF.h"
#include
Adafruit_HTU21DF htu = Adafruit_HTU21DF();
LiquidCrystal_I2C lcd(0x3F, 16, 2);
htu is the object for the HTU21D sensor, and lcd is the object for the LCD display. The I2C address for the LCD is set to 0x3F, which you may need to verify based on your configuration.
In the setup() function, we initialize the LCD and check if the sensor is operational:
void setup() {
  lcd.begin();
  lcd.backlight();
  if (!htu.begin()) {
      lcd.print("Sensor missing");
      while (1);
  }
  lcd.print("HTU21D Ready");
}
loop() function, we continuously read the temperature and humidity values and display them:
void loop() {
   lcd.clear();
   lcdDisplay(0, 0, "Celsius: ", 10, 0, getHTU('C'), 'd');
   lcdDisplay(0, 1, "Humidity: ", 10, 1, getHTU('H'), '%');
   delay(5000);
}
lcdDisplay() function to show the temperature in Celsius and the humidity. The getHTU() function retrieves the temperature or humidity based on the character passed.
Demonstration / What to Expect
When the setup is complete and the code is uploaded to the Arduino, the LCD should display the current temperature in Celsius and the relative humidity. If everything is connected properly, you will see the values update every few seconds. Watch out for common pitfalls, such as reversed connections or incorrect I2C addresses, which can lead to sensor communication failures (in video at 05:00).Video Timestamps
- 00:00 - Introduction
- 01:30 - Wiring Instructions
- 03:15 - Code Explanation
- 04:50 - Demonstration
- 05:40 - Conclusion
Görseller

LCD1602 or LCD2004 with HTU21DF Humidity and Temperature Sensor with Arduino
Arduino wiring for HTU21DF light intesity sensor with LCD
HTU21D module
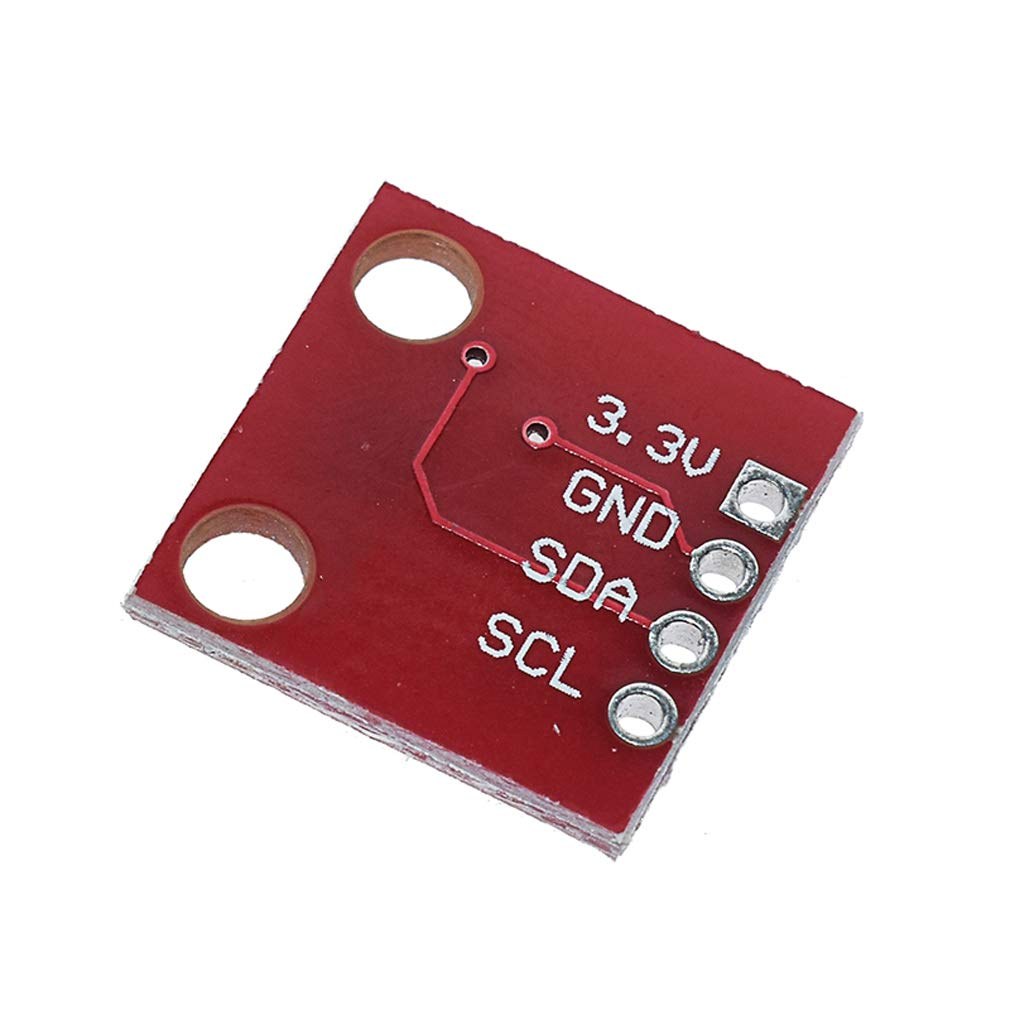
HTU21D module-back
Bu eğitim şunun parçasıdır: Dijital Bağıl Nem ve Sıcaklık Sensörü HTU21D
- Ders 35-1: HTU21D Sıcaklık Sensörünü Kullanma
- Ders 35-2: HTU21D Sıcaklık Sensörü Özel Kodunu Kullanma
- Ders 35: Arduino ile HTU21D Sıcaklık Sensörü Kullanımı
- Ders 36: HTU21D Sıcaklık Sensörünü LCD ile Kullanma Arduino Adım Adım Kurs
- Using Two More HTU21DF Humidity and Temperature Sensors with Arduino
- Displaying Temperature from an HTU21D as a Bar Graph on an LCD
- How to Use the HTU21DF Humidity and Temperature Sensor with Arduino (Basic Code)
- How to Use the HTU21DF Humidity and Temperature Sensor with Arduino (Custom Code)
213-Display Temperature from HTU21DF on LCD1602-I2C or LCD2004
Dil: C++
/*
 * LCD1602-I2C veya LCD2004'te HTU21DF'den Sıcaklık Görüntüleme
 * Ahmad Shamshiri tarafından 13 Temmuz 2019'da güncellendi
 * Ajax, Ontario, Kanada
 * Bu çizim için video talimatlarını izleyin:
 *
 * Bu, HTU21D-F Nem ve Sıcaklık Sensörü için bir örnektir
 *
 * Adafruit'in HTU21D-F sensörüyle çalışmak üzere özel olarak tasarlanmıştır
 * ----> https://www.adafruit.com/products/1899
 *
 * Bu ekranlar iletişim kurmak için I2C kullanır; Arayüz için 2 pin gereklidir.
 *
 * Kodlu 360 Servo'ya Giriş videosunu izleyin: https://youtu.be/b_xvu6wWafA
 * Bağlantı şemasını Udemy.com'daki Arduino Kursumdan edinebilirsiniz.
 * Tüm kütüphaneler, kodlar ve bağlantı şemaları tek bir yerde, Arduino'yu adım adım öğrenin.
 * Kursumu hemen ziyaret edin: http://robojax.com/L/?id=62
 *
 * Bu eğitimi faydalı bulduysanız, lütfen bu tür içerikler oluşturmaya devam edebilmem için beni destekleyin.
 * veya PayPal kullanarak bağış yapın: http://robojax.com/L/?id=64
 *
 * Kod, http://robojax.com/learn/arduino adresinde mevcuttur.
 *
 * Bu kod, garanti veya yükümlülük olmaksızın "OLDUĞU GİBİ"dir. Bu notu eksiksiz tuttuğunuz sürece ücretsiz olarak kullanabilirsiniz. Bu kod Robojax.com'dan indirilmiştir.
 * Bu program özgür bir yazılımdır: Özgür Yazılım Vakfı tarafından yayınlanan GNU Genel Kamu Lisansı'nın 3. sürümü veya (tercihinize bağlı olarak) daha sonraki herhangi bir sürümü kapsamında yeniden dağıtabilir ve/veya değiştirebilirsiniz.
 *
 * Bu program, faydalı olacağı umuduyla dağıtılmaktadır, ancak HERHANGİ BİR GARANTİ OLMADAN; hatta SATILABİLİRLİK veya BELİRLİ BİR AMACA UYGUNLUK konusunda zımni bir garanti bile verilmeden. Daha fazla bilgi için GNU Genel Kamu Lisansı'na bakın.
 *
 * Bu programla birlikte GNU Genel Kamu Lisansı'nın bir kopyasını almış olmalısınız. Almamışsanız, <https://www.gnu.org/licenses/> adresine bakın.
 */
#include <Wire.h>
#include "Adafruit_HTU21DF.h"

 // Connect Vin to 3-5VDC
 // Connect GND to ground
 // Connect SCL to I2C clock pin (A5 on UNO)
 // Connect SDA to I2C data pin (A4 on UNO)

Adafruit_HTU21DF htu = Adafruit_HTU21DF();

 // start of settings for LCD1602 with I2C
#include <LiquidCrystal_I2C.h>
 // Set the LCD address to 0x27 for a 16 chars and 2 line display
LiquidCrystal_I2C lcd(0x3F, 16, 2);
 // end of settings for LCD1602 with I2C

void setup() {
  lcd.begin();
  lcd.backlight();
  if (!htu.begin()) {
      lcd.print("Robojax HTUD1DF");
      lcd.setCursor(0,1);
      lcd.print("sensor missing");
    while (1);
  }else{
 // initialize the LCD

  lcd.print("Robojax HTUD1DF");
  lcd.setCursor(0,1);
  lcd.print("Demo");
  }
  delay(2000);
}

void loop() {
   lcd.clear(); // clear previous values from screen
lcdDisplay(
 // to print Celsius:
             0, // character 0
             0, // line 0
             "Celsius: ",

 // to print Celsius
             10, // character 10
             0, // line 0
             getHTU('C'),
             'd'
             );

  lcdDisplay(
 // to print Fahrenheit:
             0, // character 0
             1, // line 1
             "Fahrenheit: ",

 // to print Fahrenheit
             10, // character 9
             1, // line 0
             getHTU('F'),
             'd'
             );
    delay(5000);
lcdDisplay(
 // to print Kelvin:
             0, // character 0
             0, // line 0
             "Kelvin: ",

 // to print Celsius
             9, // character 10
             0, // line 0
             getHTU('K'),
             'k'
             );
  lcdDisplay(
 // to print humidity text
             0, // character 0
             1, // line 1
             "Humidity: ",

 // to print humidity
             10, // character 9
             1, // line 1
             getHTU('H'),
             '%'
             );

        delay(5000);
}

/*
 * @brief returns temperature or relative humidity
 * @param "type" is character
 *     C = Celsius
 *     K = Kelvin
 *     F = Fahrenheit
 *     H = Humidity
 * @return returns one of the values above
 * Usage: to get Fahrenheit type: getHTU('F')
 * to print it on serial monitor Serial.println(getHTU('F'));
 * Written by Ahmad Shamshiri on July 13, 2019
 * in Ajax, Ontario, Canada
 * www.Robojax.com
 */
float getHTU(char type)
{
  float value;
    float temp = htu.readTemperature();
    float rel_hum = htu.readHumidity();
   if(type =='F')
   {
    value = temp *9/5 + 32; // convert to Fahrenheit
   }else if(type =='K')
   {
    value = temp + 273.15; // convert to Kelvin
   }else if(type =='H')
   {
    value = rel_hum; // return relative humidity
   }else{
    value = temp; // return Celsius
   }
   return value;
}


/*
 * lcdDisplay(int tc, int tr, String title, int vc, int vr, float value)
 * displays value and title on LCD1602
 * How to use:
 * If you want to display: "Voltage: 13.56mV" starting from the first character
 * on the second row.
 * use:
 * lcdDisplay(0, 1, "Voltage: ", 13.56,'d')
 *
 *   'd' is degree symbol
 * tc  is character number  (0)
 * tr is row in the lcd (1)
 * title is the text (Voltage:)
 * vc value for character
 * vr value for  row or line
 * value is the value (13.56)
 */
void lcdDisplay(int tc, int tr, String title, int vc, int vr, float value,char symbol)
{
 // Robojax.com LCD1602 for HTU21D Demo
   lcd.setCursor (tc,tr);
   lcd.print(title);

   lcd.setCursor (vc,vr);
   lcd.print(value);
   if(symbol == 'd')
   {
    lcd.print((char)223);
   }else if(symbol =='%')
   {
    lcd.print("%");
   }else if(symbol =='k')
   {
    lcd.print("K");
   }
 // Robojax.com LCD1602 for HTU21D Demo
}
İhtiyacın olabileceğini düşünüyor
-
Amazon
-
eBayPurchase HTU21D from eBayebay.us
-
AliExpressPurchase HTU21D or SHT21 from AliExpresss.click.aliexpress.com
Kaynaklar ve referanslar
-
DışAdafruit HTU21D Library (GitHub)github.com
Dosyalar📁
Veri Sayfası (pdf)
-
HTU21D_temerature_humidity_datasheet
HTU21D_temerature_humidity_datasheet.pdf0.96 MB