Este tutorial faz parte de: Sensor digital de umidade relativa e temperatura HTU21D
Vídeos relacionados ao sensor digital de umidade relativa e temperatura HTU21D. Os links para outros vídeos estão abaixo deste artigo.

Exibindo a temperatura de um HTU21D em um LCD
Neste tutorial, aprenderemos como exibir leituras de temperatura do sensor de temperatura e umidade HTU21D em um LCD. O resultado será uma configuração funcional onde a temperatura pode ser visualizada em graus Celsius, Fahrenheit e Kelvin, juntamente com a umidade relativa exibida na mesma tela. Este projeto lhe dará experiência prática com comunicação I2C e manuseio básico de dados de sensores. Para um guia visual detalhado, não deixe de assistir ao vídeo (no vídeo às 00:00).

Hardware Explicado
Os principais componentes para este projeto incluem o sensor HTU21D e o display LCD. O HTU21D é um sensor digital de umidade e temperatura que se comunica através do protocolo I2C. Ele fornece medições precisas de temperatura em graus Celsius ou Fahrenheit e umidade relativa em percentual. O sensor opera normalmente a uma tensão de 3,3V, mas também pode funcionar com sistemas de 5V. O display LCD que usaremos é um LCD 16x2 com uma interface I2C. Este tipo de display requer apenas dois fios para a comunicação de dados, tornando mais fácil a conexão com microcontroladores como Arduino. A interface I2C permite que vários dispositivos sejam conectados no mesmo barramento, simplificando a fiação e reduzindo o número de pinos utilizados.
Detalhes da Ficha Técnica
| Fabricante | Adafruit |
|---|---|
| Número da peça | HTU21D-F |
| Tensão de lógica/IO | 3,3 V (típ.) |
| Tensão de alimentação | 1,5 V a 3,6 V |
| Corrente de saída | 0,5 mA (típ.) |
| Corrente de pico | 1,5 mA (máx.) |
| Faixa de temperatura | -40 a 125 °C |
| Faixa de umidade | 0 a 100 %UR |
| Pacote | DFN-6 |
| Notas / variantes | None |
- Garanta níveis de tensão corretos para evitar danos ao sensor.
- Use resistores de pull-up nas linhas SDA e SCL, se necessário.
- Verifique o endereço I2C com um scanner para garantir a configuração correta.
- Trate a saída do sensor com cuidado para evitar erros de leitura.
- Mantenha o sensor longe de fontes de calor ao fazer medições.
Instruções de Fiação

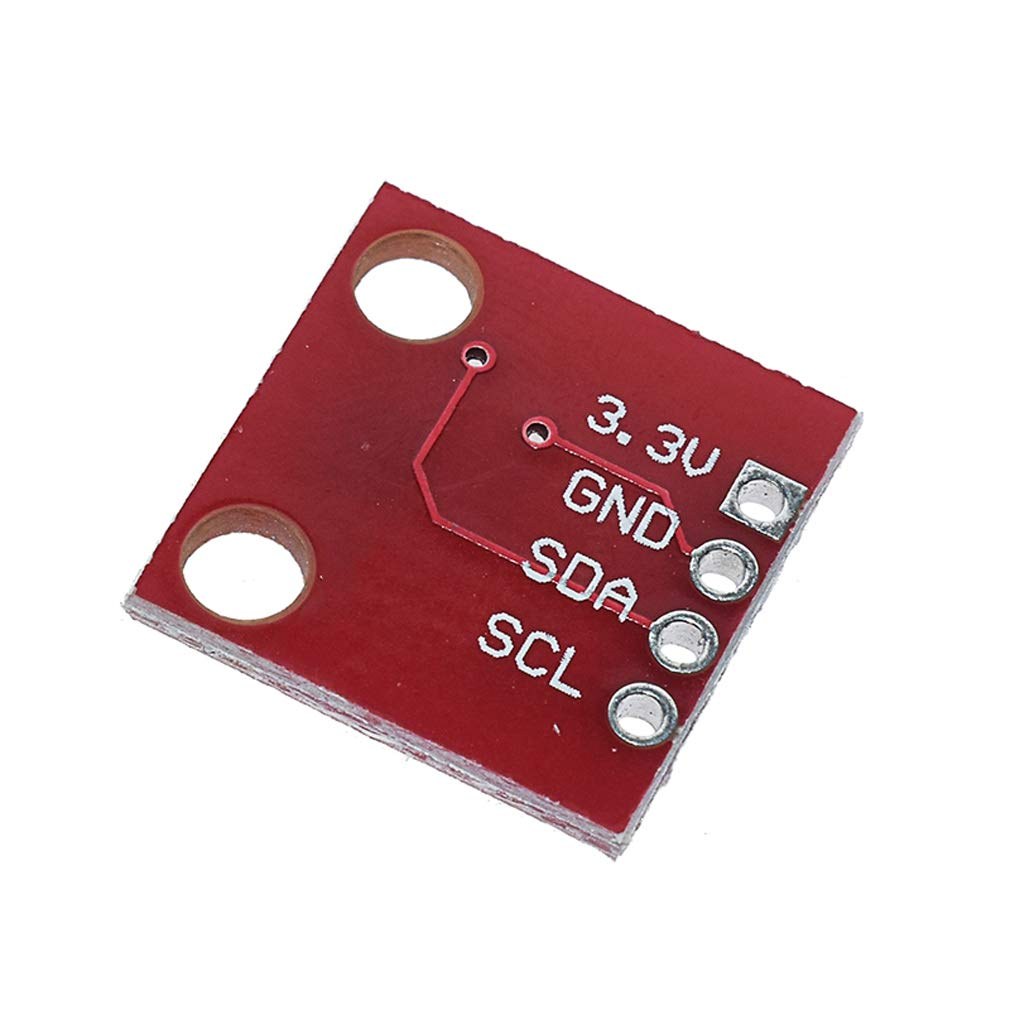
Para conectar o sensor HTU21D ao Arduino, ligue o pino VCC do sensor à saída de 3,3V no Arduino. Em seguida, conecte o pino GND do sensor ao terra do Arduino. O pino SDA, que é usado para transmissão de dados, deve ser conectado ao pino A4 do Arduino. Da mesma forma, conecte o pino SCL, que é usado para o sinal de relógio, ao pino A5 do Arduino. Certifique-se de que seu LCD esteja conectado corretamente também; o endereço I2C para o LCD nesta configuração é normalmente 0x3F. Se você estiver usando um tipo diferente de LCD ou um endereço I2C diferente, certifique-se de ajustar o código de acordo. Após a fiação, verifique se há conexões soltas antes de ligar o Arduino.
Exemplos de Código e Tutorial
No código, começamos incluindo as bibliotecas necessárias para o sensor HTU21D e o LCD:
#include
#include "Adafruit_HTU21DF.h"
#include
Isso configura o ambiente para usar tanto o sensor quanto o display. A biblioteca `Adafruit_HTU21DF` gerencia a funcionalidade do sensor, enquanto a biblioteca `LiquidCrystal_I2C` controla o LCD. Em seguida, criamos uma instância tanto para o sensor quanto para o LCD:
Adafruit_HTU21DF htu = Adafruit_HTU21DF();
LiquidCrystal_I2C lcd(0x3F, 16, 2);
Aqui,htué o objeto para o sensor HTU21D, elcdé o objeto para o display LCD. O endereço I2C para o LCD é definido como 0x3F, que você pode precisar verificar com base na sua configuração.
Nosetup()função, inicializamos o LCD e verificamos se o sensor está operacional:
void setup() {
  lcd.begin();
  lcd.backlight();
  if (!htu.begin()) {
      lcd.print("Sensor missing");
      while (1);
  }
  lcd.print("HTU21D Ready");
}
Este código inicializa o LCD e verifica a presença do sensor. Se o sensor não for detectado, ele exibirá "Sensor ausente" e encerrará o programa.loop()função, nós lemos continuamente os valores de temperatura e umidade e os exibimos:
void loop() {
   lcd.clear();
   lcdDisplay(0, 0, "Celsius: ", 10, 0, getHTU('C'), 'd');
   lcdDisplay(0, 1, "Humidity: ", 10, 1, getHTU('H'), '%');
   delay(5000);
}
Neste trecho, limpamos o LCD e, em seguida, chamamos olcdDisplay()função para mostrar a temperatura em Celsius e a umidade. AgetHTU()a função recupera a temperatura ou a umidade com base no caractere passado.
Demonstração / O que Esperar
Quando a configuração estiver completa e o código for carregado no Arduino, o LCD deve exibir a temperatura atual em Celsius e a umidade relativa. Se tudo estiver conectado corretamente, você verá os valores se atualizarem a cada poucos segundos. Fique atento a armadilhas comuns, como conexões invertidas ou endereços I2C incorretos, que podem levar a falhas de comunicação do sensor (no vídeo às 05:00).
Carimbos de Tempo do Vídeo
- 00:00- Introdução
- 01:30- Instruções de Fiação
- 03:15- Explicação do Código
- 04:50- Demonstração
- 05:40- Conclusão
Imagens

Este tutorial é parte de: Sensor digital de umidade relativa e temperatura HTU21D
- Lição 35-1: Usando o Sensor de Temperatura HTU21D
- Lição 35-2: Usando o Sensor de Temperatura HTU21D - Código Personalizado
- Lição 35: Usando o sensor de temperatura HTU21D com Arduino
- Aula 36: Usando o Sensor de Temperatura HTU21D com um LCD Arduino Curso Passo a Passo
- Usando mais dois sensores de umidade e temperatura HTU21DF com Arduino
- Exibindo a Temperatura de um HTU21D como um Gráfico de Barras em um LCD
- Como Usar o Sensor de Umidade e Temperatura HTU21DF com Arduino (Código Básico)
- Como Usar o Sensor de Umidade e Temperatura HTU21DF com Arduino (Código Personalizado)
/*
 * Display Temperature from HTU21DF on LCD1602-I2C or LCD2004
 * Updated by Ahmad Shamshiri on July 13, 2019
 * in Ajax, Ontario, Canada
 * Watch video instructions for this sketch:
**************************************************
*
  This is an example for the HTU21D-F Humidity & Temp Sensor

  Designed specifically to work with the HTU21D-F sensor from Adafruit
  ----> https://www.adafruit.com/products/1899

  These displays use I2C to communicate; 2 pins are required to
  interface

 Watch Introduction to  360 Servo video with code: https://youtu.be/b_xvu6wWafA
You can get the wiring diagram from my Arduino Course at Udemy.com
Learn Arduino step by step with all libraries, codes, wiring diagrams all in one place
visit my course now http://robojax.com/L/?id=62

If you found this tutorial helpful, please support me so I can continue creating
content like this.
or make a donation using PayPal http://robojax.com/L/?id=64

 * Code is available at http://robojax.com/learn/arduino

 * This code is "AS IS" without warranty or liability. Free to be used as long as you keep this note intact.
 * This code has been downloaded from Robojax.com
    This program is free software: you can redistribute it and/or modify
    it under the terms of the GNU General Public License as published by
    the Free Software Foundation, either version 3 of the License, or
    (at your option) any later version.

    This program is distributed in the hope that it will be useful,
    but WITHOUT ANY WARRANTY; without even the implied warranty of
    MERCHANTABILITY or FITNESS FOR A PARTICULAR PURPOSE.  See the
    GNU General Public License for more details.

    You should have received a copy of the GNU General Public License
    along with this program.  If not, see <https://www.gnu.org/licenses/>.

*/

#include <Wire.h>
#include "Adafruit_HTU21DF.h"

// Connect Vin to 3-5VDC
// Connect GND to ground
// Connect SCL to I2C clock pin (A5 on UNO)
// Connect SDA to I2C data pin (A4 on UNO)

Adafruit_HTU21DF htu = Adafruit_HTU21DF();

// start of settings for LCD1602 with I2C
#include <LiquidCrystal_I2C.h>
// Set the LCD address to 0x27 for a 16 chars and 2 line display
LiquidCrystal_I2C lcd(0x3F, 16, 2);
// end of settings for LCD1602 with I2C

void setup() {
  lcd.begin();
  lcd.backlight();
  if (!htu.begin()) {
      lcd.print("Robojax HTUD1DF");
      lcd.setCursor(0,1);
      lcd.print("sensor missing");
    while (1);
  }else{
  // initialize the LCD

  lcd.print("Robojax HTUD1DF");
  lcd.setCursor(0,1);
  lcd.print("Demo");
  }
  delay(2000);
}

void loop() {
   lcd.clear();// clear previous values from screen
lcdDisplay(
             // to print Celsius:
             0, // character 0
             0, // line 0
             "Celsius: ",

             // to print Celsius
             10, // character 10
             0, // line 0
             getHTU('C'),
             'd'
             );

  lcdDisplay(
             // to print Fahrenheit:
             0, // character 0
             1, // line 1
             "Fahrenheit: ",

             // to print Fahrenheit
             10, // character 9
             1, // line 0
             getHTU('F'),
             'd'
             );
    delay(5000);
lcdDisplay(
             // to print Kelvin:
             0, // character 0
             0, // line 0
             "Kelvin: ",

             // to print Celsius
             9, // character 10
             0, // line 0
             getHTU('K'),
             'k'
             );
  lcdDisplay(
             // to print humidity text
             0, // character 0
             1, // line 1
             "Humidity: ",

             // to print humidity
             10, // character 9
             1, // line 1
             getHTU('H'),
             '%'
             );

        delay(5000);
}

/*
 * @brief returns temperature or relative humidity
 * @param "type" is character
 *     C = Celsius
 *     K = Kelvin
 *     F = Fahrenheit
 *     H = Humidity
 * @return returns one of the values above
 * Usage: to get Fahrenheit type: getHTU('F')
 * to print it on serial monitor Serial.println(getHTU('F'));
 * Written by Ahmad Shamshiri on July 13, 2019
 * in Ajax, Ontario, Canada
 * www.Robojax.com
 */
float getHTU(char type)
{
  float value;
    float temp = htu.readTemperature();
    float rel_hum = htu.readHumidity();
   if(type =='F')
   {
    value = temp *9/5 + 32;//convert to Fahrenheit
   }else if(type =='K')
   {
    value = temp + 273.15;//convert to Kelvin
   }else if(type =='H')
   {
    value = rel_hum;//return relative humidity
   }else{
    value = temp;// return Celsius
   }
   return value;
}//


/*
 * lcdDisplay(int tc, int tr, String title, int vc, int vr, float value)
 * displays value and title on LCD1602
 * How to use:
 * If you want to display: "Voltage: 13.56mV" starting from the first character
 * on the second row.
 * use:
 * lcdDisplay(0, 1, "Voltage: ", 13.56,'d')
 *
 *   'd' is degree symbol
 * tc  is character number  (0)
 * tr is row in the lcd (1)
 * title is the text (Voltage:)
 * vc value for character
 * vr value for  row or line
 * value is the value (13.56)
 */
void lcdDisplay(int tc, int tr, String title, int vc, int vr, float value,char symbol)
{
   // Robojax.com LCD1602 for HTU21D Demo
   lcd.setCursor (tc,tr); //
   lcd.print(title);

   lcd.setCursor (vc,vr); //
   lcd.print(value);
   if(symbol == 'd')
   {
    lcd.print((char)223);
   }else if(symbol =='%')
   {
    lcd.print("%");
   }else if(symbol =='k')
   {
    lcd.print("K");
   }
 // Robojax.com LCD1602 for HTU21D Demo
}
Coisas que você pode precisar
-
Amazonas
-
eBayCompre HTU21D no eBayebay.us
-
AliExpressCompre HTU21D ou SHT21 no AliExpresss.click.aliexpress.com
Recursos e referências
-
ExternoBiblioteca Adafruit HTU21D (GitHub)github.com
Arquivos📁
Folha de dados (pdf)
-
HTU21D_folha_de_dados_de_temperatura_e_umidade
HTU21D_temerature_humidity_datasheet.pdf0.96 MB