このチュートリアルはの一部です: デジタル相対湿度・温度センサー HTU21D
デジタル相対湿度・温度センサー HTU21D に関する動画。他の動画へのリンクはこの記事の下にあります。

HTU21DからLCDに温度を表示する
このチュートリアルでは、HTU21D 温度と湿度センサーからの温度測定値を LCD に表示する方法を学びます。結果として、温度を摂氏、華氏、ケルビンで表示し、同じ画面に相対湿度も表示される機能的なセットアップが得られます。このプロジェクトでは、I2C 通信と基本的なセンサーデータの取り扱いに関する実践的な経験が得られます。詳細な視覚ガイドについては、ビデオを視聴してください(動画は 00:00 にあります)。

ハードウェアの解説
このプロジェクトの主なコンポーネントには、HTU21DセンサーとLCDディスプレイが含まれています。HTU21Dは、I2Cプロトコルを介して通信するデジタル湿度および温度センサーです。これにより、摂氏度または華氏での温度と、相対湿度をパーセンテージとして正確に測定できます。このセンサーは通常3.3Vで動作しますが、5Vシステムでも機能します。 使用するLCDディスプレイは、I2Cインターフェースを備えた16x2 LCDです。このタイプのディスプレイはデータ通信にわずか2本のワイヤーを必要とし、Arduinoのようなマイコンとの接続が容易になります。I2Cインターフェースは、同じバスに複数のデバイスを接続できるため、配線を簡素化し、使用するピン数を減少させます。
データシートの詳細
| メーカー | アダフルート |
|---|---|
| 部品番号 | HTU21D-F |
| 論理/IO 電圧 | 3.3 V(典型値) |
| 供給電圧 | 1.5 V から 3.6 V |
| 出力電流 | 0.5 mA(典型値) |
| ピーク電流 | 1.5 mA(最大) |
| 温度範囲 | -40から125 °C |
| 湿度範囲 | 0から100 %RH |
| パッケージ | DFN-6 |
| ノート / バリアント | None |
- センサーに損傷を与えないよう、適切な電圧レベルを確保してください。
- 必要に応じて、SDAおよびSCLラインにプルアップ抵抗を使用してください。
- スキャナーを使ってI2Cアドレスを確認し、正しい設定であることを確認してください。
- センサーの出力を慎重に扱い、読み取りエラーを避けてください。
- 測定中はセンサーを熱源から遠ざけてください。
配線指示

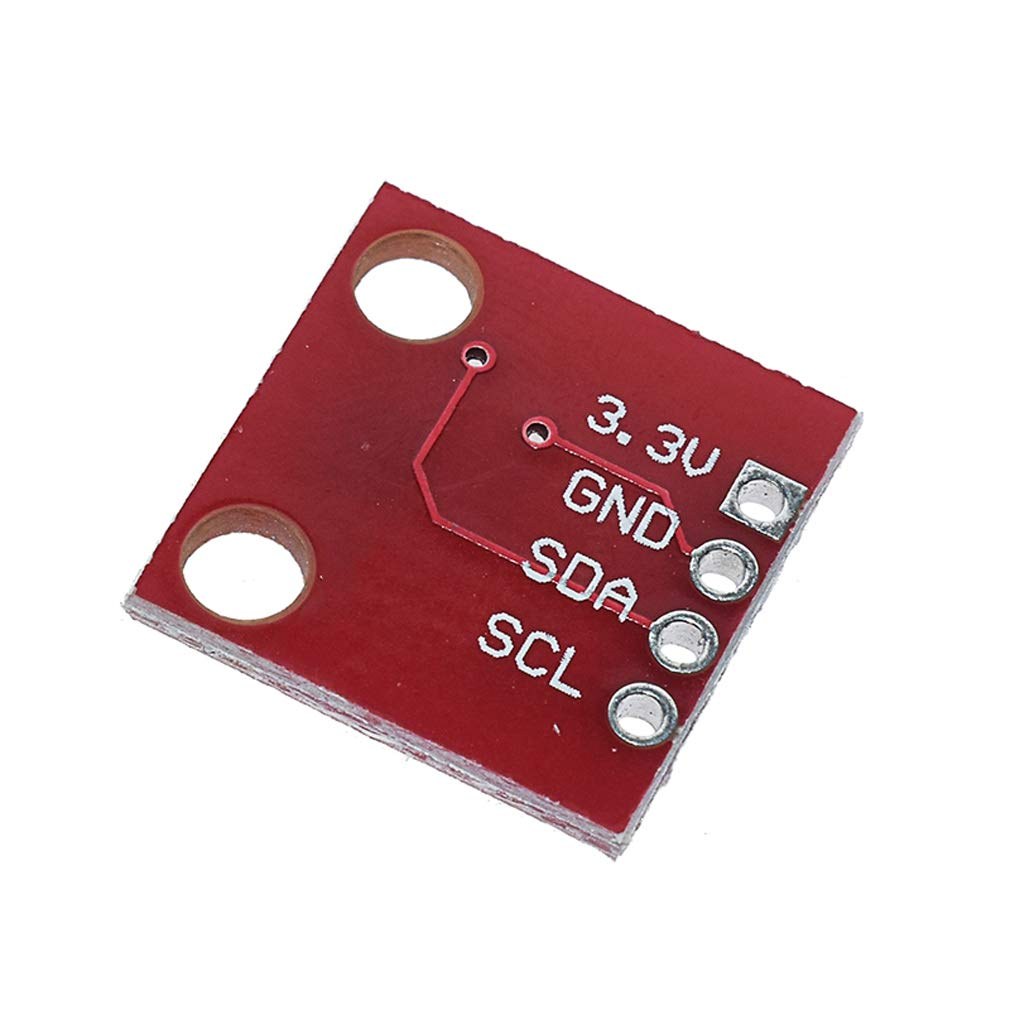
HTU21DセンサーをArduinoに接続するには、センサーのVCCピンをArduinoの3.3V出力に接続します。次に、センサーのGNDピンをArduinoのグラウンドに接続します。データ伝送に使われるSDAピンは、ArduinoのA4ピンに接続する必要があります。同様に、クロック信号に使用されるSCLピンをArduinoのA5ピンに接続します。 LCDも正しく接続されていることを確認してください。この設定でのLCDのI2Cアドレスは通常0x3Fです。異なるタイプのLCDや異なるI2Cアドレスを使用している場合は、コードを適宜調整することを確認してください。配線が完了したら、Arduinoの電源を入れる前に緩んでいる接続がないか確認してください。
コード例とウォークスルー
コードでは、HTU21DセンサーとLCDのために必要なライブラリをインクルードすることから始めます。
#include
#include "Adafruit_HTU21DF.h"
#include
これは、センサーとディスプレイの両方を使用するための環境を設定します。`Adafruit_HTU21DF`ライブラリはセンサーの機能を扱い、`LiquidCrystal_I2C`ライブラリはLCDを管理します。 次に、センサーとLCDの両方のインスタンスを作成します:
Adafruit_HTU21DF htu = Adafruit_HTU21DF();
LiquidCrystal_I2C lcd(0x3F, 16, 2);
ここでは、htuHTU21Dセンサーのオブジェクトであり、lcdLCDディスプレイのオブジェクトです。LCDのI2Cアドレスは0x3Fに設定されており、これはあなたの設定に基づいて確認する必要があるかもしれません。
次にsetup()関数では、LCDを初期化し、センサーが動作しているかどうかを確認します。
void setup() {
  lcd.begin();
  lcd.backlight();
  if (!htu.begin()) {
      lcd.print("Sensor missing");
      while (1);
  }
  lcd.print("HTU21D Ready");
}
このコードはLCDを初期化し、センサーの存在を確認します。センサーが検出されない場合は「センサーが見つかりません」と表示され、プログラムは停止します。
最後に、在loop()機能として、私たちは温度と湿度の値を継続的に読み取り、それらを表示します。
void loop() {
   lcd.clear();
   lcdDisplay(0, 0, "Celsius: ", 10, 0, getHTU('C'), 'd');
   lcdDisplay(0, 1, "Humidity: ", 10, 1, getHTU('H'), '%');
   delay(5000);
}
この抜粋では、LCDをクリアしてから呼び出します。lcdDisplay()温度を摂氏で表示し、湿度を示す関数。getHTU()関数は、渡されたキャラクターに基づいて温度または湿度を取得します。
デモンストレーション / 期待すること
セットアップが完了し、コードがArduinoにアップロードされると、LCDには現在の温度(摂氏)と相対湿度が表示されるはずです。すべてが適切に接続されていれば、数秒ごとに値が更新されるのが見えるでしょう。逆接続や不正なI2Cアドレスなどの一般的な落とし穴に注意してください。これらはセンサー通信の失敗を引き起こす可能性があります(動画では05:00に紹介)。
ビデオのタイムスタンプ
- 00:00- はじめに
- 01:30- 配線指示
- 03:15- コード説明
- 04:50- デモンストレーション
- 05:40- 結論
画像

このチュートリアルはの一部です: デジタル相対湿度・温度センサー HTU21D
/*
 * Display Temperature from HTU21DF on LCD1602-I2C or LCD2004
 * Updated by Ahmad Shamshiri on July 13, 2019
 * in Ajax, Ontario, Canada
 * Watch video instructions for this sketch:
**************************************************
*
  This is an example for the HTU21D-F Humidity & Temp Sensor

  Designed specifically to work with the HTU21D-F sensor from Adafruit
  ----> https://www.adafruit.com/products/1899

  These displays use I2C to communicate; 2 pins are required to
  interface

 Watch Introduction to  360 Servo video with code: https://youtu.be/b_xvu6wWafA
You can get the wiring diagram from my Arduino Course at Udemy.com
Learn Arduino step by step with all libraries, codes, wiring diagrams all in one place
visit my course now http://robojax.com/L/?id=62

If you found this tutorial helpful, please support me so I can continue creating
content like this.
or make a donation using PayPal http://robojax.com/L/?id=64

 * Code is available at http://robojax.com/learn/arduino

 * This code is "AS IS" without warranty or liability. Free to be used as long as you keep this note intact.
 * This code has been downloaded from Robojax.com
    This program is free software: you can redistribute it and/or modify
    it under the terms of the GNU General Public License as published by
    the Free Software Foundation, either version 3 of the License, or
    (at your option) any later version.

    This program is distributed in the hope that it will be useful,
    but WITHOUT ANY WARRANTY; without even the implied warranty of
    MERCHANTABILITY or FITNESS FOR A PARTICULAR PURPOSE.  See the
    GNU General Public License for more details.

    You should have received a copy of the GNU General Public License
    along with this program.  If not, see <https://www.gnu.org/licenses/>.

*/

#include <Wire.h>
#include "Adafruit_HTU21DF.h"

// Connect Vin to 3-5VDC
// Connect GND to ground
// Connect SCL to I2C clock pin (A5 on UNO)
// Connect SDA to I2C data pin (A4 on UNO)

Adafruit_HTU21DF htu = Adafruit_HTU21DF();

// start of settings for LCD1602 with I2C
#include <LiquidCrystal_I2C.h>
// Set the LCD address to 0x27 for a 16 chars and 2 line display
LiquidCrystal_I2C lcd(0x3F, 16, 2);
// end of settings for LCD1602 with I2C

void setup() {
  lcd.begin();
  lcd.backlight();
  if (!htu.begin()) {
      lcd.print("Robojax HTUD1DF");
      lcd.setCursor(0,1);
      lcd.print("sensor missing");
    while (1);
  }else{
  // initialize the LCD

  lcd.print("Robojax HTUD1DF");
  lcd.setCursor(0,1);
  lcd.print("Demo");
  }
  delay(2000);
}

void loop() {
   lcd.clear();// clear previous values from screen
lcdDisplay(
             // to print Celsius:
             0, // character 0
             0, // line 0
             "Celsius: ",

             // to print Celsius
             10, // character 10
             0, // line 0
             getHTU('C'),
             'd'
             );

  lcdDisplay(
             // to print Fahrenheit:
             0, // character 0
             1, // line 1
             "Fahrenheit: ",

             // to print Fahrenheit
             10, // character 9
             1, // line 0
             getHTU('F'),
             'd'
             );
    delay(5000);
lcdDisplay(
             // to print Kelvin:
             0, // character 0
             0, // line 0
             "Kelvin: ",

             // to print Celsius
             9, // character 10
             0, // line 0
             getHTU('K'),
             'k'
             );
  lcdDisplay(
             // to print humidity text
             0, // character 0
             1, // line 1
             "Humidity: ",

             // to print humidity
             10, // character 9
             1, // line 1
             getHTU('H'),
             '%'
             );

        delay(5000);
}

/*
 * @brief returns temperature or relative humidity
 * @param "type" is character
 *     C = Celsius
 *     K = Kelvin
 *     F = Fahrenheit
 *     H = Humidity
 * @return returns one of the values above
 * Usage: to get Fahrenheit type: getHTU('F')
 * to print it on serial monitor Serial.println(getHTU('F'));
 * Written by Ahmad Shamshiri on July 13, 2019
 * in Ajax, Ontario, Canada
 * www.Robojax.com
 */
float getHTU(char type)
{
  float value;
    float temp = htu.readTemperature();
    float rel_hum = htu.readHumidity();
   if(type =='F')
   {
    value = temp *9/5 + 32;//convert to Fahrenheit
   }else if(type =='K')
   {
    value = temp + 273.15;//convert to Kelvin
   }else if(type =='H')
   {
    value = rel_hum;//return relative humidity
   }else{
    value = temp;// return Celsius
   }
   return value;
}//


/*
 * lcdDisplay(int tc, int tr, String title, int vc, int vr, float value)
 * displays value and title on LCD1602
 * How to use:
 * If you want to display: "Voltage: 13.56mV" starting from the first character
 * on the second row.
 * use:
 * lcdDisplay(0, 1, "Voltage: ", 13.56,'d')
 *
 *   'd' is degree symbol
 * tc  is character number  (0)
 * tr is row in the lcd (1)
 * title is the text (Voltage:)
 * vc value for character
 * vr value for  row or line
 * value is the value (13.56)
 */
void lcdDisplay(int tc, int tr, String title, int vc, int vr, float value,char symbol)
{
   // Robojax.com LCD1602 for HTU21D Demo
   lcd.setCursor (tc,tr); //
   lcd.print(title);

   lcd.setCursor (vc,vr); //
   lcd.print(value);
   if(symbol == 'd')
   {
    lcd.print((char)223);
   }else if(symbol =='%')
   {
    lcd.print("%");
   }else if(symbol =='k')
   {
    lcd.print("K");
   }
 // Robojax.com LCD1602 for HTU21D Demo
}
必要かもしれないもの
-
アマゾンAmazonでHTU21Dモジュールを購入するamzn.to
-
イーベイeBayからHTU21Dを購入してください。ebay.us
-
アリエクスプレスAliExpressでHTU21DまたはSHT21を購入してください。s.click.aliexpress.com
リソースと参考文献
-
外部Adafruit HTU21Dライブラリ(GitHub)github.com
ファイル📁
データシート(pdf)
-
HTU21D温度・湿度データシート
HTU21D_temerature_humidity_datasheet.pdf0.96 MB