Arduinoを使用したBTS7960モジュールによる複数のDCモーターの制御
このチュートリアルでは、Arduinoを使ってBTS7960モジュールで複数のDCモーターを制御する方法について説明します。BTS7960は、高電流を扱うことができる強力なモータードライバーで、PWM(パルス幅変調)を通じてモーターの方向と速度を精密に制御することができます。このプロジェクトの終わりには、2つのDCモーターを制御する作業セットアップが完成し、時計回りと反時計回りの両方に回転させることができるようになります。このチュートリアルでは、ハードウェアのセットアップ、配線の指示、およびモーターを操作するために必要なコードを説明します。全体のプロセスをより明確に理解するために、付随するビデオ(ビデオの00:00)も必ずご覧ください。
ハードウェアの解説
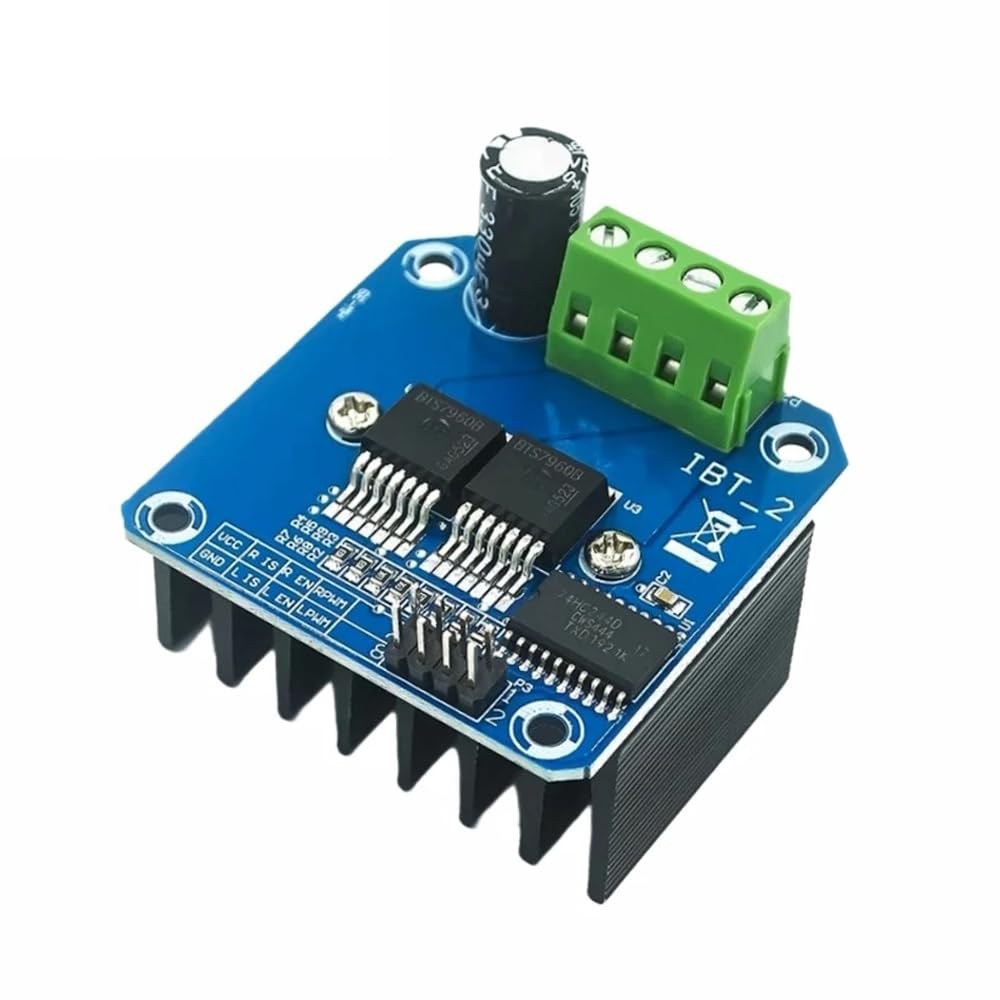
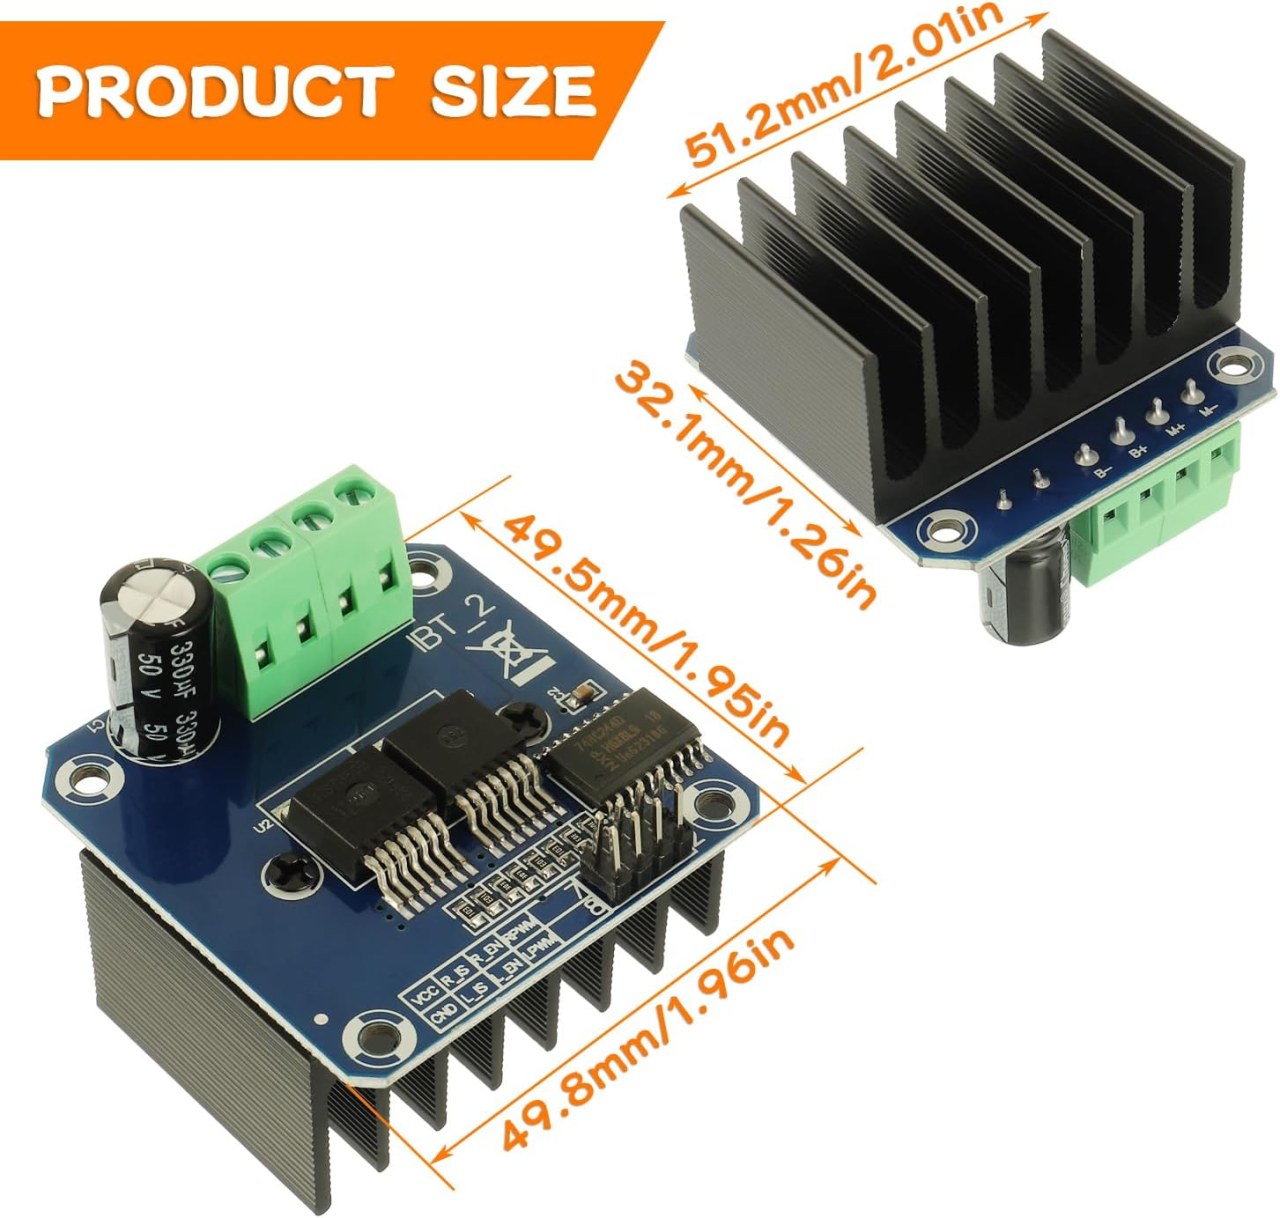
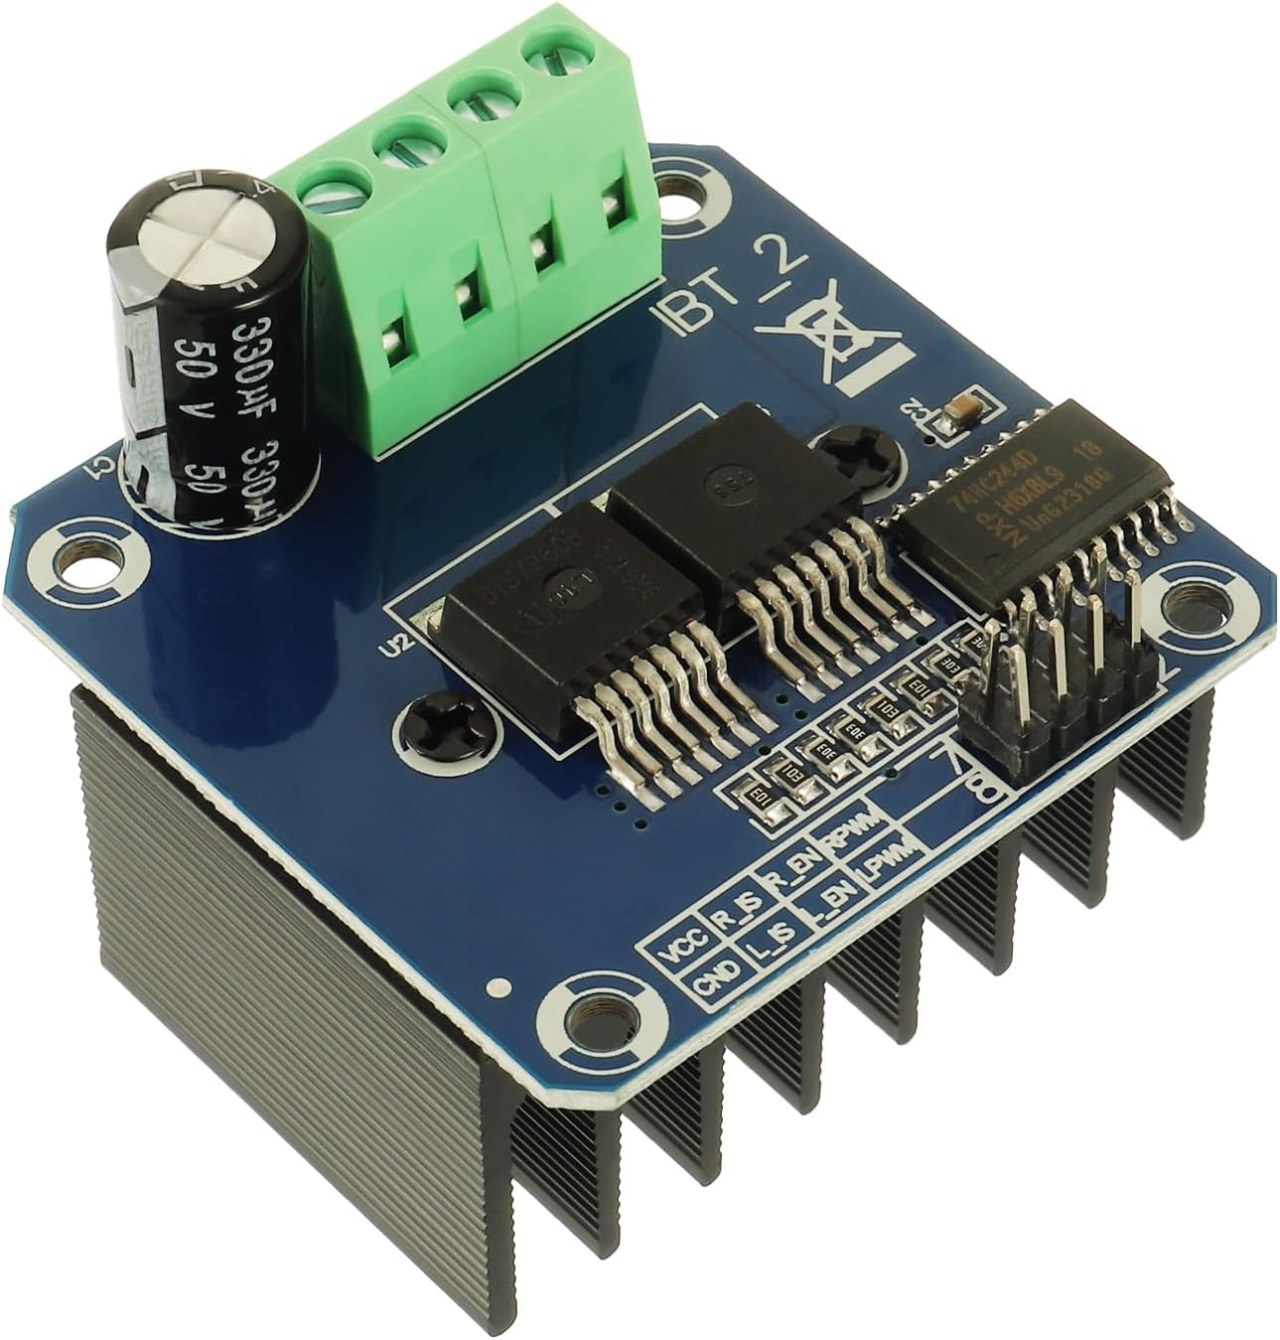
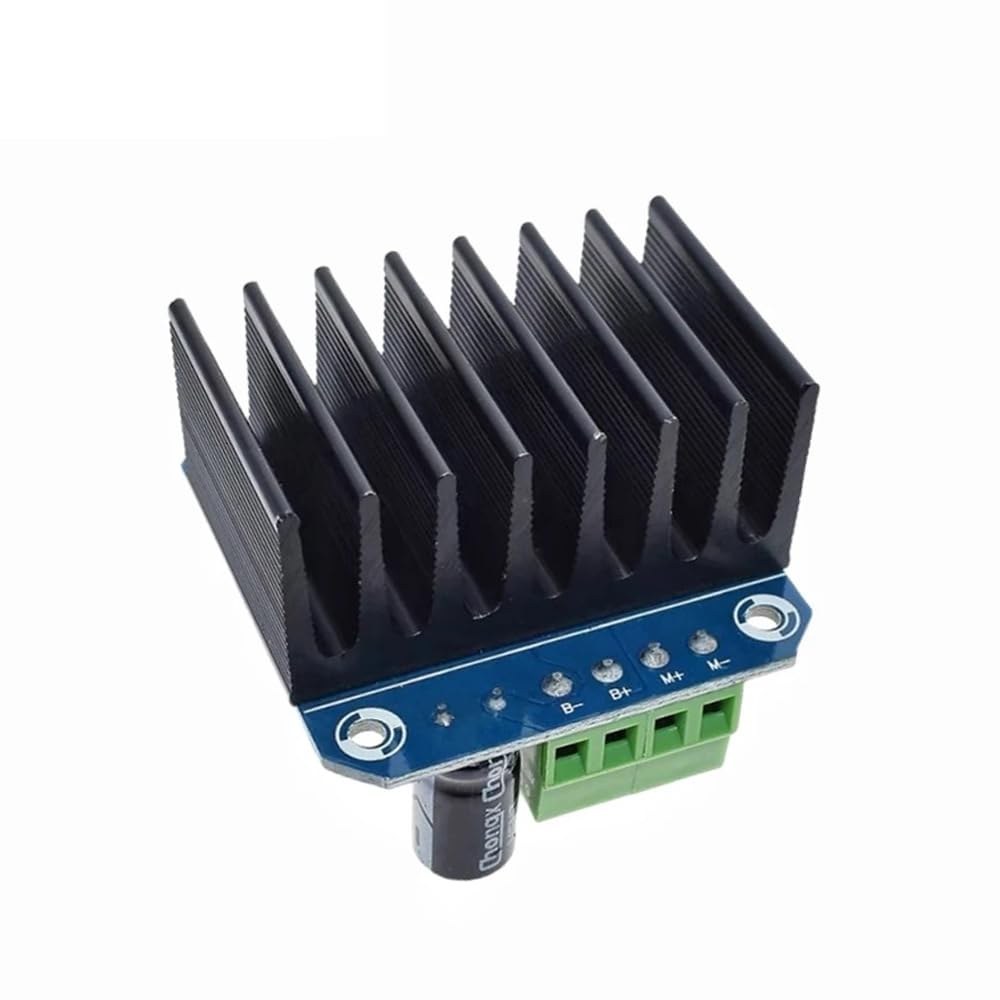
このプロジェクトの主なコンポーネントはBTS7960モータードライバーモジュールです。このモジュールには、モーターに供給される電圧の極性を切り替えることによってモーターの方向を制御できる2つのHブリッジドライバーが含まれています。各ドライバーは最大43Aの電流を扱うことができ、高出力アプリケーションに適しています。このモジュールは、過温度および過電流の状況に対する内蔵保護機能も備えています。BTS7960に加えて、モーターを制御するためにArduinoボードが必要です。ArduinoはモータードライバーにPWM信号を送信し、モーターの速度と方向を調整することを可能にします。ArduinoとBTS7960モジュール間の接続は重要です。なぜなら、それらがモーターが信号にどのように反応するかを決定するからです。
データシートの詳細
| 製造業者 | インフィニオンテクノロジーズ |
|---|---|
| 部品番号 | BTS7960 |
| 論理/IO電圧 | 3.3 Vから5 V |
| 供給電圧 | 5-40 V |
| 出力電流(チャネルごと) | 43 A最大 |
| ピーク電流(チャネルごと) | 60 A |
| PWM周波数ガイダンス | 5-25 kHz |
| 入力論理閾値 | 0.8 V(高)、0.3 V(低) |
| 電圧降下 / RDS(on)/ 飽和度 | 16 mΩ |
| 熱的限界 | 150 °C 最大 |
| パッケージ | TO-263 |
| ノート / バリアント | デュアルHブリッジ構成 |
- 高電流で運転する際は、適切なヒートシンクを確保してください。
- 電源接続には適切なワイヤーゲージを使用してください。
- ArduinoとBTS7960のピンマッピングを再確認してください。
- モジュールの損傷を防ぐために、電流制限を実装してください。
- 電源の近くにデカップリングコンデンサを使用して、安定性を確保してください。
配線指示

BTS7960モジュールをArduinoに接続するには、以下の接続を慎重に行ってください: 1. **電源接続**:電源の正端子をBTS7960モジュールのB+端子に接続し、負端子をB-端子に接続します。電源がモーターの電圧要件と一致していることを確認してください。 2. **モーター接続**:モーターの配線をモジュールのM+およびM-端子に接続します。これにより、モジュールがモーターを制御できるようになります。 3. **Arduinoピン**:以下のArduinoのピンをBTS7960モジュールに接続します: - ピン3(RPWM)をモジュールのRPWMピンに接続。 - ピン4(R_EN)をモジュールのR_ENピンに接続。 - ピン5(R_IS)をモジュールのR_ISピンに接続。 - ピン6(LPWM)をモジュールのLPWMピンに接続。 - ピン7(L_EN)をモジュールのL_ENピンに接続。 - ピン8(L_IS)をモジュールのL_ISピンに接続。 4. **グラウンド接続**:ArduinoのグラウンドピンをBTS7960モジュールのグラウンドピンに接続し、信号の共通参照を確保します。すべての接続が確実であることを確認し、動作中に予期しない動作が発生しないようにしてください。
必要なライブラリをインストールします。
インストールするにはrobojax_BTS7960_motor_driver_libraryArduino IDEで、まず提供されたリンクからライブラリのZIPファイルをダウンロードします。ファイルを保存したら、Arduino IDEを開き、次に進んでください。スケッチ > ライブラリを含める > .ZIPライブラリを追加...ファイル選択ダイアログで、ダウンロードしたZIPファイルを参照し、それを選択して「開く」をクリックします。IDEがライブラリをインストールします。成功したインストールを確認するには、確認してください。ファイル > 例メニューには「Robojax BTS7960 モータードライバーライブラリ」という新しいカテゴリが表示されるはずです。これで、コードにライブラリヘッダーを含めることができます。#include <RobojaxBTS7960.h>.
コード例とウォークスルー
以下のコードスニペットは、BTS7960モジュールを使用してモーターをセットアップし、制御する方法を示しています。初期設定では、モーターに接続されているピンを定義し、モーターオブジェクトを初期化します。
// pins for motor 1
#define RPWM_1 3
#define R_EN_1 4
#define R_IS_1 5
#define LPWM_1 6
#define L_EN_1 7
#define L_IS_1 8

// pins for motor 2
#define RPWM_2 9
#define R_EN_2 10
#define R_IS_2 12
#define LPWM_2 11
#define L_EN_2 A0
#define L_IS_2 A1

#include
RobojaxBTS7960 motor1(R_EN_1, RPWM_1, R_IS_1, L_EN_1, LPWM_1, L_IS_1, debug);
RobojaxBTS7960 motor2(R_EN_2, RPWM_2, R_IS_2, L_EN_2, LPWM_2, L_IS_2, debug);
このコードのセクションはピンの定義を設定し、両方のモーターのために `RobojaxBTS7960` クラスのインスタンスを作成します。 `setup()` 関数はモーターとシリアルモニターを初期化します。
void setup() {
  Serial.begin(9600); // setup Serial Monitor
  motor1.begin();
  motor2.begin();
}
ここでは、`motor.begin()` メソッドが各モーターを操作のために準備し、`loop()` 関数内でそれらを制御できるようにします。`loop()` 関数内では、次のようなコマンドでモーターを制御できます:
void loop() {
   motor1.rotate(100, CW); // run motor 1 at 100% speed CW
   delay(5000); // run for 5 seconds
   motor1.stop(); // stop motor 1
   delay(3000); // stop for 3 seconds
   motor2.rotate(100, CCW); // run motor 2 at 100% speed CCW
   delay(5000); // run for 5 seconds
   motor2.stop(); // stop motor 2
   delay(3000); // stop for 3 seconds
}
このセクションでは、モーターを両方向に回転させ、速度を制御する方法を示します。完全なコードは、参考のために記事の下に読み込まれています。
デモンストレーション / 何を期待するか
配線が完了し、コードをアップロードすると、モーターが時計回りと反時計回りの両方に回転するのが観察できるはずです。コードは各モーターを5秒間全速で動かし、3秒間停止し、そのプロセスを繰り返します。接続が逆になっている場合や電源の供給が不十分な場合など、潜在的な問題に注意してください。問題が発生した場合は、配線を再確認し、電源が十分であることを確認してください(ビデオの00:00で)。
ビデオのタイムスタンプ
- 00:00 スタート
- ハードウェアの説明
- 04:06 データシートが表示されました
- 07:07 配線の説明
- 09:00 コードの説明
- 14:33 デモンストレーション
- 16:47 最大電流試験
- 19:25 熱画像
- 19:27 異なるコードテスト
画像
++
/*
* This is the Arduino code for the BTS7960 DC motor driver.
Using this code, you can control more than one motor to rotate in both directions: clockwise (CW)
and counter-clockwise (CCW).
📚⬇️ Download and resource page for this video https://robojax.com/RJT169
📚⬇️ Download and resource page https://robojax.com/RJT170


Written by Ahmad Shamshiri for Robojax.com on
July 16, 2020 in Ajax, Ontario, Canada.

Watch video instructions for this code:  https://youtu.be/PUL5DZ9TA2o


BTS7960B
If you found this tutorial helpful, please support me so I can continue creating
content like this. You can support me on Patreon: http://robojax.com/L/?id=63

or make a donation using PayPal: http://robojax.com/L/?id=64

 * This code has been downloaded from Robojax.com
    This program is free software: you can redistribute it and/or modify
    it under the terms of the GNU General Public License as published by
    the Free Software Foundation, either version 3 of the License, or
    (at your option) any later version.

    This program is distributed in the hope that it will be useful,
    but WITHOUT ANY WARRANTY; without even the implied warranty of
    MERCHANTABILITY or FITNESS FOR A PARTICULAR PURPOSE.  See the
    GNU General Public License for more details.

    You should have received a copy of the GNU General Public License
    along with this program.  If not, see <https://www.gnu.org/licenses/>.

*/

// pins for motor 1
#define RPWM_1 3 // define pin 3 for RPWM pin (output)
#define R_EN_1 4 // define pin 2 for R_EN pin (input)
#define R_IS_1 5 // define pin 5 for R_IS pin (output)

#define LPWM_1 6 // define pin 6 for LPWM pin (output)
#define L_EN_1 7 // define pin 7 for L_EN pin (input)
#define L_IS_1 8 // define pin 8 for L_IS pin (output)
// motor 1 pins end here

// pins for motor 2
#define RPWM_2 9 // define pin 9 for RPWM pin (output)
#define R_EN_2 10 // define pin 10 for R_EN pin (input)
#define R_IS_2 12 // define pin 12 for R_IS pin (output)

#define LPWM_2 11 // define pin 11 for LPWM pin (output)
#define L_EN_2 A0 // define pin 7 for L_EN pin (input)
#define L_IS_2 A1 // define pin 8 for L_IS pin (output)
// motor 2 pins end here


#define CW 1 //
#define CCW 0 //
#define debug 1 //

#include <RobojaxBTS7960.h>
RobojaxBTS7960 motor1(R_EN_1,RPWM_1,R_IS_1, L_EN_1,LPWM_1,L_IS_1,debug);//define motor 1 object
RobojaxBTS7960 motor2(R_EN_2,RPWM_2,R_IS_2, L_EN_2,LPWM_2,L_IS_2,debug);//define motor 2 object and the same way for other motors

void setup() {
  // BTS7960 Motor Control Code by Robojax.com 20190622
  Serial.begin(9600);// setup Serial Monitor to display information

   motor1.begin();
   motor2.begin();

    // BTS7960 Motor Control Code by Robojax.com 20190622
}

void loop() {
   // BTS7960 Motor Control Code by Robojax.com 20190622
    motor1.rotate(100,CW);// run motor 1 with 100% speed in CW direction
    delay(5000);//run for 5 seconds
    motor1.stop();// stop the motor 1
    delay(3000);// stop for 3 seconds
    motor1.rotate(100,CCW);// run motor 1 at 100% speed in CCW direction
    delay(5000);// run for 5 seconds
    motor1.stop();// stop the motor 1
    delay(3000);  // stop for 3 seconds

    motor2.rotate(100,CW);// run motor 2 with 100% speed in CW direction
    delay(5000);//run for 5 seconds
    motor2.stop();// stop the motor 2
    delay(3000);// stop for 3 seconds
    motor2.rotate(100,CCW);// run motor 2 at 100% speed in CCW direction
    delay(5000);// run for 5 seconds
    motor2.stop();// stop the motor 2
    delay(3000);  // stop for 3 seconds


  // slowly speed up the motor 1 from 0 to 100% speed
    for(int i=0; i<=100; i++){
        motor1.rotate(i,CCW);
        delay(50);
    }

   // slow down the motor 2 from 100% to 0
    for(int i=100; i>0; i--){
        motor2.rotate(i,CCW);
        delay(50);
    }
    motor2.stop();// stop motor 2
    delay(3000); // stop for 3 seconds
 // BTS7960 more than 1 Motor Control Code by Robojax.com 20190622
}// loop ends
リソースと参考文献
-
外部AmazonでBTS7960を購入するamzn.to
-
外部AmazonカナダでBTS7960を購入するamzn.to
-
外部AmazonフランスのBTS7960amzn.to
-
外部BTS7960 アマゾンジャパンamzn.to
-
外部BTS7960、アマゾン・ドイツamzn.to
-
外部BTS7960はアマゾンスペインにあります。amzn.to
-
外部BTS7960をアマゾンイタリアでamzn.to
-
外部BTS7960を購入、Amazon UKamzn.to
-
外部BTS7960モジュールデータシート(PDF)handsontec.com
ファイル📁
Arduinoライブラリ(zip)
-
robojax_BTS7960モータードライバーライブラリ
robojax_BTS7960_motor_driver_library.zip0.10 MB
データシート(pdf)
-
BTS7960データシート
BTS7960_datasheet.pdf0.45 MB
フリッツィングファイル
-
BTS7960ドライバー
BTS7960_driver.fzpz0.01 MB