Verwendung von zwei oder mehr LCD1602-I2C-Modulen mit Arduino
Dieses Projekt zeigt, wie man zwei oder mehr LCD1602-Displays mit I2C-Modulen an ein einzelnes Arduino anschließt und steuert. Dieses Setup ist äußerst vielseitig und eröffnet eine Vielzahl von Möglichkeiten zur Anzeige von Daten auf mehreren Bildschirmen.
Hier sind einige Projektideen mit mehreren LCDs:
- Anzeige von Sensormesswerten aus verschiedenen Standorten auf separaten Bildschirmen.
- Erstellung eines Multi-Screen-Informationsdisplays für ein Projekt.
- Erstellen einer menügesteuerten Schnittstelle mit Navigationsoptionen auf einem Bildschirm und Inhalten auf einem anderen.
- Erweiterung des Anzeigebereichs für Projekte, die mehr als 16x2 Zeichen benötigen.
Hardware/Komponenten
- Arduino Uno (oder andere kompatible Platine)
- Zwei oder mehr LCD1602-Displays mit I2C-Backpacks
- Jumperdrähte
- Potentiometer (für die Kontrastanpassung auf den LCDs - normalerweise im Lieferumfang des I2C-Backpacks enthalten)
Verdrahtungsanleitung
(in Video bei 01:16)
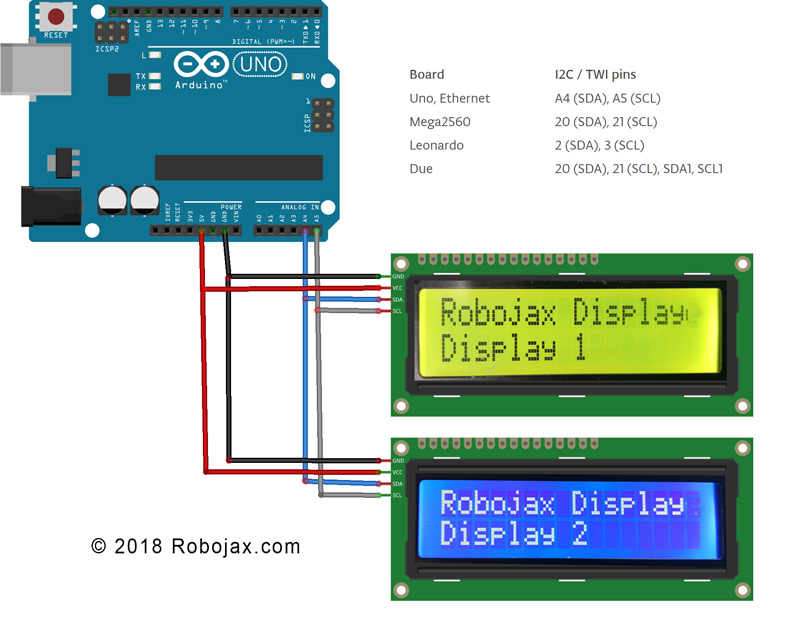
- Verbinden Sie den VCC-Pin jedes I2C LCD mit dem 5V-Pin des Arduino.
- Verbinde den GND-Pin jedes I2C-LCD mit dem GND-Pin des Arduinos.
- Verbinden Sie den SDA-Pin jedes I2C-LCD mit dem SDA-Pin des Arduino (A4 auf Uno).
- Verbinde den SCL-Pin jedes I2C LCD mit dem SCL-Pin des Arduino (A5 auf Uno).
Für andere Arduino-Boards konsultieren Sie das Pinout-Diagramm für die SDA- und SCL-Pins (im Video bei 02:20).
Anrede:Jedes LCD benötigt eine einzigartige I2C-Adresse. Diese wird typischerweise über Lötpads auf dem I2C-Backpack eingestellt (im Video bei :41). Verwenden Sie den bereitgestellten I2C-Scanner-Code (im Video bei :16), um die Adresse jedes LCD zu ermitteln.
Code-Erklärung
Der Code ist so gestaltet, dass es einfach ist, verschiedene Datentypen (Ganzzahlen, Fließkommazahlen, Zeichenfolgen) auf mehreren LCDs anzuzeigen. Die Kernfunktionalität dreht sich um benutzerdefinierte Funktionen:
LiquidCrystal_I2C lcd1(0x3F, 16, 2); // Display 1 (in video at 05:24)
LiquidCrystal_I2C lcd2(0x26, 16, 2); // Display 2
// ... add more LCD objects as needed
Ersetzen0x3Fund0x26mit den I2C-Adressen Ihrer LCDs.
lcdDisplay(1, 0, "Age: ", intToStr(age), " years"); // (in video at 09:23)
Diese Funktion vereinfacht die Anzeige von Daten auf einem bestimmten LCD (erstes Argument), Zeile (zweites Argument), mit einem Titel (drittes Argument), Wert (viertes Argument) und Einheiten (fünftes Argument). DieintToStr()undfloatToStr()Funktionen konvertieren numerische Daten in Zeichenfolgen zur Anzeige.
Live-Projekt/Demonstration
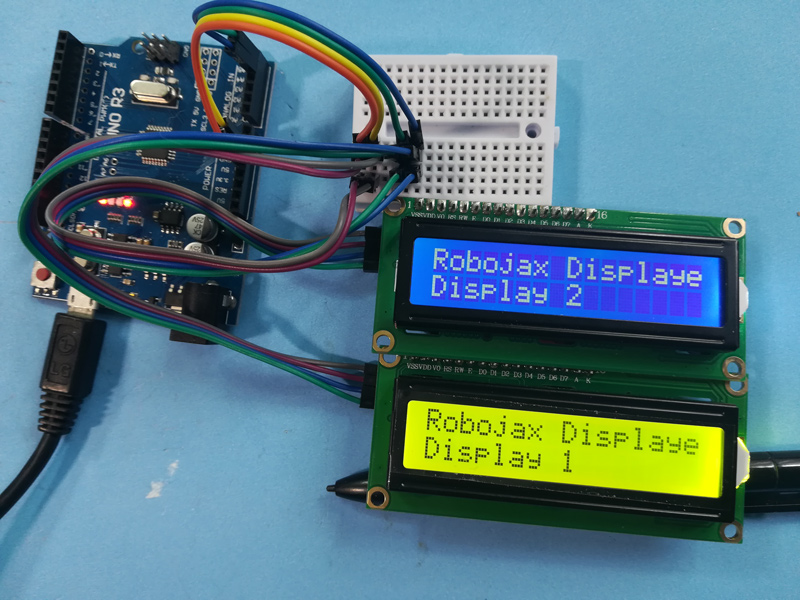
Die Demonstration zeigt, wie man Alter, Tage, Gewicht und Spannung auf zwei verschiedenen LCDs anzeigt. Die Werte werden dynamisch in der Schleife aktualisiert.
Kapitel
- [00:00] Einführung und Projektübersicht
- [01:16] Verdrahtungserklärung
- [02:20] Arduino-Board-Pinbelegung
- [02:41] I2C-Adressierung
- [04:40] Code-Übersicht
- [06:16] I2C Scanner
- [07:21] Dezimalstellen und Zahlenformatierung
- [08:00] Funktion einrichten
- [08:58] Schleifenfunktion und Datendarstellung
- [12:01] Benutzerdefinierte Anzeige-Funktion
- [13:10] Zeichenkonvertierungsfunktionen
Bilder
/*
 * Arduino code for use with two or more LCD1602 I2C displays with Arduino
 *  Custom function to display floats (like 2.45), integers (like 2 or 8), and strings
 *  very easily

 * This Arduino sketch makes it possible to use two displays at the same time.
 *
* Watch video instructions for this code: https://youtu.be/L6ekl2ABcuY
* *
 * Written by Ahmad Shamshiri for Robojax.com on Saturday, November 17, 2018
 * at 20:45 in Ajax, Ontario, Canada
 *

 * This code is "AS IS" without warranty or liability. Free to be used as long as you keep this note intact.
 * This code has been downloaded from Robojax.com
    This program is free software: you can redistribute it and/or modify
    it under the terms of the GNU General Public License as published by
    the Free Software Foundation, either version 3 of the License, or
    (at your option) any later version.

    This program is distributed in the hope that it will be useful,
    but WITHOUT ANY WARRANTY; without even the implied warranty of
    MERCHANTABILITY or FITNESS FOR A PARTICULAR PURPOSE.  See the
    GNU General Public License for more details.

    You should have received a copy of the GNU General Public License
    along with this program.  If not, see <https://www.gnu.org/licenses/>.
 */


#include <Wire.h> // this is part of arduino
#include <LiquidCrystal_I2C.h>

LiquidCrystal_I2C lcd1(0x3F, 16, 2);// display 1
LiquidCrystal_I2C lcd2(0x26, 16, 2);// display 2


// number settings
const int decimals = 2;// number of decimal places needed to be displayed
const int positions = 5;// total position of numbers including the decimal places

void setup() {
  // initialize the LCD
  lcd1.begin();//initialize LCD1
  lcd2.begin();//initialize LCD2
  lcd1.backlight();// turn the backlight ON for the LCD1
  lcd2.backlight();// turn the backlight ON for the LCD2


  Serial.begin(9600);// initialize serial monitor with 9600 baud

      lcd1.print("Robojax Display");
      lcd1.setCursor(0,1);
      lcd1.print("Display 1");

      lcd2.print("Robojax Display");
      lcd2.setCursor(0,1);
      lcd2.print("Display 2");

      Serial.println("Robojax Displays");
      Serial.println("2 or More");

  delay(3000);// change this line if you want not to wait
  lcd1.clear();// clear screen 1
  lcd2.clear();// clear screen 2
}

void loop() {
  // Robojax.com multiple LCD1602 I2C display

  int age = 31;
  int days= age * 365;
  float weight = 4.84;
  float voltage = 22.1;


      lcdDisplay(1, 0, "Age: ", intToStr(age), " years"); // print "Age: 31 years" to line 1 of display 1
      lcdDisplay(1, 1, "Days: ", intToStr(days), " days");// print "Days: 11351 days" to line 2 of display 1

      lcdDisplay(2, 0, "Weight: ", floatToStr(weight), " kg");//print "Weight: 2.84 kg" to line 1 of display 2
      lcdDisplay(2, 1, "Voltage: ", floatToStr(voltage), "V");// print "Voltage 22.10V" to line 2 of display 2

      Serial.println("Age: ");Serial.print(age); Serial.print(" years");
      Serial.println("Days: ");Serial.print(days); Serial.print(" days");
    Serial.println("====");

 delay(50); // wait for 200 milliseconds
}// loop end


/*
 * Written by Ahmad Shamshiri on November 17, 2018 for Robojax.com
 * lcdDisplay(int dis, int rowNum, String titleText, String valueText, String value2Text)
  for example to display:
 * dis is the display number
 * rowNum  is the row number  (0 or 1)
 * titleText is the text (e.g., "Voltage:")
 * valueText is the value
 *  value2Text is the text appended to the valueText (e.g., "A", "V", etc.)
 *
 * @brief Prints text on the screen on a specific row and character.
 * @param tc=text character number, trc=text row number,
 * @return the remaining time as an integer (seconds)

 *
 */
void lcdDisplay(int dis, int rowNum, String titleText, String valueText, String value2Text)
{
    clearRow(dis,rowNum);
    String myStr;
    myStr = String(valueText);

    int titleTextLength = titleText.length();
   // Robojax.com multiple LCD1602 I2C display
   if(dis ==1)
   {
     lcd1.setCursor (0,rowNum); //
     lcd1.print(titleText);

     lcd1.setCursor (titleTextLength,rowNum); //
     lcd1.print(myStr);

     lcd1.setCursor (myStr.length()+titleTextLength,rowNum); //
     lcd1.print(value2Text);
   }
   if(dis ==2)
   {
     lcd2.setCursor (0,rowNum); //
     lcd2.print(titleText);

     lcd2.setCursor (titleTextLength,rowNum); //
     lcd2.print(myStr);

     lcd2.setCursor (myStr.length()+titleTextLength,rowNum); //
     lcd2.print(value2Text);
   }

}

/*
 * Written by Ahmad Shamshiri on November 17, 2018 for Robojax.com
 * @brief Clears only one row of a specific display.
 * @param d, the display number (integer)
 * @param r, the row number (integer)
 * @return no return value
 */
void clearRow(int d,int r)
{
  //
  for(int i=0; i<16; i++)
  {
    if(d ==1)
    {
      lcd1.setCursor (i,r); //
      lcd1.print(" ");
    }
    if(d ==2)
    {
      lcd2.setCursor (i,r); //
      lcd2.print(" ");
    }

  }
}//clearRow end


/*
 * Written by Ahmad Shamshiri on November 18, 2018 for Robojax.com
 * @brief Converts an integer to a string.
 * @param a, the integer to convert.
 * @return the converted value as a string.
 */
String intToStr(int a)
{

  return String(a);
}//intToStr end


/*
 * Written by Ahmad Shamshiri on November 18, 2018 for Robojax.com
 * @brief Converts a float to a string.
 * @param a, the float to convert.
 * @return the converted value as a string.
 */
String floatToStr(float a)
{
  char buff[6]; // create a buffer of 6 characters
  dtostrf(a, positions, decimals, buff );// 5 positions and 2 decimal places
  return buff;// return the buffer
}//floatToStr end
Dinge, die Sie vielleicht brauchen
-
AmazonLCD1602-I2C bei Amazon kaufenamzn.to
-
eBayKaufen Sie LCD1602-I2C bei eBay.ebay.us
-
AliExpressKaufe LCD1602-I2C bei AliExpresss.click.aliexpress.com
-
AliExpressKaufen Sie 10 Stück LCD1602-I2C von AliExpresss.click.aliexpress.com
Ressourcen & Referenzen
-
ExternArduino Draht Dokumentationsseitearduino.cc
Dateien📁
Fritzing-Datei
-
LCD LCD1602-I2C-Modul mit 4 Drähten
LCD1602-I2C.fzpz0.01 MB
Andere Dateien
-
LCD1602 LiquidCrystal Bibliothek
robojax-LCD1602_LiquidCrystal.zip