آردوینو کے ذریعے 16 چینل ریلے ماجیول کو کنٹرول کرنا
```html
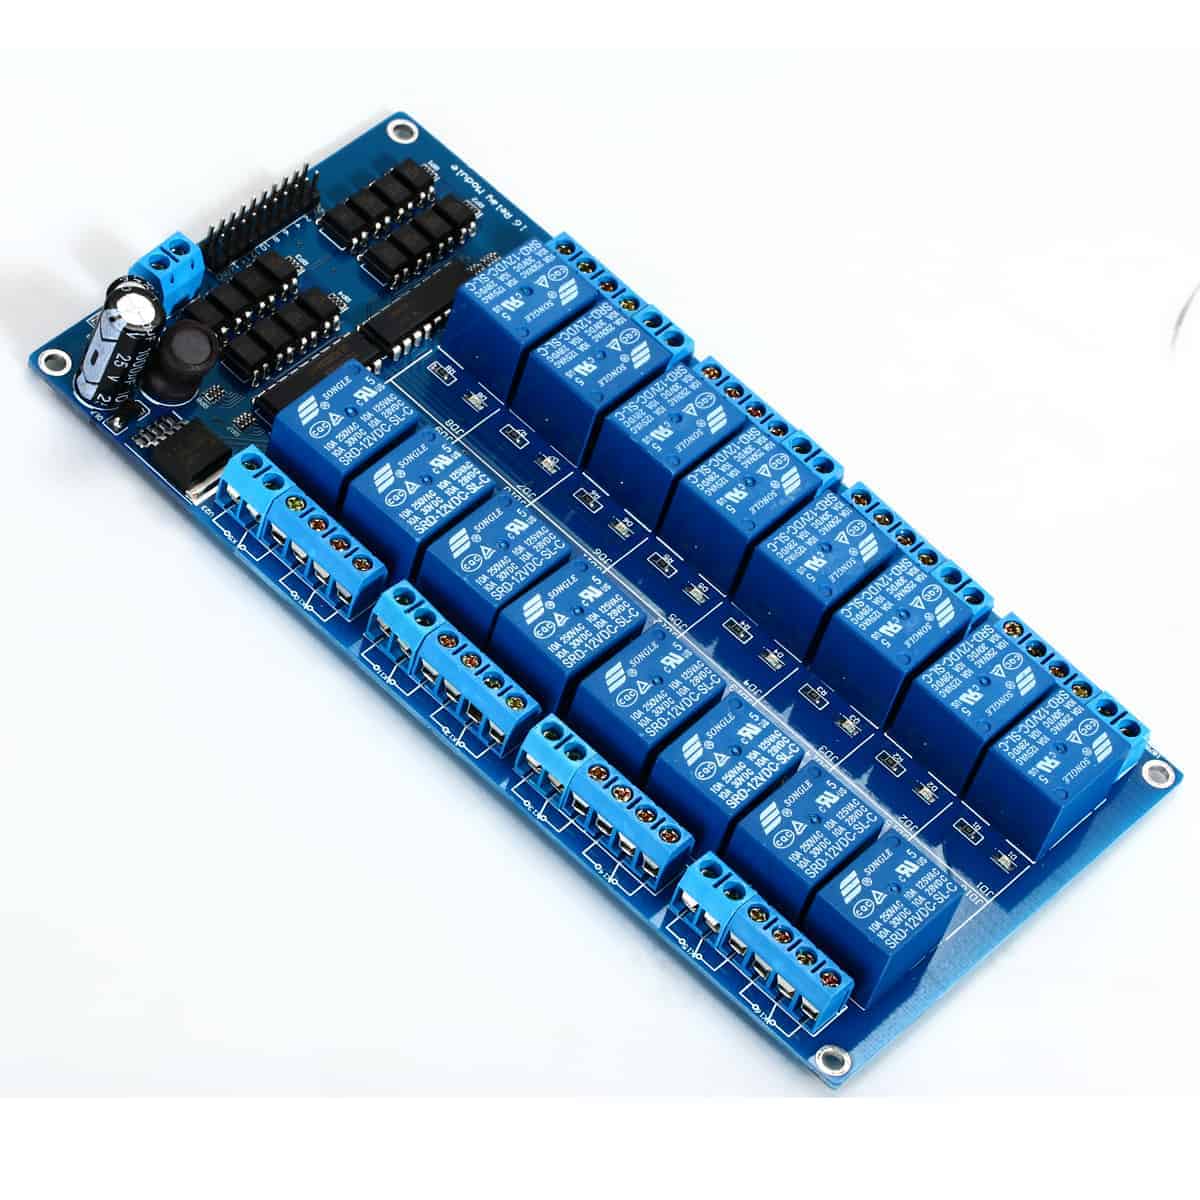
Arduino کے ساتھ 16-چینل ریلے ماجیول کو کنٹرول کرنا
یہ پروجیکٹ ظاہر کرتا ہے کہ Arduino Uno کا استعمال کرتے ہوئے 16-چینل ریلے ماجیول پر ہر ریلے کو انفرادی طور پر کیسے کنٹرول کیا جائے۔ یہ سیٹ اپ آپ کو مختلف AC یا DC لوڈز کو منظم کرنے کی اجازت دیتا ہے، جس سے یہ لائٹس، پنکھے، ہیٹر، یا دیگر برقی آلات کو کنٹرول کرنے جیسی ایپلیکیشنز کے لیے موزوں ہے۔ یہ گائیڈ آپ کے پروجیکٹ کو شروع کرنے کے لیے ہارڈویئر، وائرنگ، اور کوڈ کی مکمل وضاحت فراہم کرتا ہے۔
ہارڈویئر/اجزاء
- Arduino Uno (Mega بھی مطابقت رکھتا ہے، Nano اور Mini محدود پنوں کی وجہ سے تجویز نہیں کیے جاتے جب تک کہ علیحدہ ویڈیو میں دکھائے گئے ترمیم شدہ طریقے سے استعمال نہ کیا جائے۔) (ویڈیو میں 08:53 پر)
- 16-چینل ریلے ماجیول (ویڈیو میں 00:04 پر)
- بیرونی پاور سپلائی (کم از کم 1.5A سنبھالنے کی صلاحیت رکھتی ہو) (ویڈیو میں 02:12 پر)
- کنیکٹنگ وائرز
- لوڈز (مثلاً لائٹس، پنکھے وغیرہ)
وائرنگ گائیڈ
16-چینل ریلے ماجیول کو ریلے چلانے کے لیے بیرونی پاور سپلائی کی ضرورت ہوتی ہے۔ بیرونی پاور سپلائی کے مثبت اور گراؤنڈ کو بالترتیب ریلے ماجیول کے VCC اور GND پنوں سے جوڑیں (ویڈیو میں 12:55 پر)۔ ماجیول کا گراؤنڈ پن Arduino کے GND سے بھی منسلک ہونا چاہیے۔ ماجیول پر ہر ریلے چینل ایک پن سے مطابقت رکھتا ہے، جس کی نمبر 1 سے 16 تک ہے۔ ان پنوں کو کوڈ میں بیان کردہ Arduino کے ڈیجیٹل پنوں (پن 2 سے 12 اور A0 سے A4) سے جوڑا جانا چاہیے۔ (ویڈیو میں 09:03 پر) اگر آپ Arduino کو اسی بیرونی پاور سپلائی سے چلانا چاہتے ہیں، تو مثبت ٹرمینل کو Arduino کے VIN پن سے جوڑیں۔ (ویڈیو میں 13:24 پر)
کوڈ کی وضاحت
فراہم کردہ Arduino کوڈ 16-چینل ریلے ماجیول کو کنٹرول کرتا ہے۔ یہ ریلے چینلز سے منسلک پنوں، ریلے کی ٹرگر قسم (اس معاملے میں LOW)، اور لوپ ڈیلے کی وضاحت کرتا ہے۔ بنیادی فعالیت channelControl() فنکشن میں ہے، جو آپ کو ایک مخصوص ریلے کو مخصوص مدت کے لیے ON یا OFF کرنے کی اجازت دیتا ہے۔
const int controlPin[16] = {2,3,4,5,6,7,8,9,10,11,12,A0,A1,A2,A3,A4}; // پنوں کی وضاحت کریں

const int triggerType = LOW;// آپ کی ریلے کی قسم
اگر آپ کا ریلے ہائی-ٹرگر ہے تو triggerType کو HIGH میں تبدیل کریں۔ (ویڈیو میں 09:48 پر)
void channelControl(int relayChannel, int action, int t)
{
  // ... (مختصر کرنے کے لیے کوڈ حذف کیا گیا)
  digitalWrite(controlPin[relayChannel], state);
  // ...
}
ایک مخصوص ریلے کو کنٹرول کرنے کے لیے، channelControl() فنکشن کو ریلے چینل (0-15)، مطلوبہ ایکشن (1 برائے ON، 0 برائے OFF)، اور مدت ملی سیکنڈ میں کال کریں۔ مثال کے طور پر، ریلے 6 کو 2 سیکنڈ کے لیے آن کرنے کے لیے (ویڈیو میں 11:53 پر):
channelControl(6, 1, 2000); // ریلے 7 کو 2 سیکنڈ کے لیے ON کریں
ایک ساتھ متعدد ریلے کو کنٹرول کرنے کے لیے، loop() فنکشن کے اندر انفرادی `digitalWrite` کمانڈز استعمال کریں جیسا کہ نیچے دکھایا گیا ہے (ویڈیو میں 09:03 پر):
digitalWrite(controlPin[5], LOW); // ریلے 6 ON
digitalWrite(controlPin[2], LOW); // ریلے 3 ON
digitalWrite(controlPin[12], LOW); // ریلے 13 ON
لائیو پروجیکٹ/ڈیموسٹریشن
ڈیموسٹریشن (ویڈیو میں 14:17 پر) ہر ریلے کو ترتیب وار فعال ہوتے دکھاتی ہے۔ سیریل مانیٹر ہر ریلے کی حیثیت اور ایکٹیویشن کا وقت ظاہر کرتا ہے۔ آپ اپنے پروجیکٹ کی ضروریات کے مطابق مخصوص ریلے کو کنٹرول کرنے کے لیے کوڈ میں ترمیم کر سکتے ہیں، جیسے درجہ حرارت ایک خاص حد سے تجاوز کرنے پر ہیٹر آن کرنا (ویڈیو میں 16:24 پر)۔
ویڈیو ابواب
- تعارف: 00:00
- ہارڈویئر کی وضاحت: 01:20
- کتنا لوڈ جوڑیں؟: 05:37
- ریلے وولٹیج کی وضاحت: 06:46
- کوڈ کی وضاحت: 08:45
- وائرنگ کی وضاحت: 12:53
- ڈیموسٹریشن: 14:17
```
تصاویر
/*
 * Arduino code to control 16 channel relay with Arduino UNO
 *
 * Written by Ahmad Shamshiri for Robojax.com on Sunday, October 8, 2018
 * at 10:35 in Ajax, Ontario, Canada
 * Watch video instructions for this code: https://youtu.be/Q9aBI4ELKC4
 *
 * This code is "AS IS" without warranty or liability. Free to be used as long as you keep this note intact.
 * This code has been downloaded from Robojax.com
    This program is free software: you can redistribute it and/or modify
    it under the terms of the GNU General Public License as published by
    the Free Software Foundation, either version 3 of the License, or
    (at your option) any later version.

    This program is distributed in the hope that it will be useful,
    but WITHOUT ANY WARRANTY; without even the implied warranty of
    MERCHANTABILITY or FITNESS FOR A PARTICULAR PURPOSE.  See the
    GNU General Public License for more details.

    You should have received a copy of the GNU General Public License
    along with this program.  If not, see <https://www.gnu.org/licenses/>.
 */


const int controlPin[16] = {2,3,4,5,6,7,8,9,10,11,12,A0,A1,A2,A3,A4}; // define pins

const int triggerType = LOW;// your relay type
int loopDelay = 1000;// delay in loop
int tmpStat =1;


void setup() {
  for(int i=0; i<16; i++)
  {
    pinMode(controlPin[i], OUTPUT);// set pin as output
    if(triggerType ==LOW){
      digitalWrite(controlPin[i], HIGH); // set initial state OFF for low trigger relay
    }else{
       digitalWrite(controlPin[i], LOW); // set initial state OFF for high trigger relay
    }
  }

  Serial.begin(9600);// initialize serial monitor with 9600 baud
}

void loop() {

  for(int i=0; i<16; i++)
  {

   channelControl(i,tmpStat,200);// turn each relay ON for 200ms


  }
  if(tmpStat)
  {
    tmpStat=0;
  }else{
    tmpStat=1;
  }
 Serial.println("===============");
 //channelControl(6,1, 2000); // turn relay 7 ON for 2 seconds
 //channelControl(6,0, 5000); // turn relay 7 OFF for 5 seconds
 //channelControl(9,1, 3000); // turn relay 10 OFF for ever

 delay(loopDelay);// wait for loopDelay ms

}

/*
 * funciton: channelControl
 * turns ON or OFF specific relay channel
 * @param relayChannel is integer value channel from 0 to 15
 * @param action is 1 for ON or 0 for OFF
 * @param t is time in milliseconds
 */
void channelControl(int relayChannel, int action, int t)
{
  int state =LOW;
  String statTXT =" ON";
  if(triggerType == LOW)
  {
    if (action ==0)// if OFF requested
    {
      state = HIGH;
      statTXT = " OFF";
    }
    digitalWrite(controlPin[relayChannel], state);
    if(t >0 )
    {
      delay(t);
    }
       Serial.print ("Channel: ");
       Serial.print(relayChannel);
       Serial.print(statTXT);
       Serial.print(" - ");
       Serial.println(t);
  }else{
    if (action ==1)// if ON requested
    {
      state = HIGH;
    }else{
      statTXT = " OFF";
    }
    digitalWrite(controlPin[relayChannel], state);
    if(t >0 )
    {
      delay(t);
    }
       Serial.print ("Channel: ");
       Serial.print(relayChannel);
       Serial.print(statTXT);
       Serial.print(" - ");
       Serial.println(t);
  }

}/*
* Arduino code to control 16 channel relay with Arduino UNO
* Control more than 1 relay
* Written by Ahmad Shamshiri for Robojax.com on Sunday, October 8, 2018
* at 10:35 in Ajax, Ontario, Canada
* Watch video instructions for this code: https://youtu.be/Q9aBI4ELKC4
*
* This code is "AS IS" without warranty or liability. Free to be used as long as you keep this note intact.
* This code has been downloaded from Robojax.com
This program is free software: you can redistribute it and/or modify
it under the terms of the GNU General Public License as published by
the Free Software Foundation, either version 3 of the License, or
(at your option) any later version.
This program is distributed in the hope that it will be useful,
but WITHOUT ANY WARRANTY; without even the implied warranty of
MERCHANTABILITY or FITNESS FOR A PARTICULAR PURPOSE. See the
GNU General Public License for more details.
You should have received a copy of the GNU General Public License
along with this program. If not, see <https://www.gnu.org/licenses/>.
*/
const int controlPin[16] = {2,3,4,5,6,7,8,9,10,11,12,A0,A1,A2,A3,A4}; // define pins
const int triggerType = LOW;// your relay type
int loopDelay = 1000;// delay in loop
int tmpStat =1;
void setup() {
for(int i=0; i<16; i++)
{
pinMode(controlPin[i], OUTPUT);// set pin as output
if(triggerType ==LOW){
digitalWrite(controlPin[i], HIGH); // set initial state OFF for low trigger relay
}else{
digitalWrite(controlPin[i], LOW); // set initial state OFF for high trigger relay
}
}
Serial.begin(9600);// initialize serial monitor with 9600 baud
}
void loop() {
digitalWrite(controlPin[5], LOW); // relay 6 ON
digitalWrite(controlPin[2], LOW); // relay 3 ON
digitalWrite(controlPin[12], LOW); // relay 13 ON
digitalWrite(controlPin[5], HIGH); // relay 6 OFF
}آپ کو جن چیزوں کی ضرورت ہو سکتی ہے
-
ای بے
-
ای بے
-
علی ایکسپریسPurchase 16 Channel 5V, 12V or 24V relay module from AliExpresss.click.aliexpress.com
-
بینگوڈPurchase 16 Channel relay module from Banggoodbanggood.com
وسائل اور حوالہ جات
-
باہرونیDIP 4-pin photocouplerwebpagefx.com
-
باہرونی
-
باہرونیPurchase 16 Channel 5V, 12V or 24V relay module from AliExpresss.click.aliexpress.com
-
باہرونیPurchase 16 Channel relay module from Banggoodbanggood.com
-
باہرونی
-
باہرونی
-
باہرونی
فائلیں📁
نقشہ
-
robojax_16ch_relay module schematic
robojax_16ch_relay_schematic.pdf0.37 MB