ஒரு Arduino மோட்டார் ஷீல்டை (L298N/L298P) பயன்படுத்தி மின்னோட்ட உணர்தல்
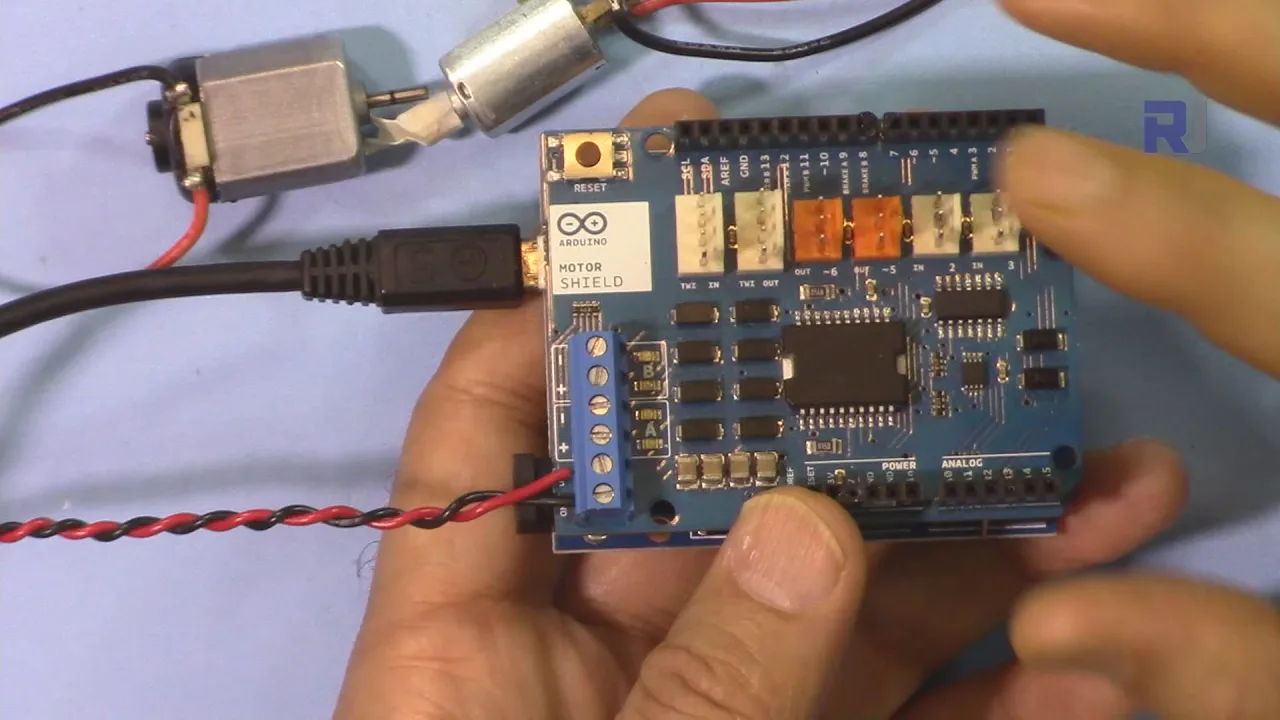
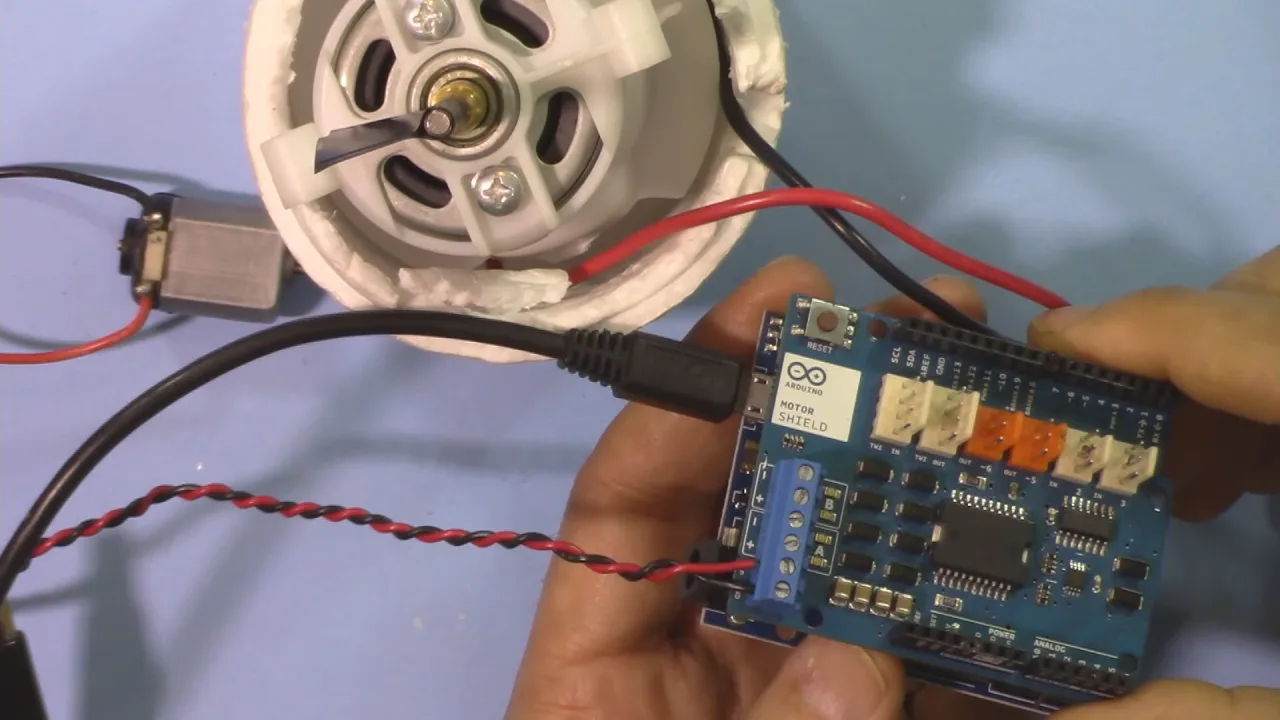
இந்த திட்டம் Arduino மோட்டார் ஷீல்டின் (L298N/L298P போன்றவை) மின்னோட்ட உணர்திறன் திறன்களைப் பயன்படுத்தி, DC மோட்டார் மூலம் எடுக்கப்படும் மின்னோட்டத்தை அளவிடுவது மற்றும் அந்த மின்னோட்டத்தின் அடிப்படையில் செயல்களைத் தூண்டுவது எப்படி என்பதை நிரூபிக்கிறது. இது மாறுபட்ட சுமைகளுக்கு பதிலளிக்கக்கூடிய, அதிக வெப்பத்தைத் தடுக்கக்கூடிய, மற்றும் மேம்பட்ட கட்டுப்பாட்டு வழிமுறைகளை செயல்படுத்தக்கூடிய புத்திசாலித்தனமான மோட்டார் கட்டுப்பாட்டு அமைப்புகளை உருவாக்க உங்களை அனுமதிக்கிறது.
திட்ட யோசனைகள்:
- சுமந்து செல்லும் சுமையின் அடிப்படையில் தானாகவே வேகத்தை சரிசெய்யும் ரோபோவை உருவாக்குங்கள்.
- சுற்றுப்புற வெப்பநிலை உயரும்போது வேகத்தை அதிகரிக்கும் ஸ்மார்ட் விசிறியை உருவாக்குங்கள் (மோட்டார் கடினமாக வேலை செய்வதால் அதிகரிக்கும் மின்னோட்ட இழுப்பை உணர்வதன் மூலம்).
- மோட்டார் நின்றுவிட்டாலோ அல்லது தடையை சந்தித்தாலோ அதை அணைத்து, சேதத்தைத் தடுக்கும் பாதுகாப்பு வழிமுறையை உருவாக்குங்கள்.
- சமநிலையின்மைகளைக் கண்டறிந்து அதன் தோரணையை சரிசெய்ய மின்னோட்ட உணர்திறனைப் பயன்படுத்தும் சுய-சமநிலை ரோபோவை வடிவமைக்கவும்.
வன்பொருள்/கூறுகள்
- Arduino Uno
- L298N/L298P மோட்டார் ஷீல்ட்
- DC மோட்டார்
- மின்வழங்கல் (மோட்டாருக்கு)
- மல்டிமீட்டர் (விருப்பம், மின்னோட்ட அளவீடுகளை சரிபார்க்க)
குறியீடு விளக்கம்
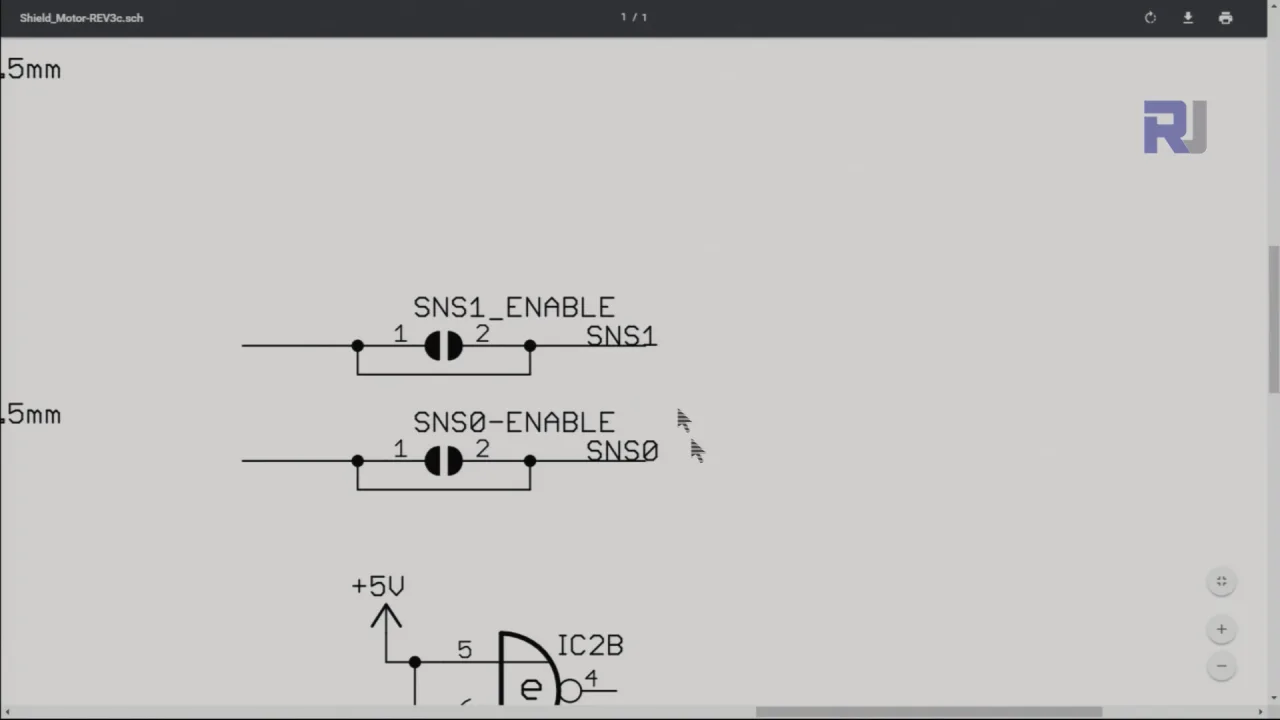
வழங்கப்பட்ட Arduino குறியீடு, மோட்டார் ஷீல்டில் உள்ள மின்னோட்ட உணர்திறன் மின்தடையங்களின் குறுக்கே உள்ள மின்னழுத்தத்தைப் படிக்க Arduino இன் அனலாக் உள்ளீடுகளைப் பயன்படுத்துகிறது. இந்த அளவீடுகள் பின்னர் மின்னோட்ட மதிப்புகளாக மாற்றப்படுகின்றன. முக்கிய செயல்பாடு இந்த முக்கிய குறியீடு பிரிவுகளில் உள்ளது:
const double currentFactor = 2/3.3;// 3.3V per 2A (வீடியோவில் 04:35 இல்)
// ... loop() செயல்பாட்டிற்குள் ...
double currentVB = map(analogRead(currentSenseB), 0, 1024, 0, 5000)/1000;
double currentB = currentVB * currentFactor; //(வீடியோவில் 04:44 இல்)
// ... currentSenseA மற்றும் currentA க்கு ஒத்த குறியீடு
currentFactor மோட்டார் ஷீல்டின் விவரக்குறிப்புகளிலிருந்து பெறப்படுகிறது (இந்த வழக்கில், 3.3V என்பது 2A க்கு ஒத்துள்ளது). map செயல்பாடு மூல அனலாக் அளவீடுகளை (0-1024) மின்னழுத்தமாக (0-5V) அளவிடுகிறது. இந்த மின்னழுத்தம் பின்னர் உண்மையான மின்னோட்டத்தை ஆம்பியர்களில் பெற currentFactor ஆல் பெருக்கப்படுகிறது.
பயனர்-கட்டமைக்கக்கூடிய அளவுருக்கள்:
currentSenseAமற்றும்currentSenseB: மோட்டார் ஷீல்டின் மின்னோட்ட உணர்திறன் வெளியீடுகளுடன் இணைக்கப்பட்ட அனலாக் பின்கள் (இந்த எடுத்துக்காட்டில் A0 மற்றும் A1). (வீடியோவில் 04:44 இல்)ifஅறிக்கையில் உள்ள வரம்பு மதிப்பு (எடுத்துக்காட்டில் 1.25) வரையறுக்கப்பட்ட செயல் தூண்டப்படும் மின்னோட்ட அளவை தீர்மானிக்கிறது. (வீடியோவில் 07:29 இல்)
if(currentB > 1.25) {
    brake('B', 1);// பிரேக்கைப் பயன்படுத்து (வீடியோவில் 07:42 இல்)
    // ... பிற செயல்கள்
}
நேரடி திட்டம்/செயல்விளக்கம்
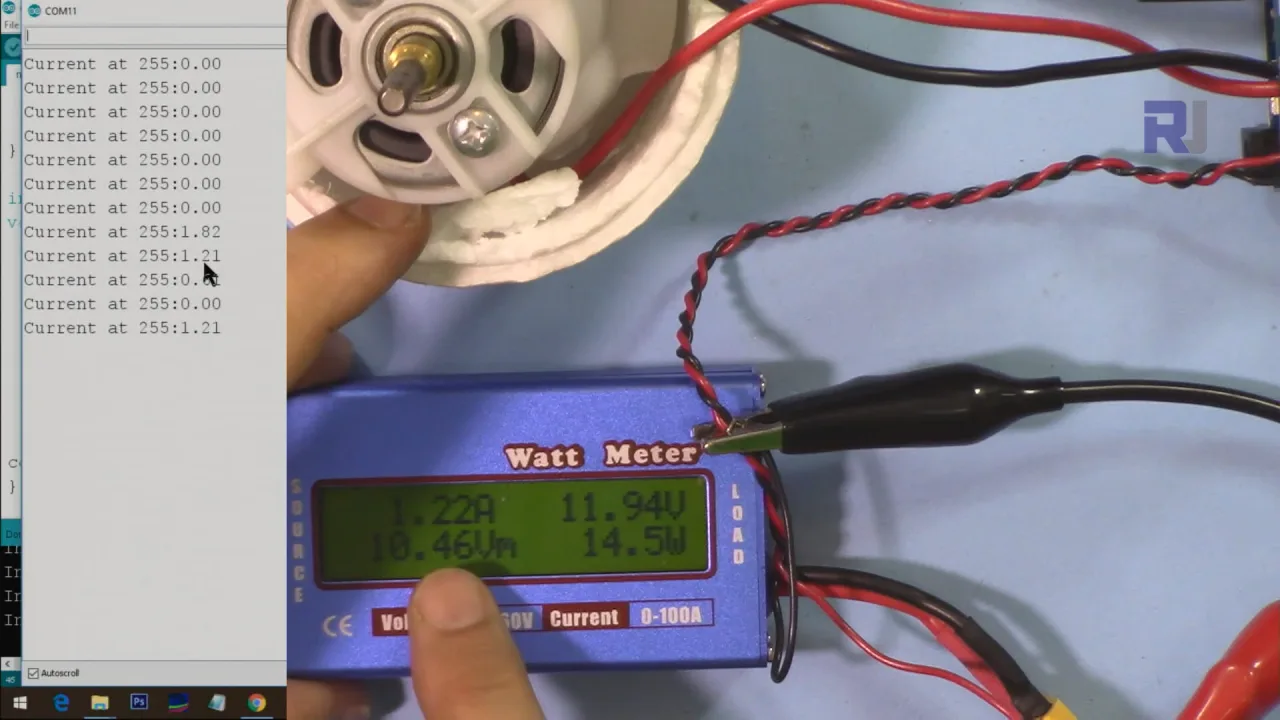
(வீடியோவில் 05:43 இல்) வீடியோ திட்டத்தை செயலில் காட்டுகிறது, மல்டிமீட்டரின் அளவீடுகளுடன் நிகழ்நேர மின்னோட்ட அளவீடுகளைக் காட்டுகிறது. இது மின்னோட்ட உணர்திறன் அமைப்பின் துல்லியத்தை சரிபார்க்கிறது மற்றும் மோட்டார் சுமையில் ஏற்படும் மாற்றங்களுக்கு குறியீடு எவ்வாறு பதிலளிக்கிறது என்பதை நிரூபிக்கிறது. எடுத்துக்காட்டு குறியீடு, மின்னோட்டம் முன்னரே தீர்மானிக்கப்பட்ட வரம்பை மீறினால் பிரேக்கைப் பயன்படுத்தும் நிபந்தனை அறிக்கையை உள்ளடக்கியது, இது மின்னோட்ட உணர்திறனின் நடைமுறை பயன்பாட்டை விளக்குகிறது.
அத்தியாயங்கள்
- [00:00] அறிமுகம் மற்றும் திட்ட கண்ணோட்டம்
- [00:35] மோட்டார் ஷீல்ட் அடிப்படைகள் மற்றும் மின்னோட்ட உணர்திறன்
- [01:06] வன்பொருள் விளக்கம்: மின்னோட்ட உணர்திறன் மின்தடையங்கள் மற்றும் பின்கள்
- [02:35] மோட்டார் ஷீல்டின் உள் மின்சுற்று
- [04:13] குறியீடு விளக்கம் மற்றும் மின்னோட்ட கணக்கீடு
- [05:43] செயல்விளக்கம் மற்றும் நிகழ்நேர மின்னோட்ட அளவீடு
- [07:15] மின்னோட்ட அளவீடுகளின் அடிப்படையில் செயல் எடுத்தல்
படங்கள்
/*
 * Current Sensing with Arduino Motor Shield
 *
 * Written by Ahmad Shamshiri for Robojax.com on August 31, 2018 at 17:40 in Ajax, Ontario, Canada
 * Watch video instruction for this code: https://youtu.be/-uQKBDTWHPM
 * This code requires a viewing of the introduction to the Arduino Motor Shield,
 * which you can watch here: https://youtu.be/kIgbjyqNrV8

     This program is free software: you can redistribute it and/or modify
    it under the terms of the GNU General Public License as published by
    the Free Software Foundation, either version 3 of the License, or
    (at your option) any later version.

    This program is distributed in the hope that it will be useful,
    but WITHOUT ANY WARRANTY; without even the implied warranty of
    MERCHANTABILITY or FITNESS FOR A PARTICULAR PURPOSE.  See the
    GNU General Public License for more details.

    You should have received a copy of the GNU General Public License
    along with this program.  If not, see <https://www.gnu.org/licenses/>.
 */
const int MotorPinA = 12;
const int MotorSpeedPinA = 3;
const int MotorBrakePinA = 9;
const int currentSenseA =A0;


const int MotorPinB = 13;
const int MotorSpeedPinB = 11;
const int MotorBrakePinB = 8;
const int currentSenseB =A1;

const int CW  = HIGH;// variable for clockwise rotation
const int CCW = LOW;// variable for counterclockwise rotation

const int showComments = 1;// show comments in serial monitor
const double currentFactor = 2/3.3;// 3.3V per 2A which is 0.909

void setup() {
  // motor A pin assignment
  pinMode(MotorPinA, OUTPUT);// define motor pin as output
  pinMode(MotorSpeedPinA, OUTPUT);//define motor speed control pin
  pinMode(MotorBrakePinA, OUTPUT);// define motor brake pin

  // motor B pin assignment
  pinMode(MotorPinB, OUTPUT);
  pinMode(MotorSpeedPinB, OUTPUT);
  pinMode(MotorBrakePinB, OUTPUT);


  Serial.begin(9600);//  serial monitor initialized

}


void loop() {

  brake('B', 0); // release brake

  moveMotor('B', CW, 255);// start motor B in CW direction with 255 PWM value
  Serial.print("Current at 255:");
  double currentVB = map(analogRead(currentSenseB), 0, 1024, 0, 5000)/1000;
  double currentB = currentVB*currentFactor;// get channel B current from voltage and current factor (from data sheet)

  double currentVA = map(analogRead(currentSenseA), 0, 1024, 0, 5000)/1000;
  double currentA = currentVA*currentFactor;// get channel A current from voltage and current factor (from data sheet)

  if(currentB >1.25)
  {
    brake('B', 1);// apply brake
    brake('B',0);// release brake
    // change the rotation direction to CCW
    moveMotor('B', CCW, 255);
  }
  Serial.println(currentB);// print the current
  delay(300);


}// loop end


/*
 *
 * Written by Ahmad Shamshiri August 29, 2018 at 20:59 in Ajax, Ontario, Canada
 * moveMotor controls the motor
  @param motor is char A or B referring to motor A or B.
  @param dir is motor direction, CW or CCW
  @param speed is PWM value between 0 to 255

  Example 1: to start moving motor A in CW direction with 135 PWM value
  moveMotor('A', CW, 135);

  Example 2: to start moving motor B in CCW direction with 200 PWM value
  moveMotor('B', CCW, 200);
 */

void moveMotor(char motor, int dir, int speed)
{
  int motorPin;
  int motorSpeedPin;

  if(motor =='A')
  {
    motorPin      = MotorPinA;
    motorSpeedPin = MotorSpeedPinA;
  }else{
    motorPin      = MotorPinB;
    motorSpeedPin = MotorSpeedPinB;
  }
   digitalWrite(motorPin, dir);// set direction for motor
   analogWrite(motorSpeedPin, speed);// set speed of motor
}//moveMotor end

/*
 * brake, stops the motor, or releases the brake
 * @param motor is character A or B
 * @param brk if 1, brake; if 0, release brake
 * example of usage:
 * brake('A', 1);// applies brake to motor A
 * brake('A', 0);// releases brake from motor A
 */
void brake(char motor, int brk)
{
  if(motor =='A')
  {
    digitalWrite(MotorBrakePinA, brk);// brake
    delay(1000);
  }else{
    digitalWrite(MotorBrakePinB, brk);// brake
    delay(1000);

  }
}
வளங்கள் மற்றும் மேற்கோள்கள்
கோப்புகள்📁
தரவியல் அட்டவணை (பிடிஎப்)
-
Datashet for L298N Dual H-bridge motor driver
robojax_L298N datasheet.pdf0.18 MB