Controlling a DC motor using an L293D motor driver with Arduino PWM
Building a robot or an automated project often comes down to one fundamental challenge: controlling a DC motor with precision. You need to not only turn it on and off but also control its speed and direction. This is where the L293D motor driver shines. This guide will walk you through building a robust motor controller using an Arduino and the popular L293D chip. By the end, you'll be able to command a motor to spin at any speed, in any direction, with just a few lines of code.

This project is a foundational building block for countless applications. Here are a few ideas to get you inspired:
- Build a two-wheeled robot: Use two of these circuits to drive a robot chassis, controlling each wheel independently for precise movement and turns.
- Create an automatic plant waterer: Control a small water pump to deliver precise amounts of water to your plants based on soil moisture sensor readings.
- Design a smart fan: Replace the manual switch on a desk fan with a system that automatically adjusts speed based on temperature or a remote command.
- Make a motorized camera slider: Drive a camera along a track at a slow, consistent speed for smooth time-lapse videos.
- Build a solar tracker: Use a motor to slowly rotate a solar panel to follow the sun across the sky, maximizing energy collection.
Hardware Components
Before you start, gather the following components. The L293D is the star of the show, acting as the bridge between your Arduino's low-power control signals and the high-power demands of the motor.
- Arduino Board (Uno, Nano, etc.)
- L293D Motor Driver IC (or a module based on it)
- A DC Motor (operating between 4.5V and 36V)
- External Power Supply (e.g., a 9V battery or a bench power supply)
- Jumper Wires
- Breadboard (optional, but helpful for prototyping)
Understanding the L293D Motor Driver
The L293D is a quadruple half-H driver, which means it contains four independent half-bridge circuits. This configuration allows it to control the direction of a motor by reversing the polarity of the voltage applied to its terminals. It can control up to two DC motors with full direction and speed control, or up to four motors if you only need to turn them on and off.
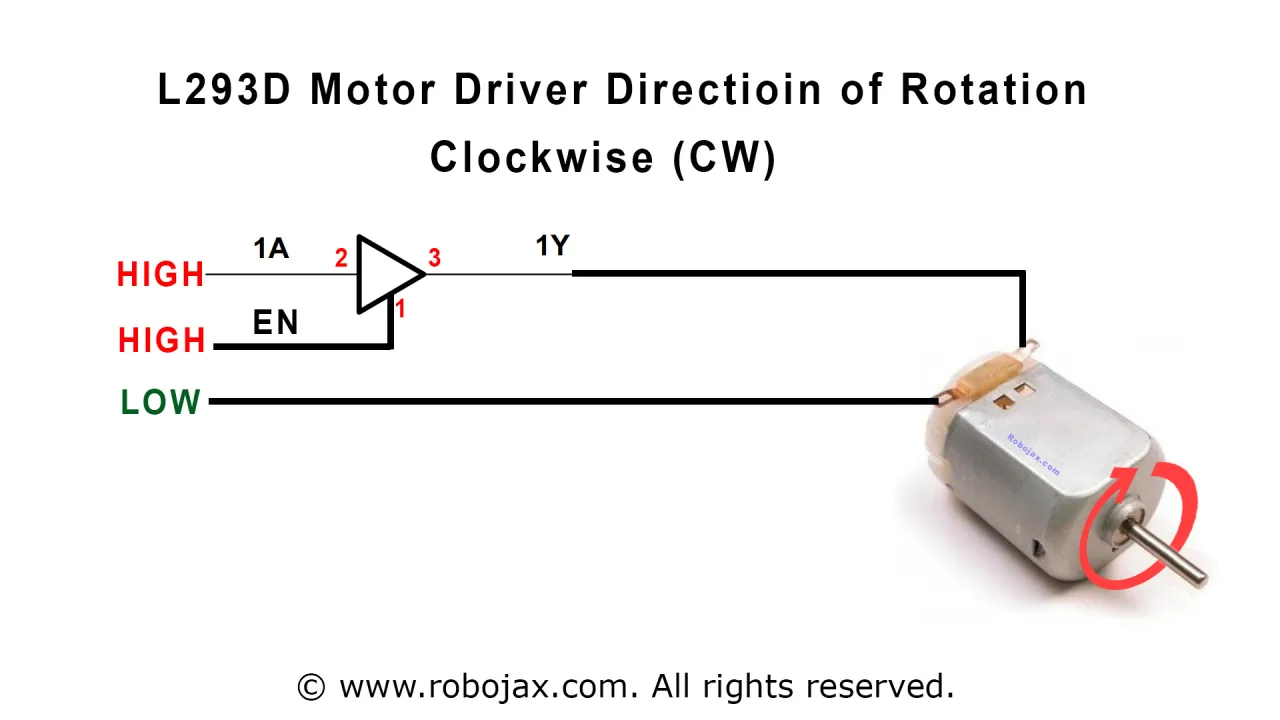
One of the most important features of the L293D is its built-in flyback diodes. Motors are inductive loads, meaning they resist changes in current. When you suddenly cut power to a motor, it generates a high-voltage spike that can damage your Arduino. The "D" in L293D signifies that these protection diodes are already integrated into the chip, saving you from having to add them externally. This is a critical distinction from the older L293 chip, which requires external diodes for safe operation.
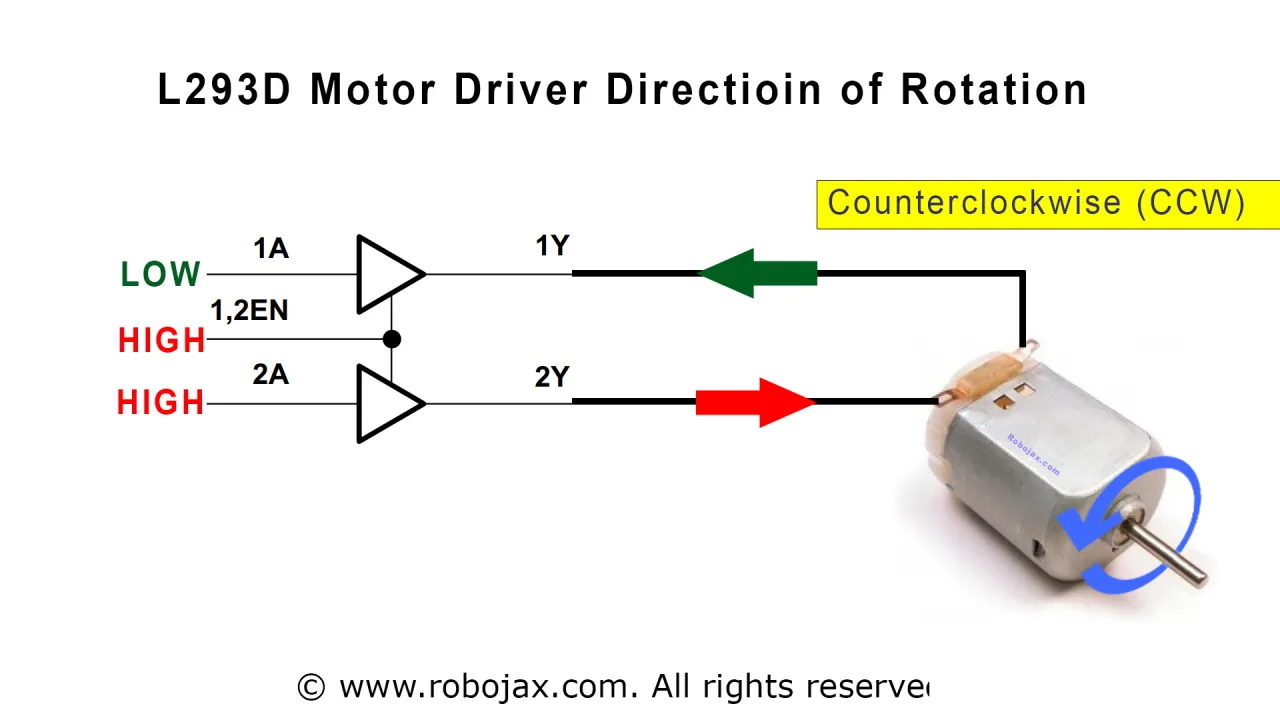
Another key detail is the chip's current limitations. The L293D can handle a continuous current of up to 600 mA per channel. If your motor draws more than this, the chip will overheat and can be permanently damaged. For motors that require more current, you would need a more powerful driver like the L298N or a dedicated motor shield.
Wiring Guide
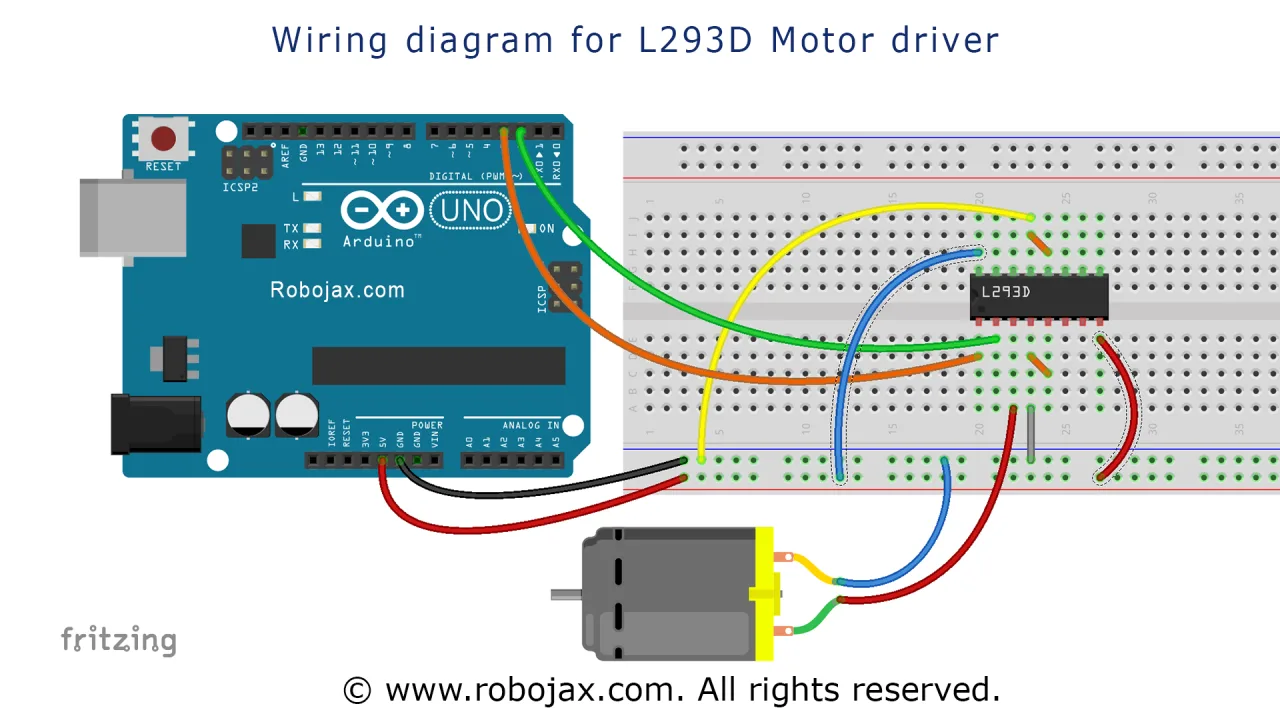
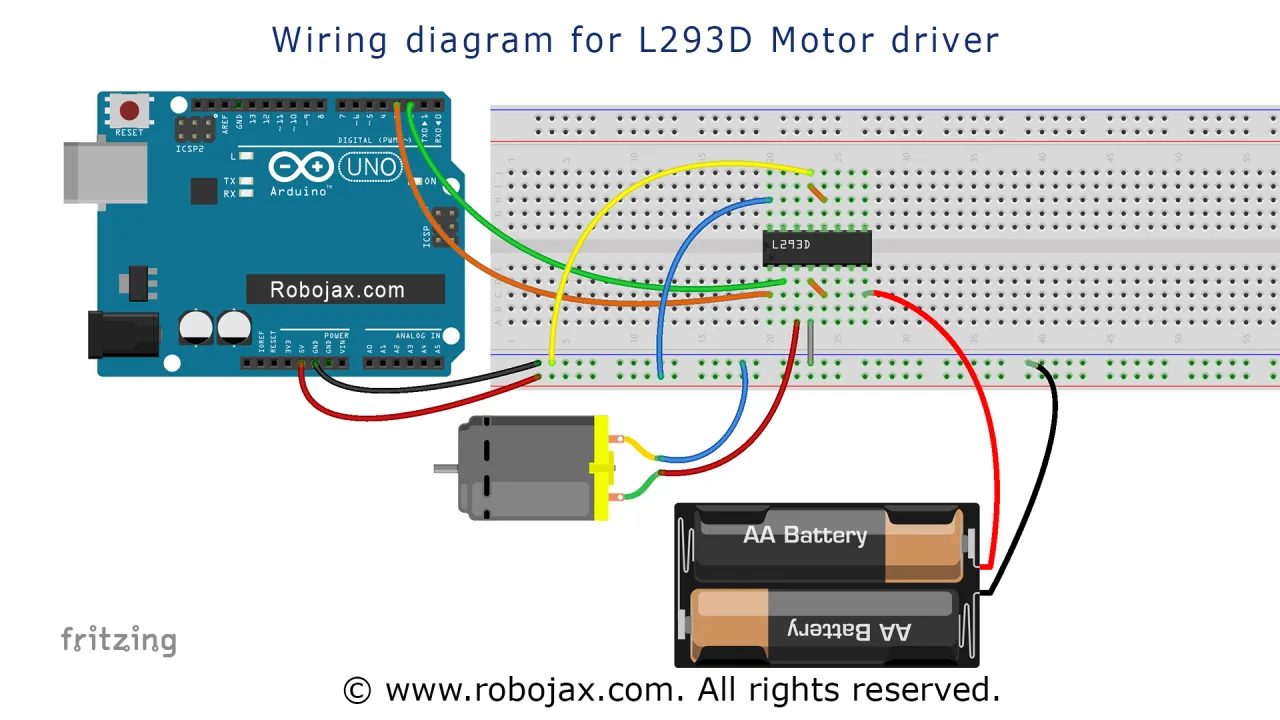
The wiring for this project is straightforward. We'll be using a single motor, which requires one full H-bridge (two half-bridges) from the L293D. The video demonstrates the wiring clearly, and a diagram is shown below.
Here's a breakdown of the connections:
- Power Connections: Connect pin 16 (VCC1) to the Arduino's 5V pin. This powers the internal logic of the chip. Connect pin 8 (VCC2) to your external motor power supply (e.g., 9V). This provides power to the motor itself. Connect pins 4, 5, 12, and 13 to the common ground of both your Arduino and your external power supply.
- Motor Connections: Connect the two terminals of your DC motor to pins 3 and 6 of the L293D. The polarity doesn't matter at this point, as reversing the direction in the code will simply reverse the motor's spin.
- Control Connections: Connect pin 1 (1,2EN) to Arduino pin 9. This is the "enable" pin, which acts as a master switch for the motor. Connect pin 2 (1A) to Arduino pin 10, and pin 7 (2A) to Arduino pin 11. These are the input pins that control the motor's direction and speed.
Code Explanation
The code provided is well-structured and easy to modify. The key to customizing this project lies in a few simple variables and function calls at the top of the sketch. (in video at 07:05)
// DC motor control
#define P1A 10 // define pin 10 as P1A
#define P2A 11 // define pin 11 as P2A
#define EN12 9 // define pin 9 as the 1,2EN enable

const int speedStep =15;
const int speedDelay = 1000;// delay between speed increment
#define P1A, P2A, EN12: These lines define which Arduino pins are connected to the L293D's input pins. If you used different pins in your wiring, you would change the numbers here. For example, if you connected EN12 to pin 6, you would change#define EN12 9to#define EN12 6.const int speedStep = 15;: This variable controls the increment by which the motor speed changes in the first demonstration loop. A smaller value (e.g., 5) will make the motor accelerate more smoothly, while a larger value (e.g., 50) will cause it to jump in speed more abruptly.const int speedDelay = 1000;: This sets the delay in milliseconds between each speed step. Combined withspeedStep, this determines how quickly the motor ramps up from zero to full speed. A value of 1000 means there is a one-second pause between each speed change.
The heart of the project is the custom L293D() function. This function simplifies the control logic, allowing you to set the motor's direction, speed, and on/off state with a single line of code. Here's how to use it:
L293D('L', 255, 1);  // Rotate counter-clockwise at full speed
L293D('R', 127, 1);  // Rotate clockwise at half speed
L293D('L', 0, 0); // Stop the motor- First argument (Direction): A single character,
'L'or'R', that sets the motor's direction. - Second argument (Speed): An integer from 0 to 255 that sets the motor's speed using PWM. 0 is stopped, and 255 is full speed.
- Third argument (Enable): An integer,
1to run the motor or0to stop it.
Live Project Demonstration
In the video, you can see the project in action. The motor starts from a standstill and gradually increases its speed in steps, demonstrating the PWM control. The Serial Monitor displays the current state and speed. You'll also see the waveform on an oscilloscope, which visually shows the PWM signal's duty cycle increasing as the motor speeds up. This is a great way to understand how PWM works—it rapidly switches the power on and off, and the proportion of "on" time (the duty cycle) determines the average voltage and thus the motor's speed. (in video at 11:07)
The second code example shows a more practical application. It runs the motor at full speed in one direction, stops it, runs it at half speed, and then runs it slowly in the opposite direction. This demonstrates how you can use the L293D() function to create complex motion sequences for your projects.
Chapters
- [00:00] Introduction and Project Overview
- [00:30] Understanding the L293D Motor Driver
- [01:16] L293D Pinout and Specifications
- [04:40] Wiring the L293D to Arduino and Motor
- [07:05] Code Explanation and Customization
- [11:07] Live Demonstration of Speed and Direction Control
- [12:30] Viewing PWM Waveforms on an Oscilloscope
Images
/*
 * This is the Arduino code to control the speed of a motor using an L293D DC motor driver.

Watch instructions for this video: https://youtu.be/akQoGNUzhHI

 // Written for Robojax.com video

 * Code is available at http://robojax.com/learn/arduino

 *
 // Written by Ahmad S. for Robojax.com on
// August 11, 2018 at 13:23 in Ajax, Ontario, Canada
// This code is AS IS without warranty. You may share it if you keep this note with the code.
*/
// DC motor control
#define P1A 10 // define pin 10 as P1A
#define P2A 11 // define pin 11 as P2A
#define EN12 9 // define pin 9 as the 1,2EN enable

const int speedStep =15;
const int speedDelay = 1000;// delay between speed increment

void setup() {
  // L293 Motor Control Code by Robojax.com 20180811
  Serial.begin(9600);// setup Serial Monitor to display information
  pinMode(P1A, OUTPUT);// define pin as OUTPUT for P1A
  pinMode(P2A, OUTPUT);// define pin as OUTPUT for P2A
  pinMode(EN12, OUTPUT);// define pin as OUTPUT for 1,2EN

  Serial.println("Robojax");
  Serial.println("L293D Motor Speed Control");

  // L293 Motor Control Code by Robojax.com 20180811
}

void loop() {
  // L293D Motor Control Code by Robojax.com 20180811

 for(int speed=0; speed<=255; speed +=speedStep)
 {
  L293D('L',speed, 0);//
  delay(speedDelay);// delay between each step
 }

  delay(50);// 50 millisecond delay
  // L293D Motor Control Code by Robojax.com 20180810
}//loop end


/*
 * L293D(char dir,int spd, int en)
 * dir is a character: 'L' for clockwise direction
 *  or 'R' for counter-clockwise direction
 *  en is an integer: 1 to rotate, 0 to stop
 *  spd is the speed value from 0 to 255
 */
void L293D(char dir,int spd, int en)
{
  if(dir =='L')
  {
    if(en ==0){
       Serial.println("CW Motor Stopped");
    }else{
       Serial.print("Rotating CW: ");
       Serial.println(spd);//print actual speed value
    }
    digitalWrite(EN12 ,en);// Enable 1A and 2A
    analogWrite(P1A,spd);// send PWM with spd value to P1A
    digitalWrite(P2A,LOW);// LOW signal to P2A

  }else{
    if(en ==0){
       Serial.println("CCW Motor Stopped");
    }else{
       Serial.print("Rotating CCW: ");
       Serial.println(spd);//print actual speed value
    }
    digitalWrite(EN12 ,en);// Disable 1A and 2A
    digitalWrite(P1A,LOW);// Keep this pin LOW
    analogWrite(P2A,spd);// send PWM with spd value to  P2A
  }
}//L293D end++
/*
* This is the Arduino code to control the speed of a motor using an L293D DC motor driver.
* This code will control the motor with different directions and speed.
Watch instructions for this video: https://youtu.be/akQoGNUzhHI
// Written for Robojax.com video
* Code is available at http://robojax.com/learn/arduino
*
// Written by Ahmad Shamshiri for Robojax.com on
// August 11, 2018 at 13:23 in Ajax, Ontario, Canada.
// This code is AS IS without warranty. You may share it if you keep this note with the code.
*/
// DC motor control
#define P1A 10 // define pin 10 as P1A
#define P2A 11 // define pin 11 as P2A
#define EN12 9 // define pin 9 as the 1,2EN enable
const int speedStep =15;
const int speedDelay = 1000;// delay between speed increment
void setup() {
// L293 Motor Control Code by Robojax.com 20180811
Serial.begin(9600);// setup Serial Monitor to display information
pinMode(P1A, OUTPUT);// define pin as OUTPUT for P1A
pinMode(P2A, OUTPUT);// define pin as OUTPUT for P2A
pinMode(EN12, OUTPUT);// define pin as OUTPUT for 1,2EN
Serial.println("Robojax");
Serial.println("L293D Motor Speed Control");
// L293 Motor Control Code by Robojax.com 20180811
}
void loop() {
// L293D Motor Control Code by Robojax.com 20180811
L293D('L',255, 1);// maximum speed to the LEFT
delay(3000);// wait for 3 seconds
L293D('L',255, 0);// stop motor
delay(2000);// wait for 2 seconds
L293D('L',127, 1);// half speed to the LEFT
delay(3000);// wait for 3 seconds
L293D('L',255, 0);// stop motor
delay(2000);// wait for 2 seconds
L293D('R',90, 1);// slow to the RIGHT
delay(3000);// wait for 3 seconds
L293D('L',255, 0);// stop motor
delay(2000);// wait for 2 seconds
// L293D Motor Control Code by Robojax.com 20180810
}//loop end
/*
* L293D(char dir,int spd, int en)
* dir is a character: 'L' for clockwise (CW) direction
* or 'R' for counter-clockwise (CCW) direction.
* en is an integer: 1 to rotate, 0 to stop.
* spd is the speed value from 0 to 255.
*/
void L293D(char dir,int spd, int en)
{
if(dir =='L')
{
if(en ==0){
Serial.println("CW Motor Stopped");
}else{
Serial.print("Rotating CW: ");
Serial.println(spd);//print actual speed value
}
digitalWrite(EN12 ,en);// Enable 1A and 2A
analogWrite(P1A,spd);// send PWM with spd value to P1A
digitalWrite(P2A,LOW);// LOW signal to P2A
}else{
if(en ==0){
Serial.println("CCW Motor Stopped");
}else{
Serial.print("Rotating CCW: ");
Serial.println(spd);//print actual speed value
}
digitalWrite(EN12 ,en);//enable 1A and 2A
digitalWrite(P1A,LOW);// Keep it LOW P1A
analogWrite(P2A,spd);// send PWM with spd value to P2A
}
}//L293D endThings you might need
-
AmazonPurchase L293D motor driver ICamzn.to
-
eBay
-
eBay
-
AliExpressPurchase an L293D chip from Amazon or AliExpresss.click.aliexpress.com
Resources & references
-
External
Files📁
Datasheet (pdf)
-
L293d_Quadruple_half_bridge_datasheet
l293d_Quadruple_half_bridge_datasheet.pdf0.34 MB -
L293d datasheet
L293d_datasheet.pdf0.34 MB