ஒரு DC மோட்டாரை IR ரிமோட் கண்ட்ரோலர் மூலம் Arduino மற்றும் L293D பயன்படுத்தி கட்டுப்படுத்துதல்
அறிமுகம்
இந்த டுடோரியல், IR ரிமோட் கண்ட்ரோலர், அகச்சிவப்பு ரிசீவர் மற்றும் Arduino பலகையைப் பயன்படுத்தி DC மோட்டாரின் திசை மற்றும் நிறுத்த செயல்பாட்டை எவ்வாறு கட்டுப்படுத்துவது என்பதை நிரூபிக்கிறது. L293D மோட்டார் டிரைவர் சிப் இடைத்தரகராக செயல்பட்டு, Arduino இன் குறைந்த மின்னோட்ட சிக்னல்களை பாதுகாப்பாக மோட்டாரை இயக்க அனுமதிக்கிறது. இந்த திட்டம், ரிமோட் கண்ட்ரோலை மோட்டார் கட்டுப்பாட்டுடன் இணைப்பதற்கான நடைமுறை அறிமுகமாகும், இது பல்வேறு ரோபாட்டிக்ஸ் மற்றும் ஆட்டோமேஷன் திட்டங்களுக்கான சாத்தியங்களைத் திறக்கிறது.
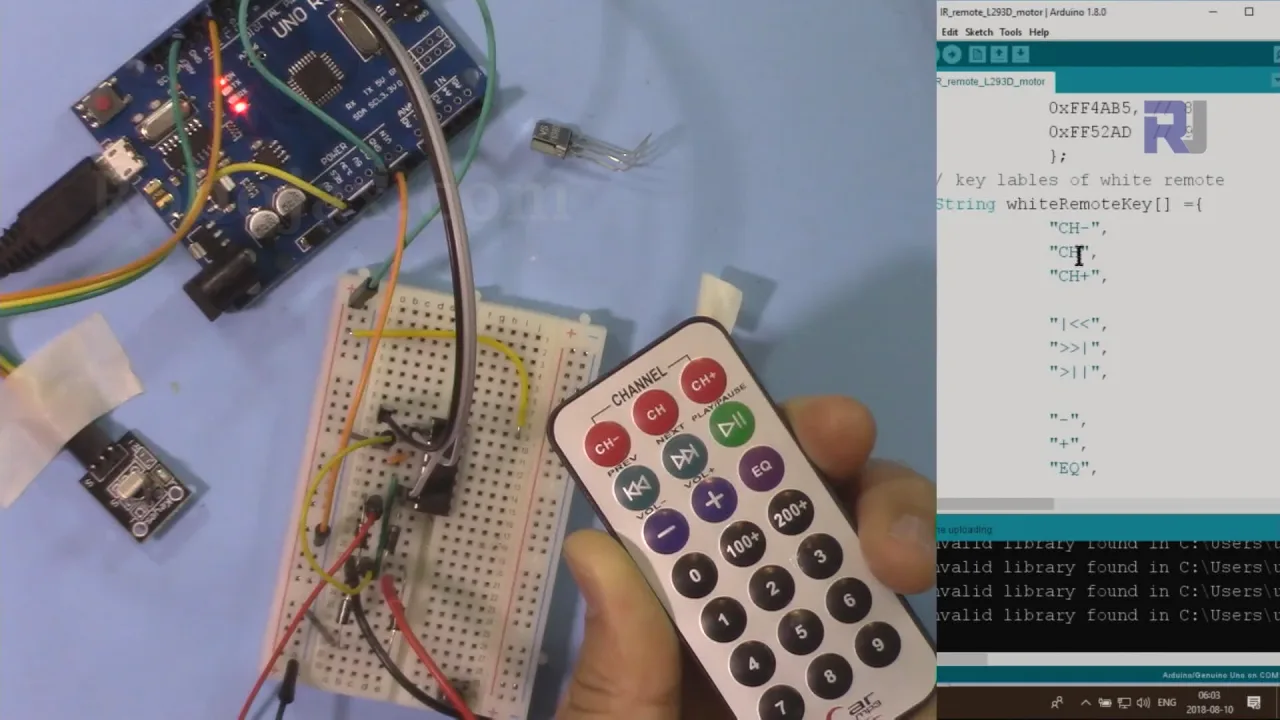
இந்த அமைப்பைக் கொண்டு நீங்கள் உருவாக்கக்கூடிய சில நடைமுறை யோசனைகள் இங்கே:
- சிறிய ரோபோடிக் கார் அல்லது ரோவரின் இயக்கத்தை கட்டுப்படுத்துதல்.
- ரிமோட் கண்ட்ரோல் செய்யப்பட்ட கேமரா ஸ்லைடர் அல்லது பான்-டில்ட் பொறிமுறையை உருவாக்குதல்.
- DIY விசிறி அல்லது பிற சிறிய உபகரணங்களுக்கான வயர்லெஸ் ஆன்/ஆஃப் சுவிட்சை உருவாக்குதல்.
- மாதிரி அல்லது சிறிய திட்டத்திற்கான ரிமோட் கேட் அல்லது பூட்டு பொறிமுறையை உருவாக்குதல்.


தேவையான வன்பொருள்
- Arduino பலகை (எ.கா., Uno)
- L293D மோட்டார் டிரைவர் IC
- DC மோட்டார் (சிறியது, 3-9V)
- IR ரிமோட் கண்ட்ரோலர் (கருப்பு அல்லது வெள்ளி/வெள்ளை)
- IR ரிசீவர் தொகுதி (PCB உடன் அல்லது இல்லாமல்)
- மோட்டாருக்கான வெளிப்புற மின்சாரம் (எ.கா., 9V பேட்டரி)
- ஜம்பர் கம்பிகள் மற்றும் பிரெட்போர்டு
வயரிங் வழிகாட்டி
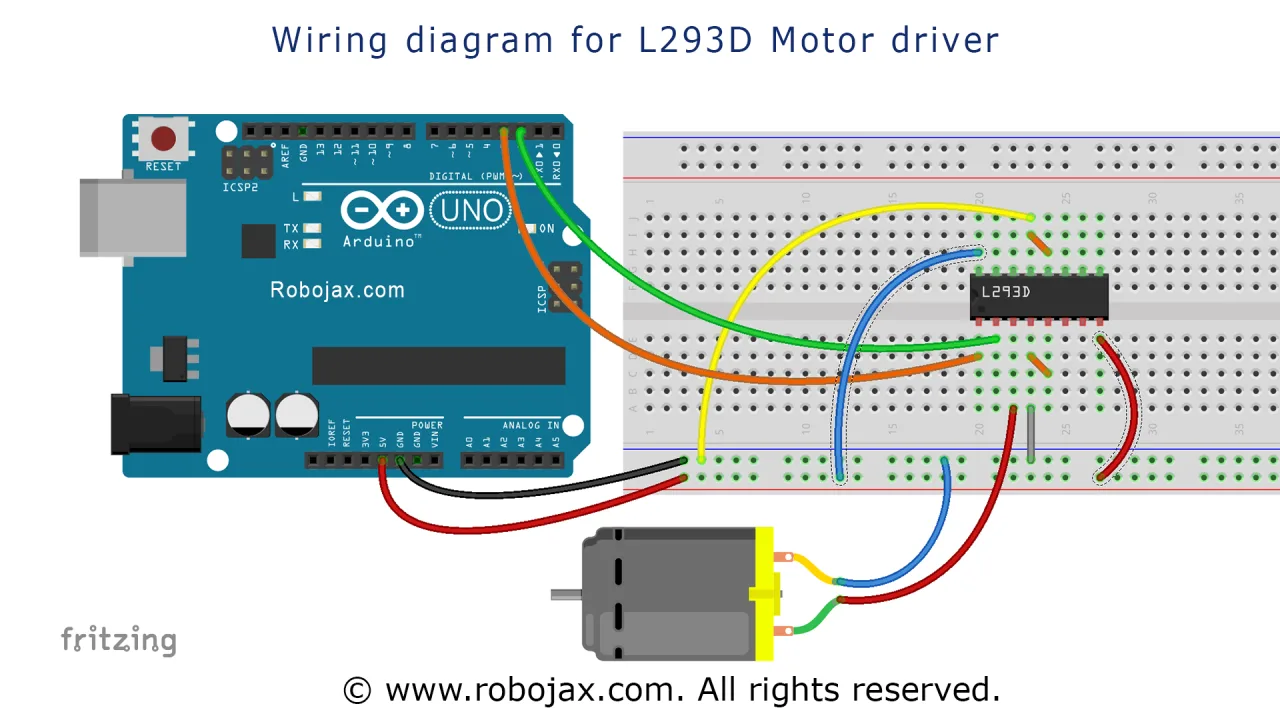
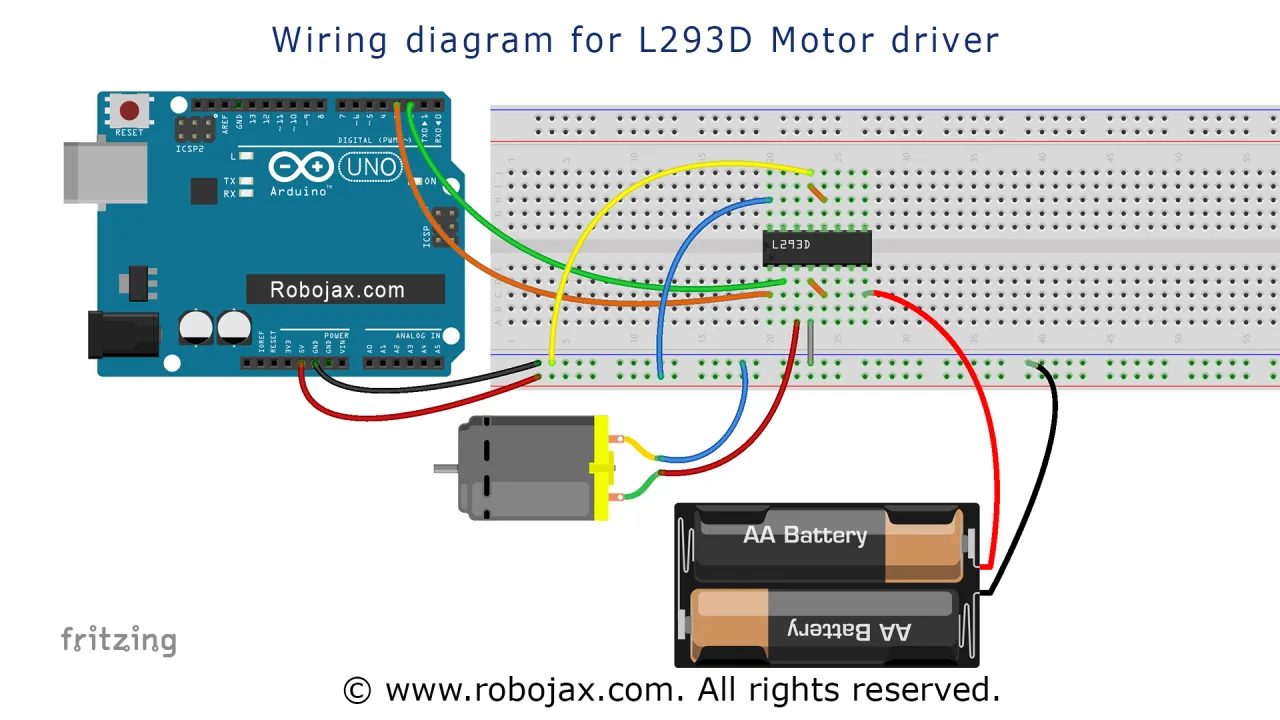
இந்த திட்டத்திற்கு, Arduino இலிருந்து வரும் சிக்னல்களின் அடிப்படையில் மோட்டாரை கட்டுப்படுத்த L293D சிப் பயன்படுத்தப்படுகிறது. இணைப்புகள் பின்வருமாறு:
- மின்சாரம் மற்றும் தரை: L293D இன் பின் 16 Arduino இன் 5V உடன் இணைக்கிறது. பின்கள் 4, 5, 12 மற்றும் 13 ஒன்றாக இணைக்கப்பட்டு பொதுவான தரையுடன் இணைக்கப்படுகின்றன. வெளிப்புற மோட்டார் மின்சாரம் (எ.கா., 9V) பின் 8 (VCC2) உடன் இணைக்கப்பட்டுள்ளது.
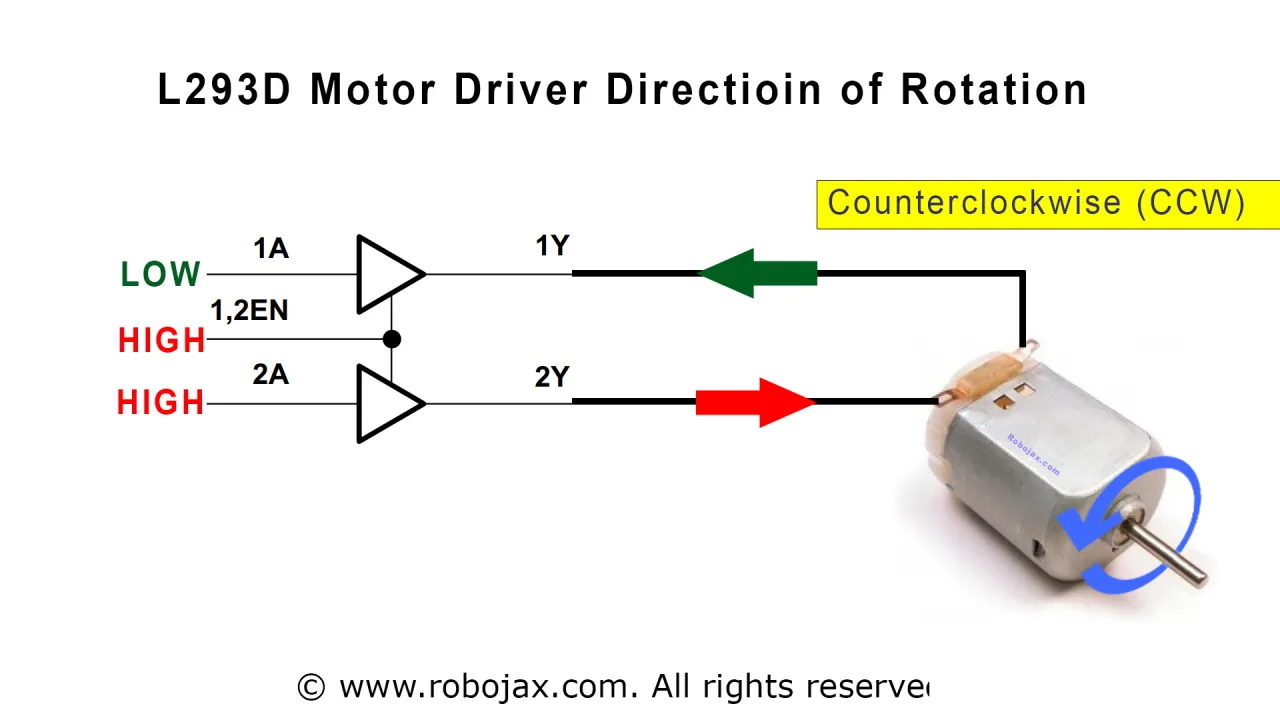
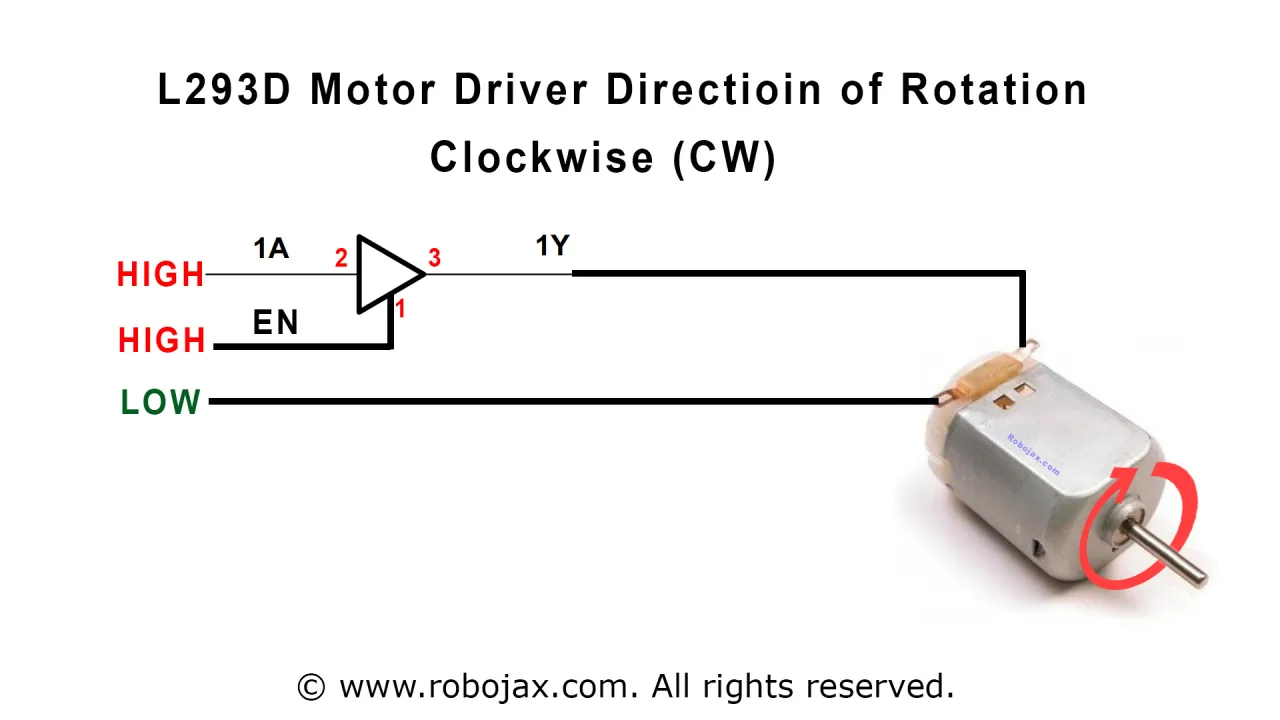
- மோட்டார் இணைப்புகள்: DC மோட்டாரின் இரண்டு கம்பிகள் L293D இன் பின்கள் 3 மற்றும் 6 உடன் இணைக்கப்பட்டுள்ளன. தேவைப்பட்டால் இந்த இணைப்புகளை மாற்றியமைப்பதன் மூலம் சுழற்சியின் திசையை மாற்றலாம். சிப்பில் உள்ள ஃப்ளைபேக் டையோட்கள், மோட்டாரால் உருவாக்கப்படும் மின்னழுத்த ஸ்பைக்குகளிலிருந்து அதைப் பாதுகாக்கின்றன.
- கட்டுப்பாட்டு பின்கள்: பின் 1 (Enable 1,2) Arduino பின் 8 உடன் இணைக்கப்பட்டுள்ளது. பின் 2 (Input 1A) Arduino பின் 2 உடன் இணைக்கப்பட்டுள்ளது, மற்றும் பின் 7 (Input 2A) Arduino பின் 7 உடன் இணைக்கப்பட்டுள்ளது. இந்த Arduino பின்கள் மோட்டாரின் திசை மற்றும் வேகத்தை கட்டுப்படுத்துகின்றன.
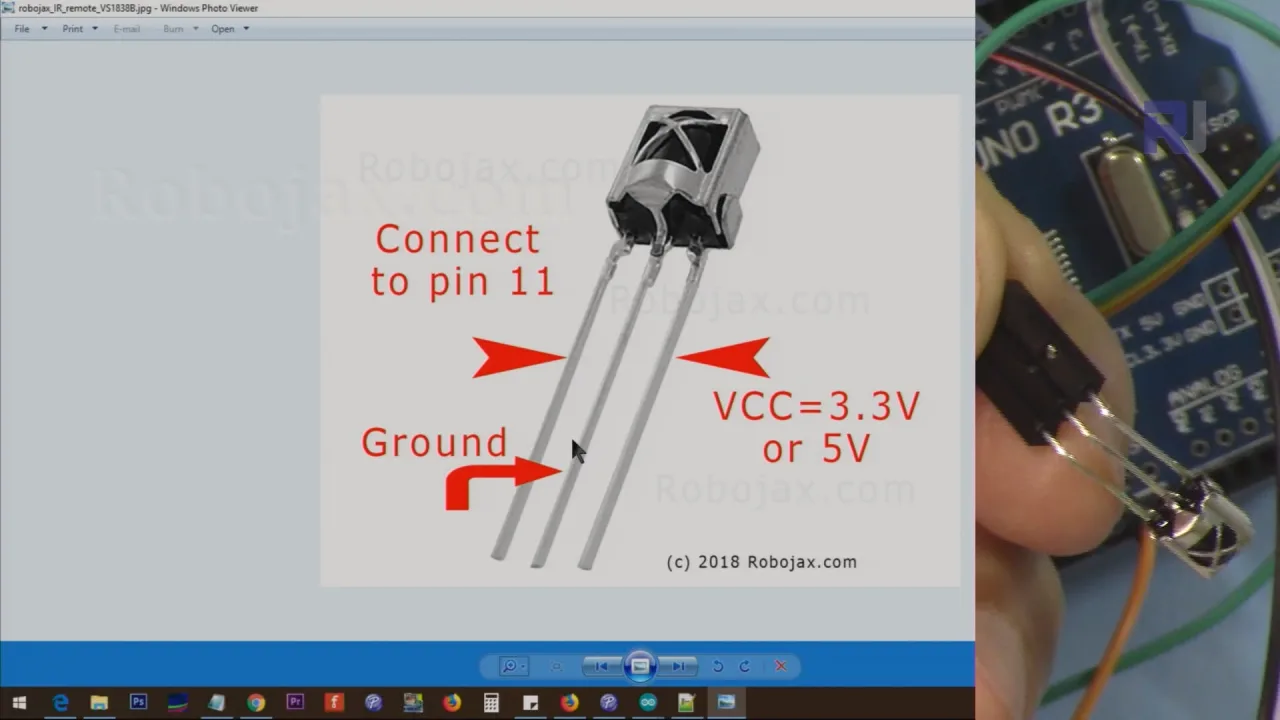
- IR ரிசீவர்: IR ரிசீவரின் சிக்னல் பின் Arduino பின் 11 உடன் இணைக்கிறது. VCC மற்றும் GND பின்கள் முறையே Arduino இன் 5V மற்றும் GND உடன் இணைக்கப்பட்டுள்ளன. வெற்று ரிசீவர் தொகுதியைப் பயன்படுத்தினால், பின்அவுட் VCC, GND மற்றும் சிக்னல் வெளியீடு ஆகும்.
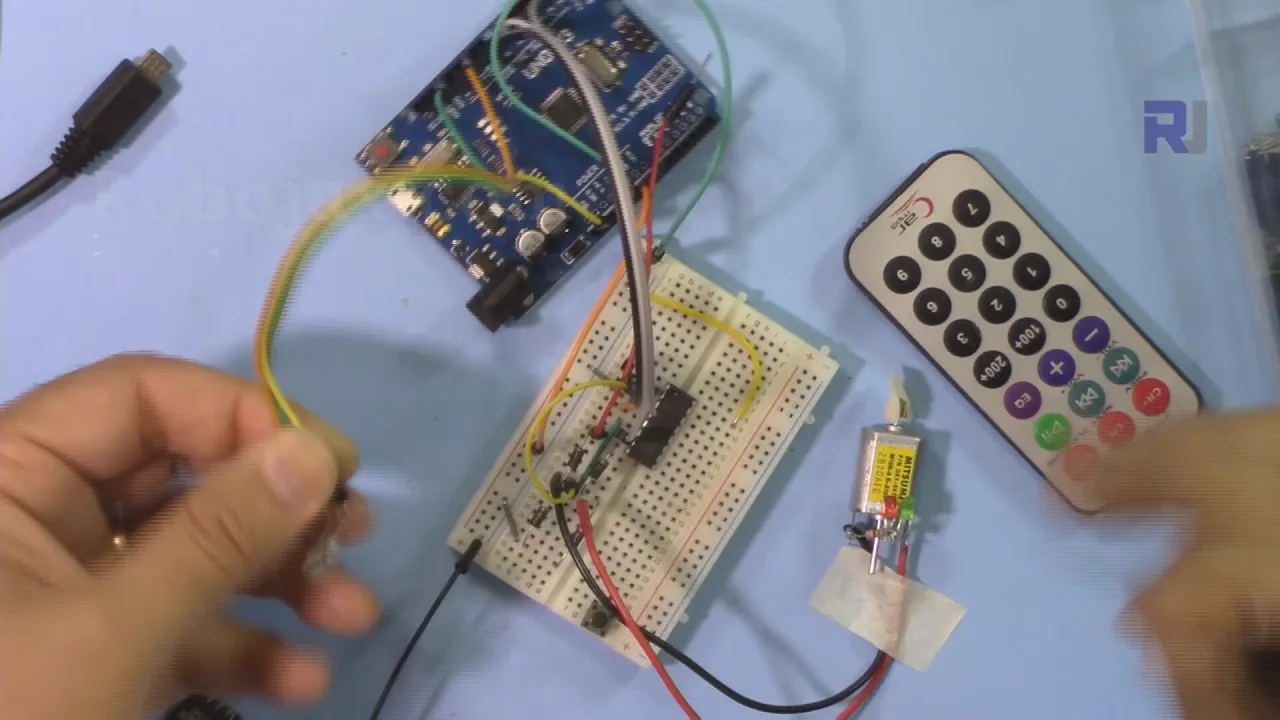
விரிவான வயரிங் வரைபடம் கீழே வழங்கப்பட்டுள்ளது.

மோட்டாரின் மின்சாரம் Arduino இன் லாஜிக் மின்சாரத்திலிருந்து தனித்தனியாக உள்ளது, இது Arduino இன் மின்னழுத்த சீராக்கியை சுமைப்படுத்தாமல் மோட்டாருக்கு போதுமான மின்னோட்டத்தை வழங்குவதற்கு முக்கியமானது.
குறியீடு விளக்கம்
இந்த டுடோரியலில் இரண்டு தனித்தனி நிரல்கள் உள்ளன. முதலாவது முக்கிய திட்ட குறியீடு, இது IR ரிமோட் கண்ட்ரோலை L293D டிரைவருடன் இணைக்கிறது. இரண்டாவது L293D மோட்டார் டிரைவரை சுயாதீனமாக சோதிக்க ஒரு எளிய நிரல்.
Arduino ஐப் பயன்படுத்தி IR ரிமோட் கண்ட்ரோலருடன் சர்வோ மோட்டாரை கட்டுப்படுத்துவதற்கான மூலம்
இது திட்டத்திற்கான முழு நிரல். இது IR ரிசீவர் நூலகம் மற்றும் L293D மோட்டார் கட்டுப்பாட்டு லாஜிக்கை ஒருங்கிணைக்கிறது. உங்கள் குறிப்பிட்ட ரிமோட் மற்றும் ரிசீவர் வகைக்கு ஏற்ப எளிதாக உள்ளமைக்க குறியீடு கட்டமைக்கப்பட்டுள்ளது.
பயனர் உள்ளமைக்கக்கூடிய பகுதி குறியீட்டின் மேலே உள்ளது. நீங்கள் அமைக்க வேண்டியவை இங்கே:
முதலில், உங்கள் IR ரிமோட் வகை மற்றும் ரிசீவர் தொகுதியைக் குறிப்பிட வேண்டும். கருப்பு ரிமோட்டிற்கு type மாறி 'B' ஆகவும், வெள்ளை/வெள்ளி ரிமோட்டிற்கு 'W' ஆகவும் அமைக்கப்பட வேண்டும். PCB உடன் ரிசீவர் தொகுதியைப் பயன்படுத்தினால் பூலியன் மாறி PCB 1 ஆகவும், வெற்று ரிசீவரைப் பயன்படுத்தினால் 0 ஆகவும் அமைக்கப்பட வேண்டும்.
const char type ='B';// W for white, B for black. Must keep single quotes like 'B' or 'W'
const boolean PCB = 0;// if receiver is PCB set to 1, if not set to 0. See video for details
அடுத்து, உங்கள் ரிமோட்டில் எந்த விசைகள் மோட்டாரை கட்டுப்படுத்தும் என்பதை வரையறுக்கலாம். RIGHT, LEFT மற்றும் STOP சரங்கள் நீங்கள் பயன்படுத்த விரும்பும் விசைகளின் லேபிள்களுக்கு அமைக்கப்படுகின்றன. எடுத்துக்காட்டாக, கருப்பு ரிமோட்டுடன், இயல்புநிலை வலது அம்பு (>), இடது அம்பு (<) மற்றும் OK பொத்தான் ஆகும். இவை blackRemoteKey[] போன்ற வரிசைகளில் வரையறுக்கப்பட்ட விசை லேபிள்களுடன் பொருந்த வேண்டும்.
மோட்டார் மற்றும் ரிசீவருக்கு பயன்படுத்தப்படும் Arduino பின்களையும் நீங்கள் சரிசெய்யலாம். குறியீடு L293D க்கு P1A, P2A, மற்றும் EN12 ஐயும், IR ரிசீவருக்கு RECV_PIN ஐயும் வரையறுக்கிறது. வேறு பின்களைப் பயன்படுத்த விரும்பினால், இந்த வரையறைகளை மாற்றலாம்.
#define P1A 2 // P1A க்கு பின் 2 ஐ வரையறுக்கவும்
#define P2A 7 // P2A க்கு பின் 7 ஐ வரையறுக்கவும்
#define EN12 8 // 1,2EN இயக்கத்திற்கு பின் 8 ஐ வரையறுக்கவும்
முக்கிய தர்க்கம் motorAction() செயல்பாட்டால் கையாளப்படுகிறது. ஒரு விசை அழுத்தப்படும்போது, robojaxValidateCode() செயல்பாடு அதை குறிவிலக்கம் செய்து, விசையின் பெயருடன் motorAction() ஐ அழைக்கிறது. இந்த செயல்பாடு பெயரை உங்கள் RIGHT, LEFT, மற்றும் STOP மாறிகளுடன் ஒப்பிட்டு, மோட்டாரை சரியான திசையில் சுழற்ற அல்லது நிறுத்த L293D() செயல்பாட்டை அதற்கேற்ப அழைக்கிறது.
Arduino ஐப் பயன்படுத்தி எளிய L293 மோட்டார் கட்டுப்படுத்திக்கான மூலம்
இது L293D சிப்பிற்கான அடிப்படை சோதனை நிரல். இதற்கு IR ரிமோட் தேவையில்லை. அதற்கு பதிலாக, உங்கள் வயரிங் சரியாக உள்ளதா என்பதை சரிபார்க்க, இது தானாகவே மோட்டாரை ஒரு தொடர் செயல்களின் மூலம் சுழற்றுகிறது.
இந்த ஸ்கெட்ச்சில் பயனர் மாற்றக்கூடிய ஒரே பகுதி பின் வரையறை ஆகும், இது உங்கள் வயரிங்குடன் பொருந்த வேண்டும்:
#define P1A 2 // P1A க்கு பின் 2 ஐ வரையறுக்கவும்
#define P2A 7 // P2A க்கு பின் 7 ஐ வரையறுக்கவும்
#define EN12 8 // 1,2EN இயக்கத்திற்கு பின் 8 ஐ வரையறுக்கவும்
loop() இல், குறியீடு வெவ்வேறு அளவுருக்களுடன் L293D_con() செயல்பாட்டை அழைக்கிறது. முதல் அளவுரு ஒரு எழுத்து: ஒரு திசைக்கு 'L' மற்றும் மற்ற திசைக்கு 'R'. இரண்டாவது அளவுரு ஒரு முழு எண்: மோட்டாரை இயக்க 1 மற்றும் நிறுத்த 0. இந்த செயல்பாடு IR கட்டுப்பாட்டு தர்க்கத்துடன் ஒருங்கிணைப்பதற்கு முன் மோட்டார் டிரைவரை சோதிக்க ஒரு எளிய வழியாகும்.
நேரடி திட்ட ஆர்ப்பாட்டம்
வீடியோவில், இந்த திட்டம் கருப்பு மற்றும் வெள்ளி ரிமோட்கள் இரண்டிலும் ஆர்ப்பாட்டம் செய்யப்படுகிறது. முதலில், வழங்குநர் PCB ரிசீவர் தொகுதியுடன் கருப்பு ரிமோட்டைப் பயன்படுத்துகிறார். சரியான அமைப்புகளுடன் (type='B', PCB=1) குறியீட்டை பதிவேற்றிய பிறகு, வலது அம்புக்குறி விசையை அழுத்துவது மோட்டாரை ஒரு திசையில் சுழற்றச் செய்கிறது, இடது அம்புக்குறி விசை அதை எதிர் திசையில் சுழற்றுகிறது, மற்றும் OK பொத்தான் அதை நிறுத்துகிறது.
ஆர்ப்பாட்டம் பின்னர் வெள்ளி ரிமோட்டிற்கு மாறுகிறது. கட்டுப்பாட்டுக்காக CH+ மற்றும் CH- போன்ற வெள்ளி ரிமோட்டின் விசை லேபிள்களைப் பயன்படுத்த குறியீடு புதுப்பிக்கப்படுகிறது. இந்த வெவ்வேறு பொத்தான்களுக்கு மோட்டார் சரியாக பதிலளிப்பதை வழங்குநர் காட்டுகிறார்.
இறுதியாக, வழங்குநர் PCB தொகுதியை அகற்றி வெற்று IR ரிசீவரைப் பயன்படுத்துகிறார். குறியீட்டில் தேவையான ஒரே மாற்றம் PCB=0 ஐ அமைப்பதாகும். மோட்டார் இன்னும் வெற்றிகரமாக கட்டுப்படுத்தப்படுவதை ஆர்ப்பாட்டம் உறுதிப்படுத்துகிறது, இது குறியீடு இரண்டு ரிசீவர் வகைகளையும் சரியாக கையாளுகிறது என்பதை நிரூபிக்கிறது.
அத்தியாயங்கள்
- [00:00] அறிமுகம் மற்றும் திட்ட ஆர்ப்பாட்டம்
- [00:53] முன்நிபந்தனைகள் மற்றும் பரிந்துரைக்கப்பட்ட வீடியோக்கள்
- [02:14] L293D சிப் வயரிங் விளக்கம்
- [07:30] குறியீடு விளக்கம் மற்றும் உள்ளமைவு
- [14:15] கருப்பு ரிமோட் மற்றும் PCB உடன் ஆர்ப்பாட்டம்
- [16:04] வெள்ளி ரிமோட் மற்றும் PCB உடன் ஆர்ப்பாட்டம்
- [17:42] PCB இல்லாமல் வெள்ளி ரிமோட்டுடன் ஆர்ப்பாட்டம்
- [18:23] PCB இல்லாமல் கருப்பு ரிமோட்டுடன் ஆர்ப்பாட்டம்
படங்கள்
/*
 * Original Infrared library from - http://arcfn.com
 *
 * This is Arduino code for the L293D DC motor driver.
 * It uses an IR remote control to rotate the DC motor clockwise (CW), counter-clockwise (CCW), and stop it.
 * Watch instructions for this video: https://youtu.be/e0pvfJbdw_o
 * To get the library and files related to this code, visit http://robojax.com/learn/arduino
 // Written for Robojax.com video

 * Code is available at http://robojax.com/learn/arduino

 *
 // Written by Ahmad S. for Robojax.com on
// August 10, 2018 at 22:03 in Ajax, Ontario, Canada
    This program is free software: you can redistribute it and/or modify
    it under the terms of the GNU General Public License as published by
    the Free Software Foundation, either version 3 of the License, or
    (at your option) any later version.

    This program is distributed in the hope that it will be useful,
    but WITHOUT ANY WARRANTY; without even the implied warranty of
    MERCHANTABILITY or FITNESS FOR A PARTICULAR PURPOSE.  See the
    GNU General Public License for more details.

    You should have received a copy of the GNU General Public License
    along with this program.  If not, see <https://www.gnu.org/licenses/>.
*/
// DC motor control
#define P1A 2 // define pin 2 as for P1A
#define P2A 7 // define pin 7 as for P2A
#define EN12 8 // define pin 8 as for 1,2EN enable

// remote settings start
#include <IRremote.h>

int RECV_PIN = 11;
const char type ='B';// W for white, B for black. Must keep single quotes like 'B' or 'W'
const boolean PCB = 0;// if receiver is PCB set to 1, if not set to 0. See video for details
boolean displayCode = false;// to display remote code. if not, set to false

// IR remote settings
const String RIGHT=">";// move motor to the right (CW) with this key on remote
const String LEFT ="<";// move motor to the left (CCW) with this key on remote
const String STOP ="OK";// stop motor with this key on remote
// remote settings end

IRrecv irrecv(RECV_PIN);

// this is array holding codes for White Remote when used with PCB version of receiver
unsigned int whiteRemotePCB[] ={
            0xE318261B, // CH-
            0x511DBB,   // CH
            0xEE886D7F,  // CH+

            0x52A3D41F, // |<<
            0xD7E84B1B, // >>|
            0x20FE4DBB, // >||

            0xF076C13B, // -
            0xA3C8EDDB, // +
            0x12CEA6E6, // EQ

            0xC101E57B, // 0
            0x97483BFB, // 100+
            0xF0C41643, // 200+

            0x9716BE3F, // 1
            0x3D9AE3F7, // 2
            0x6182021B, // 3

            0x8C22657B, // 4
            0x488F3CBB, // 5
            0x449E79F,  // 6

            0x32C6FDF7, // 7
            0x1BC0157B, // 8
            0x3EC3FC1B  // 9
            };

// this is array holding codes for White Remote when used with non-PCB version of receiver
unsigned int whiteRemote[] ={
            0xFFA25D, // CH-
            0xFF629D,   // CH
            0xFFE21D,  // CH+

            0xFF22DD, // |<<
            0xFF02FD, // >>|
            0xFFC23D, // >||

            0xFFE01F, // -
            0xFFA857, // +
            0xFF906F, // EQ

            0xFF6897, // 0
            0xFF9867, // 100+
            0xFFB04F, // 200+

            0xFF30CF, // 1
            0xFF18E7, // 2
            0xFF7A85, // 3

            0xFF10EF, // 4
            0xFF38C7, // 5
            0xFF5AA5,  // 6

            0xFF42BD, // 7
            0xFF4AB5, // 8
            0xFF52AD  // 9
            };
// key lables of white remote
 String whiteRemoteKey[] ={
            "CH-",
            "CH",
            "CH+",

            "|<<",
            ">>|",
            ">||",

            "-",
            "+",
            "EQ",

            "0",
            "100+",
            "200+",

            "1",
            "2",
            "3",

            "4",
            "5",
            "6",

            "7",
            "8",
            "9"
            };

// this is array holding codes for Black Remote when used with non-PCB version of receiver
 unsigned int blackRemote[] ={
            0xFF629D, // ^
            0xFF22DD,   // <
            0xFF02FD,  // OK
            0xFFC23D, // >
            0xFFA857, // v

            0xFF6897, // 1
            0xFF9867, // 2
            0xF0C41643, // 3

            0xFF30CF, // 4
            0xFF18E7, // 5
            0xFF7A85,  // 6

            0xFF10EF, // 7
            0xFF38C7, // 8
            0xFF5AA5,  // 9

            0xFF42BD, // *
            0xFF4AB5, // 0
            0xFF52AD  // #
            };

// this is array holding codes for Black Remote when used with PCB version of receiver
 unsigned int blackRemotePCB[] ={
            0x511DBB, // ^
            0x52A3D41F,   // <
            0xD7E84B1B,  // OK
            0x20FE4DBB, // >
            0xA3C8EDDB, // v


            0xC101E57B, // 1
            0x97483BFB, // 2
            0xF0C41643, // 3

            0x9716BE3F, // 4
            0x3D9AE3F7, // 5
            0x6182021B,  // 6

            0x8C22657B, // 7
            0x488F3CBB, // 8
            0x449E79F,  // 9

            0x32C6FDF7, // *
            0x1BC0157B, // 0
            0x3EC3FC1B  // #
            };

// Black remote key names
 String blackRemoteKey[] ={
            "^",
            "<",
            "OK",
            ">",
            "v",

            "1",
            "2",
            "3",

            "4",
            "5",
            "6",

            "7",
            "8",
            "9",

            "*",
            "0",
            "#"
            };

decode_results results;


/*
 * Permission granted to share this code given that this
 * note is kept with the code.
 * Disclaimer: this code is "AS IS" and for educational purposes only.
 *
 */

void setup() {
  // L293 Motor Control Code by Robojax.com 2018025
  Serial.begin(9600);// setup Serial Monitor to display information
  pinMode(P1A, OUTPUT);// define pin as OUTPUT for P1A
  pinMode(P2A, OUTPUT);// define pin as OUTPUT for P2A
  pinMode(EN12, OUTPUT);// define pin as OUTPUT for 1,2EN

  Serial.println("Robojax IR Decode");
  Serial.println("Motor Control with Remote");
  irrecv.enableIRIn(); // Start the receiver


  // L293 Motor Control Code by Robojax.com 20180810
}

void loop() {
  // L293d Motor Control Code with IR by Robojax.com 20180810

  if (irrecv.decode(&results)) {
    if(displayCode)Serial.println(results.value, HEX);
    robojaxValidateCode(results.value);// used the "robojaxValidateCode" bellow
    irrecv.resume(); // Receive the next value
  }
  delay(50);// 50 millisecond delay
  // L293d Motor Control Code with IR by Robojax.com 20180810
}//loop end


/*
 * function: robojaxValidateCode
 * validates the remote code and prints the correct key name
 * cd is the code passed from the loop
 * Written by A. S. for Robojax
 */
void robojaxValidateCode(int cd)
{

  // Robojax IR Remote decoder
  int found=0;

 if(type =='W' && !PCB)
 {
    // Robojax IR White Remote decoder
    // if type is set to 'W' (white remote) and PCB=0 then check White remote code
      for(int i=0; i< sizeof(whiteRemote)/sizeof(int); i++)
      {
        if(whiteRemote[i] ==cd)
        {

          Serial.print("Key pressed:");
          Serial.println(whiteRemoteKey[i]);
          motorAction(whiteRemoteKey[i]);// take action
          found=1;
        }// if matched
      }// for
 }else if(type =='W' && PCB){
    // Robojax IR White Remote decoder
    // if type is set to 'W' (white remote) and PCB=1 then check White remote code
      for(int i=0; i< sizeof(whiteRemotePCB)/sizeof(int); i++)
      {
        if(whiteRemotePCB[i] ==cd)
        {

          Serial.print("Key pressed:");
          Serial.println(whiteRemoteKey[i]);
          motorAction(whiteRemoteKey[i]);// take action
          found=1;
        }// if matched
      }// for
 }else if(type =='B' && PCB){
    // Robojax IR Black Remote decoder
       // if type is set to 'B' (black remote) and PCB=1 then check Black remote code
       for(int i=0; i< sizeof(blackRemotePCB)/sizeof(int); i++)
      {
        // Robojax IR black Remote decoder
        if(blackRemotePCB[i] ==cd)
        {

          Serial.print("Key pressed:");
          Serial.println(blackRemoteKey[i]);
         motorAction(blackRemoteKey[i]);// take action
          found=1;
        }// if matched
      }// for
 }else{

      // if type is set to 'B' (black remote) and PCB =0 then check Black remote code
       for(int i=0; i< sizeof(blackRemote)/sizeof(int); i++)
      {
        // Robojax IR black Remote decoder
        if(blackRemote[i] ==cd)
        {

          Serial.print("Key pressed:");
          Serial.println(blackRemoteKey[i]);
          motorAction(blackRemoteKey[i]);// take action

          found=1;
        }// if matched
      }// for
 }// else
  if(!found){
    if(cd !=0xFFFFFFFF)
      {
    Serial.println("Key unknown");
      }
  }// found
}// robojaxValidateCode end

/*
 *
 * motorAction()
 * receives string "value" as input and based on the settings,
 * turns motor CW, CCW or STOP
 */
void motorAction(String value)
{
  // Robojax IR motor control
   if(value == RIGHT)
   {
    L293D('R',1);// rotate motor to the right (CCW)
   }

   if(value == LEFT)
   {
    L293D('L',1);// rotate motor to the left (CW)
   }

   if(value == STOP)
   {
    L293D('R',0);// stop motor
   }
}//motorAction end


/*
 * L293D(char dir, int en)
 * dir is character either L for CW direction
 *  or R for CCW direction
 *  en is integer 1 to rotate, 0 for stop
 */
void L293D(char dir, int en)
{
  if(dir =='L')
  {
    if(en ==0){
       Serial.println("CW Motor Stopped");
    }else{
       Serial.println("Rotating CW");
    }
    digitalWrite(EN12 ,en);// Enable 1A and 2A
    digitalWrite(P1A,HIGH);// send + or HIGH signal to P1A
    digitalWrite(P2A,LOW);// send - or LOW signal to P2A

  }else{
    if(en ==0){
       Serial.println("CCW Motor Stopped");
    }else{
       Serial.println("Rotating CCW");
    }
    digitalWrite(EN12 ,en);// Disable 1A and 2A
    digitalWrite(P1A,LOW);// send + or HIGH signal to P1A
    digitalWrite(P2A,HIGH);// send - or LOW signal to P2A
  }
}//L293D end++
/*
* This is the Arduino code for L293d DC motor Driver
* watch LE18-D80NK video for details https://youtu.be/MrYsmAwzfrM
* Code is available at http://robojax.com/learn/arduino
*
* Written by Ahmad S. for Robojax.com on
* August 9, 2018 at 22:03 in Ajax, Ontario, Canada
*/
// DC motor 1 control
#define P1A 2 // define pin 2 as for P1A
#define P2A 7 // define pin 7 as for P2A
#define EN12 8 // define pin 8 as for 1,2EN enable
/*
* Permission granted to share this code given that this
* note is kept with the code.
* Disclaimer: this code is "AS IS" and for educational purposes only.
*
*/
void setup() {
// L293 Motor Control Code by Robojax.com 2018025
Serial.begin(9600);// setup Serial Monitor to display information
pinMode(P1A, OUTPUT);// define pin as OUTPUT for P1A
pinMode(P2A, OUTPUT);// define pin as OUTPUT for P2A
pinMode(EN12, OUTPUT);// define pin as OUTPUT for 1,2EN
// L293 Motor Control Code by Robojax.com 2018025
}
void loop() {
// L293 Motor Control Code by Robojax.com 2018025
L293D_con('L',1);
delay(4000);
L293D_con('L',0);
delay(2000);
L293D_con('R',1);
delay(4000);
L293D_con('R',0);
delay(2000);
Serial.println("=========== Loop done");
delay(500);
// L293 Motor Control Code by Robojax.com 2018025
}
void L293D_con(char dir, int en)
{
if(dir =='L')
{
if(en ==0){
Serial.println(" CW Motor Stopped");
}else{
Serial.println(" Rotating CW");
}
digitalWrite(EN12 ,en);// Enable 1A and 2A
digitalWrite(P1A,HIGH);// send + or HIGH signal to P1A
digitalWrite(P2A,LOW);// send - or LOW signal to P2A
}else{
if(en ==0){
Serial.println(" CCW Motor Stopped");
}else{
Serial.println(" Rotating CCW");
}
digitalWrite(EN12 ,en);// Disable 1A and 2A
digitalWrite(P1A,LOW);// send + or HIGH signal to P1A
digitalWrite(P2A,HIGH);// send - or LOW signal to P2A
}
}//L293D_con endவளங்கள் மற்றும் மேற்கோள்கள்
-
வெளியுறுப்புDownload Library for Arduino (GitHub)github.com
கோப்புகள்📁
தரவியல் அட்டவணை (பிடிஎப்)
-
robojax_L293D_motor_shield_manual.pdf
robojax_L293D_motor_shield_manual.pdf0.16 MB -
L293d datasheet
L293d_datasheet.pdf0.34 MB