Kudhibiti Motor ya DC kwa Kidhibiti cha Mbali cha IR Kwa Kutumia Arduino na L293D
Utangulizi
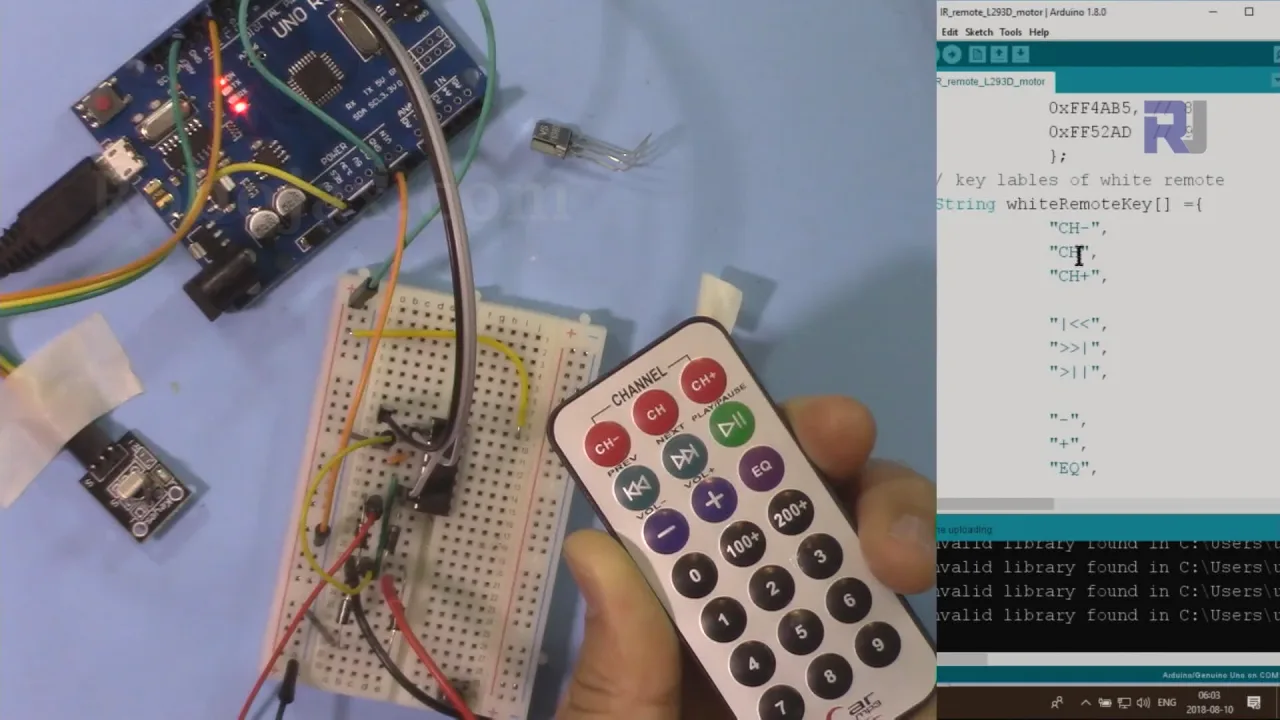
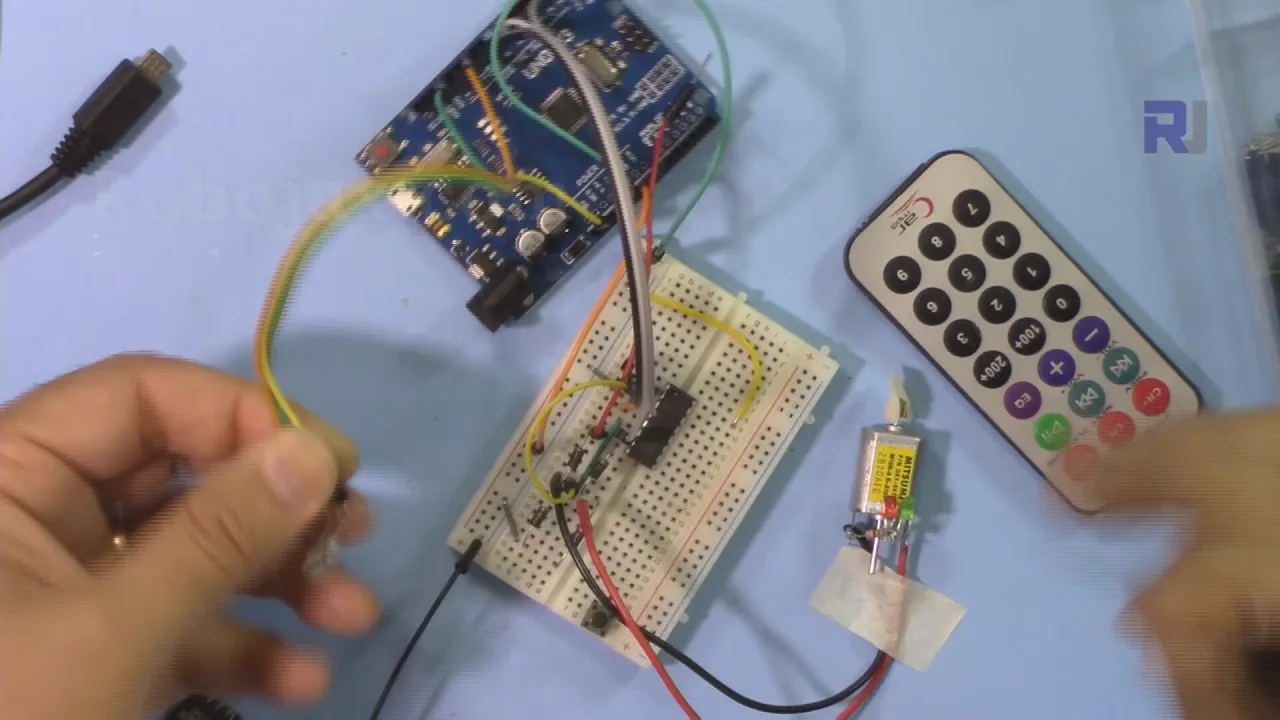
Mafunzo haya yanaonyesha jinsi ya kudhibiti mwelekeo wa motor ya DC na kazi ya kusimamisha kwa kutumia kidhibiti cha mbali cha IR, kipokezi cha infrared, na bodi ya Arduino. Chipu ya kiendeshaji cha motor ya L293D hufanya kazi kama mpatanishi, ikiruhusu mawimbi ya chini ya sasa ya Arduino kuendesha motor kwa usalama. Mradi huu ni utangulizi wa vitendo wa kuchanganya udhibiti wa mbali na udhibiti wa motor, ukifungua uwezekano wa miradi mbalimbali ya robotiki na uendeshaji wa kiotomatiki.
Hapa kuna mawazo machache ya vitendo ya kile unachoweza kujenga kwa usanidi huu:
- Kudhibiti mwendo wa gari dogo la roboti au rover.
- Kujenga kitelezi cha kamera kinachodhibitiwa kwa mbali au utaratibu wa pan-tilt.
- Kuunda swichi ya kuwasha/kuzima isiyo na waya kwa feni ya DIY au kifaa kingine kidogo.
- Kuendeleza utaratibu wa lango au kufuli la mbali kwa mfano au mradi mdogo.


Vifaa Vinavyohitajika
- Bodi ya Arduino (mfano, Uno)
- IC ya kiendeshaji cha motor ya L293D
- Motor ya DC (ndogo, 3-9V)
- Kidhibiti cha mbali cha IR (nyeusi au fedha/nyeupe)
- Moduli ya kipokezi cha IR (na PCB au bila)
- Ugavi wa nishati wa nje kwa motor (mfano, betri ya 9V)
- Waya za jumper na breadboard
Mwongozo wa Uunganishaji
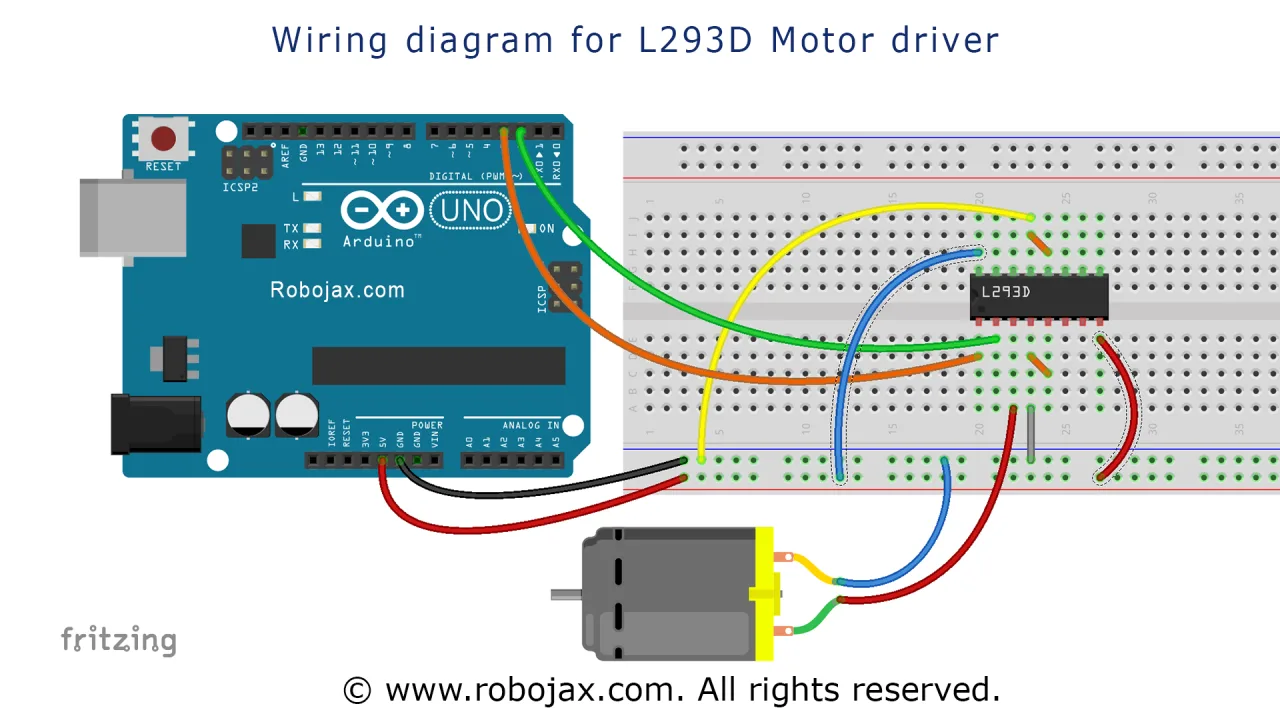
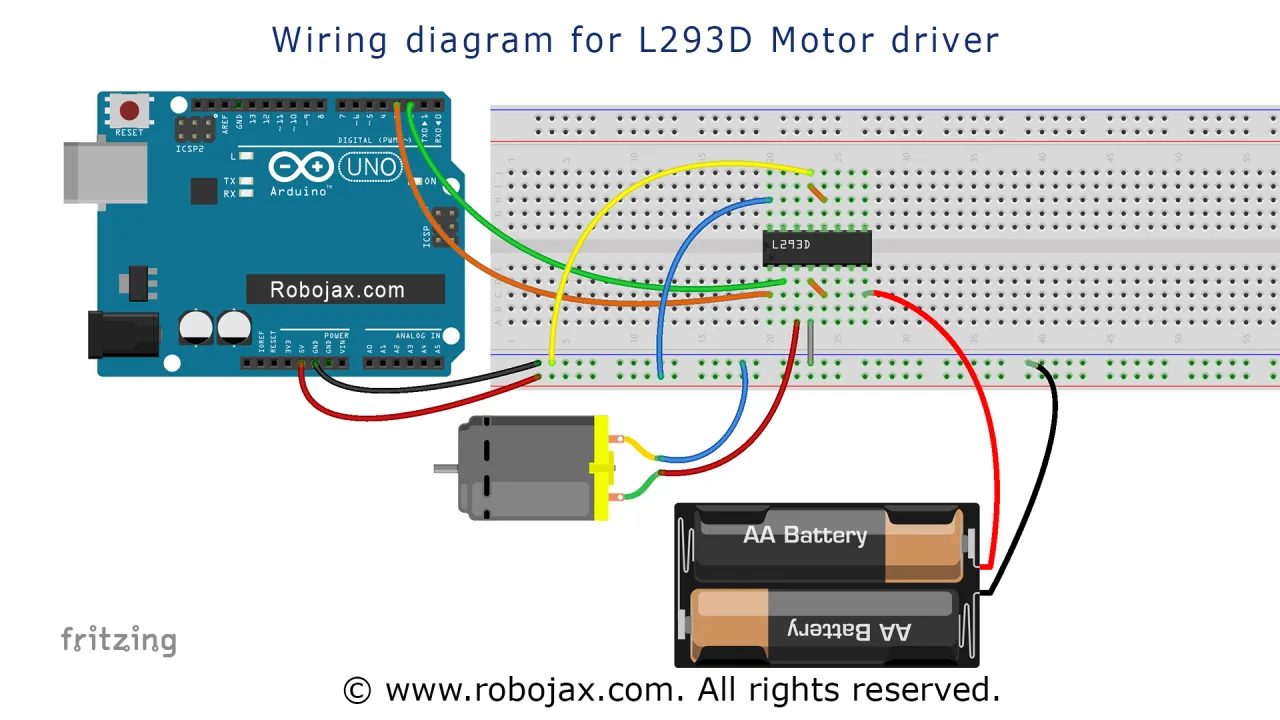
Kwa mradi huu, chipu ya L293D inatumiwa kudhibiti motor kulingana na mawimbi kutoka kwa Arduino. Uunganishaji ni kama ifuatavyo:
- Nishati na Ardhi: Pini ya 16 ya L293D inaunganishwa na 5V ya Arduino. Pini za 4, 5, 12, na 13 zinaunganishwa pamoja na kwenye ardhi ya kawaida. Ugavi wa nishati wa nje wa motor (mfano, 9V) unaunganishwa kwenye pini ya 8 (VCC2).
- Uunganishaji wa Motor: Waya mbili za motor ya DC zinaunganishwa kwenye pini za 3 na 6 za L293D. Mwelekeo wa mzunguko unaweza kubadilishwa kwa kurudisha nyuma uunganishaji huu ikiwa inahitajika. Diodi za flyback kwenye chipu hulinda dhidi ya mipigo ya voltage inayotokana na motor.
- Pini za Udhibiti: Pini ya 1 (Enable 1,2) inaunganishwa na pini ya 8 ya Arduino. Pini ya 2 (Input 1A) inaunganishwa na pini ya 2 ya Arduino, na Pini ya 7 (Input 2A) inaunganishwa na pini ya 7 ya Arduino. Pini hizi za Arduino hudhibiti mwelekeo na kasi ya motor.
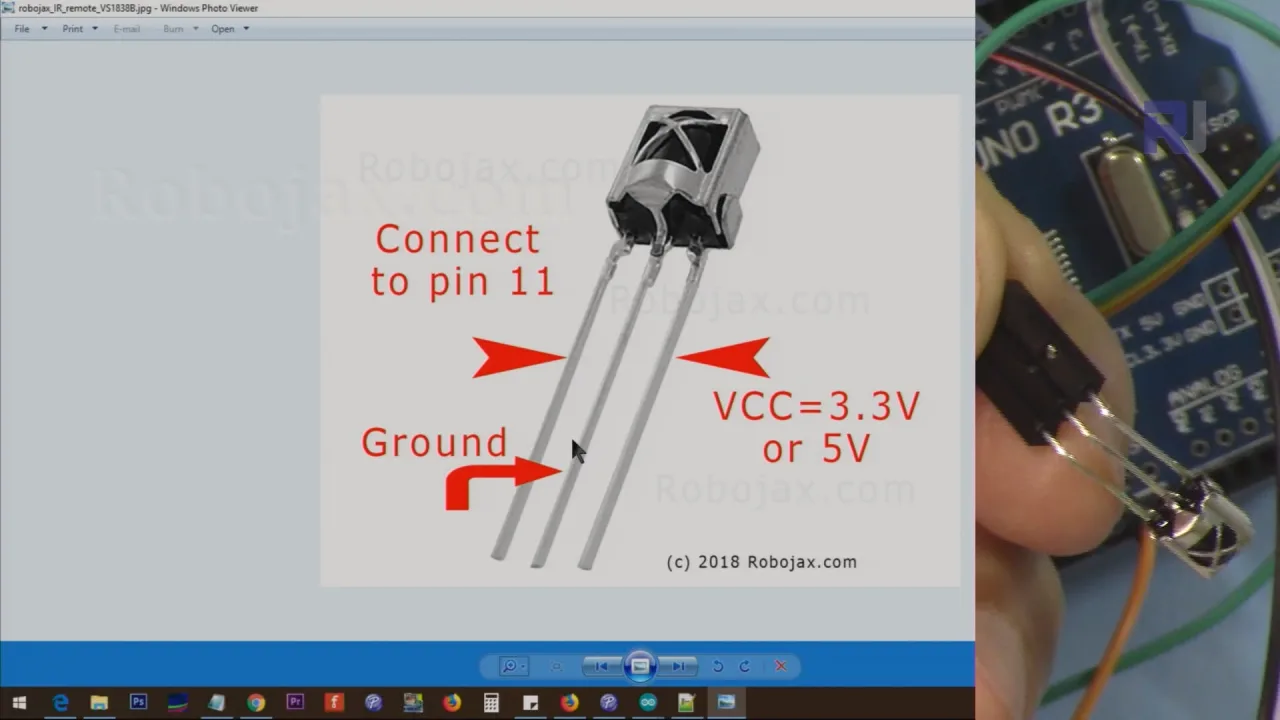
- Kipokezi cha IR: Pini ya mawimbi ya kipokezi cha IR inaunganishwa na pini ya 11 ya Arduino. Pini za VCC na GND zinaunganishwa na 5V na GND ya Arduino, mtawalia. Ikiwa unatumia moduli tupu ya kipokezi, mpangilio wa pini ni VCC, GND, na pato la mawimbi.
Mchoro wa kina wa uunganishaji umetolewa hapa chini.

Ugavi wa nishati wa motor ni tofauti na ugavi wa mantiki wa Arduino, jambo ambalo ni muhimu kwa kutoa sasa ya kutosha kwa motor bila kupakia zaidi kidhibiti cha voltage cha Arduino.
Maelezo ya Msimbo
Mafunzo haya yana programu mbili tofauti. Ya kwanza ni msimbo mkuu wa mradi unaochanganya udhibiti wa mbali wa IR na kiendeshaji cha L293D. Ya pili ni programu rahisi ya kujaribu kiendeshaji cha motor cha L293D kwa kujitegemea.
Chanzo cha kudhibiti motor ya servo na kidhibiti cha mbali cha IR kwa kutumia Arduino
Hii ni programu kamili ya mradi. Inajumuisha maktaba ya kipokezi cha IR na mantiki ya udhibiti wa motor ya L293D. Msimbo umeundwa kukuruhusu kuusanidi kwa urahisi kwa kidhibiti chako cha mbali na aina ya kipokezi.
Sehemu inayoweza kusanidiwa na mtumiaji iko juu ya msimbo. Hivi ndivyo unavyohitaji kuweka:
Kwanza, lazima ubainishe aina yako ya kidhibiti cha mbali cha IR na moduli ya kipokezi. Kigezo type kinapaswa kuwekwa kuwa 'B' kwa kidhibiti cheusi au 'W' kwa kidhibiti cheupe/cha fedha. Kigezo cha boolean PCB kinapaswa kuwekwa kuwa 1 ikiwa unatumia moduli ya kipokezi iliyo na PCB, au 0 ikiwa unatumia kipokezi tupu.
const char type ='B';// W kwa nyeupe, B kwa nyeusi. Lazima uweke alama za nukta moja kama 'B' au 'W'
const boolean PCB = 0;// ikiwa kipokezi ni PCB weka 1, ikiwa sio weka 0. Tazama video kwa maelezo
Ifuatayo, unaweza kufafanua ni funguo zipi kwenye kidhibiti chako cha mbali zitakazodhibiti motor. Michororo RIGHT, LEFT, na STOP imewekwa kwa lebo za funguo unazotaka kutumia. Kwa mfano, kwa kidhibiti cheusi, chaguo la msingi ni mshale wa kulia (>), mshale wa kushoto (<), na kitufe cha OK. Hizi lazima zilingane na lebo za funguo zilizofafanuliwa katika safu kama blackRemoteKey[].
Unaweza pia kurekebisha pini za Arduino zinazotumiwa kwa motor na receiver. Msimbo unafafanua P1A, P2A, na EN12 kwa L293D, na RECV_PIN kwa IR receiver. Ikiwa unataka kutumia pini tofauti, unaweza kubadilisha ufafanuzi huu.
#define P1A 2 // fafanua pini 2 kama P1A
#define P2A 7 // fafanua pini 7 kama P2A
#define EN12 8 // fafanua pini 8 kama 1,2EN enable
Mantiki kuu inashughulikiwa na kazi ya motorAction(). Wakati ufunguo unapobonyezwa, kazi ya robojaxValidateCode() inaifafanua na kuita motorAction() na jina la ufunguo. Kazi hii inalinganisha jina na vigezo vyako vya RIGHT, LEFT, na STOP na kuita kazi ya L293D() ipasavyo ili kuzungusha motor katika mwelekeo sahihi au kuisimamisha.
Chanzo cha kidhibiti rahisi cha motor L293 kwa kutumia Arduino
Huu ni programu ya majaribio ya msingi kwa chip ya L293D. Haihitaji IR remote. Badala yake, inazungusha motor kiotomatiki kupitia mlolongo wa vitendo ili kuthibitisha wiring yako ni sahihi.
Sehemu pekee inayoweza kubadilishwa na mtumiaji katika sketch hii ni ufafanuzi wa pini, ambao unapaswa kuendana na wiring yako:
#define P1A 2 // fafanua pini 2 kama P1A
#define P2A 7 // fafanua pini 7 kama P2A
#define EN12 8 // fafanua pini 8 kama 1,2EN enable
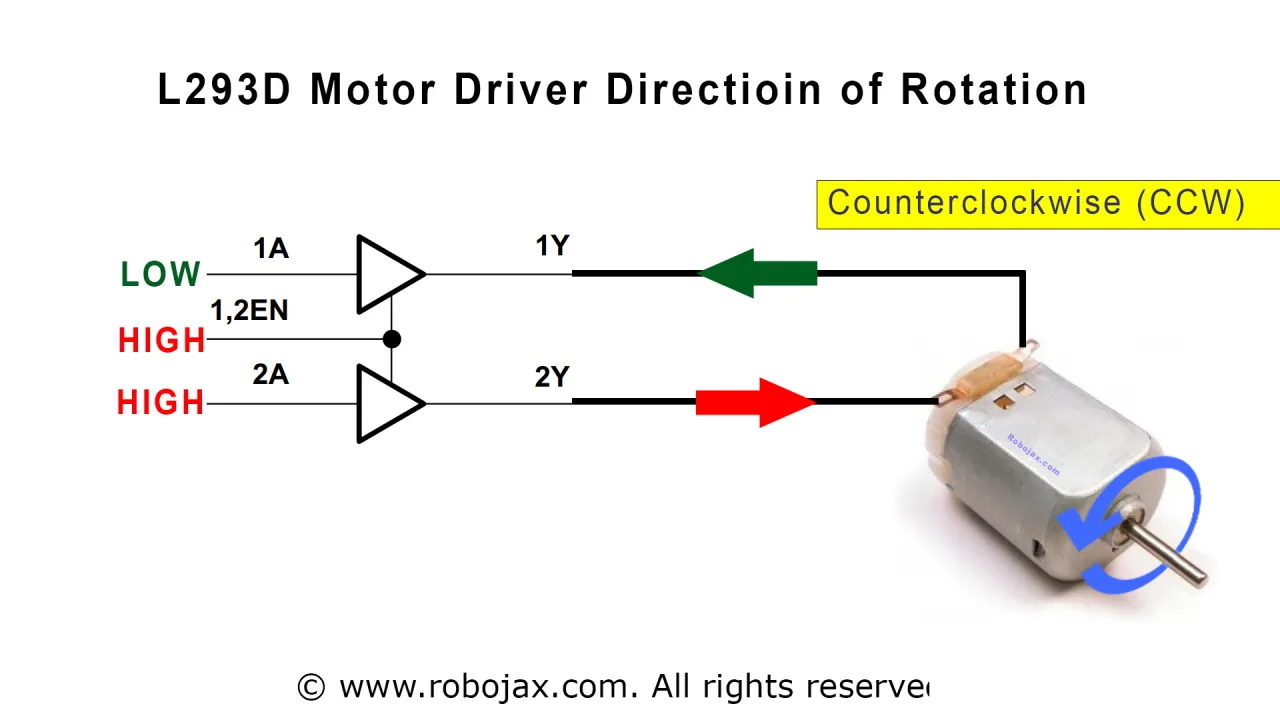
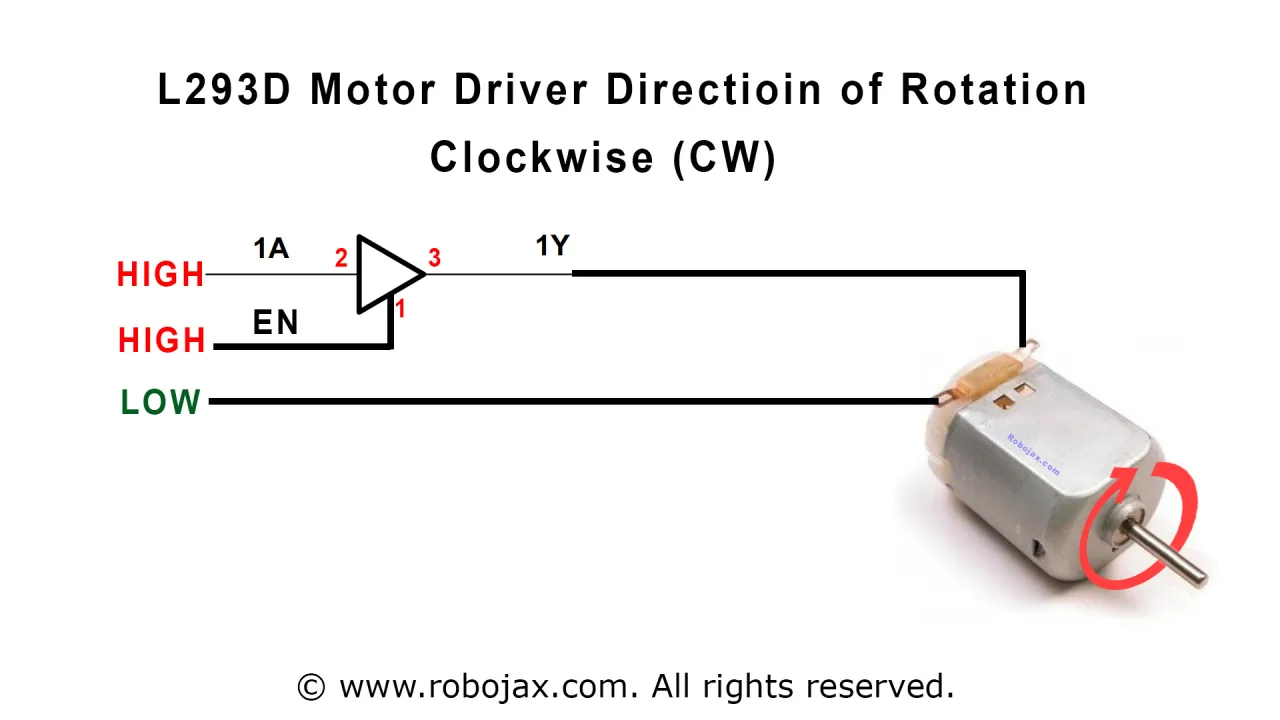
Katika loop(), msimbo unaita kazi ya L293D_con() na vigezo tofauti. Kigezo cha kwanza ni herufi: 'L' kwa mwelekeo mmoja na 'R' kwa mwingine. Kigezo cha pili ni nambari: 1 kuendesha motor na 0 kuisimamisha. Kazi hii ni njia rahisi ya kujaribu kidhibiti cha motor kabla ya kukiunganisha na mantiki ya udhibiti wa IR.
Maonyesho ya Mradi wa Moja kwa Moja
Katika video, mradi unaonyeshwa kwa remote nyeusi na ile ya fedha. Kwanza, mtangazaji anatumia remote nyeusi na moduli ya PCB receiver. Baada ya kupakia msimbo na mipangilio sahihi (type='B', PCB=1), kubonyeza kitufe cha mshale wa kulia kunasababisha motor kuzunguka katika mwelekeo mmoja, kitufe cha mshale wa kushoto kinakizungusha katika mwelekeo kinyume, na kitufe cha OK kinakisimamisha.
Maonyesho kisha yanabadilika kwa remote ya fedha. Msimbo unasasishwa kutumia lebo za vitufe vya remote ya fedha, kama vile CH+ na CH-, kwa udhibiti. Mtangazaji anaonyesha kwamba motor inaitikia ipasavyo kwa vitufe hivi tofauti.
Hatimaye, mtangazaji anaondoa moduli ya PCB na kutumia IR receiver tupu. Mabadiliko pekee yanayohitajika katika msimbo ni kuweka PCB=0. Maonyesho yanathibitisha kwamba motor bado inadhibitiwa kwa mafanikio, ikithibitisha kwamba msimbo unashughulikia aina zote mbili za receiver kwa usahihi.
Sura
- [00:00] Utangulizi na maonyesho ya mradi
- [00:53] Mahitaji ya awali na video zilizopendekezwa
- [02:14] Maelezo ya wiring ya chip ya L293D
- [07:30] Maelezo ya msimbo na usanidi
- [14:15] Maonyesho na remote nyeusi na PCB
- [16:04] Maonyesho na remote ya fedha na PCB
- [17:42] Maonyesho na remote ya fedha bila PCB
- [18:23] Maonyesho na remote nyeusi bila PCB
Bilder
/*
 * Original Infrared library from - http://arcfn.com
 *
 * This is Arduino code for the L293D DC motor driver.
 * It uses an IR remote control to rotate the DC motor clockwise (CW), counter-clockwise (CCW), and stop it.
 * Watch instructions for this video: https://youtu.be/e0pvfJbdw_o
 * To get the library and files related to this code, visit http://robojax.com/learn/arduino
 // Written for Robojax.com video

 * Code is available at http://robojax.com/learn/arduino

 *
 // Written by Ahmad S. for Robojax.com on
// August 10, 2018 at 22:03 in Ajax, Ontario, Canada
    This program is free software: you can redistribute it and/or modify
    it under the terms of the GNU General Public License as published by
    the Free Software Foundation, either version 3 of the License, or
    (at your option) any later version.

    This program is distributed in the hope that it will be useful,
    but WITHOUT ANY WARRANTY; without even the implied warranty of
    MERCHANTABILITY or FITNESS FOR A PARTICULAR PURPOSE.  See the
    GNU General Public License for more details.

    You should have received a copy of the GNU General Public License
    along with this program.  If not, see <https://www.gnu.org/licenses/>.
*/
// DC motor control
#define P1A 2 // define pin 2 as for P1A
#define P2A 7 // define pin 7 as for P2A
#define EN12 8 // define pin 8 as for 1,2EN enable

// remote settings start
#include <IRremote.h>

int RECV_PIN = 11;
const char type ='B';// W for white, B for black. Must keep single quotes like 'B' or 'W'
const boolean PCB = 0;// if receiver is PCB set to 1, if not set to 0. See video for details
boolean displayCode = false;// to display remote code. if not, set to false

// IR remote settings
const String RIGHT=">";// move motor to the right (CW) with this key on remote
const String LEFT ="<";// move motor to the left (CCW) with this key on remote
const String STOP ="OK";// stop motor with this key on remote
// remote settings end

IRrecv irrecv(RECV_PIN);

// this is array holding codes for White Remote when used with PCB version of receiver
unsigned int whiteRemotePCB[] ={
            0xE318261B, // CH-
            0x511DBB,   // CH
            0xEE886D7F,  // CH+

            0x52A3D41F, // |<<
            0xD7E84B1B, // >>|
            0x20FE4DBB, // >||

            0xF076C13B, // -
            0xA3C8EDDB, // +
            0x12CEA6E6, // EQ

            0xC101E57B, // 0
            0x97483BFB, // 100+
            0xF0C41643, // 200+

            0x9716BE3F, // 1
            0x3D9AE3F7, // 2
            0x6182021B, // 3

            0x8C22657B, // 4
            0x488F3CBB, // 5
            0x449E79F,  // 6

            0x32C6FDF7, // 7
            0x1BC0157B, // 8
            0x3EC3FC1B  // 9
            };

// this is array holding codes for White Remote when used with non-PCB version of receiver
unsigned int whiteRemote[] ={
            0xFFA25D, // CH-
            0xFF629D,   // CH
            0xFFE21D,  // CH+

            0xFF22DD, // |<<
            0xFF02FD, // >>|
            0xFFC23D, // >||

            0xFFE01F, // -
            0xFFA857, // +
            0xFF906F, // EQ

            0xFF6897, // 0
            0xFF9867, // 100+
            0xFFB04F, // 200+

            0xFF30CF, // 1
            0xFF18E7, // 2
            0xFF7A85, // 3

            0xFF10EF, // 4
            0xFF38C7, // 5
            0xFF5AA5,  // 6

            0xFF42BD, // 7
            0xFF4AB5, // 8
            0xFF52AD  // 9
            };
// key lables of white remote
 String whiteRemoteKey[] ={
            "CH-",
            "CH",
            "CH+",

            "|<<",
            ">>|",
            ">||",

            "-",
            "+",
            "EQ",

            "0",
            "100+",
            "200+",

            "1",
            "2",
            "3",

            "4",
            "5",
            "6",

            "7",
            "8",
            "9"
            };

// this is array holding codes for Black Remote when used with non-PCB version of receiver
 unsigned int blackRemote[] ={
            0xFF629D, // ^
            0xFF22DD,   // <
            0xFF02FD,  // OK
            0xFFC23D, // >
            0xFFA857, // v

            0xFF6897, // 1
            0xFF9867, // 2
            0xF0C41643, // 3

            0xFF30CF, // 4
            0xFF18E7, // 5
            0xFF7A85,  // 6

            0xFF10EF, // 7
            0xFF38C7, // 8
            0xFF5AA5,  // 9

            0xFF42BD, // *
            0xFF4AB5, // 0
            0xFF52AD  // #
            };

// this is array holding codes for Black Remote when used with PCB version of receiver
 unsigned int blackRemotePCB[] ={
            0x511DBB, // ^
            0x52A3D41F,   // <
            0xD7E84B1B,  // OK
            0x20FE4DBB, // >
            0xA3C8EDDB, // v


            0xC101E57B, // 1
            0x97483BFB, // 2
            0xF0C41643, // 3

            0x9716BE3F, // 4
            0x3D9AE3F7, // 5
            0x6182021B,  // 6

            0x8C22657B, // 7
            0x488F3CBB, // 8
            0x449E79F,  // 9

            0x32C6FDF7, // *
            0x1BC0157B, // 0
            0x3EC3FC1B  // #
            };

// Black remote key names
 String blackRemoteKey[] ={
            "^",
            "<",
            "OK",
            ">",
            "v",

            "1",
            "2",
            "3",

            "4",
            "5",
            "6",

            "7",
            "8",
            "9",

            "*",
            "0",
            "#"
            };

decode_results results;


/*
 * Permission granted to share this code given that this
 * note is kept with the code.
 * Disclaimer: this code is "AS IS" and for educational purposes only.
 *
 */

void setup() {
  // L293 Motor Control Code by Robojax.com 2018025
  Serial.begin(9600);// setup Serial Monitor to display information
  pinMode(P1A, OUTPUT);// define pin as OUTPUT for P1A
  pinMode(P2A, OUTPUT);// define pin as OUTPUT for P2A
  pinMode(EN12, OUTPUT);// define pin as OUTPUT for 1,2EN

  Serial.println("Robojax IR Decode");
  Serial.println("Motor Control with Remote");
  irrecv.enableIRIn(); // Start the receiver


  // L293 Motor Control Code by Robojax.com 20180810
}

void loop() {
  // L293d Motor Control Code with IR by Robojax.com 20180810

  if (irrecv.decode(&results)) {
    if(displayCode)Serial.println(results.value, HEX);
    robojaxValidateCode(results.value);// used the "robojaxValidateCode" bellow
    irrecv.resume(); // Receive the next value
  }
  delay(50);// 50 millisecond delay
  // L293d Motor Control Code with IR by Robojax.com 20180810
}//loop end


/*
 * function: robojaxValidateCode
 * validates the remote code and prints the correct key name
 * cd is the code passed from the loop
 * Written by A. S. for Robojax
 */
void robojaxValidateCode(int cd)
{

  // Robojax IR Remote decoder
  int found=0;

 if(type =='W' && !PCB)
 {
    // Robojax IR White Remote decoder
    // if type is set to 'W' (white remote) and PCB=0 then check White remote code
      for(int i=0; i< sizeof(whiteRemote)/sizeof(int); i++)
      {
        if(whiteRemote[i] ==cd)
        {

          Serial.print("Key pressed:");
          Serial.println(whiteRemoteKey[i]);
          motorAction(whiteRemoteKey[i]);// take action
          found=1;
        }// if matched
      }// for
 }else if(type =='W' && PCB){
    // Robojax IR White Remote decoder
    // if type is set to 'W' (white remote) and PCB=1 then check White remote code
      for(int i=0; i< sizeof(whiteRemotePCB)/sizeof(int); i++)
      {
        if(whiteRemotePCB[i] ==cd)
        {

          Serial.print("Key pressed:");
          Serial.println(whiteRemoteKey[i]);
          motorAction(whiteRemoteKey[i]);// take action
          found=1;
        }// if matched
      }// for
 }else if(type =='B' && PCB){
    // Robojax IR Black Remote decoder
       // if type is set to 'B' (black remote) and PCB=1 then check Black remote code
       for(int i=0; i< sizeof(blackRemotePCB)/sizeof(int); i++)
      {
        // Robojax IR black Remote decoder
        if(blackRemotePCB[i] ==cd)
        {

          Serial.print("Key pressed:");
          Serial.println(blackRemoteKey[i]);
         motorAction(blackRemoteKey[i]);// take action
          found=1;
        }// if matched
      }// for
 }else{

      // if type is set to 'B' (black remote) and PCB =0 then check Black remote code
       for(int i=0; i< sizeof(blackRemote)/sizeof(int); i++)
      {
        // Robojax IR black Remote decoder
        if(blackRemote[i] ==cd)
        {

          Serial.print("Key pressed:");
          Serial.println(blackRemoteKey[i]);
          motorAction(blackRemoteKey[i]);// take action

          found=1;
        }// if matched
      }// for
 }// else
  if(!found){
    if(cd !=0xFFFFFFFF)
      {
    Serial.println("Key unknown");
      }
  }// found
}// robojaxValidateCode end

/*
 *
 * motorAction()
 * receives string "value" as input and based on the settings,
 * turns motor CW, CCW or STOP
 */
void motorAction(String value)
{
  // Robojax IR motor control
   if(value == RIGHT)
   {
    L293D('R',1);// rotate motor to the right (CCW)
   }

   if(value == LEFT)
   {
    L293D('L',1);// rotate motor to the left (CW)
   }

   if(value == STOP)
   {
    L293D('R',0);// stop motor
   }
}//motorAction end


/*
 * L293D(char dir, int en)
 * dir is character either L for CW direction
 *  or R for CCW direction
 *  en is integer 1 to rotate, 0 for stop
 */
void L293D(char dir, int en)
{
  if(dir =='L')
  {
    if(en ==0){
       Serial.println("CW Motor Stopped");
    }else{
       Serial.println("Rotating CW");
    }
    digitalWrite(EN12 ,en);// Enable 1A and 2A
    digitalWrite(P1A,HIGH);// send + or HIGH signal to P1A
    digitalWrite(P2A,LOW);// send - or LOW signal to P2A

  }else{
    if(en ==0){
       Serial.println("CCW Motor Stopped");
    }else{
       Serial.println("Rotating CCW");
    }
    digitalWrite(EN12 ,en);// Disable 1A and 2A
    digitalWrite(P1A,LOW);// send + or HIGH signal to P1A
    digitalWrite(P2A,HIGH);// send - or LOW signal to P2A
  }
}//L293D end++
/*
* This is the Arduino code for L293d DC motor Driver
* watch LE18-D80NK video for details https://youtu.be/MrYsmAwzfrM
* Code is available at http://robojax.com/learn/arduino
*
* Written by Ahmad S. for Robojax.com on
* August 9, 2018 at 22:03 in Ajax, Ontario, Canada
*/
// DC motor 1 control
#define P1A 2 // define pin 2 as for P1A
#define P2A 7 // define pin 7 as for P2A
#define EN12 8 // define pin 8 as for 1,2EN enable
/*
* Permission granted to share this code given that this
* note is kept with the code.
* Disclaimer: this code is "AS IS" and for educational purposes only.
*
*/
void setup() {
// L293 Motor Control Code by Robojax.com 2018025
Serial.begin(9600);// setup Serial Monitor to display information
pinMode(P1A, OUTPUT);// define pin as OUTPUT for P1A
pinMode(P2A, OUTPUT);// define pin as OUTPUT for P2A
pinMode(EN12, OUTPUT);// define pin as OUTPUT for 1,2EN
// L293 Motor Control Code by Robojax.com 2018025
}
void loop() {
// L293 Motor Control Code by Robojax.com 2018025
L293D_con('L',1);
delay(4000);
L293D_con('L',0);
delay(2000);
L293D_con('R',1);
delay(4000);
L293D_con('R',0);
delay(2000);
Serial.println("=========== Loop done");
delay(500);
// L293 Motor Control Code by Robojax.com 2018025
}
void L293D_con(char dir, int en)
{
if(dir =='L')
{
if(en ==0){
Serial.println(" CW Motor Stopped");
}else{
Serial.println(" Rotating CW");
}
digitalWrite(EN12 ,en);// Enable 1A and 2A
digitalWrite(P1A,HIGH);// send + or HIGH signal to P1A
digitalWrite(P2A,LOW);// send - or LOW signal to P2A
}else{
if(en ==0){
Serial.println(" CCW Motor Stopped");
}else{
Serial.println(" Rotating CCW");
}
digitalWrite(EN12 ,en);// Disable 1A and 2A
digitalWrite(P1A,LOW);// send + or HIGH signal to P1A
digitalWrite(P2A,HIGH);// send - or LOW signal to P2A
}
}//L293D_con endResurser och referenser
-
Extern.Download Library for Arduino (GitHub)github.com
Filer📁
Datablad (pdf)
-
robojax_L293D_motor_shield_manual.pdf
robojax_L293D_motor_shield_manual.pdf0.16 MB -
L293d datasheet
L293d_datasheet.pdf0.34 MB