Mengendalikan Motor DC dengan Remote Kontrol IR Menggunakan Arduino dan L293D
Pendahuluan
Tutorial ini menunjukkan cara mengontrol arah motor DC dan fungsi berhenti menggunakan pengontrol remote IR, penerima inframerah, dan papan Arduino. Chip penggerak motor L293D bertindak sebagai perantara, memungkinkan sinyal arus rendah Arduino untuk menggerakkan motor dengan aman. Proyek ini adalah pengenalan praktis untuk menggabungkan kontrol jarak jauh dengan kontrol motor, membuka kemungkinan untuk berbagai proyek robotika dan otomasi.
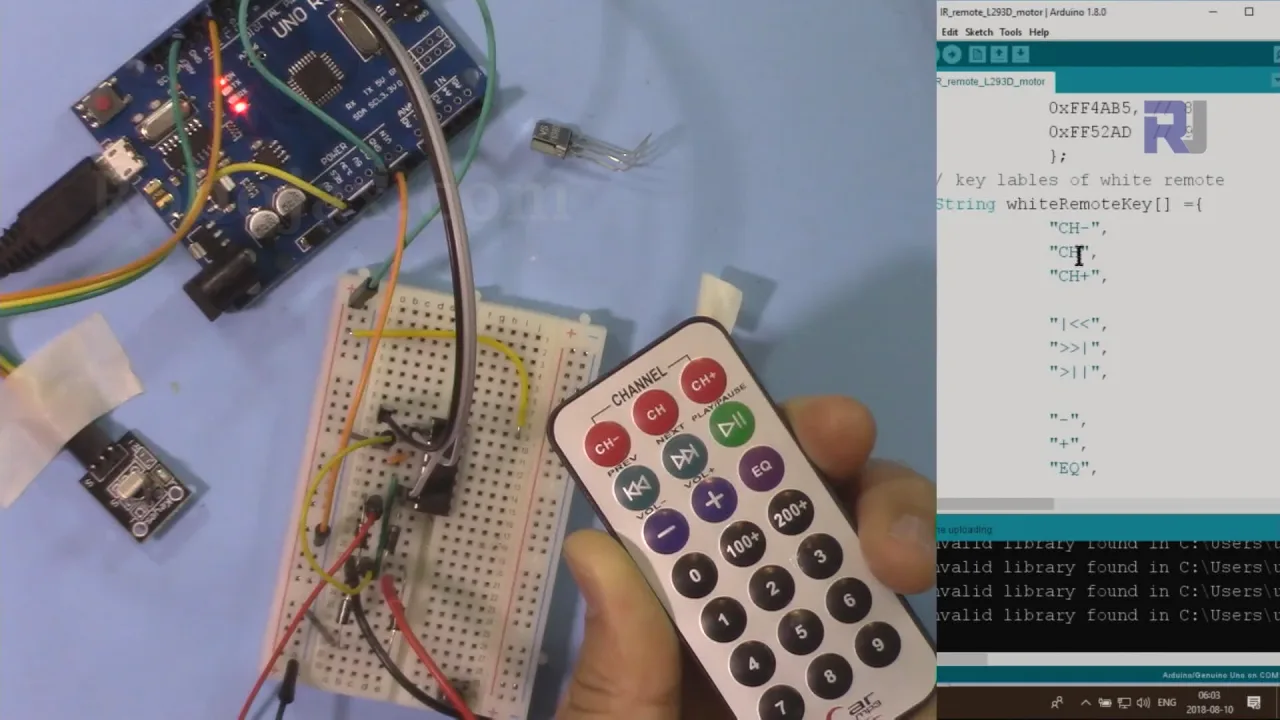
Berikut adalah beberapa ide praktis tentang apa yang dapat Anda bangun dengan pengaturan ini:
- Mengontrol pergerakan mobil robotik kecil atau penjelajah.
- Membangun penggeser kamera atau mekanisme pan-tilt yang dikendalikan jarak jauh.
- Membuat sakelar on/off nirkabel untuk kipas DIY atau peralatan kecil lainnya.
- Mengembangkan mekanisme gerbang atau kunci jarak jauh untuk model atau proyek kecil.


Perangkat Keras yang Dibutuhkan
- Papan Arduino (mis., Uno)
- IC penggerak motor L293D
- Motor DC (kecil, 3-9V)
- Pengontrol remote IR (hitam atau perak/putih)
- Modul penerima IR (dengan atau tanpa PCB)
- Catu daya eksternal untuk motor (mis., baterai 9V)
- Kabel jumper dan papan tempat memotong roti
Panduan Pengkabelan
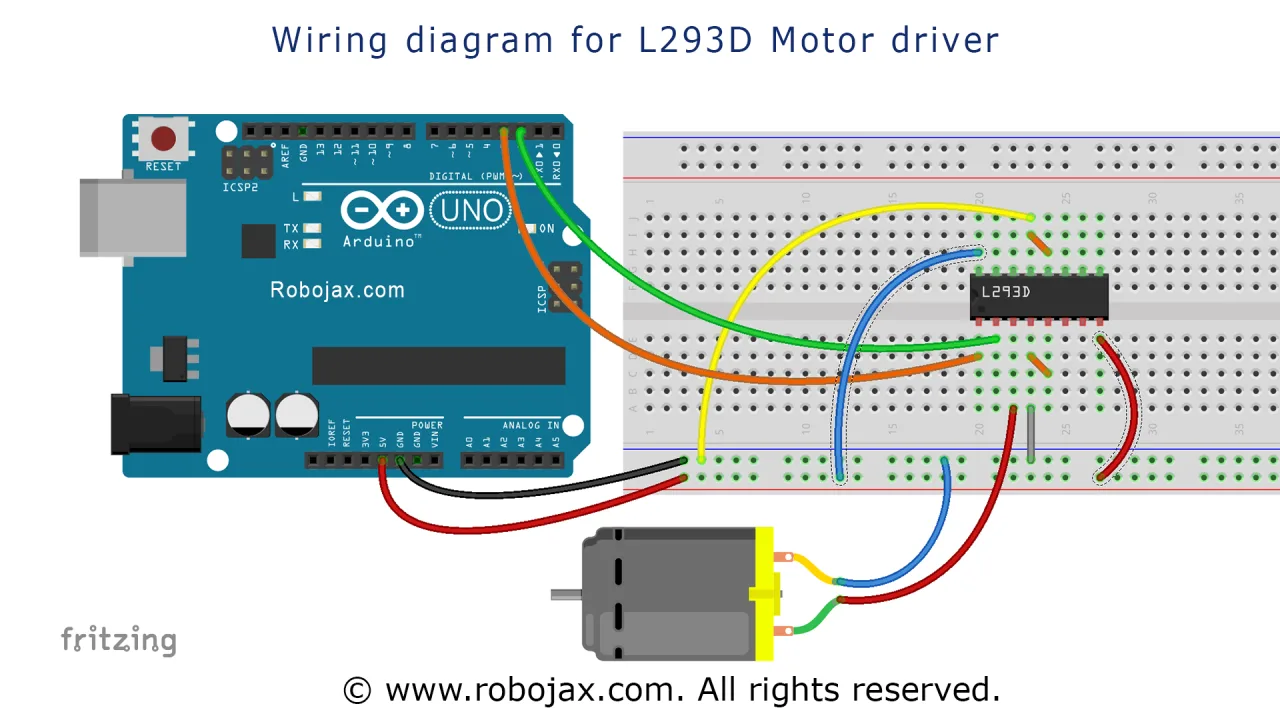
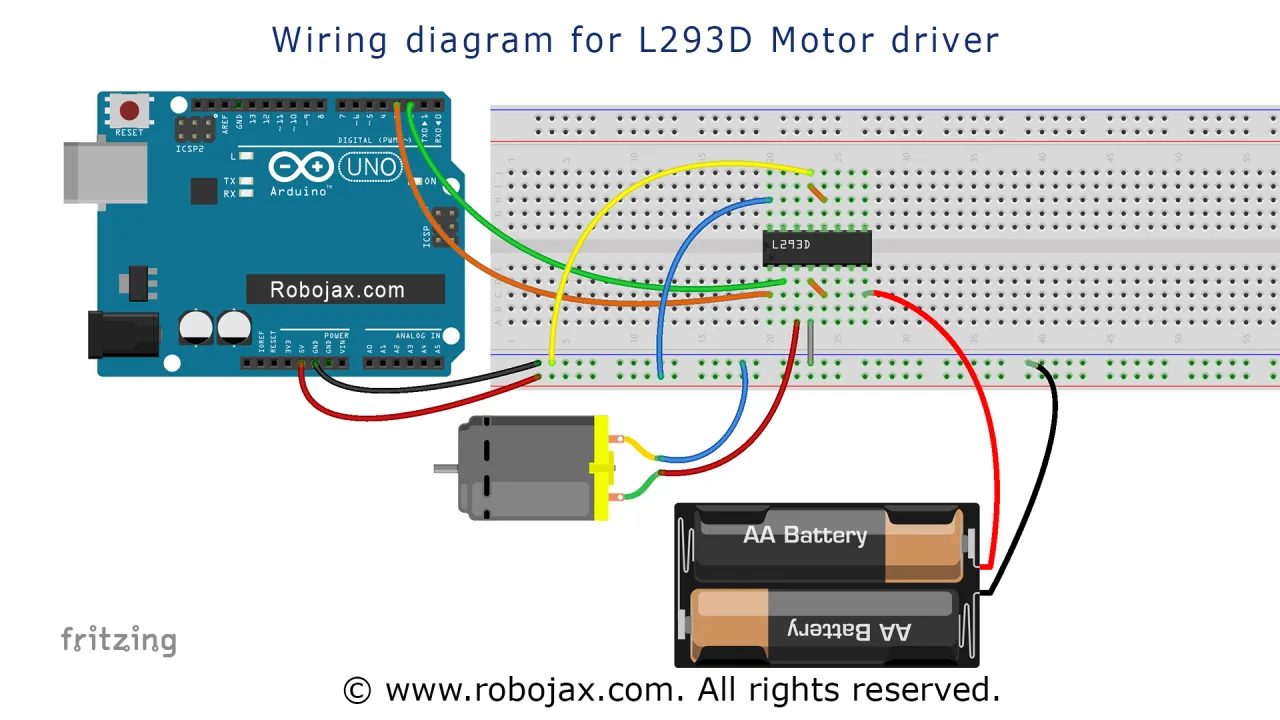
Untuk proyek ini, chip L293D digunakan untuk mengontrol motor berdasarkan sinyal dari Arduino. Koneksinya adalah sebagai berikut:
- Daya dan Ground: Pin 16 dari L293D terhubung ke 5V Arduino. Pin 4, 5, 12, dan 13 dihubungkan bersama dan ke ground umum. Catu daya motor eksternal (mis., 9V) terhubung ke pin 8 (VCC2).
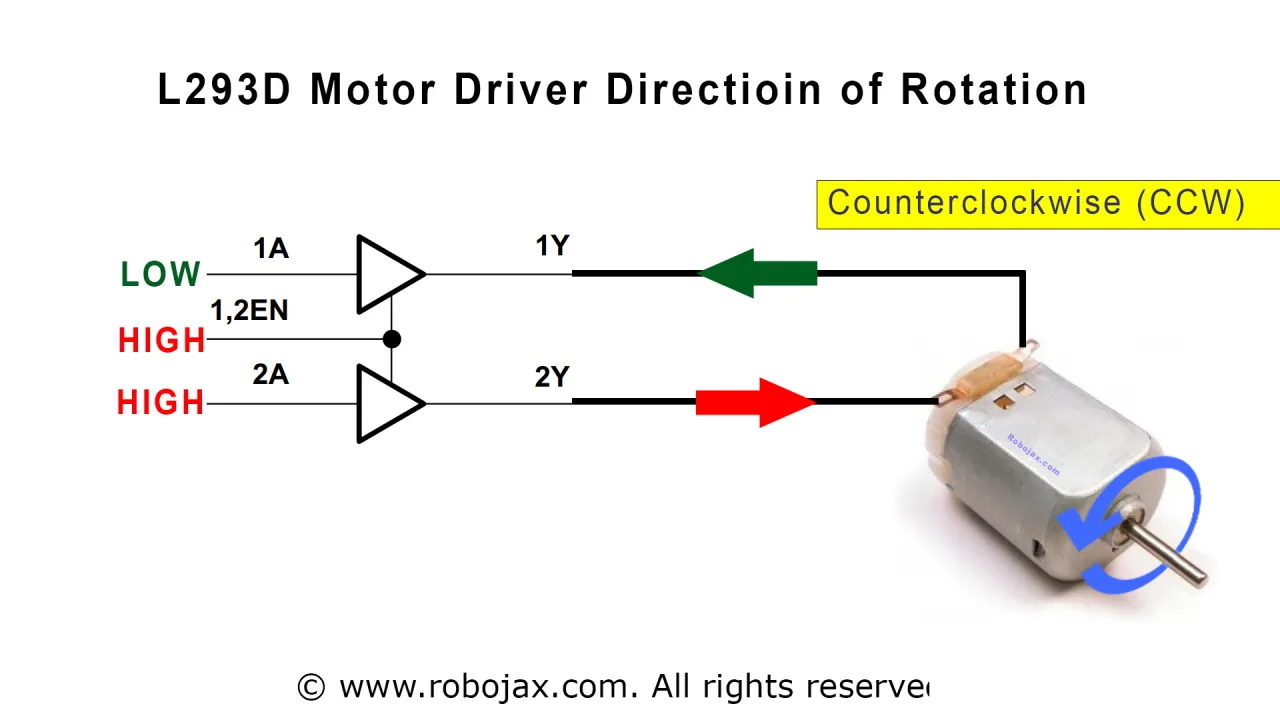
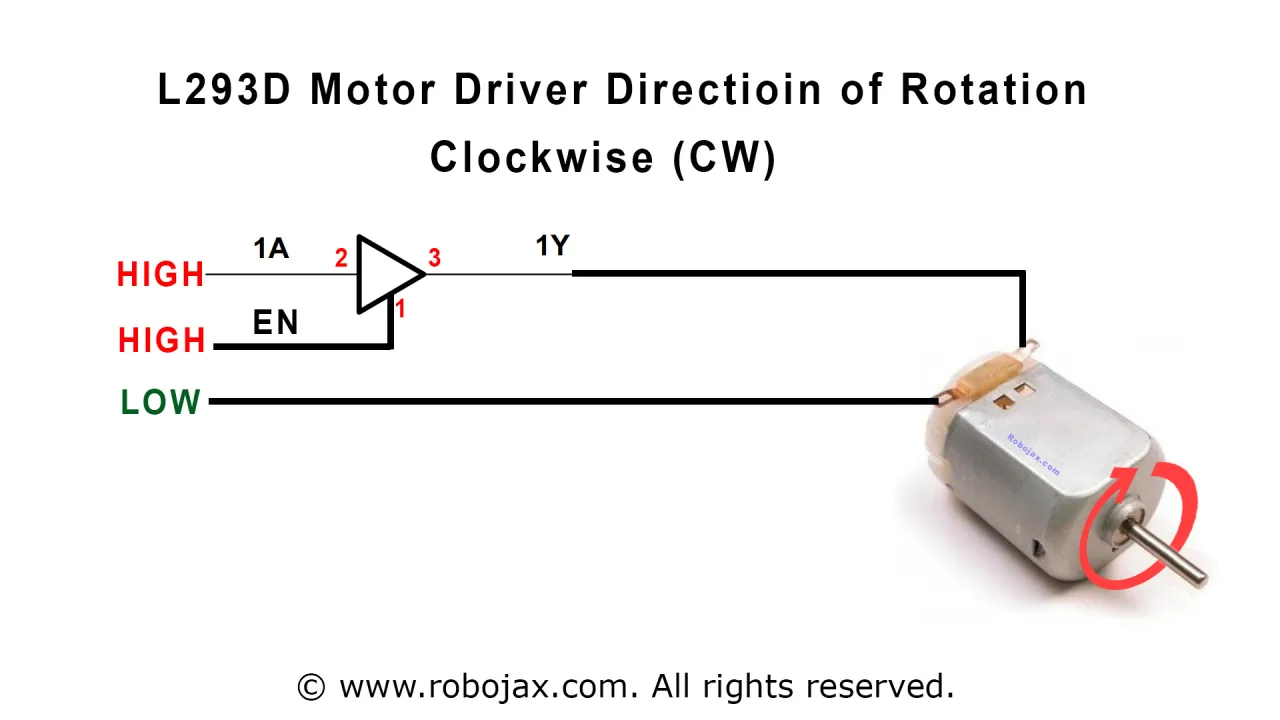
- Koneksi Motor: Dua kabel motor DC terhubung ke pin 3 dan 6 dari L293D. Arah putaran dapat ditukar dengan membalik koneksi ini jika diperlukan. Dioda flyback pada chip melindunginya dari lonjakan tegangan yang dihasilkan oleh motor.
- Pin Kontrol: Pin 1 (Enable 1,2) terhubung ke pin Arduino 8. Pin 2 (Input 1A) terhubung ke pin Arduino 2, dan Pin 7 (Input 2A) terhubung ke pin Arduino 7. Pin Arduino ini mengontrol arah dan kecepatan motor.
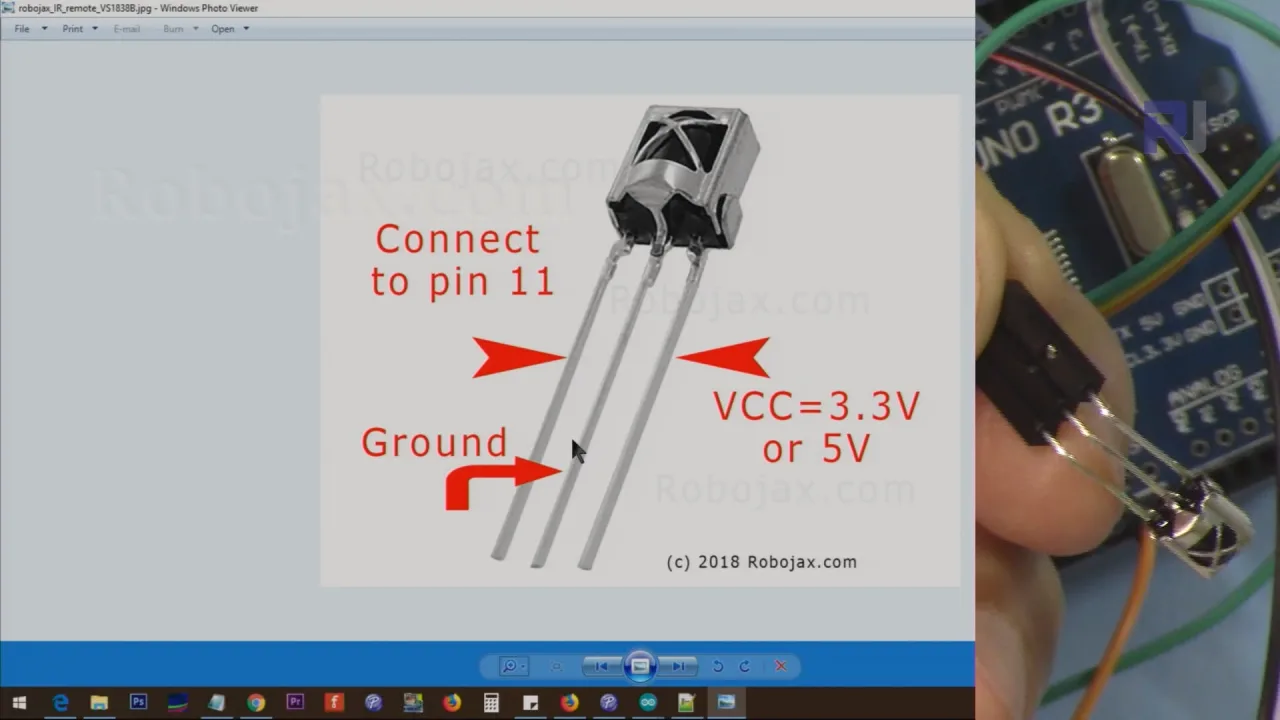
- Penerima IR: Pin sinyal penerima IR terhubung ke pin Arduino 11. Pin VCC dan GND terhubung ke 5V dan GND Arduino, masing-masing. Jika menggunakan modul penerima telanjang, pinout-nya adalah VCC, GND, dan output sinyal.
Diagram pengkabelan terperinci disediakan di bawah ini.

Catu daya motor terpisah dari catu daya logika Arduino, yang sangat penting untuk menyediakan arus yang cukup ke motor tanpa membebani regulator tegangan Arduino.
Penjelasan Kode
Tutorial ini berisi dua program terpisah. Yang pertama adalah kode proyek utama yang menggabungkan kontrol remote IR dengan penggerak L293D. Yang kedua adalah program yang lebih sederhana untuk menguji penggerak motor L293D secara independen.
Sumber untuk mengontrol motor servo dengan pengontrol remote IR menggunakan Arduino
Ini adalah program lengkap untuk proyek ini. Ini mengintegrasikan pustaka penerima IR dan logika kontrol motor L293D. Kode ini disusun untuk memungkinkan Anda dengan mudah mengonfigurasinya untuk remote dan jenis penerima spesifik Anda.
Bagian yang dapat dikonfigurasi pengguna berada di bagian atas kode. Berikut yang perlu Anda atur:
Pertama, Anda harus menentukan jenis remote IR dan modul penerima Anda. Variabel type harus diatur ke 'B' untuk remote hitam atau 'W' untuk remote putih/perak. Variabel boolean PCB harus diatur ke 1 jika Anda menggunakan modul penerima dengan PCB, atau 0 jika Anda menggunakan penerima telanjang.
const char type ='B';// W untuk putih, B untuk hitam. Harus menjaga tanda kutip tunggal seperti 'B' atau 'W'
const boolean PCB = 0;// jika penerima adalah PCB atur ke 1, jika tidak atur ke 0. Lihat video untuk detail
Selanjutnya, Anda dapat menentukan tombol mana pada remote Anda yang akan mengontrol motor. String RIGHT, LEFT, dan STOP diatur ke label tombol yang ingin Anda gunakan. Misalnya, dengan remote hitam, defaultnya adalah panah kanan (>), panah kiri (<), dan tombol OK. Ini harus cocok dengan label tombol yang didefinisikan dalam array seperti blackRemoteKey[].
const String RIGHT=">";// gerakkan motor ke kanan (CW) dengan tombol ini pada remote
const String LEFT ="<";// gerakkan motor ke kiri (CCW) dengan tombol ini pada remote
const String STOP ="OK";// hentikan motor dengan tombol ini pada remote
Anda juga dapat menyesuaikan pin Arduino yang digunakan untuk motor dan penerima. Kode ini mendefinisikan P1A, P2A, dan EN12 untuk L293D, serta RECV_PIN untuk penerima IR. Jika Anda ingin menggunakan pin yang berbeda, Anda dapat mengubah definisi ini.
#define P1A 2 // definisikan pin 2 sebagai P1A
#define P2A 7 // definisikan pin 7 sebagai P2A
#define EN12 8 // definisikan pin 8 sebagai 1,2EN enable
Logika utama ditangani oleh fungsi motorAction(). Ketika sebuah tombol ditekan, fungsi robojaxValidateCode() mendekodenya dan memanggil motorAction() dengan nama tombol tersebut. Fungsi ini membandingkan nama dengan variabel RIGHT, LEFT, dan STOP Anda dan memanggil fungsi L293D() sesuai untuk memutar motor ke arah yang benar atau menghentikannya.
Sumber untuk pengontrol motor L293 sederhana menggunakan Arduino
Ini adalah program uji dasar untuk chip L293D. Program ini tidak memerlukan remote IR. Sebagai gantinya, program ini secara otomatis memutar motor melalui serangkaian aksi untuk memverifikasi bahwa kabel Anda sudah benar.
Satu-satunya bagian yang dapat dikonfigurasi pengguna dalam sketsa ini adalah definisi pin, yang harus sesuai dengan kabel Anda:
#define P1A 2 // definisikan pin 2 sebagai P1A
#define P2A 7 // definisikan pin 7 sebagai P2A
#define EN12 8 // definisikan pin 8 sebagai 1,2EN enable
Dalam loop(), kode memanggil fungsi L293D_con() dengan parameter yang berbeda. Parameter pertama adalah karakter: 'L' untuk satu arah dan 'R' untuk arah lainnya. Parameter kedua adalah bilangan bulat: 1 untuk menjalankan motor dan 0 untuk menghentikannya. Fungsi ini adalah cara sederhana untuk menguji driver motor sebelum mengintegrasikannya dengan logika kontrol IR.
Demonstrasi Proyek Langsung
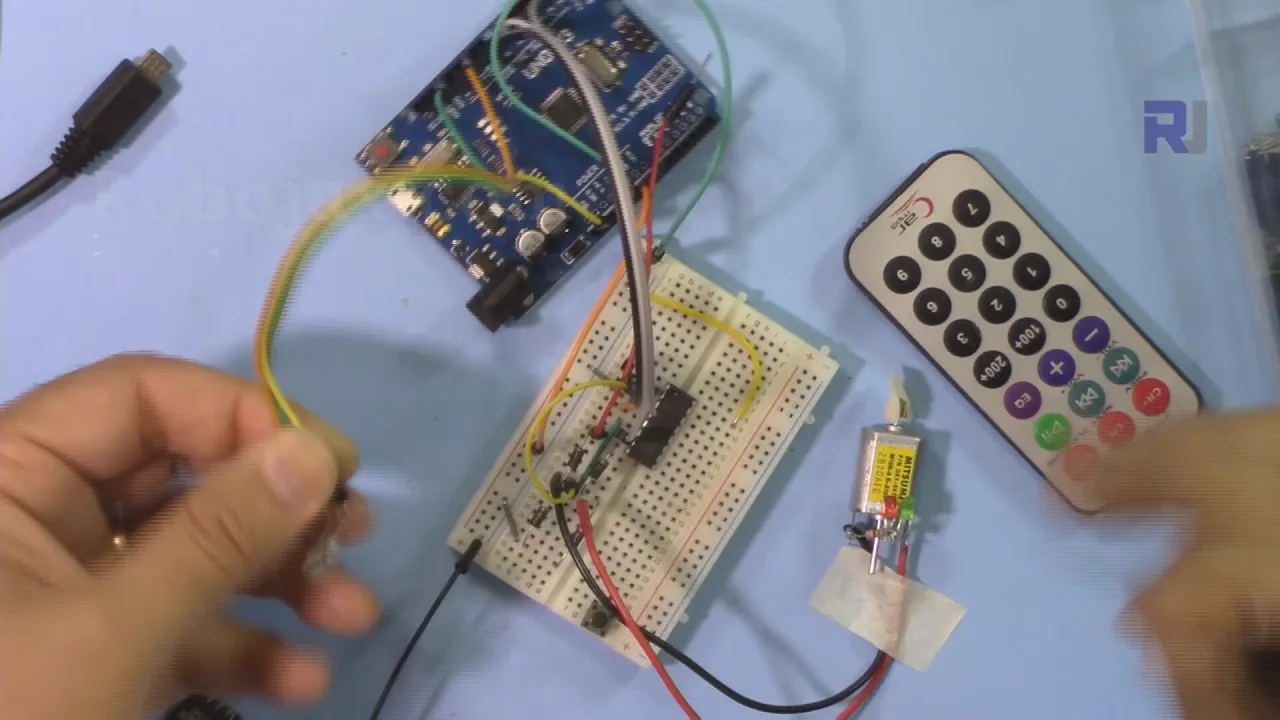
Dalam video, proyek ini didemonstrasikan dengan remote hitam dan remote perak. Pertama, presenter menggunakan remote hitam dengan modul penerima PCB. Setelah mengunggah kode dengan pengaturan yang benar (type='B', PCB=1), menekan tombol panah kanan menyebabkan motor berputar ke satu arah, tombol panah kiri memutarnya ke arah yang berlawanan, dan tombol OK menghentikannya.
Demonstrasi kemudian beralih ke remote perak. Kode diperbarui untuk menggunakan label tombol remote perak, seperti CH+ dan CH-, untuk kontrol. Presenter menunjukkan bahwa motor merespons dengan benar terhadap tombol-tombol yang berbeda ini.
Terakhir, presenter melepas modul PCB dan menggunakan penerima IR telanjang. Satu-satunya perubahan yang diperlukan dalam kode adalah mengatur PCB=0. Demonstrasi mengonfirmasi bahwa motor masih berhasil dikendalikan, membuktikan bahwa kode menangani kedua jenis penerima dengan benar.
Bab
- [00:00] Pendahuluan dan demonstrasi proyek
- [00:53] Prasyarat dan video yang direkomendasikan
- [02:14] Penjelasan kabel chip L293D
- [07:30] Penjelasan kode dan konfigurasi
- [14:15] Demonstrasi dengan remote hitam dan PCB
- [16:04] Demonstrasi dengan remote perak dan PCB
- [17:42] Demonstrasi dengan remote perak tanpa PCB
- [18:23] Demonstrasi dengan remote hitam tanpa PCB
Gambar
/*
 * Original Infrared library from - http://arcfn.com
 *
 * This is Arduino code for the L293D DC motor driver.
 * It uses an IR remote control to rotate the DC motor clockwise (CW), counter-clockwise (CCW), and stop it.
 * Watch instructions for this video: https://youtu.be/e0pvfJbdw_o
 * To get the library and files related to this code, visit http://robojax.com/learn/arduino
 // Written for Robojax.com video

 * Code is available at http://robojax.com/learn/arduino

 *
 // Written by Ahmad S. for Robojax.com on
// August 10, 2018 at 22:03 in Ajax, Ontario, Canada
    This program is free software: you can redistribute it and/or modify
    it under the terms of the GNU General Public License as published by
    the Free Software Foundation, either version 3 of the License, or
    (at your option) any later version.

    This program is distributed in the hope that it will be useful,
    but WITHOUT ANY WARRANTY; without even the implied warranty of
    MERCHANTABILITY or FITNESS FOR A PARTICULAR PURPOSE.  See the
    GNU General Public License for more details.

    You should have received a copy of the GNU General Public License
    along with this program.  If not, see <https://www.gnu.org/licenses/>.
*/
// DC motor control
#define P1A 2 // define pin 2 as for P1A
#define P2A 7 // define pin 7 as for P2A
#define EN12 8 // define pin 8 as for 1,2EN enable

// remote settings start
#include <IRremote.h>

int RECV_PIN = 11;
const char type ='B';// W for white, B for black. Must keep single quotes like 'B' or 'W'
const boolean PCB = 0;// if receiver is PCB set to 1, if not set to 0. See video for details
boolean displayCode = false;// to display remote code. if not, set to false

// IR remote settings
const String RIGHT=">";// move motor to the right (CW) with this key on remote
const String LEFT ="<";// move motor to the left (CCW) with this key on remote
const String STOP ="OK";// stop motor with this key on remote
// remote settings end

IRrecv irrecv(RECV_PIN);

// this is array holding codes for White Remote when used with PCB version of receiver
unsigned int whiteRemotePCB[] ={
            0xE318261B, // CH-
            0x511DBB,   // CH
            0xEE886D7F,  // CH+

            0x52A3D41F, // |<<
            0xD7E84B1B, // >>|
            0x20FE4DBB, // >||

            0xF076C13B, // -
            0xA3C8EDDB, // +
            0x12CEA6E6, // EQ

            0xC101E57B, // 0
            0x97483BFB, // 100+
            0xF0C41643, // 200+

            0x9716BE3F, // 1
            0x3D9AE3F7, // 2
            0x6182021B, // 3

            0x8C22657B, // 4
            0x488F3CBB, // 5
            0x449E79F,  // 6

            0x32C6FDF7, // 7
            0x1BC0157B, // 8
            0x3EC3FC1B  // 9
            };

// this is array holding codes for White Remote when used with non-PCB version of receiver
unsigned int whiteRemote[] ={
            0xFFA25D, // CH-
            0xFF629D,   // CH
            0xFFE21D,  // CH+

            0xFF22DD, // |<<
            0xFF02FD, // >>|
            0xFFC23D, // >||

            0xFFE01F, // -
            0xFFA857, // +
            0xFF906F, // EQ

            0xFF6897, // 0
            0xFF9867, // 100+
            0xFFB04F, // 200+

            0xFF30CF, // 1
            0xFF18E7, // 2
            0xFF7A85, // 3

            0xFF10EF, // 4
            0xFF38C7, // 5
            0xFF5AA5,  // 6

            0xFF42BD, // 7
            0xFF4AB5, // 8
            0xFF52AD  // 9
            };
// key lables of white remote
 String whiteRemoteKey[] ={
            "CH-",
            "CH",
            "CH+",

            "|<<",
            ">>|",
            ">||",

            "-",
            "+",
            "EQ",

            "0",
            "100+",
            "200+",

            "1",
            "2",
            "3",

            "4",
            "5",
            "6",

            "7",
            "8",
            "9"
            };

// this is array holding codes for Black Remote when used with non-PCB version of receiver
 unsigned int blackRemote[] ={
            0xFF629D, // ^
            0xFF22DD,   // <
            0xFF02FD,  // OK
            0xFFC23D, // >
            0xFFA857, // v

            0xFF6897, // 1
            0xFF9867, // 2
            0xF0C41643, // 3

            0xFF30CF, // 4
            0xFF18E7, // 5
            0xFF7A85,  // 6

            0xFF10EF, // 7
            0xFF38C7, // 8
            0xFF5AA5,  // 9

            0xFF42BD, // *
            0xFF4AB5, // 0
            0xFF52AD  // #
            };

// this is array holding codes for Black Remote when used with PCB version of receiver
 unsigned int blackRemotePCB[] ={
            0x511DBB, // ^
            0x52A3D41F,   // <
            0xD7E84B1B,  // OK
            0x20FE4DBB, // >
            0xA3C8EDDB, // v


            0xC101E57B, // 1
            0x97483BFB, // 2
            0xF0C41643, // 3

            0x9716BE3F, // 4
            0x3D9AE3F7, // 5
            0x6182021B,  // 6

            0x8C22657B, // 7
            0x488F3CBB, // 8
            0x449E79F,  // 9

            0x32C6FDF7, // *
            0x1BC0157B, // 0
            0x3EC3FC1B  // #
            };

// Black remote key names
 String blackRemoteKey[] ={
            "^",
            "<",
            "OK",
            ">",
            "v",

            "1",
            "2",
            "3",

            "4",
            "5",
            "6",

            "7",
            "8",
            "9",

            "*",
            "0",
            "#"
            };

decode_results results;


/*
 * Permission granted to share this code given that this
 * note is kept with the code.
 * Disclaimer: this code is "AS IS" and for educational purposes only.
 *
 */

void setup() {
  // L293 Motor Control Code by Robojax.com 2018025
  Serial.begin(9600);// setup Serial Monitor to display information
  pinMode(P1A, OUTPUT);// define pin as OUTPUT for P1A
  pinMode(P2A, OUTPUT);// define pin as OUTPUT for P2A
  pinMode(EN12, OUTPUT);// define pin as OUTPUT for 1,2EN

  Serial.println("Robojax IR Decode");
  Serial.println("Motor Control with Remote");
  irrecv.enableIRIn(); // Start the receiver


  // L293 Motor Control Code by Robojax.com 20180810
}

void loop() {
  // L293d Motor Control Code with IR by Robojax.com 20180810

  if (irrecv.decode(&results)) {
    if(displayCode)Serial.println(results.value, HEX);
    robojaxValidateCode(results.value);// used the "robojaxValidateCode" bellow
    irrecv.resume(); // Receive the next value
  }
  delay(50);// 50 millisecond delay
  // L293d Motor Control Code with IR by Robojax.com 20180810
}//loop end


/*
 * function: robojaxValidateCode
 * validates the remote code and prints the correct key name
 * cd is the code passed from the loop
 * Written by A. S. for Robojax
 */
void robojaxValidateCode(int cd)
{

  // Robojax IR Remote decoder
  int found=0;

 if(type =='W' && !PCB)
 {
    // Robojax IR White Remote decoder
    // if type is set to 'W' (white remote) and PCB=0 then check White remote code
      for(int i=0; i< sizeof(whiteRemote)/sizeof(int); i++)
      {
        if(whiteRemote[i] ==cd)
        {

          Serial.print("Key pressed:");
          Serial.println(whiteRemoteKey[i]);
          motorAction(whiteRemoteKey[i]);// take action
          found=1;
        }// if matched
      }// for
 }else if(type =='W' && PCB){
    // Robojax IR White Remote decoder
    // if type is set to 'W' (white remote) and PCB=1 then check White remote code
      for(int i=0; i< sizeof(whiteRemotePCB)/sizeof(int); i++)
      {
        if(whiteRemotePCB[i] ==cd)
        {

          Serial.print("Key pressed:");
          Serial.println(whiteRemoteKey[i]);
          motorAction(whiteRemoteKey[i]);// take action
          found=1;
        }// if matched
      }// for
 }else if(type =='B' && PCB){
    // Robojax IR Black Remote decoder
       // if type is set to 'B' (black remote) and PCB=1 then check Black remote code
       for(int i=0; i< sizeof(blackRemotePCB)/sizeof(int); i++)
      {
        // Robojax IR black Remote decoder
        if(blackRemotePCB[i] ==cd)
        {

          Serial.print("Key pressed:");
          Serial.println(blackRemoteKey[i]);
         motorAction(blackRemoteKey[i]);// take action
          found=1;
        }// if matched
      }// for
 }else{

      // if type is set to 'B' (black remote) and PCB =0 then check Black remote code
       for(int i=0; i< sizeof(blackRemote)/sizeof(int); i++)
      {
        // Robojax IR black Remote decoder
        if(blackRemote[i] ==cd)
        {

          Serial.print("Key pressed:");
          Serial.println(blackRemoteKey[i]);
          motorAction(blackRemoteKey[i]);// take action

          found=1;
        }// if matched
      }// for
 }// else
  if(!found){
    if(cd !=0xFFFFFFFF)
      {
    Serial.println("Key unknown");
      }
  }// found
}// robojaxValidateCode end

/*
 *
 * motorAction()
 * receives string "value" as input and based on the settings,
 * turns motor CW, CCW or STOP
 */
void motorAction(String value)
{
  // Robojax IR motor control
   if(value == RIGHT)
   {
    L293D('R',1);// rotate motor to the right (CCW)
   }

   if(value == LEFT)
   {
    L293D('L',1);// rotate motor to the left (CW)
   }

   if(value == STOP)
   {
    L293D('R',0);// stop motor
   }
}//motorAction end


/*
 * L293D(char dir, int en)
 * dir is character either L for CW direction
 *  or R for CCW direction
 *  en is integer 1 to rotate, 0 for stop
 */
void L293D(char dir, int en)
{
  if(dir =='L')
  {
    if(en ==0){
       Serial.println("CW Motor Stopped");
    }else{
       Serial.println("Rotating CW");
    }
    digitalWrite(EN12 ,en);// Enable 1A and 2A
    digitalWrite(P1A,HIGH);// send + or HIGH signal to P1A
    digitalWrite(P2A,LOW);// send - or LOW signal to P2A

  }else{
    if(en ==0){
       Serial.println("CCW Motor Stopped");
    }else{
       Serial.println("Rotating CCW");
    }
    digitalWrite(EN12 ,en);// Disable 1A and 2A
    digitalWrite(P1A,LOW);// send + or HIGH signal to P1A
    digitalWrite(P2A,HIGH);// send - or LOW signal to P2A
  }
}//L293D end++
/*
* This is the Arduino code for L293d DC motor Driver
* watch LE18-D80NK video for details https://youtu.be/MrYsmAwzfrM
* Code is available at http://robojax.com/learn/arduino
*
* Written by Ahmad S. for Robojax.com on
* August 9, 2018 at 22:03 in Ajax, Ontario, Canada
*/
// DC motor 1 control
#define P1A 2 // define pin 2 as for P1A
#define P2A 7 // define pin 7 as for P2A
#define EN12 8 // define pin 8 as for 1,2EN enable
/*
* Permission granted to share this code given that this
* note is kept with the code.
* Disclaimer: this code is "AS IS" and for educational purposes only.
*
*/
void setup() {
// L293 Motor Control Code by Robojax.com 2018025
Serial.begin(9600);// setup Serial Monitor to display information
pinMode(P1A, OUTPUT);// define pin as OUTPUT for P1A
pinMode(P2A, OUTPUT);// define pin as OUTPUT for P2A
pinMode(EN12, OUTPUT);// define pin as OUTPUT for 1,2EN
// L293 Motor Control Code by Robojax.com 2018025
}
void loop() {
// L293 Motor Control Code by Robojax.com 2018025
L293D_con('L',1);
delay(4000);
L293D_con('L',0);
delay(2000);
L293D_con('R',1);
delay(4000);
L293D_con('R',0);
delay(2000);
Serial.println("=========== Loop done");
delay(500);
// L293 Motor Control Code by Robojax.com 2018025
}
void L293D_con(char dir, int en)
{
if(dir =='L')
{
if(en ==0){
Serial.println(" CW Motor Stopped");
}else{
Serial.println(" Rotating CW");
}
digitalWrite(EN12 ,en);// Enable 1A and 2A
digitalWrite(P1A,HIGH);// send + or HIGH signal to P1A
digitalWrite(P2A,LOW);// send - or LOW signal to P2A
}else{
if(en ==0){
Serial.println(" CCW Motor Stopped");
}else{
Serial.println(" Rotating CCW");
}
digitalWrite(EN12 ,en);// Disable 1A and 2A
digitalWrite(P1A,LOW);// send + or HIGH signal to P1A
digitalWrite(P2A,HIGH);// send - or LOW signal to P2A
}
}//L293D_con endSumber daya & referensi
-
EksternalDownload Library for Arduino (GitHub)github.com
Berkas📁
Lembar Data (pdf)
-
robojax_L293D_motor_shield_manual.pdf
robojax_L293D_motor_shield_manual.pdf0.16 MB -
L293d datasheet
L293d_datasheet.pdf0.34 MB