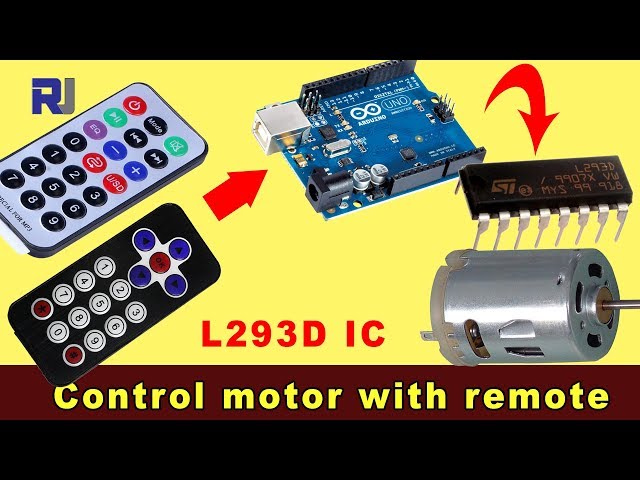
Steuerung eines DC Motors mit einer IR-Fernbedienung unter Verwendung von Arduino und L293D
Dieses Projekt zeigt, wie man die Richtung und Geschwindigkeit eines Gleichstrommotors mit einer Infrarotfernbedienung, einem Arduino Uno und einem L293D Motorsteuerchip steuern kann. Diese Anordnung ermöglicht eine präzise Kontrolle des Motors, was sie für eine Vielzahl von Anwendungen geeignet macht.
Dieses Projekt eröffnet eine Welt voller Möglichkeiten für Ihre DIY-Elektronikprojekte. Hier sind einige Ideen, um Ihnen den Einstieg zu erleichtern:
- Fernbedienter Roboter:Steuern Sie die Bewegung eines kleinen Roboters mit einer IR-Fernbedienung.
- Automatisches Vorhangsystem:Steuern Sie Vorhänge oder Jalousien aus der Ferne.
- Interaktive Kunstinstallationen:Erschaffen Sie dynamische Kunstwerke mit beweglichen Teilen, die von einer IR-Fernbedienung gesteuert werden.
- Schwenk- und Neigesystem:Steuern Sie die Schwenk- und Neigungsbewegung einer Kamera oder eines Sensors mit einer IR-Fernbedienung.
Hardware/Komponenten
- Arduino Uno
- L293D Motorsteuer-IC
- Gleichstrommotor
- IR-Fernbedienung und Empfänger
- Dioden (1N4001 x4)
- Verbindungsdrähte
- Stromversorgung (z.B. 9V-Batterie für den Motor)
Verdrahtungsanleitung
%%VERKABELUNG%%
(in Video um 02:14)
Der L293D-Chip erfordert Verbindungen sowohl zum Arduino als auch zu einer externen Stromversorgung für den Motor. Dioden werden zum Schutz gegen Rückspannungen verwendet. Der IR-Empfänger wird an die 5V- und GND-Pins des Arduinos angeschlossen, wobei der Signalpin mit dem digitalen Pin 11 verbunden ist (im Code konfigurierbar). Der Motor wird an die Ausgangspins des L293D angeschlossen, die vom Arduino gesteuert werden.
Code-Erklärung
(in Video um 07:30)
Der bereitgestellte Arduino-Code verwendet die IRremote-Bibliothek, um Signale von der IR-Fernbedienung zu decodieren. Die entscheidenden konfigurierbaren Parameter im Code umfassen:
const char type ='B';// W for white, B for black. Must keep single quotes like 'B' or 'W'
const boolean PCB = 0;// if receiver is PCB set to 1, if not set to 0. See video for details
Setzen Sie dietypevariable auf 'W' für eine weiße Fernbedienung oder 'B' für eine schwarze Fernbedienung (im Video um 07:41). DiePCBDie Variable sollte auf 1 gesetzt werden, wenn Ihr IR-Empfänger eine Platine hat, und auf 0, wenn es ein nacktes Modul ist (im Video bei 07:50).
const String RIGHT=">";// move motor to the right (CW) with this key on remote
const String LEFT ="<";// move motor to the left (CCW) with this key on remote
const String STOP ="OK";// stop motor with this key on remote
Diese Zeilen definieren die Bezeichnungen der IR-Fernbedienungstasten zur Steuerung des Motors. Stellen Sie sicher, dass diese mit den Beschriftungen auf Ihrer Fernbedienung übereinstimmen (im Video bei 08:12). Sie können diese anpassen, um andere Tasten auf Ihrer Fernbedienung zu verwenden.
#define P1A 2 // define pin 2 as for P1A
#define P2A 7 // define pin 7 as for P2A
#define EN12 8 // define pin 8 as for 1,2EN enable
int RECV_PIN = 11;
Diese Zeilen definieren die Arduino-Pins, die zur Steuerung des L293D-Motortreibers verwendet werden (im Video bei 09:52).P1AundP2Adie Richtung steuern, undEN12aktiviert den Motor.RECV_PINist der Pin verbunden mit dem Signal-Ausgang des IR-Empfängers (im Video bei 06:52). Ändern Sie diese, wenn Sie andere Pins verwenden.
Live-Projekt/Demonstration
(im Video um 14:15)
Das Video zeigt das Projekt in Aktion und veranschaulicht, wie der Gleichstrommotor auf die IR-Fernbedienungsbefehle reagiert. Die Demonstration zeigt, wie man die Drehung des Motors im Uhrzeigersinn und gegen den Uhrzeigersinn steuert und wie man den Motor mit verschiedenen Fernbedientasten stoppt.
Kapitel
- [00:00] Einführung und Projektübersicht
- Projektkomponenten und -voraussetzungen
- [02:14] Verkabelungserklärung
- [07:30] Code-Erklärung und Konfiguration
- [14:15] Projektvorführung mit schwarzem Remote und PCB
- [16:04] Demonstration mit Silver Remote und PCB
- [17:42] Demonstration mit Silver Remote und Bare Module
- Demonstration mit schwarzer Fernbedienung und barem Modul
/*
 * Original Infrared library from - http://arcfn.com
 *
 * This is Arduino code for the L293D DC motor driver.
 * It uses an IR remote control to rotate the DC motor clockwise (CW), counter-clockwise (CCW), and stop it.
 * Watch instructions for this video: https://youtu.be/e0pvfJbdw_o
 * To get the library and files related to this code, visit http://robojax.com/learn/arduino
 // Written for Robojax.com video

 * Code is available at http://robojax.com/learn/arduino

 *
 // Written by Ahmad S. for Robojax.com on
// August 10, 2018 at 22:03 in Ajax, Ontario, Canada
    This program is free software: you can redistribute it and/or modify
    it under the terms of the GNU General Public License as published by
    the Free Software Foundation, either version 3 of the License, or
    (at your option) any later version.

    This program is distributed in the hope that it will be useful,
    but WITHOUT ANY WARRANTY; without even the implied warranty of
    MERCHANTABILITY or FITNESS FOR A PARTICULAR PURPOSE.  See the
    GNU General Public License for more details.

    You should have received a copy of the GNU General Public License
    along with this program.  If not, see <https://www.gnu.org/licenses/>.
*/
// DC motor control
#define P1A 2 // define pin 2 as for P1A
#define P2A 7 // define pin 7 as for P2A
#define EN12 8 // define pin 8 as for 1,2EN enable

// remote settings start
#include <IRremote.h>

int RECV_PIN = 11;
const char type ='B';// W for white, B for black. Must keep single quotes like 'B' or 'W'
const boolean PCB = 0;// if receiver is PCB set to 1, if not set to 0. See video for details
boolean displayCode = false;// to display remote code. if not, set to false

// IR remote settings
const String RIGHT=">";// move motor to the right (CW) with this key on remote
const String LEFT ="<";// move motor to the left (CCW) with this key on remote
const String STOP ="OK";// stop motor with this key on remote
// remote settings end

IRrecv irrecv(RECV_PIN);

// this is array holding codes for White Remote when used with PCB version of receiver
unsigned int whiteRemotePCB[] ={
            0xE318261B, // CH-
            0x511DBB,   // CH
            0xEE886D7F,  // CH+

            0x52A3D41F, // |<<
            0xD7E84B1B, // >>|
            0x20FE4DBB, // >||

            0xF076C13B, // -
            0xA3C8EDDB, // +
            0x12CEA6E6, // EQ

            0xC101E57B, // 0
            0x97483BFB, // 100+
            0xF0C41643, // 200+

            0x9716BE3F, // 1
            0x3D9AE3F7, // 2
            0x6182021B, // 3

            0x8C22657B, // 4
            0x488F3CBB, // 5
            0x449E79F,  // 6

            0x32C6FDF7, // 7
            0x1BC0157B, // 8
            0x3EC3FC1B  // 9
            };

// this is array holding codes for White Remote when used with non-PCB version of receiver
unsigned int whiteRemote[] ={
            0xFFA25D, // CH-
            0xFF629D,   // CH
            0xFFE21D,  // CH+

            0xFF22DD, // |<<
            0xFF02FD, // >>|
            0xFFC23D, // >||

            0xFFE01F, // -
            0xFFA857, // +
            0xFF906F, // EQ

            0xFF6897, // 0
            0xFF9867, // 100+
            0xFFB04F, // 200+

            0xFF30CF, // 1
            0xFF18E7, // 2
            0xFF7A85, // 3

            0xFF10EF, // 4
            0xFF38C7, // 5
            0xFF5AA5,  // 6

            0xFF42BD, // 7
            0xFF4AB5, // 8
            0xFF52AD  // 9
            };
// key lables of white remote
 String whiteRemoteKey[] ={
            "CH-",
            "CH",
            "CH+",

            "|<<",
            ">>|",
            ">||",

            "-",
            "+",
            "EQ",

            "0",
            "100+",
            "200+",

            "1",
            "2",
            "3",

            "4",
            "5",
            "6",

            "7",
            "8",
            "9"
            };

// this is array holding codes for Black Remote when used with non-PCB version of receiver
 unsigned int blackRemote[] ={
            0xFF629D, // ^
            0xFF22DD,   // <
            0xFF02FD,  // OK
            0xFFC23D, // >
            0xFFA857, // v

            0xFF6897, // 1
            0xFF9867, // 2
            0xF0C41643, // 3

            0xFF30CF, // 4
            0xFF18E7, // 5
            0xFF7A85,  // 6

            0xFF10EF, // 7
            0xFF38C7, // 8
            0xFF5AA5,  // 9

            0xFF42BD, // *
            0xFF4AB5, // 0
            0xFF52AD  // #
            };

// this is array holding codes for Black Remote when used with PCB version of receiver
 unsigned int blackRemotePCB[] ={
            0x511DBB, // ^
            0x52A3D41F,   // <
            0xD7E84B1B,  // OK
            0x20FE4DBB, // >
            0xA3C8EDDB, // v


            0xC101E57B, // 1
            0x97483BFB, // 2
            0xF0C41643, // 3

            0x9716BE3F, // 4
            0x3D9AE3F7, // 5
            0x6182021B,  // 6

            0x8C22657B, // 7
            0x488F3CBB, // 8
            0x449E79F,  // 9

            0x32C6FDF7, // *
            0x1BC0157B, // 0
            0x3EC3FC1B  // #
            };

// Black remote key names
 String blackRemoteKey[] ={
            "^",
            "<",
            "OK",
            ">",
            "v",

            "1",
            "2",
            "3",

            "4",
            "5",
            "6",

            "7",
            "8",
            "9",

            "*",
            "0",
            "#"
            };

decode_results results;


/*
 * Permission granted to share this code given that this
 * note is kept with the code.
 * Disclaimer: this code is "AS IS" and for educational purposes only.
 *
 */

void setup() {
  // L293 Motor Control Code by Robojax.com 2018025
  Serial.begin(9600);// setup Serial Monitor to display information
  pinMode(P1A, OUTPUT);// define pin as OUTPUT for P1A
  pinMode(P2A, OUTPUT);// define pin as OUTPUT for P2A
  pinMode(EN12, OUTPUT);// define pin as OUTPUT for 1,2EN

  Serial.println("Robojax IR Decode");
  Serial.println("Motor Control with Remote");
  irrecv.enableIRIn(); // Start the receiver


  // L293 Motor Control Code by Robojax.com 20180810
}

void loop() {
  // L293d Motor Control Code with IR by Robojax.com 20180810

  if (irrecv.decode(&results)) {
    if(displayCode)Serial.println(results.value, HEX);
    robojaxValidateCode(results.value);// used the "robojaxValidateCode" bellow
    irrecv.resume(); // Receive the next value
  }
  delay(50);// 50 millisecond delay
  // L293d Motor Control Code with IR by Robojax.com 20180810
}//loop end


/*
 * function: robojaxValidateCode
 * validates the remote code and prints the correct key name
 * cd is the code passed from the loop
 * Written by A. S. for Robojax
 */
void robojaxValidateCode(int cd)
{

  // Robojax IR Remote decoder
  int found=0;

 if(type =='W' && !PCB)
 {
    // Robojax IR White Remote decoder
    // if type is set to 'W' (white remote) and PCB=0 then check White remote code
      for(int i=0; i< sizeof(whiteRemote)/sizeof(int); i++)
      {
        if(whiteRemote[i] ==cd)
        {

          Serial.print("Key pressed:");
          Serial.println(whiteRemoteKey[i]);
          motorAction(whiteRemoteKey[i]);// take action
          found=1;
        }// if matched
      }// for
 }else if(type =='W' && PCB){
    // Robojax IR White Remote decoder
    // if type is set to 'W' (white remote) and PCB=1 then check White remote code
      for(int i=0; i< sizeof(whiteRemotePCB)/sizeof(int); i++)
      {
        if(whiteRemotePCB[i] ==cd)
        {

          Serial.print("Key pressed:");
          Serial.println(whiteRemoteKey[i]);
          motorAction(whiteRemoteKey[i]);// take action
          found=1;
        }// if matched
      }// for
 }else if(type =='B' && PCB){
    // Robojax IR Black Remote decoder
       // if type is set to 'B' (black remote) and PCB=1 then check Black remote code
       for(int i=0; i< sizeof(blackRemotePCB)/sizeof(int); i++)
      {
        // Robojax IR black Remote decoder
        if(blackRemotePCB[i] ==cd)
        {

          Serial.print("Key pressed:");
          Serial.println(blackRemoteKey[i]);
         motorAction(blackRemoteKey[i]);// take action
          found=1;
        }// if matched
      }// for
 }else{

      // if type is set to 'B' (black remote) and PCB =0 then check Black remote code
       for(int i=0; i< sizeof(blackRemote)/sizeof(int); i++)
      {
        // Robojax IR black Remote decoder
        if(blackRemote[i] ==cd)
        {

          Serial.print("Key pressed:");
          Serial.println(blackRemoteKey[i]);
          motorAction(blackRemoteKey[i]);// take action

          found=1;
        }// if matched
      }// for
 }// else
  if(!found){
    if(cd !=0xFFFFFFFF)
      {
    Serial.println("Key unknown");
      }
  }// found
}// robojaxValidateCode end

/*
 *
 * motorAction()
 * receives string "value" as input and based on the settings,
 * turns motor CW, CCW or STOP
 */
void motorAction(String value)
{
  // Robojax IR motor control
   if(value == RIGHT)
   {
    L293D('R',1);// rotate motor to the right (CCW)
   }

   if(value == LEFT)
   {
    L293D('L',1);// rotate motor to the left (CW)
   }

   if(value == STOP)
   {
    L293D('R',0);// stop motor
   }
}//motorAction end


/*
 * L293D(char dir, int en)
 * dir is character either L for CW direction
 *  or R for CCW direction
 *  en is integer 1 to rotate, 0 for stop
 */
void L293D(char dir, int en)
{
  if(dir =='L')
  {
    if(en ==0){
       Serial.println("CW Motor Stopped");
    }else{
       Serial.println("Rotating CW");
    }
    digitalWrite(EN12 ,en);// Enable 1A and 2A
    digitalWrite(P1A,HIGH);// send + or HIGH signal to P1A
    digitalWrite(P2A,LOW);// send - or LOW signal to P2A

  }else{
    if(en ==0){
       Serial.println("CCW Motor Stopped");
    }else{
       Serial.println("Rotating CCW");
    }
    digitalWrite(EN12 ,en);// Disable 1A and 2A
    digitalWrite(P1A,LOW);// send + or HIGH signal to P1A
    digitalWrite(P2A,HIGH);// send - or LOW signal to P2A
  }
}//L293D end++
/*
* This is the Arduino code for L293d DC motor Driver
* watch LE18-D80NK video for details https://youtu.be/MrYsmAwzfrM
* Code is available at http://robojax.com/learn/arduino
*
* Written by Ahmad S. for Robojax.com on
* August 9, 2018 at 22:03 in Ajax, Ontario, Canada
*/
// DC motor 1 control
#define P1A 2 // define pin 2 as for P1A
#define P2A 7 // define pin 7 as for P2A
#define EN12 8 // define pin 8 as for 1,2EN enable
/*
* Permission granted to share this code given that this
* note is kept with the code.
* Disclaimer: this code is "AS IS" and for educational purposes only.
*
*/
void setup() {
// L293 Motor Control Code by Robojax.com 2018025
Serial.begin(9600);// setup Serial Monitor to display information
pinMode(P1A, OUTPUT);// define pin as OUTPUT for P1A
pinMode(P2A, OUTPUT);// define pin as OUTPUT for P2A
pinMode(EN12, OUTPUT);// define pin as OUTPUT for 1,2EN
// L293 Motor Control Code by Robojax.com 2018025
}
void loop() {
// L293 Motor Control Code by Robojax.com 2018025
L293D_con('L',1);
delay(4000);
L293D_con('L',0);
delay(2000);
L293D_con('R',1);
delay(4000);
L293D_con('R',0);
delay(2000);
Serial.println("=========== Loop done");
delay(500);
// L293 Motor Control Code by Robojax.com 2018025
}
void L293D_con(char dir, int en)
{
if(dir =='L')
{
if(en ==0){
Serial.println(" CW Motor Stopped");
}else{
Serial.println(" Rotating CW");
}
digitalWrite(EN12 ,en);// Enable 1A and 2A
digitalWrite(P1A,HIGH);// send + or HIGH signal to P1A
digitalWrite(P2A,LOW);// send - or LOW signal to P2A
}else{
if(en ==0){
Serial.println(" CCW Motor Stopped");
}else{
Serial.println(" Rotating CCW");
}
digitalWrite(EN12 ,en);// Disable 1A and 2A
digitalWrite(P1A,LOW);// send + or HIGH signal to P1A
digitalWrite(P2A,HIGH);// send - or LOW signal to P2A
}
}//L293D_con endRessourcen & Referenzen
-
Extern
Dateien📁
Keine Dateien verfügbar.