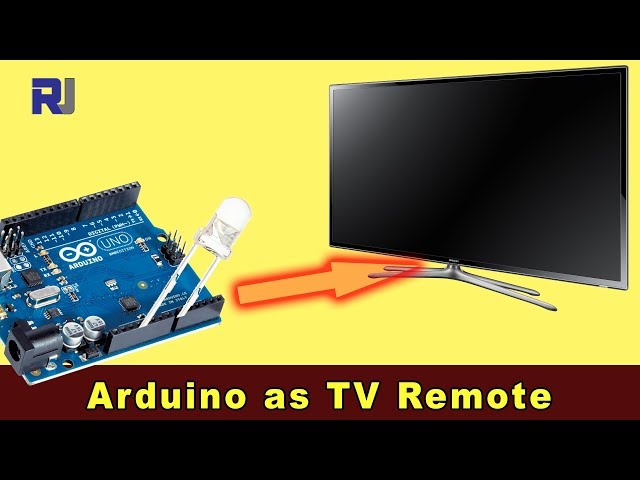
Cómo usar un Arduino como control remoto de TV
Esta guía demuestra cómo transformar un Arduino en un control remoto universal para tu televisor, reproductor de Blu-ray u otros dispositivos controlados por infrarrojos. Aprenderás a decodificar señales de cualquier control remoto y luego transmitir esos códigos utilizando un Arduino y un LED infrarrojo. Esto abre un mundo de posibilidades de automatización, desde un control simple de encendido/apagado hasta secuencias complejas que involucran múltiples dispositivos.

Aquí tienes algunas ideas de proyectos para que empieces:
- Crea un sistema programado para encender/apagar la televisión.
- Integra el control de tu televisor en un sistema de hogar inteligente.
- Crea un control remoto personalizado con funciones únicas.
- Controla tu sistema de entretenimiento con comandos de voz a través de un asistente de voz basado en Arduino.
Hardware/Componentes
- Arduino Uno (o placa compatible)
- Módulo receptor de infrarrojos (IR) (por ejemplo, TSOP1738, VS1838B)
- LED infrarrojo (IR) (por ejemplo, longitud de onda de 940 nm)
- Resistor (270-330 ohm para el LED IR)
- Cables de conexión
- Placa de pruebas (opcional)
Guía de Cableado
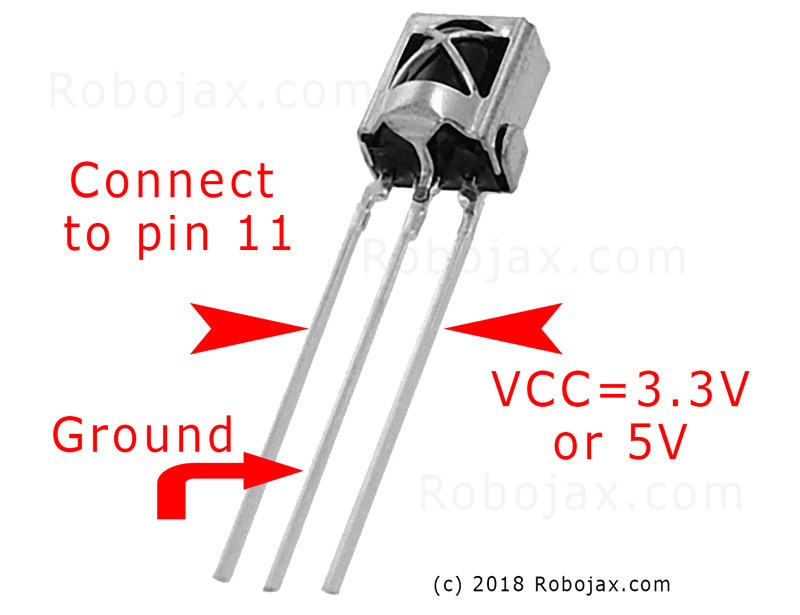
Conecta el módulo receptor IR de la siguiente manera (en el video a las 02:45):
- VCC a Arduino 5V
- GND a GND de Arduino
- Pin de señal al pin 11 de Arduino (se puede cambiar en el código)
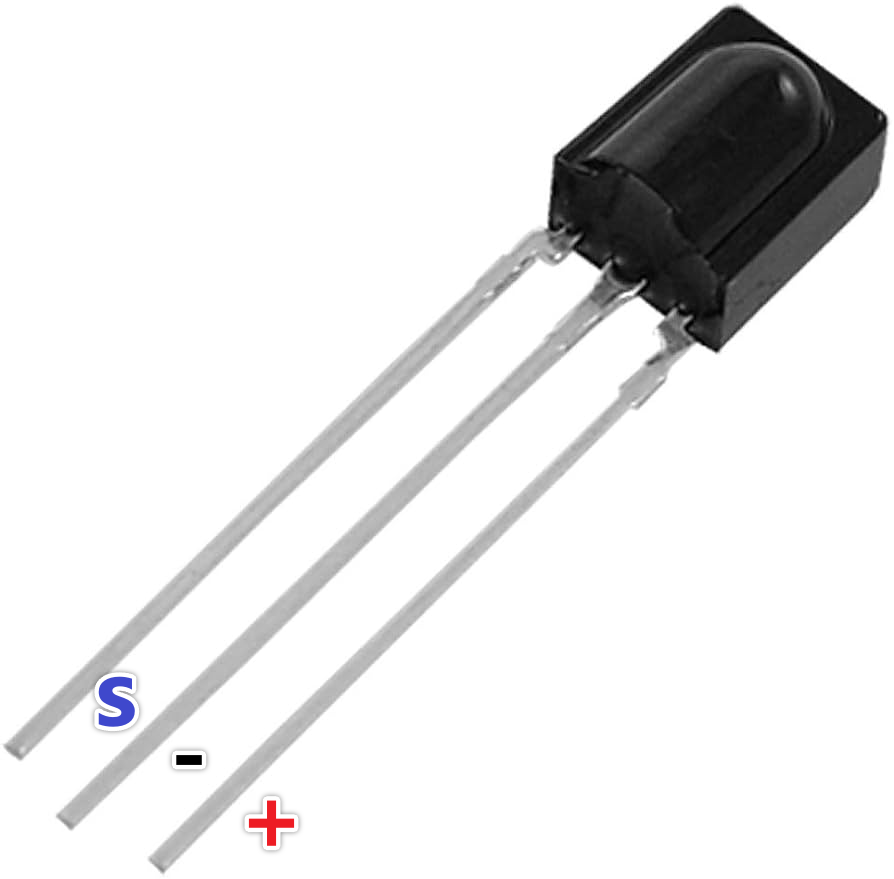
Conecta el LED IR de la siguiente manera (en el video a las :02:07):
- Un pin LED al pin 3 de Arduino (a través de una resistencia de 270-330 ohmios)
- Otro pin LED a GND de Arduino
El resistor limita la corriente al LED IR, protegiéndolo de daños (en el video a las 03:37).
Explicación del código
Primero, instala la biblioteca IRremote (en el video a las 04:16). Esta biblioteca maneja las complejidades de enviar y recibir señales infrarrojas. Puedes encontrarla en el Administrador de bibliotecas de Arduino.
Los fragmentos de código proporcionados son para referencia. La biblioteca IRremote incluye código de ejemplo para recibir y enviar señales IR. Los ejemplos se pueden encontrar en el IDE de Arduino: Archivo > Ejemplos > IRremote.
Código de Recepción
Este fragmento de código configura el receptor en el pin 11 (en el video a las 04:50). Modifica elRECV_PINsi estás usando un pin diferente.
#include
int RECV_PIN = 11;
IRrecv irrecv(RECV_PIN);
decode_results results;
Enviando código
Este código envía el código IR en crudo capturado. Elrawel arreglo almacena los tiempos de señal, y38representa la frecuencia (en kHz). Necesitarás reemplazar los datos de ejemplo con el código capturado de tu remoto (en el video a las 05:26).
irsend.sendRaw(raw, sizeof(raw) / sizeof(raw[0]), 38);
Lasizeof(raw) / sizeof(raw[0])calcula el número de elementos en elrawarray (en el video a las 06:18).
Proyecto en vivo/Demostración
El video demuestra cómo capturar el código del botón de encendido de un control remoto de Samsung y luego usar el Arduino para encender y apagar el televisor (en el video a las 08:29). El proceso implica capturar el código utilizando el sketch de recepción y luego pegar ese código en el sketch de envío. La demostración muestra cómo el Arduino imita exitosamente el control remoto original.
Capítulos
- [00:00] Introducción y resumen del proyecto
- [00:41] Comprendiendo el control remoto por infrarrojos
- [02:07] Componentes de hardware y cableado
- [04:16] Instalando la biblioteca IRremote
- [05:26] Enviando señales IR con Arduino
- [06:46] Probando la transmisión IR
- [08:29] Demostración en vivo con un televisor Samsung
- [09:27] Expansión del proyecto y más ideas
Imágenes


#include <IRremote.h>
// Sketch from:
//https://gist.github.com/probonopd/5793692#file-sendandreceive-ino

// http://www.pjrc.com/teensy/td_libs_IRremote.html
// If one keypress results in multiple codes being output, then
// change in IRremoteInt.h:
// #define _GAP 50000
// Provided by Robojax.com on August 4, 2018
// Watch video instructions for this code:https://youtu.be/xA66hXYRx9I

int RECV_PIN = 11;
IRrecv irrecv(RECV_PIN);
decode_results results;

// Compare two tick values, returning 0 if newval is shorter,
// 1 if newval is equal, and 2 if newval is longer.
// Use a tolerance of 20%
int compare(unsigned int oldval, unsigned int newval) {
  if (newval < oldval * .8) {
    return 0;
  }
  else if (oldval < newval * .8) {
    return 2;
  }
  else {
    return 1;
  }
}

// Use FNV hash algorithm: http://isthe.com/chongo/tech/comp/fnv/#FNV-param
#define FNV_PRIME_32 16777619
#define FNV_BASIS_32 2166136261

/* Converts the raw code values into a 32-bit hash code.
 * Hopefully this code is unique for each button.
 */
unsigned long decodeHash(decode_results *results) {
  unsigned long hash = FNV_BASIS_32;
  for (int i = 1; i+2 < results->rawlen; i++) {
    int value =  compare(results->rawbuf[i], results->rawbuf[i+2]);
    // Add value into the hash
    hash = (hash * FNV_PRIME_32) ^ value;
  }
  return hash;
}

void setup()
{
  Serial.begin(9600);
  Serial.println("Robojax IR Capture");
  irrecv.enableIRIn(); // Start the receiver
}

int c = 1;

void dump(decode_results *results) {
  int count = results->rawlen;
  Serial.println(c);
  c++;
  Serial.println("Hash: ");
  unsigned long hash = decodeHash(results);
  Serial.println(hash, HEX);
  Serial.println("For IR Scope/IrScrutinizer: ");
  for (int i = 1; i < count; i++) {

    if ((i % 2) == 1) {
      Serial.print("+");
      Serial.print(results->rawbuf[i]*USECPERTICK, DEC);
    }
    else {
      Serial.print(-(int)results->rawbuf[i]*USECPERTICK, DEC);
    }
    Serial.print(" ");
  }
  Serial.println("-127976");
  Serial.println("For Arduino sketch: ");
  Serial.print("unsigned int raw[");
  Serial.print(count, DEC);
  Serial.print("] = {");
  for (int i = 1; i < count; i++) {

    if ((i % 2) == 1) {
      Serial.print(results->rawbuf[i]*USECPERTICK, DEC);
    }
    else {
      Serial.print((int)results->rawbuf[i]*USECPERTICK, DEC);
    }
    Serial.print(",");
  }
  Serial.print("};");
  Serial.println("");
  Serial.print("irsend.sendRaw(raw,");
  Serial.print(count, DEC);
  Serial.print(",38);");
  Serial.println("");
  Serial.println("");
}


#include <avr/interrupt.h>
#include <stdio.h>
#include <avr/pgmspace.h>
#include <stdint.h>
#include <avr/io.h>
#define IR_PORT PORTB
// #define IR_PIN PINB
// #define IR_DDR DDRB
// #define IR_BV _BV(1)
#define IR_OCR OCR1A
#define IR_TCCRnA TCCR1A
#define IR_TCCRnB TCCR1B
#define IR_TCNTn TCNT1
#define IR_TIFRn TIFR1
#define IR_TIMSKn TIMSK1
#define IR_TOIEn TOIE1
#define IR_ICRn ICR1
#define IR_OCRn OCR1A
#define IR_COMn0 COM1A0
#define IR_COMn1 COM1A1
#define PRONTO_IR_SOURCE 0 // Pronto code byte 0
#define PRONTO_FREQ_CODE 1 // Pronto code byte 1
#define PRONTO_SEQUENCE1_LENGTH 2 // Pronto code byte 2
#define PRONTO_SEQUENCE2_LENGTH 3 // Pronto code byte 3
#define PRONTO_CODE_START 4 // Pronto code byte 4

static const uint16_t *ir_code = NULL;
static uint16_t ir_cycle_count = 0;
static uint32_t ir_total_cycle_count = 0;
static uint8_t ir_seq_index = 0;
static uint8_t ir_led_state = 0;

void ir_on()
{
  IR_TCCRnA |= (1<<IR_COMn1) + (1<<IR_COMn0);
  ir_led_state = 1;
}

void ir_off()
{
  IR_TCCRnA &= ((~(1<<IR_COMn1)) & (~(1<<IR_COMn0)) );
  ir_led_state = 0;
}

void ir_toggle()
{
  if (ir_led_state)
    ir_off();
  else
    ir_on();
}

void ir_start(uint16_t *code)
{
  ir_code = code;
  // IR_PORT &= ~IR_BV; // Turn output off (atmega328 only)
  digitalWrite(9,LOW); // Turn output off
  // IR_DDR |= IR_BV; // Set it as output (atmega328 only)
  pinMode(9,OUTPUT); // Set it as output
  IR_TCCRnA = 0x00; // Reset the pwm
  IR_TCCRnB = 0x00;
  //printf_P(PSTR("FREQ CODE: %hd\r\n"), code[PRONTO_FREQ_CODE]);
  uint16_t top = ( (F_CPU/1000000.0) * code[PRONTO_FREQ_CODE] * 0.241246 ) - 1;
  //printf_P(PSTR("top: %hu\n\r"), top);
  IR_ICRn = top;
  IR_OCRn = top >> 1;
  IR_TCCRnA = (1<<WGM11);
  IR_TCCRnB = (1<<WGM13) | (1<<WGM12);
  IR_TCNTn = 0x0000;
  IR_TIFRn = 0x00;
  IR_TIMSKn = 1 << IR_TOIEn;
  ir_seq_index = PRONTO_CODE_START;
  ir_cycle_count = 0;
  ir_on();
  IR_TCCRnB |= (1<<CS10);
}

#define TOTAL_CYCLES 80000 // Turns off after this number of
// cycles. About 2 seconds.
// FIXME: Turn off after having sent all data
ISR(TIMER1_OVF_vect) {
  uint16_t sequenceIndexEnd;
  uint16_t repeatSequenceIndexStart;
  ir_total_cycle_count++;
  ir_cycle_count++;

  if (ir_cycle_count== ir_code[ir_seq_index]) {
    ir_toggle();
    ir_cycle_count = 0;
    ir_seq_index++;
    sequenceIndexEnd = PRONTO_CODE_START +
      (ir_code[PRONTO_SEQUENCE1_LENGTH]<<1) +
      (ir_code[PRONTO_SEQUENCE2_LENGTH]<<1);

    repeatSequenceIndexStart = PRONTO_CODE_START +
      (ir_code[PRONTO_SEQUENCE1_LENGTH]<<1);

    if (ir_seq_index >= sequenceIndexEnd ) {
      ir_seq_index = repeatSequenceIndexStart;

      if(ir_total_cycle_count>TOTAL_CYCLES) {
        ir_off();
        TCCR1B &= ~(1<<CS10);
      }
    }
  }
}

void ir_stop()
{
  IR_TCCRnA = 0x00; // Reset the pwm
  IR_TCCRnB = 0x00;
}

const uint16_t inputLength = 512;


void loop() {
  if (irrecv.decode(&results)) {
    dump(&results);
    irrecv.resume(); // Receive the next value
  }

  if ( Serial.available() > 0 )
  {
    static char input[inputLength];
    static uint16_t i;
    char c = Serial.read();

    if ( c != '\r' && c != '\n' && i < inputLength-1)
      input[i++] = c;

    else
    {
      input[i] = '\0';
      i = 0;

      uint16_t array[80];
      uint16_t j = 0;

      if ( !strncmp(input, "SEND", 4) )
      {
        char* p = input+4;

        while ( (p = strchr(p, ' ')) != NULL )
          array[j++] = strtol(p, &p, 16);

        ir_start(array);
        Serial.print("SENT ");
        for ( uint8_t i = 0; i < j; i++ )
        {
          Serial.print ("0x");
          Serial.print (array[i], HEX);
          Serial.print(" ");
        }


        Serial.println();
      }
    }
  }
}
Cosas que podrías necesitar
-
Amazonas
-
eBay
Recursos y referencias
-
Externo
Archivos📁
No hay archivos disponibles.