چگونه از آردوینو به عنوان کنترل از راه دور تلویزیون استفاده کنیم
این راهنما نشان میدهد که چگونه یک آردوینو را به یک کنترل از راه دور یونیورسال برای تلویزیون، پخش کننده بلورای شما یا سایر دستگاههای کنترل شده با مادون قرمز تبدیل کنید. شما یاد خواهید گرفت که سیگنالها را از هر کنترل از راه دور رمزگشایی کنید و سپس آن کدها را با استفاده از آردوینو و یک LED مادون قرمز منتقل کنید. این امکان را برای شما فراهم میکند که به دنیای امکانات اتوماسیون دست پیدا کنید، از کنترل ساده روشن/خاموش تا توالیهای پیچیده شامل چندین دستگاه.

اینجا چند ایده پروژه برای شروع به شما ارائه میشود:
- یک سیستم زمانبندی شده روشن/خاموش تلویزیون ایجاد کنید.
- کنترل تلویزیون خود را به یک سیستم خانه هوشمند ادغام کنید.
- یک کنترل از راه دور سفارشی با عملکردهای منحصر به فرد بسازید.
- سیستم سرگرمی خود را با دستورات صوتی از طریق یک دستیار صوتی مبتنی بر آردوینو کنترل کنید.
سختافزار/قطعات
- آردوینو یونو (یا برد سازگار)
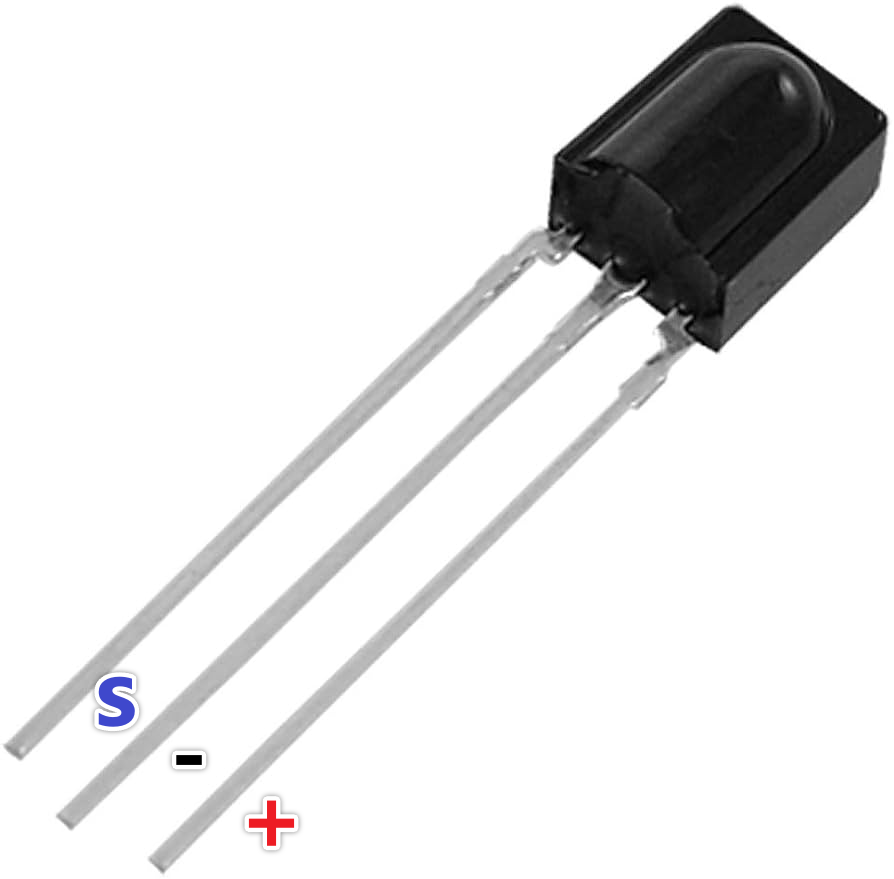
- ماجیول گیرنده مادون قرمز (به عنوان مثال، TSOP1738، VS1838B)
- LED مادون قرمز (IR) (به عنوان مثال، طول موج 940 نانومتر)
- مقاوم (۲۷۰-۳۳۰ اهم برای LED مادون قرمز)
- سیمهای رابط
- بورد آزمایش (اختیاری)
راهنمای سیمکشی
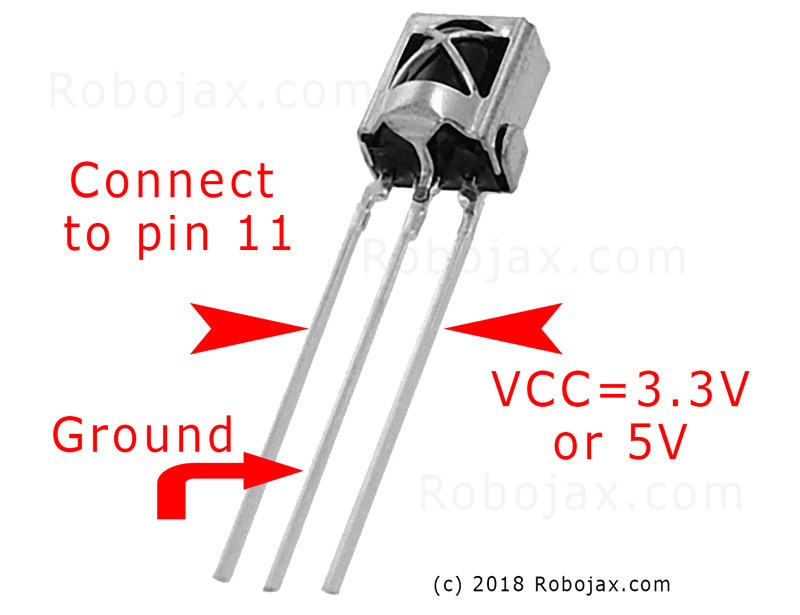
ماجیول گیرنده IR را به شرح زیر متصل کنید (در ویدئو در ۰۲:۴۵):
- VCC به ۵ ولت آردوینو
- GND به GND آردوینو
- پایه سیگنال به پایه ۱۱ آردوینو (قابل تغییر در شِفر (کود))
LED IR را به صورت زیر وصل کنید (در ویدیو در ۰۲:۰۷):
- یک پایه LED به پایه 3 آردوینو (از طریق یک مقاومت 270-330 اهم)
- پایه دیگر LED به GND آردوینو
مقاومت جریان را به LED مادون قرمز محدود میکند و از آسیب آن محافظت میکند (در ویدیو در 03:37).
توضیحات شِفر (کود)
ابتدا کتابخانه IRremote را نصب کنید (در ویدیو در 04:16). این کتابخانه جزئیات ارسال و دریافت سیگنالهای مادون قرمز را مدیریت میکند. شما میتوانید آن را در مدیر کتابخانه آردوینو پیدا کنید.
کدهای ارائه شده برای مرجع هستند. کتابخانه IRremote شامل شِفر (کود) نمونه برای دریافت و ارسال سیگنالهای IR میباشد. نمونهها را میتوان در IDE آردوینو پیدا کرد: فایل > نمونهها > IRremote.
شِفر (کود) دریافت
این قطعه شِفر (کود) دریافتکننده را بر روی پایه 11 تنظیم میکند (در ویدیو در 04:50). تغییر دهیدRECV_PINاگر شما از پایه متفاوتی استفاده میکنید.
#include
int RECV_PIN = 11;
IRrecv irrecv(RECV_PIN);
decode_results results;
ارسال شِفر (کود)
این شِفر (کود) شِفر (کود) خام IR ضبط شده را ارسال میکند.rawآرایه زمانبندی سیگنالها را ذخیره میکند و38فرکانس (به کلوهرتز) را نشان میدهد. شما باید دادههای نمونه را با کدی که از کنترل از راه دور خود ضبط کردهاید جایگزین کنید (در ویدیو در 05:26).
irsend.sendRaw(raw, sizeof(raw) / sizeof(raw[0]), 38);
متن:sizeof(raw) / sizeof(raw[0])تعداد عناصر موجود در را محاسبه میکندrawآرایه (در ویدیو در ساعت ۰۶:۱۸).
پروژه/نمایش زنده
این ویدئو نحوه ضبط شِفر (کود) دکمه پاور از ریموت تلویزیون سامسونگ و سپس استفاده از آردوینو برای روشن و خاموش کردن تلویزیون (در ویدئو در 08:29) را نشان میدهد. این فرآیند شامل ضبط شِفر (کود) با استفاده از اسکریپت دریافت و سپس چسباندن آن شِفر (کود) به اسکریپت ارسال است. این نمایش نشان میدهد که چگونه آردوینو با موفقیت ریموت اصلی را شبیهسازی میکند.
فصلها
- [00:00] مقدمه و مرور کلی پروژه
- [00:41] درک کنترل از راه دور مادون قرمز
- قطعات سختافزاری و سیمکشی
- [04:16] نصب کتابخانه IRremote
- ارسال سیگنالهای IR با آردوینو
- [06:46] آزمایش انتقال مادون قرمز
- [08:29] نمایش زنده با تلویزیون سامسونگ
- [09:27] گسترش پروژه و ایدههای بیشتر
تصاویر


This code has not been parsed yet. Please return to the admin panel to parse it.مواردی که ممکن است به آنها نیاز داشته باشید
-
آمازون
-
ایبی
منابع و مراجع
فایلها📁
هیچ فایلی موجود نیست.