本教程是的一部分: 伺服电机
这里列出了所有与伺服电机相关的视频。其他视频的链接在本文下方。
使用红外遥控器和Arduino控制伺服电机
```html
使用红外遥控器和Arduino控制伺服电机
该项目展示了如何使用红外(IR)遥控器和Arduino控制伺服电机。该设置允许无线控制伺服电机的位置,适用于各种应用。

这里有一些使用这个设置的项目想法:
- 远程调整相机的平移和俯仰。
- 控制机器人手臂的运动。
- 自动化窗帘或窗帘。
- 创作互动艺术装置。
- 建造一辆遥控车或车辆。
硬件/组件
- Arduino 板(例如,Uno,Nano)
- 伺服电机
- 红外遥控器(任何标准遥控器均可使用,但代码已为特定遥控器配置)
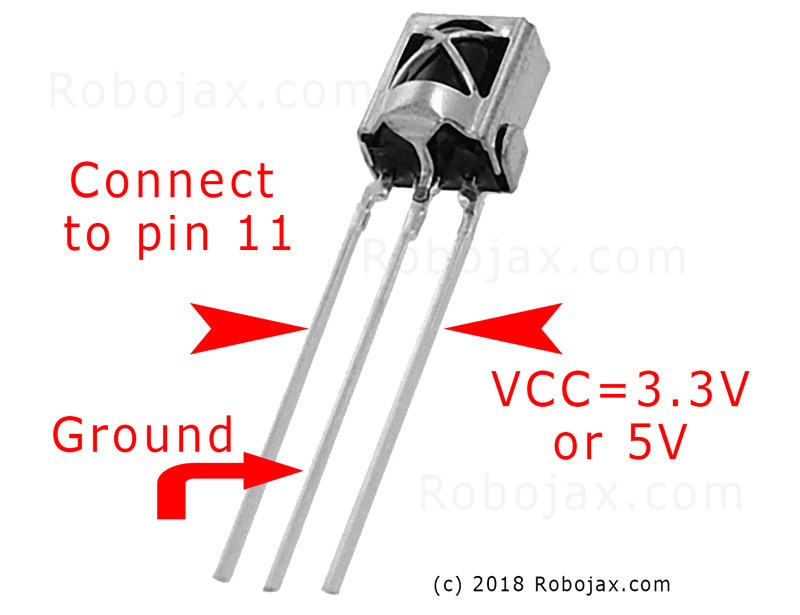
- 红外接收模块(例如,TSOP1838)
- 跳线
- 面包板(可选)
接线指南
伺服电机有三根线:接地(通常是棕色或黑色)、电源(通常是红色)和信号(通常是橙色或白色)。红外接收器也有三根线:接地、电源(VCC)和信号。
(in video at 01:46)

- 舵机接地到Arduino接地
- 伺服电源至Arduino 5V
- 伺服信号到Arduino Pin 8(视频中在02:23)
- 红外接收器地线连接到Arduino地线
- 红外接收器VCC连接到Arduino 5V
- 红外接收器信号传输到 Arduino 引脚 11(视频中在 02:38)
代码解释
代码首先包含用于红外通信和伺服控制的必要库。(视频中在03:16)
#include <IRremote.h>
#include <Servo.h>
接下来,定义必要的变量。您需要根据您的特定设置来配置这些变量。(视频中 03:44)
const char type = 'B'; // 'W' for white remote, 'B' for black remote
const boolean PCB = 0; // 1 if the IR receiver has a PCB, 0 if it's a bare module
const int SERVO_PIN = 8; // The pin connected to the servo's signal wire
int angleStep = 10; // How many degrees the servo moves per button press
const int ANGLE_CENTRE = 90; // The center/reset position of the servo
(视频中在 05:06)
最重要的配置步骤是将遥控器按钮与特定操作匹配。代码包括不同遥控器类型(白色/黑色,PCB/非PCB)及其相应的按钮代码的数组。您需要识别您遥控器的正确代码并将其分配给所需操作(右、左、中)。 (视频中在 05:16)
const String RIGHT = ">"; // Replace with the code for your "right" button
const String LEFT = "<"; // Replace with the code for your "left" button
const String CENTRE = "OK"; // Replace with the code for your "center" button
(视频中于08:12)
翻servoAction()该函数根据接收到的红外信号控制伺服电机的运动。它检查收到的命令,并相应调整伺服角度。angleStep变量控制伺服器位置的增减。(在视频中时间为08:06)
实时项目/演示
(视频中在 09:56)
该视频演示了如何使用不同的遥控器控制舵机。它展示了如何调整代码以适应各种遥控器类型和接收模块。演示还涵盖了如何从自己的遥控器捕捉红外代码并将其集成到代码中。(视频时间:12:48)
章节
- [00:00] 引言和项目概述
- [00:36] 组件和材料
- 接线说明
- [03:16] 代码解释
- [09:56] 项目演示
- 使用您自己的远程设备
```
本教程是……的一部分: 伺服电机
- Controlling a Servo with Push Buttons Using Arduino
- Control a Servo Motor with a Push Button: Move Servo and Return SPB-1
- Control a Servo Motor with a Push Button: Move Servo in One Direction SPB-2
- Controlling a Servo Motor with a Push Button: Move Servo While Button Is Pressed (SPB-3)
- Controlling a Servo with a Potentiometer Using Arduino
- Controlling a Servo with Potentiometer and LCD1602 using Arduino
- 使用电位器控制Arduino伺服电机
- 通过手势控制Arduino的伺服位置
- Controlling Two or More Servos with Potentiometers Using an Arduino
- How to Control a 360° Servo with Three Push-Button Switches
- How to Use Continuous 360° Servo with Arduino
- PCA9685 16通道12位伺服控制器V1的Arduino代码和视频
- Build an Arduino Servo Toggle Switch with a Push Button
/*
* Original library from - http://arcfn.com
*
* This Arduino code controls a servo motor with an IR remote controller or any TV remote.
*
* You have to select the type of your remote as Black or White in the code below
* and also select your receiver 1838 as either a PCB or bare module. See video for details.
*
* You have to watch this video: https://youtu.be/muAkBQb24NI
* before proceeding with this code.
*
* Modified/Written by Ahmad Shamshiri
* on August 02, 2018 at 20:35 in Ajax, Ontario, Canada
* for Robojax.com
* Watch video instructions for this code: https://youtu.be/Wp7hX9UErSQ
* Get other Arduino codes from Robojax.com
*
*/
#include <IRremote.h>
int RECV_PIN = 11;
const char type ='B';// W for white, B for black. Must keep single quotes like 'B' or 'W'
const boolean PCB = 0;// if receiver is PCB set to 1, if not set to 0. See video for details
boolean displayCode = true;// to display remote code. if not, set to false
//***** Servo settings begins
#include <Servo.h>
Servo RJservo; // create servo object to control a servo
const int SERVO_PIN = 8; // analog pin used to connect the potentiometer
int angle =90; // initial angle for servo
int angleStep =10;
const int ANGLE_CENTRE =90;// the centre/reset angle of your servo
//**** Servo settings ends
// remote settings
const String RIGHT=">";// move servo to the right with this key on remote
const String LEFT ="<";// move servo to the left with this key on remote
const String CENTRE ="OK";// move servo to centre with this key on remote
// remote settings end
IRrecv irrecv(RECV_PIN);
// this is array holding codes for White Remote when used with PCB version of receiver
unsigned int whiteRemotePCB[] ={
0xE318261B, // CH-
0x511DBB, // CH
0xEE886D7F, // CH+
0x52A3D41F, // |<<
0xD7E84B1B, // >>|
0x20FE4DBB, // >||
0xF076C13B, // -
0xA3C8EDDB, // +
0x12CEA6E6, // EQ
0xC101E57B, // 0
0x97483BFB, // 100+
0xF0C41643, // 200+
0x9716BE3F, // 1
0x3D9AE3F7, // 2
0x6182021B, // 3
0x8C22657B, // 4
0x488F3CBB, // 5
0x449E79F, // 6
0x32C6FDF7, // 7
0x1BC0157B, // 8
0x3EC3FC1B // 9
};
// this is array holding codes for White Remote when used with non-PCB version of receiver
unsigned int whiteRemote[] ={
0xFFA25D, // CH-
0xFF629D, // CH
0xFFE21D, // CH+
0xFF22DD, // |<<
0xFF02FD, // >>|
0xFFC23D, // >||
0xFFE01F, // -
0xFFA857, // +
0xFF906F, // EQ
0xFF6897, // 0
0xFF9867, // 100+
0xFFB04F, // 200+
0xFF30CF, // 1
0xFF18E7, // 2
0xFF7A85, // 3
0xFF10EF, // 4
0xFF38C7, // 5
0xFF5AA5, // 6
0xFF42BD, // 7
0xFF4AB5, // 8
0xFF52AD // 9
};
// key lables of white remote
String whiteRemoteKey[] ={
"CH-",
"CH",
"CH+",
"|<<",
">>|",
">||",
"-",
"+",
"EQ",
"0",
"100+",
"200+",
"1",
"2",
"3",
"4",
"5",
"6",
"7",
"8",
"9"
};
// this is array holding codes for Black Remote when used with non-PCB version of receiver
unsigned int blackRemote[] ={
0xFF629D, // ^
0xFF22DD, // <
0xFF02FD, // OK
0xFFC23D, // >
0xFFA857, // v
0xFF6897, // 1
0xFF9867, // 2
0xF0C41643, // 3
0xFF30CF, // 4
0xFF18E7, // 5
0xFF7A85, // 6
0xFF10EF, // 7
0xFF38C7, // 8
0xFF5AA5, // 9
0xFF42BD, // *
0xFF4AB5, // 0
0xFF52AD // #
};
// this is array holding codes for Black Remote when used with PCB version of receiver
unsigned int blackRemotePCB[] ={
0x511DBB, // ^
0x52A3D41F, // <
0xD7E84B1B, // OK
0x20FE4DBB, // >
0xA3C8EDDB, // v
0xC101E57B, // 1
0x97483BFB, // 2
0xF0C41643, // 3
0x9716BE3F, // 4
0x3D9AE3F7, // 5
0x6182021B, // 6
0x8C22657B, // 7
0x488F3CBB, // 8
0x449E79F, // 9
0x32C6FDF7, // *
0x1BC0157B, // 0
0x3EC3FC1B // #
};
// Black remote key names
String blackRemoteKey[] ={
"^",
"<",
"OK",
">",
"v",
"1",
"2",
"3",
"4",
"5",
"6",
"7",
"8",
"9",
"*",
"0",
"#"
};
decode_results results;
void setup()
{
Serial.begin(9600);
// In case the interrupt driver crashes on setup, give a clue
// to the user what's going on.
Serial.println("Robojax IR Decode");
Serial.println("Servo Control with Remote");
irrecv.enableIRIn(); // Start the receiver
RJservo.attach(SERVO_PIN); // attaches the servo on pin servoPin to the servo object
}
void loop() {
if (irrecv.decode(&results)) {
if(displayCode)Serial.println(results.value, HEX);
robojaxValidateCode(results.value);// used the "robojaxValidateCode" bellow
irrecv.resume(); // Receive the next value
}
delay(50);// 50 millisecond delay
}
/*
* function: robojaxValidateCode
* validates the remote code and prints the correct key name.
* cd is the code passed from the loop.
* Written by A. S. for Robojax
*/
void robojaxValidateCode(int cd)
{
// Robojax IR Remote decoder
int found=0;
if(type =='W' && !PCB)
{
// Robojax IR White Remote decoder
// if type is set to 'W' (white remote) and PCB=0 then check White remote code
for(int i=0; i< sizeof(whiteRemote)/sizeof(int); i++)
{
if(whiteRemote[i] ==cd)
{
Serial.print("Key pressed:");
Serial.println(whiteRemoteKey[i]);
servoAction(whiteRemoteKey[i]);// take action
found=1;
}// if matched
}// for
}else if(type =='W' && PCB){
// Robojax IR White Remote decoder
// if type is set to 'W' (white remote) and PCB=1 then check White remote code
for(int i=0; i< sizeof(whiteRemotePCB)/sizeof(int); i++)
{
if(whiteRemotePCB[i] ==cd)
{
Serial.print("Key pressed:");
Serial.println(whiteRemoteKey[i]);
servoAction(whiteRemoteKey[i]);// take action
found=1;
}// if matched
}// for
}else if(type =='B' && PCB){
// Robojax IR Black Remote decoder
// if type is set to 'B' (black remote) and PCB=1 then check Black remote code
for(int i=0; i< sizeof(blackRemotePCB)/sizeof(int); i++)
{
// Robojax IR black Remote decoder
if(blackRemotePCB[i] ==cd)
{
Serial.print("Key pressed:");
Serial.println(blackRemoteKey[i]);
servoAction(blackRemoteKey[i]);// take action
found=1;
}// if matched
}// for
}else{
// if type is set to 'B' (black remote) and PCB =0 then check Black remote code
for(int i=0; i< sizeof(blackRemote)/sizeof(int); i++)
{
// Robojax IR black Remote decoder
if(blackRemote[i] ==cd)
{
Serial.print("Key pressed:");
Serial.println(blackRemoteKey[i]);
servoAction(blackRemoteKey[i]);// take action
found=1;
}// if matched
}// for
}// else
if(!found){
if(cd !=0xFFFFFFFF)
{
Serial.println("Key unknown");
}
}// found
}// robojaxValidateCode end
/*
*
* servoAction()
* receives string "value" as input and based on the settings,
* sends translates it to servo value and controls servo, either by:
* rotating servo to the right
* rotating servo to the left
* moving the servo to the middle
*
*/
void servoAction(String value)
{
// Servo button demo with IR remote by Robojax.com
while(value == RIGHT){
if (angle > 0 && angle <= 180) {
angle = angle - angleStep;
if(angle < 0){
angle = 0;
}else{
RJservo.write(angle); // move the servo to desired angle
Serial.print("Moved to: ");
Serial.print(angle); // print the angle
Serial.println(" degree");
}
}// if
value =".";
delay(100);
}// while for RIGHT
while(value == LEFT){
// Servo button demo with IR remote by Robojax.com
if (angle >= 0 && angle <= 180) {
angle = angle + angleStep;
if(angle >180){
angle =180;
}else{
RJservo.write(angle); // move the servo to desired angle
Serial.print("Moved to: ");
Serial.print(angle); // print the angle
Serial.println(" degree");
}
}
value =".";
delay(100);
}// while for LEFT
if(value == CENTRE)
{
angle = ANGLE_CENTRE;
RJservo.write(angle); // move the servo to centre at 90 degree angle
}
// Robojax IR Servo control
}//servoAction end
|||您可能需要的东西
-
亚马逊从亚马逊购买红外遥控器amzn.to
-
易趣从eBay购买红外遥控器ebay.us
资源与参考
尚无可用资源。
文件📁
没有可用的文件。