บทเรียนนี้เป็นส่วนหนึ่งของ: มอเตอร์เซอร์โว
วิดีโอทั้งหมดที่เกี่ยวข้องกับมอเตอร์เซอร์โว แสดงไว้ที่นี่ ลิงก์ไปยังวิดีโออื่นๆ อยู่ด้านล่างบทความนี้
การควบคุมเซอร์โวมอเตอร์โดยใช้รีโมทอินฟราเรดร่วมกับอาร์ดูอิโน
```html
การควบคุมมอเตอร์เซอร์โวด้วยรีโมทอินฟราเรดและ Arduino
โปรเจกต์นี้สาธิตวิธีการควบคุมมอเตอร์เซอร์โวโดยใช้รีโมทอินฟราเรด (IR) และ Arduino การตั้งค่านี้ช่วยให้สามารถควบคุมตำแหน่งของเซอร์โวแบบไร้สาย ซึ่งเหมาะสำหรับการใช้งานต่างๆ มากมาย


นี่คือแนวคิดโปรเจกต์บางส่วนที่ใช้การตั้งค่านี้:
- ปรับการแพนและเอียงของกล้องจากระยะไกล
- ควบคุมการเคลื่อนไหวของแขนหุ่นยนต์
- ควบคุมมู่ลี่หรือผ้าม่านอัตโนมัติ
- สร้างงานศิลปะแบบอินเทอร์แอคทีฟ
- สร้างรถหรือยานพาหนะที่ควบคุมระยะไกล
ฮาร์ดแวร์/อุปกรณ์
- บอร์ด Arduino (เช่น Uno, Nano)
- มอเตอร์เซอร์โว
- รีโมทอินฟราเรด (รีโมทมาตรฐานใดๆ ก็ใช้งานได้ แต่โค้ดถูกตั้งค่าสำหรับรีโมทเฉพาะ)
- โมดูลตัวรับสัญญาณ IR (เช่น TSOP1838)
- สายจัมเปอร์
- เบรดบอร์ด (ไม่จำเป็น)
คู่มือการเดินสายไฟ
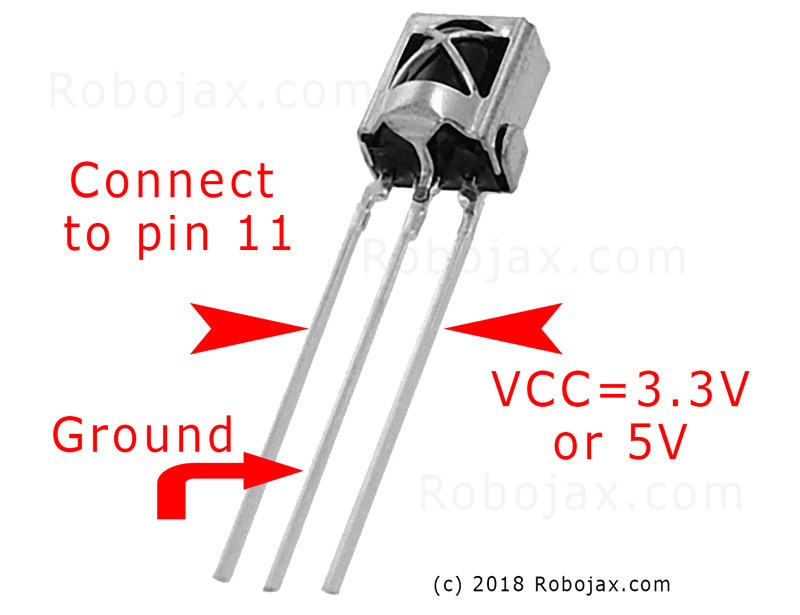
มอเตอร์เซอร์โวมีสายสามเส้น: กราวด์ (โดยปกติเป็นสีน้ำตาลหรือสีดำ), ไฟเลี้ยง (โดยทั่วไปเป็นสีแดง), และสัญญาณ (มักเป็นสีส้มหรือสีขาว) ตัวรับสัญญาณ IR ก็มีสามสายเช่นกัน: กราวด์, ไฟเลี้ยง (VCC), และสัญญาณ
(ในวิดีโอที่ 01:46)

- กราวด์ของเซอร์โวไปยังกราวด์ของ Arduino
- ไฟเลี้ยงของเซอร์โวไปยัง 5V ของ Arduino
- สัญญาณของเซอร์โวไปยังพิน 8 ของ Arduino (ในวิดีโอที่ 02:23)
- กราวด์ของตัวรับสัญญาณ IR ไปยังกราวด์ของ Arduino
- VCC ของตัวรับสัญญาณ IR ไปยัง 5V ของ Arduino
- สัญญาณของตัวรับสัญญาณ IR ไปยังพิน 11 ของ Arduino (ในวิดีโอที่ 02:38)
คำอธิบายโค้ด
โค้ดเริ่มต้นด้วยการรวมไลบรารีที่จำเป็นสำหรับการสื่อสาร IR และการควบคุมเซอร์โว (ในวิดีโอที่ 03:16)
#include <IRremote.h>
#include <Servo.h>
ถัดไป มีการกำหนดตัวแปรที่จำเป็น คุณจะต้องกำหนดค่าตามการตั้งค่าของคุณ (ในวิดีโอที่ 03:44)
const char type = 'B'; // 'W' สำหรับรีโมทสีขาว, 'B' สำหรับรีโมทสีดำ
const boolean PCB = 0;   // 1 ถ้าตัวรับสัญญาณ IR มี PCB, 0 ถ้าเป็นโมดูลเปล่า
const int SERVO_PIN = 8; // พินที่เชื่อมต่อกับสายสัญญาณของเซอร์โว
int angleStep = 10;      // จำนวนองศาที่เซอร์โวเคลื่อนที่ต่อการกดปุ่มหนึ่งครั้ง
const int ANGLE_CENTRE = 90; // ตำแหน่งศูนย์กลาง/รีเซ็ตของเซอร์โว
(ในวิดีโอที่ 05:06)
ขั้นตอนการกำหนดค่าที่สำคัญที่สุดคือการจับคู่ปุ่มรีโมทกับการทำงานเฉพาะ โค้ดมีอาร์เรย์สำหรับรีโมทประเภทต่างๆ (ขาว/ดำ, มี PCB/ไม่มี PCB) และรหัสปุ่มที่เกี่ยวข้อง คุณจะต้องระบุรหัสที่ถูกต้องสำหรับรีโมทของคุณและกำหนดให้กับการทำงานที่ต้องการ (ขวา, ซ้าย, ศูนย์กลาง) (ในวิดีโอที่ 05:16)
const String RIGHT = ">"; // แทนที่ด้วยรหัสสำหรับปุ่ม "ขวา" ของคุณ
const String LEFT = "<";  // แทนที่ด้วยรหัสสำหรับปุ่ม "ซ้าย" ของคุณ
const String CENTRE = "OK"; // แทนที่ด้วยรหัสสำหรับปุ่ม "ศูนย์กลาง" ของคุณ
(ในวิดีโอที่ 08:12)
ฟังก์ชัน servoAction() จัดการการเคลื่อนที่ของเซอร์โวตามสัญญาณ IR ที่ได้รับ โดยจะตรวจสอบคำสั่งที่ได้รับและปรับมุมของเซอร์โวตามนั้น ตัวแปร angleStep ควบคุมการเพิ่มหรือลดตำแหน่งของเซอร์โว (ในวิดีโอที่ 08:06)
โปรเจกต์/การสาธิตสด
(ในวิดีโอที่ 09:56)
วิดีโอสาธิตวิธีการควบคุมเซอร์โวโดยใช้รีโมทต่างๆ โดยแสดงวิธีการปรับโค้ดสำหรับรีโมทและโมดูลตัวรับสัญญาณประเภทต่างๆ การสาธิตยังครอบคลุมถึงวิธีการจับรหัส IR จากรีโมทของคุณเองและรวมเข้ากับโค้ด (ในวิดีโอที่ 12:48)
บทต่างๆ
- [00:00] บทนำและภาพรวมโปรเจกต์
- [00:36] อุปกรณ์และวัสดุ
- [01:46] คำแนะนำการเดินสายไฟ
- [03:16] คำอธิบายโค้ด
- [09:56] การสาธิตโปรเจกต์
- [12:48] การใช้รีโมทของคุณเอง
```
ภาพ
บทเรียนนี้เป็นส่วนหนึ่งของ: มอเตอร์เซอร์โว
- ควบคุมเซอร์โวด้วยปุ่มกดโดยใช้ Arduino
- Control a Servo Motor with a Push Button: Move Servo and Return SPB-1
- Control a Servo Motor with a Push Button: Move Servo in One Direction SPB-2
- Controlling a Servo Motor with a Push Button: Move Servo While Button Is Pressed (SPB-3)
- ควบคุมเซอร์โวด้วยโพเทนชิโอมิเตอร์โดยใช้ Arduino
- ควบคุมเซอร์โวด้วยโพเทนชิโอมิเตอร์และLCD1602 โดยใช้ Arduino
- การควบคุมมอเตอร์เซอร์โว Arduino โดยใช้พอเทนชิโอมิเตอร์
- ควบคุมตำแหน่งเซอร์โวด้วยท่าทางมือสำหรับ Arduino
- Controlling Two or More Servos with Potentiometers Using an Arduino
- How to Control a 360° Servo with Three Push-Button Switches
- วิธีใช้เซอร์โวหมุนต่อเนื่อง 360° กับ Arduino
- โค้ด Arduino และวิดีโอสำหรับ PCA9685 ตัวควบคุมเซอร์โว 16 ช่อง 12 บิต V1
- สร้างสวิตช์สลับเซอร์โว Arduino ด้วยปุ่มกด
/*
 * Original library from - http://arcfn.com
 *
 * This Arduino code controls a servo motor with an IR remote controller or any TV remote.
 *
 * You have to select the type of your remote as Black or White in the code below
 * and also select your receiver 1838 as either a PCB or bare module. See video for details.
 *
 * You have to watch this video: https://youtu.be/muAkBQb24NI
 * before proceeding with this code.
 *
 * Modified/Written by Ahmad Shamshiri
 * on August 02, 2018 at 20:35 in Ajax, Ontario, Canada
 * for Robojax.com
 * Watch video instructions for this code: https://youtu.be/Wp7hX9UErSQ
 * Get other Arduino codes from Robojax.com
 *
 */

#include <IRremote.h>

int RECV_PIN = 11;
const char type ='B';// W for white, B for black. Must keep single quotes like 'B' or 'W'
const boolean PCB = 0;// if receiver is PCB set to 1, if not set to 0. See video for details
boolean displayCode = true;// to display remote code. if not, set to false

//***** Servo settings begins
#include <Servo.h>
Servo RJservo;  // create servo object to control a servo
const int SERVO_PIN = 8;  // analog pin used to connect the potentiometer
int angle =90;    // initial angle  for servo
int angleStep =10;
const int ANGLE_CENTRE =90;// the centre/reset angle of your servo
//**** Servo settings ends

// remote settings
const String RIGHT=">";// move servo to the right with this key on remote
const String LEFT ="<";// move servo to the left with this key on remote
const String CENTRE ="OK";// move servo to centre with this key on remote
// remote settings end

IRrecv irrecv(RECV_PIN);

// this is array holding codes for White Remote when used with PCB version of receiver
unsigned int whiteRemotePCB[] ={
            0xE318261B, // CH-
            0x511DBB,   // CH
            0xEE886D7F,  // CH+

            0x52A3D41F, // |<<
            0xD7E84B1B, // >>|
            0x20FE4DBB, // >||

            0xF076C13B, // -
            0xA3C8EDDB, // +
            0x12CEA6E6, // EQ

            0xC101E57B, // 0
            0x97483BFB, // 100+
            0xF0C41643, // 200+

            0x9716BE3F, // 1
            0x3D9AE3F7, // 2
            0x6182021B, // 3

            0x8C22657B, // 4
            0x488F3CBB, // 5
            0x449E79F,  // 6

            0x32C6FDF7, // 7
            0x1BC0157B, // 8
            0x3EC3FC1B  // 9
            };

// this is array holding codes for White Remote when used with non-PCB version of receiver
unsigned int whiteRemote[] ={
            0xFFA25D, // CH-
            0xFF629D,   // CH
            0xFFE21D,  // CH+

            0xFF22DD, // |<<
            0xFF02FD, // >>|
            0xFFC23D, // >||

            0xFFE01F, // -
            0xFFA857, // +
            0xFF906F, // EQ

            0xFF6897, // 0
            0xFF9867, // 100+
            0xFFB04F, // 200+

            0xFF30CF, // 1
            0xFF18E7, // 2
            0xFF7A85, // 3

            0xFF10EF, // 4
            0xFF38C7, // 5
            0xFF5AA5,  // 6

            0xFF42BD, // 7
            0xFF4AB5, // 8
            0xFF52AD  // 9
            };
// key lables of white remote
 String whiteRemoteKey[] ={
            "CH-",
            "CH",
            "CH+",

            "|<<",
            ">>|",
            ">||",

            "-",
            "+",
            "EQ",

            "0",
            "100+",
            "200+",

            "1",
            "2",
            "3",

            "4",
            "5",
            "6",

            "7",
            "8",
            "9"
            };

// this is array holding codes for Black Remote when used with non-PCB version of receiver
 unsigned int blackRemote[] ={
            0xFF629D, // ^
            0xFF22DD,   // <
            0xFF02FD,  // OK
            0xFFC23D, // >
            0xFFA857, // v

            0xFF6897, // 1
            0xFF9867, // 2
            0xF0C41643, // 3

            0xFF30CF, // 4
            0xFF18E7, // 5
            0xFF7A85,  // 6

            0xFF10EF, // 7
            0xFF38C7, // 8
            0xFF5AA5,  // 9

            0xFF42BD, // *
            0xFF4AB5, // 0
            0xFF52AD  // #
            };

// this is array holding codes for Black Remote when used with PCB version of receiver
 unsigned int blackRemotePCB[] ={
            0x511DBB, // ^
            0x52A3D41F,   // <
            0xD7E84B1B,  // OK
            0x20FE4DBB, // >
            0xA3C8EDDB, // v


            0xC101E57B, // 1
            0x97483BFB, // 2
            0xF0C41643, // 3

            0x9716BE3F, // 4
            0x3D9AE3F7, // 5
            0x6182021B,  // 6

            0x8C22657B, // 7
            0x488F3CBB, // 8
            0x449E79F,  // 9

            0x32C6FDF7, // *
            0x1BC0157B, // 0
            0x3EC3FC1B  // #
            };

// Black remote key names
 String blackRemoteKey[] ={
            "^",
            "<",
            "OK",
            ">",
            "v",

            "1",
            "2",
            "3",

            "4",
            "5",
            "6",

            "7",
            "8",
            "9",

            "*",
            "0",
            "#"
            };

decode_results results;


void setup()
{
  Serial.begin(9600);
  // In case the interrupt driver crashes on setup, give a clue
  // to the user what's going on.
  Serial.println("Robojax IR Decode");
  Serial.println("Servo Control with Remote");
  irrecv.enableIRIn(); // Start the receiver

   RJservo.attach(SERVO_PIN);  // attaches the servo on pin servoPin to the servo object

}

void loop() {

  if (irrecv.decode(&results)) {
    if(displayCode)Serial.println(results.value, HEX);
    robojaxValidateCode(results.value);// used the "robojaxValidateCode" bellow
    irrecv.resume(); // Receive the next value
  }
  delay(50);// 50 millisecond delay
}

/*
 * function: robojaxValidateCode
 * validates the remote code and prints the correct key name.
 * cd is the code passed from the loop.
 * Written by A. S. for Robojax
 */
void robojaxValidateCode(int cd)
{

  // Robojax IR Remote decoder
  int found=0;

 if(type =='W' && !PCB)
 {
    // Robojax IR White Remote decoder
    // if type is set to 'W' (white remote) and PCB=0 then check White remote code
      for(int i=0; i< sizeof(whiteRemote)/sizeof(int); i++)
      {
        if(whiteRemote[i] ==cd)
        {

          Serial.print("Key pressed:");
          Serial.println(whiteRemoteKey[i]);
          servoAction(whiteRemoteKey[i]);// take action
          found=1;
        }// if matched
      }// for
 }else if(type =='W' && PCB){
    // Robojax IR White Remote decoder
    // if type is set to 'W' (white remote) and PCB=1 then check White remote code
      for(int i=0; i< sizeof(whiteRemotePCB)/sizeof(int); i++)
      {
        if(whiteRemotePCB[i] ==cd)
        {

          Serial.print("Key pressed:");
          Serial.println(whiteRemoteKey[i]);
          servoAction(whiteRemoteKey[i]);// take action
          found=1;
        }// if matched
      }// for
 }else if(type =='B' && PCB){
    // Robojax IR Black Remote decoder
       // if type is set to 'B' (black remote) and PCB=1 then check Black remote code
       for(int i=0; i< sizeof(blackRemotePCB)/sizeof(int); i++)
      {
        // Robojax IR black Remote decoder
        if(blackRemotePCB[i] ==cd)
        {

          Serial.print("Key pressed:");
          Serial.println(blackRemoteKey[i]);
         servoAction(blackRemoteKey[i]);// take action
          found=1;
        }// if matched
      }// for
 }else{

      // if type is set to 'B' (black remote) and PCB =0 then check Black remote code
       for(int i=0; i< sizeof(blackRemote)/sizeof(int); i++)
      {
        // Robojax IR black Remote decoder
        if(blackRemote[i] ==cd)
        {

          Serial.print("Key pressed:");
          Serial.println(blackRemoteKey[i]);
          servoAction(blackRemoteKey[i]);// take action

          found=1;
        }// if matched
      }// for
 }// else
  if(!found){
    if(cd !=0xFFFFFFFF)
      {
    Serial.println("Key unknown");
      }
  }// found
}// robojaxValidateCode end

/*
 *
 * servoAction()
 * receives string "value" as input and based on the settings,
 * sends translates it to servo value and controls servo, either by:
 * rotating servo to the right
 * rotating servo to the left
 * moving the servo to the middle
 *
 */
void servoAction(String value)
{
  // Servo button demo with IR remote by Robojax.com
  while(value == RIGHT){

    if (angle > 0 && angle <= 180) {
      angle = angle - angleStep;
       if(angle < 0){
        angle = 0;
       }else{
      RJservo.write(angle); // move the servo to desired angle
      Serial.print("Moved to: ");
      Serial.print(angle);   // print the angle
      Serial.println(" degree");
       }
    }// if
    value =".";
    delay(100);
  }// while for RIGHT
  while(value == LEFT){

    // Servo button demo with IR remote by Robojax.com
    if (angle >= 0 && angle <= 180) {
      angle = angle + angleStep;
      if(angle >180){
        angle =180;
       }else{
      RJservo.write(angle); // move the servo to desired angle
      Serial.print("Moved to: ");
      Serial.print(angle);   // print the angle
      Serial.println(" degree");
       }
    }
    value =".";
    delay(100);
  }// while for LEFT

  if(value == CENTRE)
  {
    angle = ANGLE_CENTRE;
    RJservo.write(angle); // move the servo to centre at 90 degree angle
  }
    // Robojax IR Servo control
}//servoAction end
สิ่งที่คุณอาจต้องการ
-
อเมซอน
-
อีเบย์
แหล่งข้อมูลและเอกสารอ้างอิง
ยังไม่มีทรัพยากรเลย
ไฟล์📁
ไม่มีไฟล์ที่พร้อมใช้งาน