இந்த பயிற்சி பகுதியாகும்: சர்வோ மோட்டார்ஸ்
சர்வோ மோட்டார்கள் தொடர்பான அனைத்து வீடியோக்களும் இங்கே பட்டியலிடப்பட்டுள்ளன. மற்ற வீடியோக்களுக்கான இணைப்புகள் இந்தக் கட்டுரையின் கீழே உள்ளன.
இன்ஃப்ராரெட் ரிமோட் மூலம் ஆர்டுயினோவைப் பயன்படுத்தி சர்வோ மோட்டார்களைக் கட்டுப்படுத்துதல்
```htmlஅகச்சிவப்பு ரிமோட் மற்றும் Arduino மூலம் சர்வோ மோட்டார்களை கட்டுப்படுத்துதல்
இந்த திட்டம் ஒரு அகச்சிவப்பு (IR) ரிமோட் மற்றும் Arduino ஐப் பயன்படுத்தி ஒரு சர்வோ மோட்டாரை எவ்வாறு கட்டுப்படுத்துவது என்பதை நிரூபிக்கிறது. இந்த அமைப்பு சர்வோவின் நிலையை வயர்லெஸ் முறையில் கட்டுப்படுத்த அனுமதிக்கிறது, இது பல்வேறு பயன்பாடுகளுக்கு ஏற்றதாக அமைகிறது.


இந்த அமைப்பைப் பயன்படுத்தி சில திட்ட யோசனைகள் இங்கே:
- கேமராவின் பேன் மற்றும் டில்ட்டை தொலைவிலிருந்து சரிசெய்தல்.
- ரோபோ கையின் இயக்கங்களை கட்டுப்படுத்துதல்.
- ஜன்னல் திரைச்சீலைகள் அல்லது திரைச்சீலைகளை தானியக்கமாக்குதல்.
- ஊடாடும் கலை நிறுவல்களை உருவாக்குதல்.
- ரிமோட் கண்ட்ரோல் கார் அல்லது வாகனத்தை உருவாக்குதல்.
வன்பொருள்/கூறுகள்
- Arduino போர்டு (எ.கா., Uno, Nano)
- சர்வோ மோட்டார்
- IR ரிமோட் கண்ட்ரோல் (எந்த நிலையான ரிமோட் வேலை செய்யும், ஆனால் குறியீடு குறிப்பிட்ட ரிமோட்களுக்காக உள்ளமைக்கப்பட்டுள்ளது)
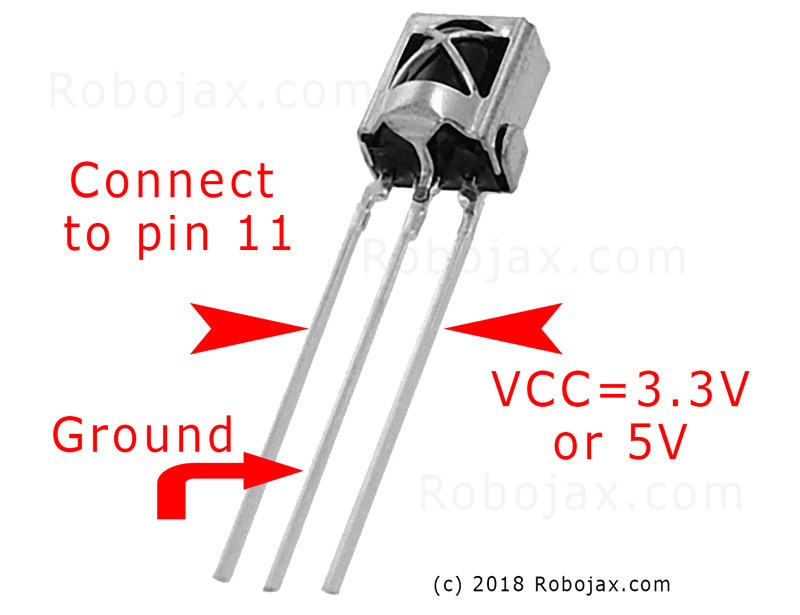
- IR ரிசீவர் தொகுதி (எ.கா., TSOP1838)
- ஜம்பர் கம்பிகள்
- பிரெட்போர்டு (விருப்பம்)
வயரிங் வழிகாட்டி
சர்வோ மோட்டாரில் மூன்று கம்பிகள் உள்ளன: தரை (பொதுவாக பழுப்பு அல்லது கருப்பு), மின்சாரம் (பொதுவாக சிவப்பு), மற்றும் சிக்னல் (பெரும்பாலும் ஆரஞ்சு அல்லது வெள்ளை). IR ரிசீவரிலும் மூன்று கம்பிகள் உள்ளன: தரை, மின்சாரம் (VCC), மற்றும் சிக்னல்.
(வீடியோவில் 01:46)

- சர்வோ தரை Arduino தரையுடன்
- சர்வோ மின்சாரம் Arduino 5V உடன்
- சர்வோ சிக்னல் Arduino பின் 8 உடன் (வீடியோவில் 02:23)
- IR ரிசீவர் தரை Arduino தரையுடன்
- IR ரிசீவர் VCC Arduino 5V உடன்
- IR ரிசீவர் சிக்னல் Arduino பின் 11 உடன் (வீடியோவில் 02:38)
குறியீடு விளக்கம்
குறியீடு IR தொடர்பு மற்றும் சர்வோ கட்டுப்பாட்டிற்கு தேவையான நூலகங்களைச் சேர்ப்பதன் மூலம் தொடங்குகிறது. (வீடியோவில் 03:16)
#include <IRremote.h>
#include <Servo.h>
அடுத்து, அத்தியாவசிய மாறிகள் வரையறுக்கப்படுகின்றன. உங்கள் குறிப்பிட்ட அமைப்பின் அடிப்படையில் இவற்றை உள்ளமைக்க வேண்டும். (வீடியோவில் 03:44)
const char type = 'B'; // 'W' வெள்ளை ரிமோட்டிற்கு, 'B' கருப்பு ரிமோட்டிற்கு
const boolean PCB = 0;   // IR ரிசீவரில் PCB இருந்தால் 1, வெற்று தொகுதியாக இருந்தால் 0
const int SERVO_PIN = 8; // சர்வோவின் சிக்னல் கம்பியுடன் இணைக்கப்பட்ட பின்
int angleStep = 10;      // ஒவ்வொரு பொத்தான் அழுத்தத்திற்கும் சர்வோ எத்தனை டிகிரி நகரும்
const int ANGLE_CENTRE = 90; // சர்வோவின் மைய/மீட்டமைப்பு நிலை
(வீடியோவில் 05:06)
மிக முக்கியமான உள்ளமைவு படி, ரிமோட் கண்ட்ரோல் பொத்தான்களை குறிப்பிட்ட செயல்களுடன் பொருத்துவதாகும். குறியீடு வெவ்வேறு ரிமோட் வகைகளுக்கான (வெள்ளை/கருப்பு, PCB/PCB அல்லாத) வரிசைகள் மற்றும் அவற்றின் தொடர்புடைய பொத்தான் குறியீடுகளை உள்ளடக்கியது. உங்கள் ரிமோட்டிற்கான சரியான குறியீடுகளை அடையாளம் கண்டு, அவற்றை விரும்பிய செயல்களுக்கு (வலது, இடது, மையம்) ஒதுக்க வேண்டும். (வீடியோவில் 05:16)
const String RIGHT = ">"; // உங்கள் "வலது" பொத்தானுக்கான குறியீட்டுடன் மாற்றவும்
const String LEFT = "<";  // உங்கள் "இடது" பொத்தானுக்கான குறியீட்டுடன் மாற்றவும்
const String CENTRE = "OK"; // உங்கள் "மையம்" பொத்தானுக்கான குறியீட்டுடன் மாற்றவும்
(வீடியோவில் 08:12)
servoAction() செயல்பாடு பெறப்பட்ட IR சிக்னலின் அடிப்படையில் சர்வோ இயக்கத்தை கையாளுகிறது. இது பெறப்பட்ட கட்டளையை சரிபார்த்து, அதற்கேற்ப சர்வோ கோணத்தை சரிசெய்கிறது. angleStep மாறி சர்வோவின் நிலையின் அதிகரிப்பு அல்லது குறைப்பை கட்டுப்படுத்துகிறது. (வீடியோவில் 08:06)
நேரடி திட்டம்/செயல்விளக்கம்
(வீடியோவில் 09:56)
வீடியோ வெவ்வேறு ரிமோட்களைப் பயன்படுத்தி சர்வோவை எவ்வாறு கட்டுப்படுத்துவது என்பதை நிரூபிக்கிறது. பல்வேறு ரிமோட் வகைகள் மற்றும் ரிசீவர் தொகுதிகளுக்கான குறியீட்டை எவ்வாறு சரிசெய்வது என்பதை இது காட்டுகிறது. உங்கள் சொந்த ரிமோட்களிலிருந்து IR குறியீடுகளைப் பிடிக்கும் மற்றும் அவற்றை குறியீட்டில் ஒருங்கிணைப்பதையும் இந்த செயல்விளக்கம் உள்ளடக்கியது. (வீடியோவில் 12:48)
அத்தியாயங்கள்
- [00:00] அறிமுகம் மற்றும் திட்ட கண்ணோட்டம்
- [00:36] கூறுகள் மற்றும் பொருட்கள்
- [01:46] வயரிங் வழிமுறைகள்
- [03:16] குறியீடு விளக்கம்
- [09:56] திட்ட செயல்விளக்கம்
- [12:48] உங்கள் சொந்த ரிமோட்டைப் பயன்படுத்துதல்
```
```படங்கள்
இந்த பயிற்சி பகுதியாகும்: சர்வோ மோட்டார்ஸ்
- ஆர்டுயினோவைப் பயன்படுத்தி புஷ் பட்டன்கள் மூலம் சர்வோவைக் கட்டுப்படுத்துதல்
- Control a Servo Motor with a Push Button: Move Servo and Return SPB-1
- Control a Servo Motor with a Push Button: Move Servo in One Direction SPB-2
- Controlling a Servo Motor with a Push Button: Move Servo While Button Is Pressed (SPB-3)
- பொட்டென்ஷியோமீட்டரைப் பயன்படுத்தி ஆர்டுயினோ மூலம் ஒரு சர்வோவைக் கட்டுப்படுத்துதல்
- பொட்டென்சியோமீட்டர் மற்றும் LCD1602 ஐப் பயன்படுத்தி ஆர்டுயினோ மூலம் சர்வோவைக் கட்டுப்படுத்துதல்
- பொட்டென்ஷியோமீட்டர் பயன்படுத்தி ஆர்டினோ சர்வோ மோட்டார் கட்டுப்பாடு
- அர்டினோவுக்கான கை அசைவுகளால் சர்வோ நிலையை கட்டுப்படுத்துதல்
- Controlling Two or More Servos with Potentiometers Using an Arduino
- How to Control a 360° Servo with Three Push-Button Switches
- தொடர்ச்சியான 360° சர்வோவை Arduino உடன் எவ்வாறு பயன்படுத்துவது
- அர்டுயினோ குறியீடு மற்றும் PCA9685 16-சேனல் 12-பிட் சர்வோ கட்டுப்படுத்தி V1க்கான வீடியோ
- ஒரு புஷ் பட்டன் மூலம் Arduino சர்வோ டோகிள் சுவிட்சை உருவாக்கவும்
/*
 * Original library from - http://arcfn.com
 *
 * This Arduino code controls a servo motor with an IR remote controller or any TV remote.
 *
 * You have to select the type of your remote as Black or White in the code below
 * and also select your receiver 1838 as either a PCB or bare module. See video for details.
 *
 * You have to watch this video: https://youtu.be/muAkBQb24NI
 * before proceeding with this code.
 *
 * Modified/Written by Ahmad Shamshiri
 * on August 02, 2018 at 20:35 in Ajax, Ontario, Canada
 * for Robojax.com
 * Watch video instructions for this code: https://youtu.be/Wp7hX9UErSQ
 * Get other Arduino codes from Robojax.com
 *
 */

#include <IRremote.h>

int RECV_PIN = 11;
const char type ='B';// W for white, B for black. Must keep single quotes like 'B' or 'W'
const boolean PCB = 0;// if receiver is PCB set to 1, if not set to 0. See video for details
boolean displayCode = true;// to display remote code. if not, set to false

//***** Servo settings begins
#include <Servo.h>
Servo RJservo;  // create servo object to control a servo
const int SERVO_PIN = 8;  // analog pin used to connect the potentiometer
int angle =90;    // initial angle  for servo
int angleStep =10;
const int ANGLE_CENTRE =90;// the centre/reset angle of your servo
//**** Servo settings ends

// remote settings
const String RIGHT=">";// move servo to the right with this key on remote
const String LEFT ="<";// move servo to the left with this key on remote
const String CENTRE ="OK";// move servo to centre with this key on remote
// remote settings end

IRrecv irrecv(RECV_PIN);

// this is array holding codes for White Remote when used with PCB version of receiver
unsigned int whiteRemotePCB[] ={
            0xE318261B, // CH-
            0x511DBB,   // CH
            0xEE886D7F,  // CH+

            0x52A3D41F, // |<<
            0xD7E84B1B, // >>|
            0x20FE4DBB, // >||

            0xF076C13B, // -
            0xA3C8EDDB, // +
            0x12CEA6E6, // EQ

            0xC101E57B, // 0
            0x97483BFB, // 100+
            0xF0C41643, // 200+

            0x9716BE3F, // 1
            0x3D9AE3F7, // 2
            0x6182021B, // 3

            0x8C22657B, // 4
            0x488F3CBB, // 5
            0x449E79F,  // 6

            0x32C6FDF7, // 7
            0x1BC0157B, // 8
            0x3EC3FC1B  // 9
            };

// this is array holding codes for White Remote when used with non-PCB version of receiver
unsigned int whiteRemote[] ={
            0xFFA25D, // CH-
            0xFF629D,   // CH
            0xFFE21D,  // CH+

            0xFF22DD, // |<<
            0xFF02FD, // >>|
            0xFFC23D, // >||

            0xFFE01F, // -
            0xFFA857, // +
            0xFF906F, // EQ

            0xFF6897, // 0
            0xFF9867, // 100+
            0xFFB04F, // 200+

            0xFF30CF, // 1
            0xFF18E7, // 2
            0xFF7A85, // 3

            0xFF10EF, // 4
            0xFF38C7, // 5
            0xFF5AA5,  // 6

            0xFF42BD, // 7
            0xFF4AB5, // 8
            0xFF52AD  // 9
            };
// key lables of white remote
 String whiteRemoteKey[] ={
            "CH-",
            "CH",
            "CH+",

            "|<<",
            ">>|",
            ">||",

            "-",
            "+",
            "EQ",

            "0",
            "100+",
            "200+",

            "1",
            "2",
            "3",

            "4",
            "5",
            "6",

            "7",
            "8",
            "9"
            };

// this is array holding codes for Black Remote when used with non-PCB version of receiver
 unsigned int blackRemote[] ={
            0xFF629D, // ^
            0xFF22DD,   // <
            0xFF02FD,  // OK
            0xFFC23D, // >
            0xFFA857, // v

            0xFF6897, // 1
            0xFF9867, // 2
            0xF0C41643, // 3

            0xFF30CF, // 4
            0xFF18E7, // 5
            0xFF7A85,  // 6

            0xFF10EF, // 7
            0xFF38C7, // 8
            0xFF5AA5,  // 9

            0xFF42BD, // *
            0xFF4AB5, // 0
            0xFF52AD  // #
            };

// this is array holding codes for Black Remote when used with PCB version of receiver
 unsigned int blackRemotePCB[] ={
            0x511DBB, // ^
            0x52A3D41F,   // <
            0xD7E84B1B,  // OK
            0x20FE4DBB, // >
            0xA3C8EDDB, // v


            0xC101E57B, // 1
            0x97483BFB, // 2
            0xF0C41643, // 3

            0x9716BE3F, // 4
            0x3D9AE3F7, // 5
            0x6182021B,  // 6

            0x8C22657B, // 7
            0x488F3CBB, // 8
            0x449E79F,  // 9

            0x32C6FDF7, // *
            0x1BC0157B, // 0
            0x3EC3FC1B  // #
            };

// Black remote key names
 String blackRemoteKey[] ={
            "^",
            "<",
            "OK",
            ">",
            "v",

            "1",
            "2",
            "3",

            "4",
            "5",
            "6",

            "7",
            "8",
            "9",

            "*",
            "0",
            "#"
            };

decode_results results;


void setup()
{
  Serial.begin(9600);
  // In case the interrupt driver crashes on setup, give a clue
  // to the user what's going on.
  Serial.println("Robojax IR Decode");
  Serial.println("Servo Control with Remote");
  irrecv.enableIRIn(); // Start the receiver

   RJservo.attach(SERVO_PIN);  // attaches the servo on pin servoPin to the servo object

}

void loop() {

  if (irrecv.decode(&results)) {
    if(displayCode)Serial.println(results.value, HEX);
    robojaxValidateCode(results.value);// used the "robojaxValidateCode" bellow
    irrecv.resume(); // Receive the next value
  }
  delay(50);// 50 millisecond delay
}

/*
 * function: robojaxValidateCode
 * validates the remote code and prints the correct key name.
 * cd is the code passed from the loop.
 * Written by A. S. for Robojax
 */
void robojaxValidateCode(int cd)
{

  // Robojax IR Remote decoder
  int found=0;

 if(type =='W' && !PCB)
 {
    // Robojax IR White Remote decoder
    // if type is set to 'W' (white remote) and PCB=0 then check White remote code
      for(int i=0; i< sizeof(whiteRemote)/sizeof(int); i++)
      {
        if(whiteRemote[i] ==cd)
        {

          Serial.print("Key pressed:");
          Serial.println(whiteRemoteKey[i]);
          servoAction(whiteRemoteKey[i]);// take action
          found=1;
        }// if matched
      }// for
 }else if(type =='W' && PCB){
    // Robojax IR White Remote decoder
    // if type is set to 'W' (white remote) and PCB=1 then check White remote code
      for(int i=0; i< sizeof(whiteRemotePCB)/sizeof(int); i++)
      {
        if(whiteRemotePCB[i] ==cd)
        {

          Serial.print("Key pressed:");
          Serial.println(whiteRemoteKey[i]);
          servoAction(whiteRemoteKey[i]);// take action
          found=1;
        }// if matched
      }// for
 }else if(type =='B' && PCB){
    // Robojax IR Black Remote decoder
       // if type is set to 'B' (black remote) and PCB=1 then check Black remote code
       for(int i=0; i< sizeof(blackRemotePCB)/sizeof(int); i++)
      {
        // Robojax IR black Remote decoder
        if(blackRemotePCB[i] ==cd)
        {

          Serial.print("Key pressed:");
          Serial.println(blackRemoteKey[i]);
         servoAction(blackRemoteKey[i]);// take action
          found=1;
        }// if matched
      }// for
 }else{

      // if type is set to 'B' (black remote) and PCB =0 then check Black remote code
       for(int i=0; i< sizeof(blackRemote)/sizeof(int); i++)
      {
        // Robojax IR black Remote decoder
        if(blackRemote[i] ==cd)
        {

          Serial.print("Key pressed:");
          Serial.println(blackRemoteKey[i]);
          servoAction(blackRemoteKey[i]);// take action

          found=1;
        }// if matched
      }// for
 }// else
  if(!found){
    if(cd !=0xFFFFFFFF)
      {
    Serial.println("Key unknown");
      }
  }// found
}// robojaxValidateCode end

/*
 *
 * servoAction()
 * receives string "value" as input and based on the settings,
 * sends translates it to servo value and controls servo, either by:
 * rotating servo to the right
 * rotating servo to the left
 * moving the servo to the middle
 *
 */
void servoAction(String value)
{
  // Servo button demo with IR remote by Robojax.com
  while(value == RIGHT){

    if (angle > 0 && angle <= 180) {
      angle = angle - angleStep;
       if(angle < 0){
        angle = 0;
       }else{
      RJservo.write(angle); // move the servo to desired angle
      Serial.print("Moved to: ");
      Serial.print(angle);   // print the angle
      Serial.println(" degree");
       }
    }// if
    value =".";
    delay(100);
  }// while for RIGHT
  while(value == LEFT){

    // Servo button demo with IR remote by Robojax.com
    if (angle >= 0 && angle <= 180) {
      angle = angle + angleStep;
      if(angle >180){
        angle =180;
       }else{
      RJservo.write(angle); // move the servo to desired angle
      Serial.print("Moved to: ");
      Serial.print(angle);   // print the angle
      Serial.println(" degree");
       }
    }
    value =".";
    delay(100);
  }// while for LEFT

  if(value == CENTRE)
  {
    angle = ANGLE_CENTRE;
    RJservo.write(angle); // move the servo to centre at 90 degree angle
  }
    // Robojax IR Servo control
}//servoAction end
நீங்கள் தேவைப்படும் எண்ணங்கள்
-
அமேசான்
-
இபேய்
வளங்கள் மற்றும் மேற்கோள்கள்
இன்னும் எந்த வளங்களும் இல்லை.
கோப்புகள்📁
கோப்புகள் கிடைக்கவில்லை.