Casharradan waa qayb ka mid ah: Matoorada Servo
Dhammaan fiidiyowyada la xiriira matoorada servo ee la xiriira, halkan ayaa lagu taxay. Xiriirinta fiidiyowyada kale waxay ku yaalliin maqaalkan hoose.
Kontoroolka Matoorka Servo iyadoo la isticmaalayo Remote Infrared ah oo leh Arduino
```htmlKu Xakamaynta Matoorada Servo ee Istemalka Kontoroolka Infrared iyo Arduino
Mashruucani wuxuu muujinayaa sida loo xakameeyo matoorka servo iyadoo la isticmaalayo kontoroolka infrared (IR) iyo Arduino. Qaabkani wuxuu u oggolaanayaa xakamaynta wireless-ka ee booska servo-ga, taasoo ka dhigaysa mid ku habboon codsiyo kala duwan.


Waa kuwan qaar ka mid ah fikradaha mashruuca ee isticmaalaya qaabkan:
- Si fog u hagaajinta pan iyo tilt kamarada.
- Xakamaynta dhaqdhaqaaqa gacanta robotic-ka.
- Otomaatigga daahyada ama gogosha.
- Abuurista bandhigyo farshaxan oo is-dhexgal ah.
- Dhisidda gaari ama baabuur lagu xakameeyo fog.
Qalabka/Qaybaha
- Arduino board (tusaale, Uno, Nano)
- Matoorka servo
- Kontoroolka IR (kontorool kasta oo caadi ah ayaa shaqeynaya, laakiin koodhku wuxuu u qoran yahay kontoroolo gaar ah)
- Qaabka IR receiver (tusaale, TSOP1838)
- Fiilooyinka jumper
- Breadboard (ikhtiyaar)
Hagaha Xirista
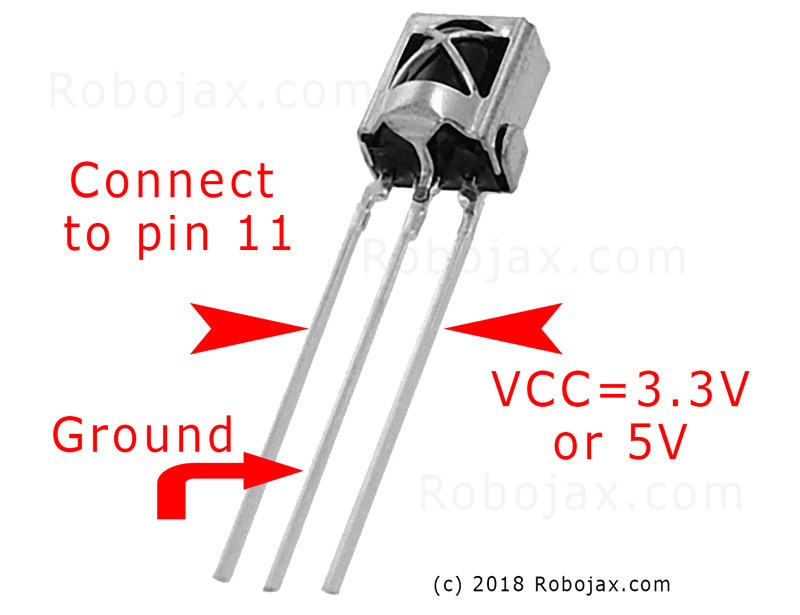
Matoorka servo wuxuu leeyahay saddex fiilo: dhulka (badanaa brown ama madow), korontada (badanaa casaan), iyo signal-ka (badanaa orange ama cad). Qaabka IR receiver sidoo kale wuxuu leeyahay saddex fiilo: dhulka, korontada (VCC), iyo signal-ka.
(fiidiyowga 01:46)

- Dhulka Servo ee Dhulka Arduino
- Korontada Servo ee Arduino 5V
- Signal-ka Servo ee Pin-ka 8 ee Arduino (fiidiyowga 02:23)
- Dhulka IR Receiver ee Dhulka Arduino
- VCC ee IR Receiver ee Arduino 5V
- Signal-ka IR Receiver ee Pin-ka 11 ee Arduino (fiidiyowga 02:38)
Sharaxaadda Koodhka
Koodhku wuxuu ku bilaabmaa inuu ku daro maktabado lagama maarmaan ah oo loogu talagalay isgaarsiinta IR iyo xakamaynta servo. (fiidiyowga 03:16)
#include <IRremote.h>
#include <Servo.h>
Marka xigta, doorsoomayaal muhiim ah ayaa la qeexaa. Waa inaad ku habaysaa kuwaan iyadoo lagu salaynayo qaabkaaga gaarka ah. (fiidiyowga 03:44)
const char type = 'B'; // 'W' ee kontoroolka cad, 'B' ee kontoroolka madow
const boolean PCB = 0;   // 1 haddii IR receiver uu leeyahay PCB, 0 haddii uu yahay module qaawan
const int SERVO_PIN = 8; // Pin-ka ku xiran fiilada signal-ka ee servo
int angleStep = 10;      // Inta digrii ee servo uu dhaqaaqo marka la riixo baton
const int ANGLE_CENTRE = 90; // Booska dhexe/soo celinta ee servo
(fiidiyowga 05:06)
Tallaabada ugu muhiimsan ee habaynta waa in la waafajiyo badhamada kontoroolka IR ee ficillada gaarka ah. Koodhku wuxuu ku darayaa arrays noocyo kala duwan oo kontorool ah (cad/madow, PCB/non-PCB) iyo koodhadhkooda badhamada u dhigma. Waa inaad aqoonsato koodhadhka saxda ah ee kontoroolkaaga oo aad u qoondayso ficillada la doonayo (midig, bidix, dhexe). (fiidiyowga 05:16)
const String RIGHT = ">"; // Ku beddel koodhka batonkaaga "midig"
const String LEFT = "<";  // Ku beddel koodhka batonkaaga "bidix"
const String CENTRE = "OK"; // Ku beddel koodhka batonkaaga "dhexe"
(fiidiyowga 08:12)
Hawsha servoAction() waxay maamushaa dhaqdhaqaaqa servo iyadoo ku saleysan signal-ka IR ee la helay. Waxay hubisaa amarka la helay oo waxay hagaajisaa xagasha servo si waafaqsan. Doorsoomaha angleStep wuxuu xakameeyaa kororka ama hoos u dhaca booska servo. (fiidiyowga 08:06)
Mashruuca Tooska ah/Muujinta
(fiidiyowga 09:56)
Fiidiyowgu wuxuu muujinayaa sida loo xakameeyo servo iyadoo la isticmaalayo kontoroolo kala duwan. Wuxuu muujinayaa sida loo hagaajiyo koodhka noocyada kala duwan ee kontoroolka iyo qaababka receiver-ka. Muujintu sidoo kale waxay daboolaysaa sida loo qabto koodhadhka IR ee kontoroolkaaga gaarka ah oo loogu daro koodhka. (fiidiyowga 12:48)
Cutubyada
- [00:00] Hordhac iyo Dulmarka Mashruuca
- [00:36] Qaybaha iyo Qalabka
- [01:46] Tilmaamaha Xirista
- [03:16] Sharaxaadda Koodhka
- [09:56] Muujinta Mashruuca
- [12:48] Isticmaalka Kontoroolkaaga Gaarka ah
```
Sawirro
Casharradan waa qayb ka mid ah: Matoorada Servo
- Xakamaynta Servo-ga iyadoo la isticmaalayo Buttons-ka Riixaya iyadoo la isticmaalayo Arduino
- Control a Servo Motor with a Push Button: Move Servo and Return SPB-1
- Control a Servo Motor with a Push Button: Move Servo in One Direction SPB-2
- Controlling a Servo Motor with a Push Button: Move Servo While Button Is Pressed (SPB-3)
- Xakamaynta Servo-ga iyadoo la isticmaalayo Potentiometer iyadoo la adeegsanayo Arduino
- Xakamaynta Servo-ga iyadoo la isticmaalayo Potentiometer iyo LCD1602 iyadoo la adeegsanayo Arduino
- Xakameynta Moterka Servo ee Arduino iyadoo la adeegsanayo Potentiometer
- Xakameynta Meesha Servo iyadoo la adeegsanayo Gacmaha ee Arduino
- Controlling Two or More Servos with Potentiometers Using an Arduino
- How to Control a 360° Servo with Three Push-Button Switches
- Sida loo isticmaalo Servo 360° oo joogto ah oo leh Arduino
- Koodhka Arduino iyo Fiidiyowga ee PCA9685 16-Kanaal 12-Bit Kontoroolaha Servo V1
- Dhis Arduino Servo Toggle Switch ku sameeyo oo leh Push Button
/*
 * Original library from - http://arcfn.com
 *
 * This Arduino code controls a servo motor with an IR remote controller or any TV remote.
 *
 * You have to select the type of your remote as Black or White in the code below
 * and also select your receiver 1838 as either a PCB or bare module. See video for details.
 *
 * You have to watch this video: https://youtu.be/muAkBQb24NI
 * before proceeding with this code.
 *
 * Modified/Written by Ahmad Shamshiri
 * on August 02, 2018 at 20:35 in Ajax, Ontario, Canada
 * for Robojax.com
 * Watch video instructions for this code: https://youtu.be/Wp7hX9UErSQ
 * Get other Arduino codes from Robojax.com
 *
 */

#include <IRremote.h>

int RECV_PIN = 11;
const char type ='B';// W for white, B for black. Must keep single quotes like 'B' or 'W'
const boolean PCB = 0;// if receiver is PCB set to 1, if not set to 0. See video for details
boolean displayCode = true;// to display remote code. if not, set to false

//***** Servo settings begins
#include <Servo.h>
Servo RJservo;  // create servo object to control a servo
const int SERVO_PIN = 8;  // analog pin used to connect the potentiometer
int angle =90;    // initial angle  for servo
int angleStep =10;
const int ANGLE_CENTRE =90;// the centre/reset angle of your servo
//**** Servo settings ends

// remote settings
const String RIGHT=">";// move servo to the right with this key on remote
const String LEFT ="<";// move servo to the left with this key on remote
const String CENTRE ="OK";// move servo to centre with this key on remote
// remote settings end

IRrecv irrecv(RECV_PIN);

// this is array holding codes for White Remote when used with PCB version of receiver
unsigned int whiteRemotePCB[] ={
            0xE318261B, // CH-
            0x511DBB,   // CH
            0xEE886D7F,  // CH+

            0x52A3D41F, // |<<
            0xD7E84B1B, // >>|
            0x20FE4DBB, // >||

            0xF076C13B, // -
            0xA3C8EDDB, // +
            0x12CEA6E6, // EQ

            0xC101E57B, // 0
            0x97483BFB, // 100+
            0xF0C41643, // 200+

            0x9716BE3F, // 1
            0x3D9AE3F7, // 2
            0x6182021B, // 3

            0x8C22657B, // 4
            0x488F3CBB, // 5
            0x449E79F,  // 6

            0x32C6FDF7, // 7
            0x1BC0157B, // 8
            0x3EC3FC1B  // 9
            };

// this is array holding codes for White Remote when used with non-PCB version of receiver
unsigned int whiteRemote[] ={
            0xFFA25D, // CH-
            0xFF629D,   // CH
            0xFFE21D,  // CH+

            0xFF22DD, // |<<
            0xFF02FD, // >>|
            0xFFC23D, // >||

            0xFFE01F, // -
            0xFFA857, // +
            0xFF906F, // EQ

            0xFF6897, // 0
            0xFF9867, // 100+
            0xFFB04F, // 200+

            0xFF30CF, // 1
            0xFF18E7, // 2
            0xFF7A85, // 3

            0xFF10EF, // 4
            0xFF38C7, // 5
            0xFF5AA5,  // 6

            0xFF42BD, // 7
            0xFF4AB5, // 8
            0xFF52AD  // 9
            };
// key lables of white remote
 String whiteRemoteKey[] ={
            "CH-",
            "CH",
            "CH+",

            "|<<",
            ">>|",
            ">||",

            "-",
            "+",
            "EQ",

            "0",
            "100+",
            "200+",

            "1",
            "2",
            "3",

            "4",
            "5",
            "6",

            "7",
            "8",
            "9"
            };

// this is array holding codes for Black Remote when used with non-PCB version of receiver
 unsigned int blackRemote[] ={
            0xFF629D, // ^
            0xFF22DD,   // <
            0xFF02FD,  // OK
            0xFFC23D, // >
            0xFFA857, // v

            0xFF6897, // 1
            0xFF9867, // 2
            0xF0C41643, // 3

            0xFF30CF, // 4
            0xFF18E7, // 5
            0xFF7A85,  // 6

            0xFF10EF, // 7
            0xFF38C7, // 8
            0xFF5AA5,  // 9

            0xFF42BD, // *
            0xFF4AB5, // 0
            0xFF52AD  // #
            };

// this is array holding codes for Black Remote when used with PCB version of receiver
 unsigned int blackRemotePCB[] ={
            0x511DBB, // ^
            0x52A3D41F,   // <
            0xD7E84B1B,  // OK
            0x20FE4DBB, // >
            0xA3C8EDDB, // v


            0xC101E57B, // 1
            0x97483BFB, // 2
            0xF0C41643, // 3

            0x9716BE3F, // 4
            0x3D9AE3F7, // 5
            0x6182021B,  // 6

            0x8C22657B, // 7
            0x488F3CBB, // 8
            0x449E79F,  // 9

            0x32C6FDF7, // *
            0x1BC0157B, // 0
            0x3EC3FC1B  // #
            };

// Black remote key names
 String blackRemoteKey[] ={
            "^",
            "<",
            "OK",
            ">",
            "v",

            "1",
            "2",
            "3",

            "4",
            "5",
            "6",

            "7",
            "8",
            "9",

            "*",
            "0",
            "#"
            };

decode_results results;


void setup()
{
  Serial.begin(9600);
  // In case the interrupt driver crashes on setup, give a clue
  // to the user what's going on.
  Serial.println("Robojax IR Decode");
  Serial.println("Servo Control with Remote");
  irrecv.enableIRIn(); // Start the receiver

   RJservo.attach(SERVO_PIN);  // attaches the servo on pin servoPin to the servo object

}

void loop() {

  if (irrecv.decode(&results)) {
    if(displayCode)Serial.println(results.value, HEX);
    robojaxValidateCode(results.value);// used the "robojaxValidateCode" bellow
    irrecv.resume(); // Receive the next value
  }
  delay(50);// 50 millisecond delay
}

/*
 * function: robojaxValidateCode
 * validates the remote code and prints the correct key name.
 * cd is the code passed from the loop.
 * Written by A. S. for Robojax
 */
void robojaxValidateCode(int cd)
{

  // Robojax IR Remote decoder
  int found=0;

 if(type =='W' && !PCB)
 {
    // Robojax IR White Remote decoder
    // if type is set to 'W' (white remote) and PCB=0 then check White remote code
      for(int i=0; i< sizeof(whiteRemote)/sizeof(int); i++)
      {
        if(whiteRemote[i] ==cd)
        {

          Serial.print("Key pressed:");
          Serial.println(whiteRemoteKey[i]);
          servoAction(whiteRemoteKey[i]);// take action
          found=1;
        }// if matched
      }// for
 }else if(type =='W' && PCB){
    // Robojax IR White Remote decoder
    // if type is set to 'W' (white remote) and PCB=1 then check White remote code
      for(int i=0; i< sizeof(whiteRemotePCB)/sizeof(int); i++)
      {
        if(whiteRemotePCB[i] ==cd)
        {

          Serial.print("Key pressed:");
          Serial.println(whiteRemoteKey[i]);
          servoAction(whiteRemoteKey[i]);// take action
          found=1;
        }// if matched
      }// for
 }else if(type =='B' && PCB){
    // Robojax IR Black Remote decoder
       // if type is set to 'B' (black remote) and PCB=1 then check Black remote code
       for(int i=0; i< sizeof(blackRemotePCB)/sizeof(int); i++)
      {
        // Robojax IR black Remote decoder
        if(blackRemotePCB[i] ==cd)
        {

          Serial.print("Key pressed:");
          Serial.println(blackRemoteKey[i]);
         servoAction(blackRemoteKey[i]);// take action
          found=1;
        }// if matched
      }// for
 }else{

      // if type is set to 'B' (black remote) and PCB =0 then check Black remote code
       for(int i=0; i< sizeof(blackRemote)/sizeof(int); i++)
      {
        // Robojax IR black Remote decoder
        if(blackRemote[i] ==cd)
        {

          Serial.print("Key pressed:");
          Serial.println(blackRemoteKey[i]);
          servoAction(blackRemoteKey[i]);// take action

          found=1;
        }// if matched
      }// for
 }// else
  if(!found){
    if(cd !=0xFFFFFFFF)
      {
    Serial.println("Key unknown");
      }
  }// found
}// robojaxValidateCode end

/*
 *
 * servoAction()
 * receives string "value" as input and based on the settings,
 * sends translates it to servo value and controls servo, either by:
 * rotating servo to the right
 * rotating servo to the left
 * moving the servo to the middle
 *
 */
void servoAction(String value)
{
  // Servo button demo with IR remote by Robojax.com
  while(value == RIGHT){

    if (angle > 0 && angle <= 180) {
      angle = angle - angleStep;
       if(angle < 0){
        angle = 0;
       }else{
      RJservo.write(angle); // move the servo to desired angle
      Serial.print("Moved to: ");
      Serial.print(angle);   // print the angle
      Serial.println(" degree");
       }
    }// if
    value =".";
    delay(100);
  }// while for RIGHT
  while(value == LEFT){

    // Servo button demo with IR remote by Robojax.com
    if (angle >= 0 && angle <= 180) {
      angle = angle + angleStep;
      if(angle >180){
        angle =180;
       }else{
      RJservo.write(angle); // move the servo to desired angle
      Serial.print("Moved to: ");
      Serial.print(angle);   // print the angle
      Serial.println(" degree");
       }
    }
    value =".";
    delay(100);
  }// while for LEFT

  if(value == CENTRE)
  {
    angle = ANGLE_CENTRE;
    RJservo.write(angle); // move the servo to centre at 90 degree angle
  }
    // Robojax IR Servo control
}//servoAction end
Waad u baahan tahay
-
Amaazon
-
eBay
Kheyraadka & Tixraacyada
Wali wax kaydsan ah oo weli ma jiro.
Faylasha📁
Fayl la'aan.