Этот учебник является частью: Сервомоторы
Здесь перечислены все видеоролики, связанные с сервомоторами. Ссылки на другие видео находятся ниже этой статьи.
Управление сервомоторами с помощью инфракрасного пульта на Arduino
```html
Управление серводвигателями с помощью инфракрасного пульта и Arduino
Этот проект демонстрирует, как управлять сервомотором с помощью инфракрасного (ИК) пульта и Arduino. Эта установка позволяет беспроводным образом управлять положением сервомотора, что делает ее идеальной для различных приложений.

Вот несколько идей проектов с использованием этой настройки:
- Удаленная настройка панорамирования и наклона камеры.
- Управление движениямиrobotic руки.
- Автоматизация жалюзи или штор.
- Создание интерактивных художественных инсталляций.
- Постройка радиоуправляемой машины или транспортного средства.
Оборудование/Компоненты
- Плата Arduino (например, Uno, Nano)
- Сервомотор
- ИП-пульт дистанционного управления (любой стандартный пульт подойдет, но код настроен для конкретных пультов)
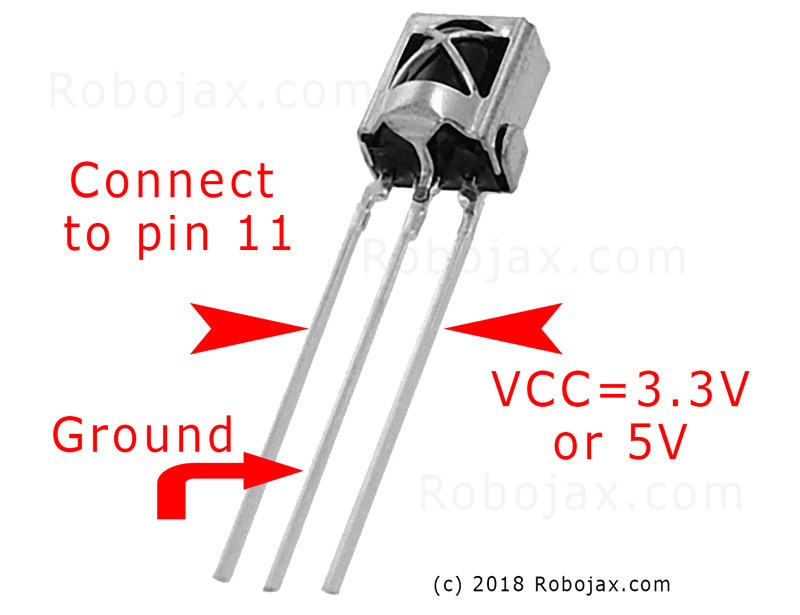
- ИР-приемный модуль (например, TSOP1838)
- Проводки для соединений
- Макетная плата (по желанию)
Схема подключения
Серводвигатель имеет три провода: земля (обычно коричневый или черный), питание (обычно красный) и сигнал (часто оранжевый или белый). ИК-приемник также имеет три провода: земля, питание (VCC) и сигнал.
(в видео на 01:46)

- Серво Земля к Земле Arduino
- Сервоприводное питание для Arduino 5V
- Сигнал сервопривода на пин 8 Ардуино (в видео на 02:23)
- ИР-приемник земля к земле Ардуино
- Приемник ИК VCC к Arduino 5В
- ИР-приемник сигнал на пин 11 Arduino (в видео на 02:38)
Объяснение кода
Код начинается с подключения необходимых библиотек для ИК-связи и управления сервоприводом. (в видео на 03:16)
#include <IRremote.h>
#include <Servo.h>
Далее определяются необходимые переменные. Вам нужно настроить их в зависимости от вашей конкретной конфигурации. (в видео на 03:44)
const char type = 'B'; // 'W' for white remote, 'B' for black remote
const boolean PCB = 0; // 1 if the IR receiver has a PCB, 0 if it's a bare module
const int SERVO_PIN = 8; // The pin connected to the servo's signal wire
int angleStep = 10; // How many degrees the servo moves per button press
const int ANGLE_CENTRE = 90; // The center/reset position of the servo
(в видео на 05:06)
Самым важным шагом настройки является соответствие кнопок пульта дистанционного управления конкретным действиям. Код включает массивы для различных типов пультов (белый/черный, PCB/не PCB) и их соответствующие коды кнопок. Вам необходимо определить правильные коды для вашего пульта и назначить их нужным действиям (вправо, влево, по центру). (в видео на 05:16)
const String RIGHT = ">"; // Replace with the code for your "right" button
const String LEFT = "<"; // Replace with the code for your "left" button
const String CENTRE = "OK"; // Replace with the code for your "center" button
(в видео на 08:12)
Пожалуйста, предоставьте текст для перевода.servoAction()функция управляет движением сервопривода на основе полученного ИК сигнала. Она проверяет полученную команду и соответственно регулирует угол сервопривода.angleStepпеременная управляет увеличением или уменьшением положения сервопривода. (в видео в 08:06)
Живой проект/демонстрация
(в видео на 09:56)
Видео демонстрирует, как управлять сервоприводом с помощью различных пультов дистанционного управления. Оно показывает, как настроить код для различных типов пультов и приемников. Демонстрация также охватывает, как захватывать ИК-коды с ваших собственных пультов и интегрировать их в код. (в видео на 12:48)
Главы
- [00:00] Введение и обзор проекта
- [00:36] Компоненты и материалы
- [01:46] Инструкции по подключению
- [03:16] Объяснение кода
- [09:56] Демонстрация проекта
- Использование вашего собственного пульта
```
Этот учебник является частью: Сервомоторы
- Controlling a Servo with Push Buttons Using Arduino
- Control a Servo Motor with a Push Button: Move Servo and Return SPB-1
- Control a Servo Motor with a Push Button: Move Servo in One Direction SPB-2
- Controlling a Servo Motor with a Push Button: Move Servo While Button Is Pressed (SPB-3)
- Controlling a Servo with a Potentiometer Using Arduino
- Controlling a Servo with Potentiometer and LCD1602 using Arduino
- Управление сервомотором Arduino с помощью потенциометра
- Управление положением сервопривода с помощью жестов рук для Arduino
- Controlling Two or More Servos with Potentiometers Using an Arduino
- How to Control a 360° Servo with Three Push-Button Switches
- How to Use Continuous 360° Servo with Arduino
- Код Arduino и видео для сервоконтроллера PCA9685 на 16 каналов с разрешением 12 бит V1
- Build an Arduino Servo Toggle Switch with a Push Button
/*
* Original library from - http://arcfn.com
*
* This Arduino code controls a servo motor with an IR remote controller or any TV remote.
*
* You have to select the type of your remote as Black or White in the code below
* and also select your receiver 1838 as either a PCB or bare module. See video for details.
*
* You have to watch this video: https://youtu.be/muAkBQb24NI
* before proceeding with this code.
*
* Modified/Written by Ahmad Shamshiri
* on August 02, 2018 at 20:35 in Ajax, Ontario, Canada
* for Robojax.com
* Watch video instructions for this code: https://youtu.be/Wp7hX9UErSQ
* Get other Arduino codes from Robojax.com
*
*/
#include <IRremote.h>
int RECV_PIN = 11;
const char type ='B';// W for white, B for black. Must keep single quotes like 'B' or 'W'
const boolean PCB = 0;// if receiver is PCB set to 1, if not set to 0. See video for details
boolean displayCode = true;// to display remote code. if not, set to false
//***** Servo settings begins
#include <Servo.h>
Servo RJservo; // create servo object to control a servo
const int SERVO_PIN = 8; // analog pin used to connect the potentiometer
int angle =90; // initial angle for servo
int angleStep =10;
const int ANGLE_CENTRE =90;// the centre/reset angle of your servo
//**** Servo settings ends
// remote settings
const String RIGHT=">";// move servo to the right with this key on remote
const String LEFT ="<";// move servo to the left with this key on remote
const String CENTRE ="OK";// move servo to centre with this key on remote
// remote settings end
IRrecv irrecv(RECV_PIN);
// this is array holding codes for White Remote when used with PCB version of receiver
unsigned int whiteRemotePCB[] ={
0xE318261B, // CH-
0x511DBB, // CH
0xEE886D7F, // CH+
0x52A3D41F, // |<<
0xD7E84B1B, // >>|
0x20FE4DBB, // >||
0xF076C13B, // -
0xA3C8EDDB, // +
0x12CEA6E6, // EQ
0xC101E57B, // 0
0x97483BFB, // 100+
0xF0C41643, // 200+
0x9716BE3F, // 1
0x3D9AE3F7, // 2
0x6182021B, // 3
0x8C22657B, // 4
0x488F3CBB, // 5
0x449E79F, // 6
0x32C6FDF7, // 7
0x1BC0157B, // 8
0x3EC3FC1B // 9
};
// this is array holding codes for White Remote when used with non-PCB version of receiver
unsigned int whiteRemote[] ={
0xFFA25D, // CH-
0xFF629D, // CH
0xFFE21D, // CH+
0xFF22DD, // |<<
0xFF02FD, // >>|
0xFFC23D, // >||
0xFFE01F, // -
0xFFA857, // +
0xFF906F, // EQ
0xFF6897, // 0
0xFF9867, // 100+
0xFFB04F, // 200+
0xFF30CF, // 1
0xFF18E7, // 2
0xFF7A85, // 3
0xFF10EF, // 4
0xFF38C7, // 5
0xFF5AA5, // 6
0xFF42BD, // 7
0xFF4AB5, // 8
0xFF52AD // 9
};
// key lables of white remote
String whiteRemoteKey[] ={
"CH-",
"CH",
"CH+",
"|<<",
">>|",
">||",
"-",
"+",
"EQ",
"0",
"100+",
"200+",
"1",
"2",
"3",
"4",
"5",
"6",
"7",
"8",
"9"
};
// this is array holding codes for Black Remote when used with non-PCB version of receiver
unsigned int blackRemote[] ={
0xFF629D, // ^
0xFF22DD, // <
0xFF02FD, // OK
0xFFC23D, // >
0xFFA857, // v
0xFF6897, // 1
0xFF9867, // 2
0xF0C41643, // 3
0xFF30CF, // 4
0xFF18E7, // 5
0xFF7A85, // 6
0xFF10EF, // 7
0xFF38C7, // 8
0xFF5AA5, // 9
0xFF42BD, // *
0xFF4AB5, // 0
0xFF52AD // #
};
// this is array holding codes for Black Remote when used with PCB version of receiver
unsigned int blackRemotePCB[] ={
0x511DBB, // ^
0x52A3D41F, // <
0xD7E84B1B, // OK
0x20FE4DBB, // >
0xA3C8EDDB, // v
0xC101E57B, // 1
0x97483BFB, // 2
0xF0C41643, // 3
0x9716BE3F, // 4
0x3D9AE3F7, // 5
0x6182021B, // 6
0x8C22657B, // 7
0x488F3CBB, // 8
0x449E79F, // 9
0x32C6FDF7, // *
0x1BC0157B, // 0
0x3EC3FC1B // #
};
// Black remote key names
String blackRemoteKey[] ={
"^",
"<",
"OK",
">",
"v",
"1",
"2",
"3",
"4",
"5",
"6",
"7",
"8",
"9",
"*",
"0",
"#"
};
decode_results results;
void setup()
{
Serial.begin(9600);
// In case the interrupt driver crashes on setup, give a clue
// to the user what's going on.
Serial.println("Robojax IR Decode");
Serial.println("Servo Control with Remote");
irrecv.enableIRIn(); // Start the receiver
RJservo.attach(SERVO_PIN); // attaches the servo on pin servoPin to the servo object
}
void loop() {
if (irrecv.decode(&results)) {
if(displayCode)Serial.println(results.value, HEX);
robojaxValidateCode(results.value);// used the "robojaxValidateCode" bellow
irrecv.resume(); // Receive the next value
}
delay(50);// 50 millisecond delay
}
/*
* function: robojaxValidateCode
* validates the remote code and prints the correct key name.
* cd is the code passed from the loop.
* Written by A. S. for Robojax
*/
void robojaxValidateCode(int cd)
{
// Robojax IR Remote decoder
int found=0;
if(type =='W' && !PCB)
{
// Robojax IR White Remote decoder
// if type is set to 'W' (white remote) and PCB=0 then check White remote code
for(int i=0; i< sizeof(whiteRemote)/sizeof(int); i++)
{
if(whiteRemote[i] ==cd)
{
Serial.print("Key pressed:");
Serial.println(whiteRemoteKey[i]);
servoAction(whiteRemoteKey[i]);// take action
found=1;
}// if matched
}// for
}else if(type =='W' && PCB){
// Robojax IR White Remote decoder
// if type is set to 'W' (white remote) and PCB=1 then check White remote code
for(int i=0; i< sizeof(whiteRemotePCB)/sizeof(int); i++)
{
if(whiteRemotePCB[i] ==cd)
{
Serial.print("Key pressed:");
Serial.println(whiteRemoteKey[i]);
servoAction(whiteRemoteKey[i]);// take action
found=1;
}// if matched
}// for
}else if(type =='B' && PCB){
// Robojax IR Black Remote decoder
// if type is set to 'B' (black remote) and PCB=1 then check Black remote code
for(int i=0; i< sizeof(blackRemotePCB)/sizeof(int); i++)
{
// Robojax IR black Remote decoder
if(blackRemotePCB[i] ==cd)
{
Serial.print("Key pressed:");
Serial.println(blackRemoteKey[i]);
servoAction(blackRemoteKey[i]);// take action
found=1;
}// if matched
}// for
}else{
// if type is set to 'B' (black remote) and PCB =0 then check Black remote code
for(int i=0; i< sizeof(blackRemote)/sizeof(int); i++)
{
// Robojax IR black Remote decoder
if(blackRemote[i] ==cd)
{
Serial.print("Key pressed:");
Serial.println(blackRemoteKey[i]);
servoAction(blackRemoteKey[i]);// take action
found=1;
}// if matched
}// for
}// else
if(!found){
if(cd !=0xFFFFFFFF)
{
Serial.println("Key unknown");
}
}// found
}// robojaxValidateCode end
/*
*
* servoAction()
* receives string "value" as input and based on the settings,
* sends translates it to servo value and controls servo, either by:
* rotating servo to the right
* rotating servo to the left
* moving the servo to the middle
*
*/
void servoAction(String value)
{
// Servo button demo with IR remote by Robojax.com
while(value == RIGHT){
if (angle > 0 && angle <= 180) {
angle = angle - angleStep;
if(angle < 0){
angle = 0;
}else{
RJservo.write(angle); // move the servo to desired angle
Serial.print("Moved to: ");
Serial.print(angle); // print the angle
Serial.println(" degree");
}
}// if
value =".";
delay(100);
}// while for RIGHT
while(value == LEFT){
// Servo button demo with IR remote by Robojax.com
if (angle >= 0 && angle <= 180) {
angle = angle + angleStep;
if(angle >180){
angle =180;
}else{
RJservo.write(angle); // move the servo to desired angle
Serial.print("Moved to: ");
Serial.print(angle); // print the angle
Serial.println(" degree");
}
}
value =".";
delay(100);
}// while for LEFT
if(value == CENTRE)
{
angle = ANGLE_CENTRE;
RJservo.write(angle); // move the servo to centre at 90 degree angle
}
// Robojax IR Servo control
}//servoAction end
Вещи, которые могут вам понадобиться
-
Амазонка
-
eBay
Ресурсы и ссылки
Ресурсов пока нет.
Файлы📁
Нет доступных файлов.