Ten poradnik jest częścią: Silniki serwo
Wszystkie powiązane filmy dotyczące serwomotorów znajdują się tutaj. Linki do innych filmów znajdują się poniżej tego artykułu.
Sterowanie serwomotorami za pomocą pilota na podczerwień z Arduino
```html
Sterowanie serwomechanizmami za pomocą pilota na podczerwień i Arduino
Ten projekt pokazuje, jak sterować serwomechanizmem za pomocą pilota na podczerwień (IR) i Arduino. Taka konfiguracja umożliwia bezprzewodowe sterowanie pozycją serwa, co czyni ją idealną do różnych zastosowań.


Oto kilka pomysłów na projekty wykorzystujące tę konfigurację:
- Zdalna regulacja pochylenia i obrotu kamery.
- Sterowanie ruchami ramienia robota.
- Automatyzacja rolet lub zasłon okiennych.
- Tworzenie interaktywnych instalacji artystycznych.
- Budowa zdalnie sterowanego samochodu lub pojazdu.
Sprzęt/Komponenty
- Płytka Arduino (np. Uno, Nano)
- Serwomechanizm
- Pilot na podczerwień (działa każdy standardowy pilot, ale kod jest skonfigurowany dla konkretnych pilotów)
- Moduł odbiornika podczerwieni (np. TSOP1838)
- Przewody połączeniowe
- Płytka stykowa (opcjonalnie)
Schemat podłączeń
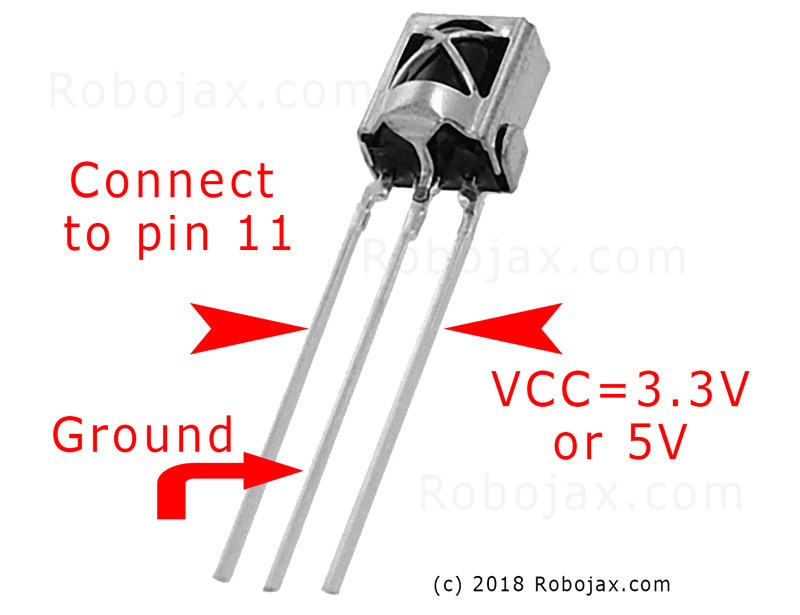
Serwomechanizm ma trzy przewody: masa (zwykle brązowy lub czarny), zasilanie (zazwyczaj czerwony) i sygnał (często pomarańczowy lub biały). Odbiornik podczerwieni również ma trzy przewody: masa, zasilanie (VCC) i sygnał.
(na filmie w 01:46)

- Masa serwa do masy Arduino
- Zasilanie serwa do 5V Arduino
- Sygnał serwa do pinu 8 Arduino (na filmie w 02:23)
- Masa odbiornika podczerwieni do masy Arduino
- VCC odbiornika podczerwieni do 5V Arduino
- Sygnał odbiornika podczerwieni do pinu 11 Arduino (na filmie w 02:38)
Wyjaśnienie kodu
Kod zaczyna się od dołączenia niezbędnych bibliotek do komunikacji IR i sterowania serwem. (na filmie w 03:16)
#include <IRremote.h>
#include <Servo.h>
Następnie definiowane są kluczowe zmienne. Musisz je skonfigurować zgodnie z własną konfiguracją. (na filmie w 03:44)
const char type = 'B'; // 'W' dla białego pilota, 'B' dla czarnego pilota
const boolean PCB = 0;   // 1, jeśli odbiornik IR ma PCB, 0, jeśli to goły moduł
const int SERVO_PIN = 8; // Pin podłączony do przewodu sygnałowego serwa
int angleStep = 10;      // O ile stopni serwo porusza się przy każdym naciśnięciu przycisku
const int ANGLE_CENTRE = 90; // Pozycja środkowa/reset serwa
(na filmie w 05:06)
Najważniejszym krokiem konfiguracji jest dopasowanie przycisków pilota do konkretnych akcji. Kod zawiera tablice dla różnych typów pilotów (biały/czarny, z PCB/bez PCB) i odpowiadających im kodów przycisków. Musisz zidentyfikować właściwe kody dla swojego pilota i przypisać je do pożądanych akcji (prawo, lewo, środek). (na filmie w 05:16)
const String RIGHT = ">"; // Zastąp kodem przycisku "w prawo"
const String LEFT = "<";  // Zastąp kodem przycisku "w lewo"
const String CENTRE = "OK"; // Zastąp kodem przycisku "środek"
(na filmie w 08:12)
Funkcja servoAction() obsługuje ruch serwa na podstawie odebranego sygnału IR. Sprawdza odebrane polecenie i odpowiednio dostosowuje kąt serwa. Zmienna angleStep kontroluje przyrost lub zmniejszenie pozycji serwa. (na filmie w 08:06)
Projekt na żywo/Demonstracja
(na filmie w 09:56)
Film pokazuje, jak sterować serwem za pomocą różnych pilotów. Wyjaśnia, jak dostosować kod do różnych typów pilotów i modułów odbiornika. Demonstracja obejmuje również przechwytywanie kodów IR z własnych pilotów i integrowanie ich z kodem. (na filmie w 12:48)
Rozdziały
- [00:00] Wprowadzenie i przegląd projektu
- [00:36] Komponenty i materiały
- [01:46] Instrukcje podłączenia
- [03:16] Wyjaśnienie kodu
- [09:56] Demonstracja projektu
- [12:48] Używanie własnego pilota
```
Obrazy
Ten poradnik jest częścią: Silniki serwo
- Sterowanie serwomechanizmem za pomocą przycisków przy użyciu Arduino
- Control a Servo Motor with a Push Button: Move Servo and Return SPB-1
- Control a Servo Motor with a Push Button: Move Servo in One Direction SPB-2
- Controlling a Servo Motor with a Push Button: Move Servo While Button Is Pressed (SPB-3)
- Sterowanie serwomechanizmem za pomocą potencjometru z użyciem Arduino
- Sterowanie serwomechanizmem za pomocą potencjometru i wyświetlacza LCD1602 przy użyciu Arduino
- Kontrola serwomotoru Arduino za pomocą potencjometru
- Kontrolowanie pozycji serwomechanizmu za pomocą gestów ręcznych dla Arduino
- Controlling Two or More Servos with Potentiometers Using an Arduino
- How to Control a 360° Servo with Three Push-Button Switches
- Jak używać ciągłego serwa 360° z Arduino
- Kod Arduino i wideo dla kontrolera serw PCA9685 16-kanałowego 12-bitowego V1
- Zbuduj przełącznik serwomechanizmu Arduino z przyciskiem
/*
 * Original library from - http://arcfn.com
 *
 * This Arduino code controls a servo motor with an IR remote controller or any TV remote.
 *
 * You have to select the type of your remote as Black or White in the code below
 * and also select your receiver 1838 as either a PCB or bare module. See video for details.
 *
 * You have to watch this video: https://youtu.be/muAkBQb24NI
 * before proceeding with this code.
 *
 * Modified/Written by Ahmad Shamshiri
 * on August 02, 2018 at 20:35 in Ajax, Ontario, Canada
 * for Robojax.com
 * Watch video instructions for this code: https://youtu.be/Wp7hX9UErSQ
 * Get other Arduino codes from Robojax.com
 *
 */

#include <IRremote.h>

int RECV_PIN = 11;
const char type ='B';// W for white, B for black. Must keep single quotes like 'B' or 'W'
const boolean PCB = 0;// if receiver is PCB set to 1, if not set to 0. See video for details
boolean displayCode = true;// to display remote code. if not, set to false

//***** Servo settings begins
#include <Servo.h>
Servo RJservo;  // create servo object to control a servo
const int SERVO_PIN = 8;  // analog pin used to connect the potentiometer
int angle =90;    // initial angle  for servo
int angleStep =10;
const int ANGLE_CENTRE =90;// the centre/reset angle of your servo
//**** Servo settings ends

// remote settings
const String RIGHT=">";// move servo to the right with this key on remote
const String LEFT ="<";// move servo to the left with this key on remote
const String CENTRE ="OK";// move servo to centre with this key on remote
// remote settings end

IRrecv irrecv(RECV_PIN);

// this is array holding codes for White Remote when used with PCB version of receiver
unsigned int whiteRemotePCB[] ={
            0xE318261B, // CH-
            0x511DBB,   // CH
            0xEE886D7F,  // CH+

            0x52A3D41F, // |<<
            0xD7E84B1B, // >>|
            0x20FE4DBB, // >||

            0xF076C13B, // -
            0xA3C8EDDB, // +
            0x12CEA6E6, // EQ

            0xC101E57B, // 0
            0x97483BFB, // 100+
            0xF0C41643, // 200+

            0x9716BE3F, // 1
            0x3D9AE3F7, // 2
            0x6182021B, // 3

            0x8C22657B, // 4
            0x488F3CBB, // 5
            0x449E79F,  // 6

            0x32C6FDF7, // 7
            0x1BC0157B, // 8
            0x3EC3FC1B  // 9
            };

// this is array holding codes for White Remote when used with non-PCB version of receiver
unsigned int whiteRemote[] ={
            0xFFA25D, // CH-
            0xFF629D,   // CH
            0xFFE21D,  // CH+

            0xFF22DD, // |<<
            0xFF02FD, // >>|
            0xFFC23D, // >||

            0xFFE01F, // -
            0xFFA857, // +
            0xFF906F, // EQ

            0xFF6897, // 0
            0xFF9867, // 100+
            0xFFB04F, // 200+

            0xFF30CF, // 1
            0xFF18E7, // 2
            0xFF7A85, // 3

            0xFF10EF, // 4
            0xFF38C7, // 5
            0xFF5AA5,  // 6

            0xFF42BD, // 7
            0xFF4AB5, // 8
            0xFF52AD  // 9
            };
// key lables of white remote
 String whiteRemoteKey[] ={
            "CH-",
            "CH",
            "CH+",

            "|<<",
            ">>|",
            ">||",

            "-",
            "+",
            "EQ",

            "0",
            "100+",
            "200+",

            "1",
            "2",
            "3",

            "4",
            "5",
            "6",

            "7",
            "8",
            "9"
            };

// this is array holding codes for Black Remote when used with non-PCB version of receiver
 unsigned int blackRemote[] ={
            0xFF629D, // ^
            0xFF22DD,   // <
            0xFF02FD,  // OK
            0xFFC23D, // >
            0xFFA857, // v

            0xFF6897, // 1
            0xFF9867, // 2
            0xF0C41643, // 3

            0xFF30CF, // 4
            0xFF18E7, // 5
            0xFF7A85,  // 6

            0xFF10EF, // 7
            0xFF38C7, // 8
            0xFF5AA5,  // 9

            0xFF42BD, // *
            0xFF4AB5, // 0
            0xFF52AD  // #
            };

// this is array holding codes for Black Remote when used with PCB version of receiver
 unsigned int blackRemotePCB[] ={
            0x511DBB, // ^
            0x52A3D41F,   // <
            0xD7E84B1B,  // OK
            0x20FE4DBB, // >
            0xA3C8EDDB, // v


            0xC101E57B, // 1
            0x97483BFB, // 2
            0xF0C41643, // 3

            0x9716BE3F, // 4
            0x3D9AE3F7, // 5
            0x6182021B,  // 6

            0x8C22657B, // 7
            0x488F3CBB, // 8
            0x449E79F,  // 9

            0x32C6FDF7, // *
            0x1BC0157B, // 0
            0x3EC3FC1B  // #
            };

// Black remote key names
 String blackRemoteKey[] ={
            "^",
            "<",
            "OK",
            ">",
            "v",

            "1",
            "2",
            "3",

            "4",
            "5",
            "6",

            "7",
            "8",
            "9",

            "*",
            "0",
            "#"
            };

decode_results results;


void setup()
{
  Serial.begin(9600);
  // In case the interrupt driver crashes on setup, give a clue
  // to the user what's going on.
  Serial.println("Robojax IR Decode");
  Serial.println("Servo Control with Remote");
  irrecv.enableIRIn(); // Start the receiver

   RJservo.attach(SERVO_PIN);  // attaches the servo on pin servoPin to the servo object

}

void loop() {

  if (irrecv.decode(&results)) {
    if(displayCode)Serial.println(results.value, HEX);
    robojaxValidateCode(results.value);// used the "robojaxValidateCode" bellow
    irrecv.resume(); // Receive the next value
  }
  delay(50);// 50 millisecond delay
}

/*
 * function: robojaxValidateCode
 * validates the remote code and prints the correct key name.
 * cd is the code passed from the loop.
 * Written by A. S. for Robojax
 */
void robojaxValidateCode(int cd)
{

  // Robojax IR Remote decoder
  int found=0;

 if(type =='W' && !PCB)
 {
    // Robojax IR White Remote decoder
    // if type is set to 'W' (white remote) and PCB=0 then check White remote code
      for(int i=0; i< sizeof(whiteRemote)/sizeof(int); i++)
      {
        if(whiteRemote[i] ==cd)
        {

          Serial.print("Key pressed:");
          Serial.println(whiteRemoteKey[i]);
          servoAction(whiteRemoteKey[i]);// take action
          found=1;
        }// if matched
      }// for
 }else if(type =='W' && PCB){
    // Robojax IR White Remote decoder
    // if type is set to 'W' (white remote) and PCB=1 then check White remote code
      for(int i=0; i< sizeof(whiteRemotePCB)/sizeof(int); i++)
      {
        if(whiteRemotePCB[i] ==cd)
        {

          Serial.print("Key pressed:");
          Serial.println(whiteRemoteKey[i]);
          servoAction(whiteRemoteKey[i]);// take action
          found=1;
        }// if matched
      }// for
 }else if(type =='B' && PCB){
    // Robojax IR Black Remote decoder
       // if type is set to 'B' (black remote) and PCB=1 then check Black remote code
       for(int i=0; i< sizeof(blackRemotePCB)/sizeof(int); i++)
      {
        // Robojax IR black Remote decoder
        if(blackRemotePCB[i] ==cd)
        {

          Serial.print("Key pressed:");
          Serial.println(blackRemoteKey[i]);
         servoAction(blackRemoteKey[i]);// take action
          found=1;
        }// if matched
      }// for
 }else{

      // if type is set to 'B' (black remote) and PCB =0 then check Black remote code
       for(int i=0; i< sizeof(blackRemote)/sizeof(int); i++)
      {
        // Robojax IR black Remote decoder
        if(blackRemote[i] ==cd)
        {

          Serial.print("Key pressed:");
          Serial.println(blackRemoteKey[i]);
          servoAction(blackRemoteKey[i]);// take action

          found=1;
        }// if matched
      }// for
 }// else
  if(!found){
    if(cd !=0xFFFFFFFF)
      {
    Serial.println("Key unknown");
      }
  }// found
}// robojaxValidateCode end

/*
 *
 * servoAction()
 * receives string "value" as input and based on the settings,
 * sends translates it to servo value and controls servo, either by:
 * rotating servo to the right
 * rotating servo to the left
 * moving the servo to the middle
 *
 */
void servoAction(String value)
{
  // Servo button demo with IR remote by Robojax.com
  while(value == RIGHT){

    if (angle > 0 && angle <= 180) {
      angle = angle - angleStep;
       if(angle < 0){
        angle = 0;
       }else{
      RJservo.write(angle); // move the servo to desired angle
      Serial.print("Moved to: ");
      Serial.print(angle);   // print the angle
      Serial.println(" degree");
       }
    }// if
    value =".";
    delay(100);
  }// while for RIGHT
  while(value == LEFT){

    // Servo button demo with IR remote by Robojax.com
    if (angle >= 0 && angle <= 180) {
      angle = angle + angleStep;
      if(angle >180){
        angle =180;
       }else{
      RJservo.write(angle); // move the servo to desired angle
      Serial.print("Moved to: ");
      Serial.print(angle);   // print the angle
      Serial.println(" degree");
       }
    }
    value =".";
    delay(100);
  }// while for LEFT

  if(value == CENTRE)
  {
    angle = ANGLE_CENTRE;
    RJservo.write(angle); // move the servo to centre at 90 degree angle
  }
    // Robojax IR Servo control
}//servoAction end
Rzeczy, których możesz potrzebować
-
Amazon
-
Allegro
Zasoby i odniesienia
Brak zasobów.
Pliki📁
Brak dostępnych plików.