このチュートリアルはの一部です: サーボモーター
サーボモーターに関連するすべてのビデオをここに掲載しています。他のビデオへのリンクはこの記事の下にあります。

Arduinoを使った赤外線リモコンによるサーボモーターの制御
```html
赤外線リモコンとArduinoでサーボモーターを制御する
このプロジェクトは、赤外線(IR)リモコンとArduinoを使用してサーボモーターを制御する方法を示しています。このセットアップにより、サーボの位置をワイヤレスで制御できるため、さまざまなアプリケーションに最適です。


このセットアップを使ったプロジェクトのアイデアをいくつか紹介します:
- リモートでカメラのパンとチルトを調整する。
- ロボットアームの動きを制御する。
- ウィンドウブラインドやカーテンの自動化。
- インタラクティブアートインスタレーションを作成する。
- リモコンカーや車両を作ること。
ハードウェア/コンポーネント
- Arduinoボード(例:Uno、Nano)
- サーボモーター
- IRリモコン(任意の標準リモコンが使用できますが、コードは特定のリモコン用に設定されています)
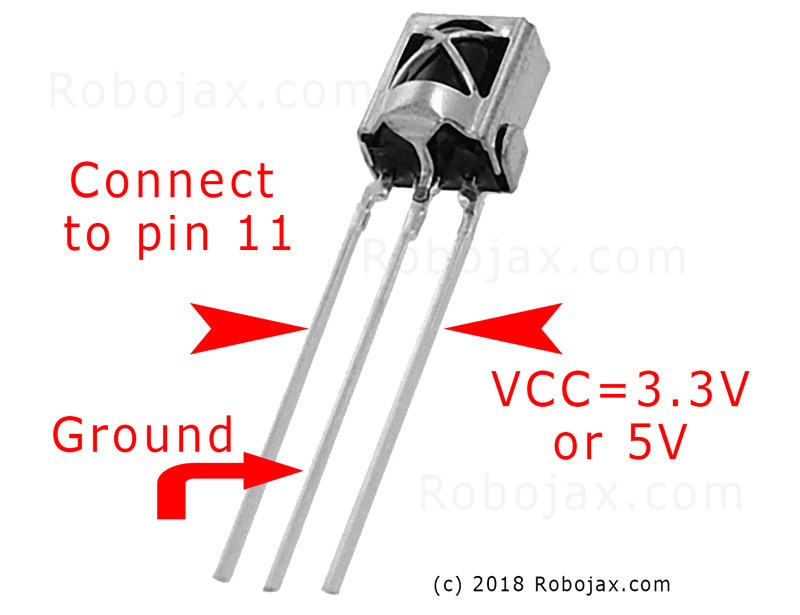
- IR受信モジュール(例:TSOP1838)
- ジャンパーワイヤー
- ブレッドボード(オプション)
配線ガイド
サーボモーターには3本のワイヤーがあります:グラウンド(通常は茶色または黒)、電源(通常は赤)、および信号(しばしばオレンジまたは白)。IR受信機にも3本のワイヤーがあります:グラウンド、電源(VCC)、および信号。
(in video at 01:46)

- サーボのグラウンドをArduinoのグラウンドに接続します
- サーボの電源をArduino 5Vに接続
- サーボ信号をArduinoピン8に (動画の02:23で)
- IR受信機のグラウンドをArduinoのグラウンドに接続
- IR受信機VCCをArduinoの5Vに接続
- IR受信機信号をArduinoのピン11に(動画の02:38で)
コードの説明
コードは、IR通信とサーボ制御に必要なライブラリを含めることから始まります。(動画の03:16にて)
#include <IRremote.h>
#include <Servo.h>
次に、重要な変数が定義されます。これらは、あなたの特定の設定に基づいて構成する必要があります。(動画の03:44にて)
const char type = 'B'; // 'W' for white remote, 'B' for black remote
const boolean PCB = 0;   // 1 if the IR receiver has a PCB, 0 if it's a bare module
const int SERVO_PIN = 8; // The pin connected to the servo's signal wire
int angleStep = 10;      // How many degrees the servo moves per button press
const int ANGLE_CENTRE = 90; // The center/reset position of the servo
動画内の05:06で
最も重要な構成ステップは、リモコンのボタンを特定のアクションに一致させることです。このコードには、異なるリモコンタイプ(白/黒、PCB/非PCB)とそれに対応するボタンコードの配列が含まれています。リモコンの正しいコードを特定し、それを望ましいアクション(右、左、中央)に割り当てる必要があります。(動画の05:16にて)
const String RIGHT = ">"; // Replace with the code for your "right" button
const String LEFT = "<";  // Replace with the code for your "left" button
const String CENTRE = "OK"; // Replace with the code for your "center" button
(in video at 08:12)
そのservoAction()受信したIR信号に基づいてサーボの動きを制御する関数です。受信したコマンドを確認し、それに応じてサーボの角度を調整します。angleStep変数はサーボの位置の増加または減少を制御します。(動画で08:06)
ライブプロジェクト/デモンストレーション
(in video at 09:56)
この動画では、異なるリモコンを使用してサーボを制御する方法を示しています。さまざまなリモコンタイプと受信モジュールに合わせてコードを調整する方法を説明しています。また、あなた自身のリモコンからIRコードをキャプチャしてそれをコードに統合する方法も紹介しています。(動画内の12:48)
章
- [00:00] イントロダクションとプロジェクト概要
- [00:36] コンポーネントと材料
- [01:46] 配線指示
- [03:16] コードの説明
- [09:56] プロジェクトデモンストレーション
- 自分のリモコンを使う
```
画像
このチュートリアルはの一部です: サーボモーター
- Arduinoを使ってプッシュボタンでサーボを制御する
- Control a Servo Motor with a Push Button: Move Servo and Return SPB-1
- Control a Servo Motor with a Push Button: Move Servo in One Direction SPB-2
- Controlling a Servo Motor with a Push Button: Move Servo While Button Is Pressed (SPB-3)
- Arduinoを使ってポテンショメータでサーボを制御する
- Arduinoを使ってポテンショメータとLCD1602でサーボを制御する
- ポテンショメーターを使用したArduinoサーボモーター制御
- Arduino用の手のジェスチャーによるサーボ位置の制御
- Controlling Two or More Servos with Potentiometers Using an Arduino
- How to Control a 360° Servo with Three Push-Button Switches
- How to Use Continuous 360° Servo with Arduino
- PCA9685 16チャンネル 12ビット サーボコントローラ V1 用の Arduino コードとビデオ
- Build an Arduino Servo Toggle Switch with a Push Button
/*
 * Original library from - http://arcfn.com
 *
 * This Arduino code controls a servo motor with an IR remote controller or any TV remote.
 *
 * You have to select the type of your remote as Black or White in the code below
 * and also select your receiver 1838 as either a PCB or bare module. See video for details.
 *
 * You have to watch this video: https://youtu.be/muAkBQb24NI
 * before proceeding with this code.
 *
 * Modified/Written by Ahmad Shamshiri
 * on August 02, 2018 at 20:35 in Ajax, Ontario, Canada
 * for Robojax.com
 * Watch video instructions for this code: https://youtu.be/Wp7hX9UErSQ
 * Get other Arduino codes from Robojax.com
 *
 */

#include <IRremote.h>

int RECV_PIN = 11;
const char type ='B';// W for white, B for black. Must keep single quotes like 'B' or 'W'
const boolean PCB = 0;// if receiver is PCB set to 1, if not set to 0. See video for details
boolean displayCode = true;// to display remote code. if not, set to false

//***** Servo settings begins
#include <Servo.h>
Servo RJservo;  // create servo object to control a servo
const int SERVO_PIN = 8;  // analog pin used to connect the potentiometer
int angle =90;    // initial angle  for servo
int angleStep =10;
const int ANGLE_CENTRE =90;// the centre/reset angle of your servo
//**** Servo settings ends

// remote settings
const String RIGHT=">";// move servo to the right with this key on remote
const String LEFT ="<";// move servo to the left with this key on remote
const String CENTRE ="OK";// move servo to centre with this key on remote
// remote settings end

IRrecv irrecv(RECV_PIN);

// this is array holding codes for White Remote when used with PCB version of receiver
unsigned int whiteRemotePCB[] ={
            0xE318261B, // CH-
            0x511DBB,   // CH
            0xEE886D7F,  // CH+

            0x52A3D41F, // |<<
            0xD7E84B1B, // >>|
            0x20FE4DBB, // >||

            0xF076C13B, // -
            0xA3C8EDDB, // +
            0x12CEA6E6, // EQ

            0xC101E57B, // 0
            0x97483BFB, // 100+
            0xF0C41643, // 200+

            0x9716BE3F, // 1
            0x3D9AE3F7, // 2
            0x6182021B, // 3

            0x8C22657B, // 4
            0x488F3CBB, // 5
            0x449E79F,  // 6

            0x32C6FDF7, // 7
            0x1BC0157B, // 8
            0x3EC3FC1B  // 9
            };

// this is array holding codes for White Remote when used with non-PCB version of receiver
unsigned int whiteRemote[] ={
            0xFFA25D, // CH-
            0xFF629D,   // CH
            0xFFE21D,  // CH+

            0xFF22DD, // |<<
            0xFF02FD, // >>|
            0xFFC23D, // >||

            0xFFE01F, // -
            0xFFA857, // +
            0xFF906F, // EQ

            0xFF6897, // 0
            0xFF9867, // 100+
            0xFFB04F, // 200+

            0xFF30CF, // 1
            0xFF18E7, // 2
            0xFF7A85, // 3

            0xFF10EF, // 4
            0xFF38C7, // 5
            0xFF5AA5,  // 6

            0xFF42BD, // 7
            0xFF4AB5, // 8
            0xFF52AD  // 9
            };
// key lables of white remote
 String whiteRemoteKey[] ={
            "CH-",
            "CH",
            "CH+",

            "|<<",
            ">>|",
            ">||",

            "-",
            "+",
            "EQ",

            "0",
            "100+",
            "200+",

            "1",
            "2",
            "3",

            "4",
            "5",
            "6",

            "7",
            "8",
            "9"
            };

// this is array holding codes for Black Remote when used with non-PCB version of receiver
 unsigned int blackRemote[] ={
            0xFF629D, // ^
            0xFF22DD,   // <
            0xFF02FD,  // OK
            0xFFC23D, // >
            0xFFA857, // v

            0xFF6897, // 1
            0xFF9867, // 2
            0xF0C41643, // 3

            0xFF30CF, // 4
            0xFF18E7, // 5
            0xFF7A85,  // 6

            0xFF10EF, // 7
            0xFF38C7, // 8
            0xFF5AA5,  // 9

            0xFF42BD, // *
            0xFF4AB5, // 0
            0xFF52AD  // #
            };

// this is array holding codes for Black Remote when used with PCB version of receiver
 unsigned int blackRemotePCB[] ={
            0x511DBB, // ^
            0x52A3D41F,   // <
            0xD7E84B1B,  // OK
            0x20FE4DBB, // >
            0xA3C8EDDB, // v


            0xC101E57B, // 1
            0x97483BFB, // 2
            0xF0C41643, // 3

            0x9716BE3F, // 4
            0x3D9AE3F7, // 5
            0x6182021B,  // 6

            0x8C22657B, // 7
            0x488F3CBB, // 8
            0x449E79F,  // 9

            0x32C6FDF7, // *
            0x1BC0157B, // 0
            0x3EC3FC1B  // #
            };

// Black remote key names
 String blackRemoteKey[] ={
            "^",
            "<",
            "OK",
            ">",
            "v",

            "1",
            "2",
            "3",

            "4",
            "5",
            "6",

            "7",
            "8",
            "9",

            "*",
            "0",
            "#"
            };

decode_results results;


void setup()
{
  Serial.begin(9600);
  // In case the interrupt driver crashes on setup, give a clue
  // to the user what's going on.
  Serial.println("Robojax IR Decode");
  Serial.println("Servo Control with Remote");
  irrecv.enableIRIn(); // Start the receiver

   RJservo.attach(SERVO_PIN);  // attaches the servo on pin servoPin to the servo object

}

void loop() {

  if (irrecv.decode(&results)) {
    if(displayCode)Serial.println(results.value, HEX);
    robojaxValidateCode(results.value);// used the "robojaxValidateCode" bellow
    irrecv.resume(); // Receive the next value
  }
  delay(50);// 50 millisecond delay
}

/*
 * function: robojaxValidateCode
 * validates the remote code and prints the correct key name.
 * cd is the code passed from the loop.
 * Written by A. S. for Robojax
 */
void robojaxValidateCode(int cd)
{

  // Robojax IR Remote decoder
  int found=0;

 if(type =='W' && !PCB)
 {
    // Robojax IR White Remote decoder
    // if type is set to 'W' (white remote) and PCB=0 then check White remote code
      for(int i=0; i< sizeof(whiteRemote)/sizeof(int); i++)
      {
        if(whiteRemote[i] ==cd)
        {

          Serial.print("Key pressed:");
          Serial.println(whiteRemoteKey[i]);
          servoAction(whiteRemoteKey[i]);// take action
          found=1;
        }// if matched
      }// for
 }else if(type =='W' && PCB){
    // Robojax IR White Remote decoder
    // if type is set to 'W' (white remote) and PCB=1 then check White remote code
      for(int i=0; i< sizeof(whiteRemotePCB)/sizeof(int); i++)
      {
        if(whiteRemotePCB[i] ==cd)
        {

          Serial.print("Key pressed:");
          Serial.println(whiteRemoteKey[i]);
          servoAction(whiteRemoteKey[i]);// take action
          found=1;
        }// if matched
      }// for
 }else if(type =='B' && PCB){
    // Robojax IR Black Remote decoder
       // if type is set to 'B' (black remote) and PCB=1 then check Black remote code
       for(int i=0; i< sizeof(blackRemotePCB)/sizeof(int); i++)
      {
        // Robojax IR black Remote decoder
        if(blackRemotePCB[i] ==cd)
        {

          Serial.print("Key pressed:");
          Serial.println(blackRemoteKey[i]);
         servoAction(blackRemoteKey[i]);// take action
          found=1;
        }// if matched
      }// for
 }else{

      // if type is set to 'B' (black remote) and PCB =0 then check Black remote code
       for(int i=0; i< sizeof(blackRemote)/sizeof(int); i++)
      {
        // Robojax IR black Remote decoder
        if(blackRemote[i] ==cd)
        {

          Serial.print("Key pressed:");
          Serial.println(blackRemoteKey[i]);
          servoAction(blackRemoteKey[i]);// take action

          found=1;
        }// if matched
      }// for
 }// else
  if(!found){
    if(cd !=0xFFFFFFFF)
      {
    Serial.println("Key unknown");
      }
  }// found
}// robojaxValidateCode end

/*
 *
 * servoAction()
 * receives string "value" as input and based on the settings,
 * sends translates it to servo value and controls servo, either by:
 * rotating servo to the right
 * rotating servo to the left
 * moving the servo to the middle
 *
 */
void servoAction(String value)
{
  // Servo button demo with IR remote by Robojax.com
  while(value == RIGHT){

    if (angle > 0 && angle <= 180) {
      angle = angle - angleStep;
       if(angle < 0){
        angle = 0;
       }else{
      RJservo.write(angle); // move the servo to desired angle
      Serial.print("Moved to: ");
      Serial.print(angle);   // print the angle
      Serial.println(" degree");
       }
    }// if
    value =".";
    delay(100);
  }// while for RIGHT
  while(value == LEFT){

    // Servo button demo with IR remote by Robojax.com
    if (angle >= 0 && angle <= 180) {
      angle = angle + angleStep;
      if(angle >180){
        angle =180;
       }else{
      RJservo.write(angle); // move the servo to desired angle
      Serial.print("Moved to: ");
      Serial.print(angle);   // print the angle
      Serial.println(" degree");
       }
    }
    value =".";
    delay(100);
  }// while for LEFT

  if(value == CENTRE)
  {
    angle = ANGLE_CENTRE;
    RJservo.write(angle); // move the servo to centre at 90 degree angle
  }
    // Robojax IR Servo control
}//servoAction end
必要かもしれないもの
-
アマゾンAmazonで赤外線リモコンを購入するamzn.to
-
イーベイeBayから赤外線リモコンを購入するebay.us
リソースと参考文献
まだリソースはありません。
ファイル📁
ファイルは利用できません。