Ce tutoriel fait partie de: servomoteurs
Vous trouverez ici une liste de toutes les vidéos relatives aux servomoteurs. D'autres liens vers ces vidéos sont disponibles plus bas.

Contrôler des servomoteurs à l'aide d'une télécommande infrarouge avec Arduino
```html
Contrôle des servomoteurs avec une télécommande infrarouge et Arduino
Ce projet démontre comment contrôler un servo-moteur à l'aide d'une télécommande infrarouge (IR) et d'un Arduino. Cette configuration permet de contrôler sans fil la position du servo, ce qui la rend idéale pour diverses applications.


Voici quelques idées de projets utilisant cette configuration :
- Ajustement à distance du panoramique et de l'inclinaison d'une caméra.
- Contrôler les mouvements d'un bras robotique.
- Automatisation des stores ou des rideaux.
- Créer des installations artistiques interactives.
- Construire une voiture ou un véhicule télécommandé.
Matériel/Composants
- Carte Arduino (par exemple, Uno, Nano)
- Servomoteur
- Télécommande IR (n'importe quelle télécommande standard fonctionnera, mais le code est configuré pour des télécommandes spécifiques)
- Module récepteur IR (par exemple, TSOP1838)
- Fils de liaison
- Planche à pain (optionnel)
Guide de câblage
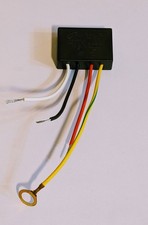
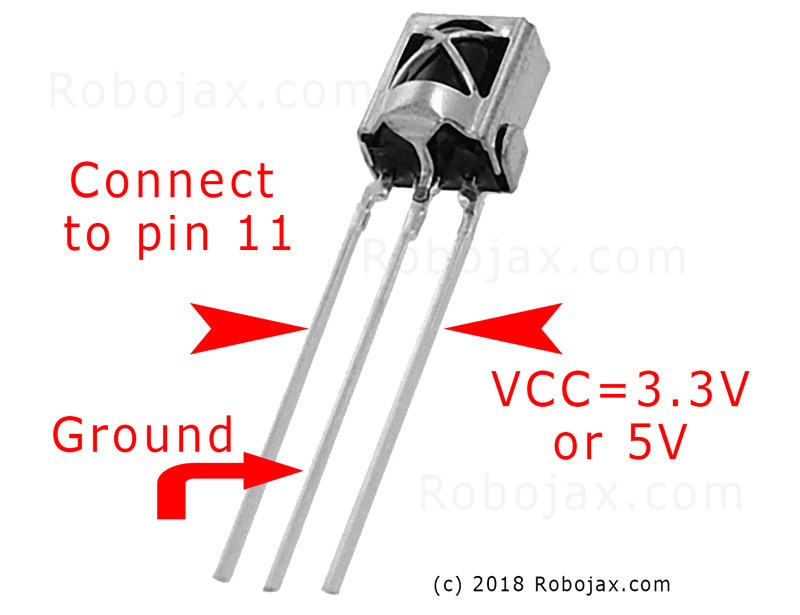
Le moteur servo a trois fils : la terre (généralement marron ou noir), l'alimentation (typiquement rouge) et le signal (souvent orange ou blanc). Le récepteur IR a également trois fils : la terre, l'alimentation (VCC) et le signal.
(in vidéo à 01:46)

- Servo de masse à Arduino de masse
- Alimentation du servo par Arduino 5V
- Signal servo à la broche 8 de l'Arduino (dans la vidéo à 02:23)
- Récepteur IR Terre à la Terre de l'Arduino
- VCC du récepteur IR à 5V de l'Arduino
- Signal du récepteur IR vers la broche 11 de l'Arduino (dans la vidéo à 02:38)
Explication du code
Le code commence par inclure les bibliothèques nécessaires pour la communication IR et le contrôle des servos. (dans la vidéo à 03:16)
#include <IRremote.h>
#include <Servo.h>
Ensuite, les variables essentielles sont définies. Vous devrez les configurer en fonction de votre configuration spécifique. (dans la vidéo à 03:44)
const char type = 'B'; // 'W' for white remote, 'B' for black remote
const boolean PCB = 0;   // 1 if the IR receiver has a PCB, 0 if it's a bare module
const int SERVO_PIN = 8; // The pin connected to the servo's signal wire
int angleStep = 10;      // How many degrees the servo moves per button press
const int ANGLE_CENTRE = 90; // The center/reset position of the servo
(in vidéo à 05:06)
L'étape de configuration la plus cruciale consiste à associer les boutons de la télécommande à des actions spécifiques. Le code comprend des tableaux pour différents types de télécommandes (blanche/noire, PCB/non-PCB) et leurs codes de bouton correspondants. Vous devrez identifier les codes corrects pour votre télécommande et les attribuer aux actions souhaitées (droite, gauche, centre). (dans la vidéo à 05:16)
const String RIGHT = ">"; // Replace with the code for your "right" button
const String LEFT = "<";  // Replace with the code for your "left" button
const String CENTRE = "OK"; // Replace with the code for your "center" button
(in vidéo à 08:12)
LaservoAction()la fonction gère le mouvement du servo en fonction du signal IR reçu. Elle vérifie la commande reçue et ajuste l'angle du servo en conséquence. LeangleStepla variable contrôle l'incrément ou le décrément de la position du servo. (dans la vidéo à 08:06)
Projet en direct/Démonstration
(in vidéo à 09:56)
La vidéo démontre comment contrôler le servo en utilisant différents télécommandes. Elle montre comment ajuster le code pour divers types de télécommandes et modules récepteurs. La démonstration couvre également comment capturer les codes IR de vos propres télécommandes et les intégrer dans le code. (dans la vidéo à 12:48)
Chapitres
- [00:00] Introduction et aperçu du projet
- [00:36] Composants et matériaux
- [01:46] Instructions de câblage
- [03:16] Explication du code
- [09:56] Démonstration du projet
- Utiliser votre propre télécommande
```
Images
Ce tutoriel fait partie de: servomoteurs
- Contrôler un servomoteur avec des boutons-poussoirs à l'aide d'un Arduino
- Control a Servo Motor with a Push Button: Move Servo and Return SPB-1
- Control a Servo Motor with a Push Button: Move Servo in One Direction SPB-2
- Controlling a Servo Motor with a Push Button: Move Servo While Button Is Pressed (SPB-3)
- Contrôler un servomoteur avec un potentiomètre à l'aide d'un Arduino
- Contrôler un servomoteur avec un potentiomètre et un écran LCD1602 à l'aide d'un Arduino
- Contrôle de moteur servo Arduino à l'aide d'un potentiomètre
- Contrôle de la position du servo avec des gestes de la main pour Arduino
- Controlling Two or More Servos with Potentiometers Using an Arduino
- How to Control a 360° Servo with Three Push-Button Switches
- How to Use Continuous 360° Servo with Arduino
- Code Arduino et vidéo pour le contrôleur de servomoteurs PCA9685 16 canaux 12 bits V1
- Build an Arduino Servo Toggle Switch with a Push Button
/*
 * Original library from - http://arcfn.com
 *
 * This Arduino code controls a servo motor with an IR remote controller or any TV remote.
 *
 * You have to select the type of your remote as Black or White in the code below
 * and also select your receiver 1838 as either a PCB or bare module. See video for details.
 *
 * You have to watch this video: https://youtu.be/muAkBQb24NI
 * before proceeding with this code.
 *
 * Modified/Written by Ahmad Shamshiri
 * on August 02, 2018 at 20:35 in Ajax, Ontario, Canada
 * for Robojax.com
 * Watch video instructions for this code: https://youtu.be/Wp7hX9UErSQ
 * Get other Arduino codes from Robojax.com
 *
 */

#include <IRremote.h>

int RECV_PIN = 11;
const char type ='B';// W for white, B for black. Must keep single quotes like 'B' or 'W'
const boolean PCB = 0;// if receiver is PCB set to 1, if not set to 0. See video for details
boolean displayCode = true;// to display remote code. if not, set to false

//***** Servo settings begins
#include <Servo.h>
Servo RJservo;  // create servo object to control a servo
const int SERVO_PIN = 8;  // analog pin used to connect the potentiometer
int angle =90;    // initial angle  for servo
int angleStep =10;
const int ANGLE_CENTRE =90;// the centre/reset angle of your servo
//**** Servo settings ends

// remote settings
const String RIGHT=">";// move servo to the right with this key on remote
const String LEFT ="<";// move servo to the left with this key on remote
const String CENTRE ="OK";// move servo to centre with this key on remote
// remote settings end

IRrecv irrecv(RECV_PIN);

// this is array holding codes for White Remote when used with PCB version of receiver
unsigned int whiteRemotePCB[] ={
            0xE318261B, // CH-
            0x511DBB,   // CH
            0xEE886D7F,  // CH+

            0x52A3D41F, // |<<
            0xD7E84B1B, // >>|
            0x20FE4DBB, // >||

            0xF076C13B, // -
            0xA3C8EDDB, // +
            0x12CEA6E6, // EQ

            0xC101E57B, // 0
            0x97483BFB, // 100+
            0xF0C41643, // 200+

            0x9716BE3F, // 1
            0x3D9AE3F7, // 2
            0x6182021B, // 3

            0x8C22657B, // 4
            0x488F3CBB, // 5
            0x449E79F,  // 6

            0x32C6FDF7, // 7
            0x1BC0157B, // 8
            0x3EC3FC1B  // 9
            };

// this is array holding codes for White Remote when used with non-PCB version of receiver
unsigned int whiteRemote[] ={
            0xFFA25D, // CH-
            0xFF629D,   // CH
            0xFFE21D,  // CH+

            0xFF22DD, // |<<
            0xFF02FD, // >>|
            0xFFC23D, // >||

            0xFFE01F, // -
            0xFFA857, // +
            0xFF906F, // EQ

            0xFF6897, // 0
            0xFF9867, // 100+
            0xFFB04F, // 200+

            0xFF30CF, // 1
            0xFF18E7, // 2
            0xFF7A85, // 3

            0xFF10EF, // 4
            0xFF38C7, // 5
            0xFF5AA5,  // 6

            0xFF42BD, // 7
            0xFF4AB5, // 8
            0xFF52AD  // 9
            };
// key lables of white remote
 String whiteRemoteKey[] ={
            "CH-",
            "CH",
            "CH+",

            "|<<",
            ">>|",
            ">||",

            "-",
            "+",
            "EQ",

            "0",
            "100+",
            "200+",

            "1",
            "2",
            "3",

            "4",
            "5",
            "6",

            "7",
            "8",
            "9"
            };

// this is array holding codes for Black Remote when used with non-PCB version of receiver
 unsigned int blackRemote[] ={
            0xFF629D, // ^
            0xFF22DD,   // <
            0xFF02FD,  // OK
            0xFFC23D, // >
            0xFFA857, // v

            0xFF6897, // 1
            0xFF9867, // 2
            0xF0C41643, // 3

            0xFF30CF, // 4
            0xFF18E7, // 5
            0xFF7A85,  // 6

            0xFF10EF, // 7
            0xFF38C7, // 8
            0xFF5AA5,  // 9

            0xFF42BD, // *
            0xFF4AB5, // 0
            0xFF52AD  // #
            };

// this is array holding codes for Black Remote when used with PCB version of receiver
 unsigned int blackRemotePCB[] ={
            0x511DBB, // ^
            0x52A3D41F,   // <
            0xD7E84B1B,  // OK
            0x20FE4DBB, // >
            0xA3C8EDDB, // v


            0xC101E57B, // 1
            0x97483BFB, // 2
            0xF0C41643, // 3

            0x9716BE3F, // 4
            0x3D9AE3F7, // 5
            0x6182021B,  // 6

            0x8C22657B, // 7
            0x488F3CBB, // 8
            0x449E79F,  // 9

            0x32C6FDF7, // *
            0x1BC0157B, // 0
            0x3EC3FC1B  // #
            };

// Black remote key names
 String blackRemoteKey[] ={
            "^",
            "<",
            "OK",
            ">",
            "v",

            "1",
            "2",
            "3",

            "4",
            "5",
            "6",

            "7",
            "8",
            "9",

            "*",
            "0",
            "#"
            };

decode_results results;


void setup()
{
  Serial.begin(9600);
  // In case the interrupt driver crashes on setup, give a clue
  // to the user what's going on.
  Serial.println("Robojax IR Decode");
  Serial.println("Servo Control with Remote");
  irrecv.enableIRIn(); // Start the receiver

   RJservo.attach(SERVO_PIN);  // attaches the servo on pin servoPin to the servo object

}

void loop() {

  if (irrecv.decode(&results)) {
    if(displayCode)Serial.println(results.value, HEX);
    robojaxValidateCode(results.value);// used the "robojaxValidateCode" bellow
    irrecv.resume(); // Receive the next value
  }
  delay(50);// 50 millisecond delay
}

/*
 * function: robojaxValidateCode
 * validates the remote code and prints the correct key name.
 * cd is the code passed from the loop.
 * Written by A. S. for Robojax
 */
void robojaxValidateCode(int cd)
{

  // Robojax IR Remote decoder
  int found=0;

 if(type =='W' && !PCB)
 {
    // Robojax IR White Remote decoder
    // if type is set to 'W' (white remote) and PCB=0 then check White remote code
      for(int i=0; i< sizeof(whiteRemote)/sizeof(int); i++)
      {
        if(whiteRemote[i] ==cd)
        {

          Serial.print("Key pressed:");
          Serial.println(whiteRemoteKey[i]);
          servoAction(whiteRemoteKey[i]);// take action
          found=1;
        }// if matched
      }// for
 }else if(type =='W' && PCB){
    // Robojax IR White Remote decoder
    // if type is set to 'W' (white remote) and PCB=1 then check White remote code
      for(int i=0; i< sizeof(whiteRemotePCB)/sizeof(int); i++)
      {
        if(whiteRemotePCB[i] ==cd)
        {

          Serial.print("Key pressed:");
          Serial.println(whiteRemoteKey[i]);
          servoAction(whiteRemoteKey[i]);// take action
          found=1;
        }// if matched
      }// for
 }else if(type =='B' && PCB){
    // Robojax IR Black Remote decoder
       // if type is set to 'B' (black remote) and PCB=1 then check Black remote code
       for(int i=0; i< sizeof(blackRemotePCB)/sizeof(int); i++)
      {
        // Robojax IR black Remote decoder
        if(blackRemotePCB[i] ==cd)
        {

          Serial.print("Key pressed:");
          Serial.println(blackRemoteKey[i]);
         servoAction(blackRemoteKey[i]);// take action
          found=1;
        }// if matched
      }// for
 }else{

      // if type is set to 'B' (black remote) and PCB =0 then check Black remote code
       for(int i=0; i< sizeof(blackRemote)/sizeof(int); i++)
      {
        // Robojax IR black Remote decoder
        if(blackRemote[i] ==cd)
        {

          Serial.print("Key pressed:");
          Serial.println(blackRemoteKey[i]);
          servoAction(blackRemoteKey[i]);// take action

          found=1;
        }// if matched
      }// for
 }// else
  if(!found){
    if(cd !=0xFFFFFFFF)
      {
    Serial.println("Key unknown");
      }
  }// found
}// robojaxValidateCode end

/*
 *
 * servoAction()
 * receives string "value" as input and based on the settings,
 * sends translates it to servo value and controls servo, either by:
 * rotating servo to the right
 * rotating servo to the left
 * moving the servo to the middle
 *
 */
void servoAction(String value)
{
  // Servo button demo with IR remote by Robojax.com
  while(value == RIGHT){

    if (angle > 0 && angle <= 180) {
      angle = angle - angleStep;
       if(angle < 0){
        angle = 0;
       }else{
      RJservo.write(angle); // move the servo to desired angle
      Serial.print("Moved to: ");
      Serial.print(angle);   // print the angle
      Serial.println(" degree");
       }
    }// if
    value =".";
    delay(100);
  }// while for RIGHT
  while(value == LEFT){

    // Servo button demo with IR remote by Robojax.com
    if (angle >= 0 && angle <= 180) {
      angle = angle + angleStep;
      if(angle >180){
        angle =180;
       }else{
      RJservo.write(angle); // move the servo to desired angle
      Serial.print("Moved to: ");
      Serial.print(angle);   // print the angle
      Serial.println(" degree");
       }
    }
    value =".";
    delay(100);
  }// while for LEFT

  if(value == CENTRE)
  {
    angle = ANGLE_CENTRE;
    RJservo.write(angle); // move the servo to centre at 90 degree angle
  }
    // Robojax IR Servo control
}//servoAction end
Ce dont vous pourriez avoir besoin
-
Amazon
-
eBay
Ressources et références
Aucune ressource pour le moment.
Fichiers📁
Aucun fichier disponible.