این آموزش بخشی است از: سروو موتورها
تمام ویدیوهای مربوط به سروو موتورها که مرتبط هستند، در اینجا فهرست شدهاند. لینک سایر ویدیوها در زیر این مقاله قرار دارد.

کنترل سرو موتورها با استفاده از یک کنترل از راه دور مادون قرمز و آردوینو
```html
کنترل سرو موتور با یک کنترل از راه دور مادون قرمز و آردوینو
این پروژه نحوه کنترل یک موتور سروو را با استفاده از یک ریموت مادون قرمز (IR) و یک آردوینو نشان میدهد. این تنظیمات امکان کنترل بیسیم موقعیت سروو را فراهم میکند که آن را برای کاربردهای مختلف ایدهآل میسازد.


در اینجا چند ایده پروژه با استفاده از این تنظیمات آورده شده است:
- تنظیم از راه دور پن و تیلت یک دوربین.
- کنترل حرکات یک بازوی رباتیک.
- اتوماسیون پردهها یا کرکرههای پنجره.
- ایجاد نصبهای هنری تعاملی.
- ساخت یک خودروی کنترل از راه دور.
سختافزار/قطعات
- برد آردوینو (مانند، Uno، Nano)
- موتور سرو
- کنترل از راه دور IR (هر کنترل استانداردی کار خواهد کرد، اما شِفر (کود) برای کنترلهای خاص پیکربندی شده است)
- ماجیول گیرنده IR (به عنوان مثال، TSOP1838)
- سیمهای پرش
- بردبورد (اختیاری)
راهنمای سیمکشی
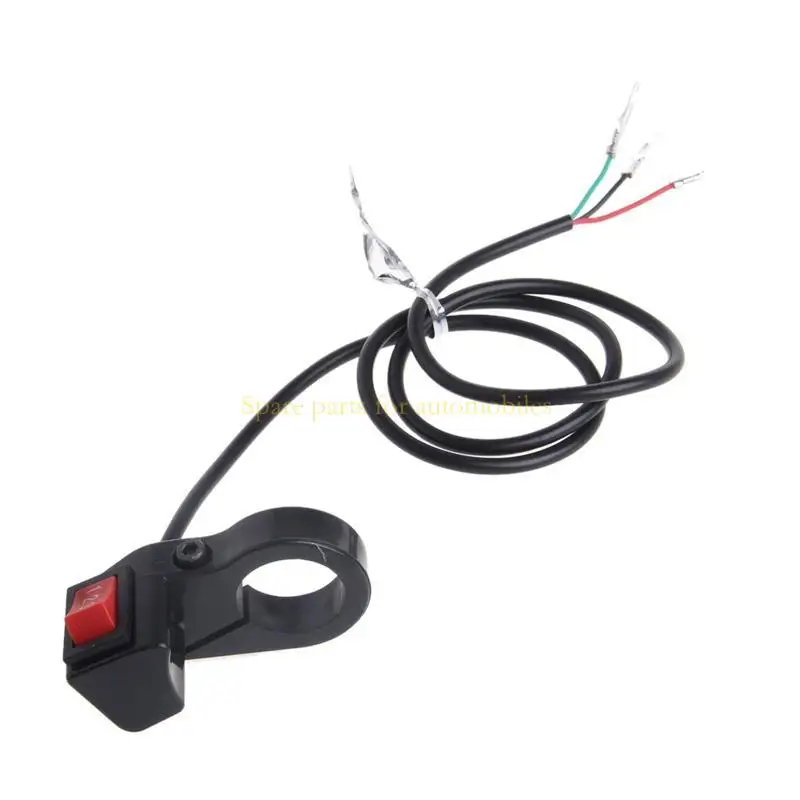
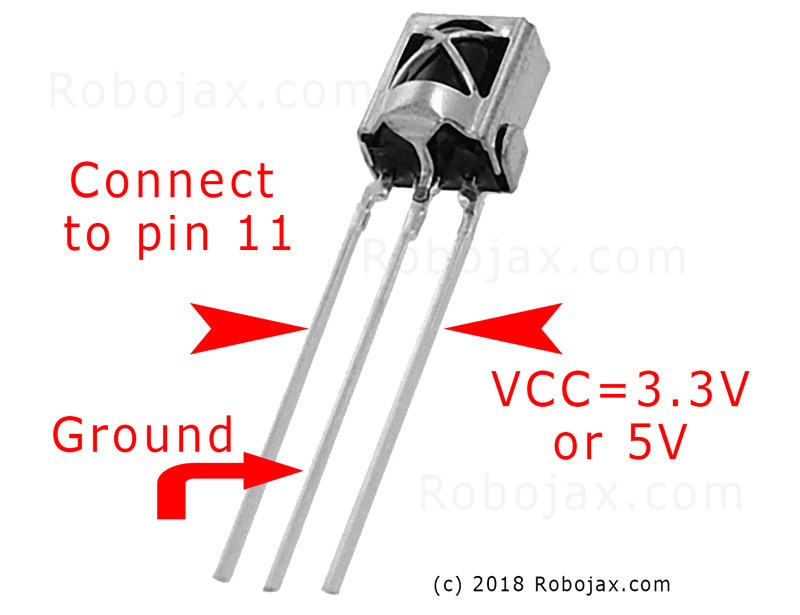
موتر سرو دارای سه سیم است: زمین (که معمولاً قهوهای یا سیاه است)، برق (که معمولاً قرمز است) و سیگنال (که اغلب نارنجی یا سفید است). گیرنده IR نیز دارای سه سیم است: زمین، برق (VCC) و سیگنال.
(in video at 01:46)

- پایه زمین سروو به پایه زمین آردوینو
- قدرت سروو به آردوینو ۵ ولت
- سیگنال سروو به پایه ۸ آردوینو (در ویدیو در ۰۲:۲۳)
- زمین گیرنده IR به زمین آردوینو
- ورودی IR VCC به 5V آردوینو
- سیگنال گیرنده IR به پایه ۱۱ آردوینو (در ویدیو در ۰۲:۳۸)
توضیح شِفر (کود)
شِفر (کود) با شامل کردن کتابخانههای لازم برای ارتباط IR و کنترل سرو servo آغاز میشود. (در ویدیو در ۰۳:۱۶)
#include <IRremote.h>
#include <Servo.h>
سپس، متغیرهای ضروری تعریف میشوند. شما باید اینها را بر اساس تنظیمات خاص خود پیکربندی کنید. (در ویدئو در ۰۳:۴۴)
const char type = 'B'; // 'W' for white remote, 'B' for black remote
const boolean PCB = 0;   // 1 if the IR receiver has a PCB, 0 if it's a bare module
const int SERVO_PIN = 8; // The pin connected to the servo's signal wire
int angleStep = 10;      // How many degrees the servo moves per button press
const int ANGLE_CENTRE = 90; // The center/reset position of the servo
در ویدیو در دقیقه ۰۵:۰۶
مهمترین مرحله پیکربندی، تطابق دکمههای کنترل از راه دور با اقدامات خاص است. شِفر (کود) شامل آرایههایی برای انواع مختلف کنترل از راه دور (سفید/سیاه، PCB/غیر PCB) و کدهای مربوط به دکمههای آنها است. شما باید کدهای درست برای کنترل از راه دور خود را شناسایی کرده و آنها را به اقدامات موردنظر (راست، چپ، مرکز) اختصاص دهید. (در ویدیو در 05:16)
const String RIGHT = ">"; // Replace with the code for your "right" button
const String LEFT = "<";  // Replace with the code for your "left" button
const String CENTRE = "OK"; // Replace with the code for your "center" button
(در ویدیو در ساعت ۰۸:۱۲)
محتواservoAction()عملکرد، حرکت سروو را بر اساس سیگنال IR دریافت شده کنترل میکند. این عملکرد، فرمان دریافتی را بررسی کرده و زاویه سروو را متناسب با آن تنظیم میکند.angleStepمتغیر کنترل کننده افزایش یا کاهش موقعیت سروو است. (در ویدیو در 08:06)
پروژه زنده/نمایشگاه
(in video at 09:56)
این ویدیو نشان میدهد که چگونه میتوان سرو را با استفاده از ریموتهای مختلف کنترل کرد. این ویدیو نشان میدهد که چگونه میتوان شِفر (کود) را برای انواع مختلف ریموتها و ماجیولهای دریافتکننده تنظیم کرد. این نمایش همچنین شامل چگونگی ضبط کدهای IR از ریموتهای خود و ادغام آنها در شِفر (کود) است. (در ویدیو در ۱۲:۴۸)
فصلها
- [00:00] معرفی و مرور پروژه
- [۰۰:۳۶] اجزا و مواد
- [01:46] دستورالعملهای سیمکشی
- [03:16] توضیح شِفر (کود)
- [09:56] نمایش پروژه
- استفاده از ریموت خودتان
```
تصاویر
این آموزش بخشی از: سروو موتورها
- کنترل یک سرو موتور با دکمههای فشاری با استفاده از آردوینو
- Control a Servo Motor with a Push Button: Move Servo and Return SPB-1
- Control a Servo Motor with a Push Button: Move Servo in One Direction SPB-2
- Controlling a Servo Motor with a Push Button: Move Servo While Button Is Pressed (SPB-3)
- کنترل یک سروو با پتانسیومتر با استفاده از آردوینو
- کنترل یک سروو با پتانسیومتر و LCD1602 با استفاده از آردوینو
- کنترل موتور سروو آردوینو با استفاده از پتانسیومتر
- کنترل موقعیت سروو با حرکات دست برای آردوینو
- Controlling Two or More Servos with Potentiometers Using an Arduino
- How to Control a 360° Servo with Three Push-Button Switches
- How to Use Continuous 360° Servo with Arduino
- شِفر (کود) آردوینو و ویدیو برای کنترلکننده سروو PCA9685، 16 کاناله، 12 بیتی، V1
- Build an Arduino Servo Toggle Switch with a Push Button
/*
 * Original library from - http://arcfn.com
 *
 * This Arduino code controls a servo motor with an IR remote controller or any TV remote.
 *
 * You have to select the type of your remote as Black or White in the code below
 * and also select your receiver 1838 as either a PCB or bare module. See video for details.
 *
 * You have to watch this video: https://youtu.be/muAkBQb24NI
 * before proceeding with this code.
 *
 * Modified/Written by Ahmad Shamshiri
 * on August 02, 2018 at 20:35 in Ajax, Ontario, Canada
 * for Robojax.com
 * Watch video instructions for this code: https://youtu.be/Wp7hX9UErSQ
 * Get other Arduino codes from Robojax.com
 *
 */

#include <IRremote.h>

int RECV_PIN = 11;
const char type ='B';// W for white, B for black. Must keep single quotes like 'B' or 'W'
const boolean PCB = 0;// if receiver is PCB set to 1, if not set to 0. See video for details
boolean displayCode = true;// to display remote code. if not, set to false

//***** Servo settings begins
#include <Servo.h>
Servo RJservo;  // create servo object to control a servo
const int SERVO_PIN = 8;  // analog pin used to connect the potentiometer
int angle =90;    // initial angle  for servo
int angleStep =10;
const int ANGLE_CENTRE =90;// the centre/reset angle of your servo
//**** Servo settings ends

// remote settings
const String RIGHT=">";// move servo to the right with this key on remote
const String LEFT ="<";// move servo to the left with this key on remote
const String CENTRE ="OK";// move servo to centre with this key on remote
// remote settings end

IRrecv irrecv(RECV_PIN);

// this is array holding codes for White Remote when used with PCB version of receiver
unsigned int whiteRemotePCB[] ={
            0xE318261B, // CH-
            0x511DBB,   // CH
            0xEE886D7F,  // CH+

            0x52A3D41F, // |<<
            0xD7E84B1B, // >>|
            0x20FE4DBB, // >||

            0xF076C13B, // -
            0xA3C8EDDB, // +
            0x12CEA6E6, // EQ

            0xC101E57B, // 0
            0x97483BFB, // 100+
            0xF0C41643, // 200+

            0x9716BE3F, // 1
            0x3D9AE3F7, // 2
            0x6182021B, // 3

            0x8C22657B, // 4
            0x488F3CBB, // 5
            0x449E79F,  // 6

            0x32C6FDF7, // 7
            0x1BC0157B, // 8
            0x3EC3FC1B  // 9
            };

// this is array holding codes for White Remote when used with non-PCB version of receiver
unsigned int whiteRemote[] ={
            0xFFA25D, // CH-
            0xFF629D,   // CH
            0xFFE21D,  // CH+

            0xFF22DD, // |<<
            0xFF02FD, // >>|
            0xFFC23D, // >||

            0xFFE01F, // -
            0xFFA857, // +
            0xFF906F, // EQ

            0xFF6897, // 0
            0xFF9867, // 100+
            0xFFB04F, // 200+

            0xFF30CF, // 1
            0xFF18E7, // 2
            0xFF7A85, // 3

            0xFF10EF, // 4
            0xFF38C7, // 5
            0xFF5AA5,  // 6

            0xFF42BD, // 7
            0xFF4AB5, // 8
            0xFF52AD  // 9
            };
// key lables of white remote
 String whiteRemoteKey[] ={
            "CH-",
            "CH",
            "CH+",

            "|<<",
            ">>|",
            ">||",

            "-",
            "+",
            "EQ",

            "0",
            "100+",
            "200+",

            "1",
            "2",
            "3",

            "4",
            "5",
            "6",

            "7",
            "8",
            "9"
            };

// this is array holding codes for Black Remote when used with non-PCB version of receiver
 unsigned int blackRemote[] ={
            0xFF629D, // ^
            0xFF22DD,   // <
            0xFF02FD,  // OK
            0xFFC23D, // >
            0xFFA857, // v

            0xFF6897, // 1
            0xFF9867, // 2
            0xF0C41643, // 3

            0xFF30CF, // 4
            0xFF18E7, // 5
            0xFF7A85,  // 6

            0xFF10EF, // 7
            0xFF38C7, // 8
            0xFF5AA5,  // 9

            0xFF42BD, // *
            0xFF4AB5, // 0
            0xFF52AD  // #
            };

// this is array holding codes for Black Remote when used with PCB version of receiver
 unsigned int blackRemotePCB[] ={
            0x511DBB, // ^
            0x52A3D41F,   // <
            0xD7E84B1B,  // OK
            0x20FE4DBB, // >
            0xA3C8EDDB, // v


            0xC101E57B, // 1
            0x97483BFB, // 2
            0xF0C41643, // 3

            0x9716BE3F, // 4
            0x3D9AE3F7, // 5
            0x6182021B,  // 6

            0x8C22657B, // 7
            0x488F3CBB, // 8
            0x449E79F,  // 9

            0x32C6FDF7, // *
            0x1BC0157B, // 0
            0x3EC3FC1B  // #
            };

// Black remote key names
 String blackRemoteKey[] ={
            "^",
            "<",
            "OK",
            ">",
            "v",

            "1",
            "2",
            "3",

            "4",
            "5",
            "6",

            "7",
            "8",
            "9",

            "*",
            "0",
            "#"
            };

decode_results results;


void setup()
{
  Serial.begin(9600);
  // In case the interrupt driver crashes on setup, give a clue
  // to the user what's going on.
  Serial.println("Robojax IR Decode");
  Serial.println("Servo Control with Remote");
  irrecv.enableIRIn(); // Start the receiver

   RJservo.attach(SERVO_PIN);  // attaches the servo on pin servoPin to the servo object

}

void loop() {

  if (irrecv.decode(&results)) {
    if(displayCode)Serial.println(results.value, HEX);
    robojaxValidateCode(results.value);// used the "robojaxValidateCode" bellow
    irrecv.resume(); // Receive the next value
  }
  delay(50);// 50 millisecond delay
}

/*
 * function: robojaxValidateCode
 * validates the remote code and prints the correct key name.
 * cd is the code passed from the loop.
 * Written by A. S. for Robojax
 */
void robojaxValidateCode(int cd)
{

  // Robojax IR Remote decoder
  int found=0;

 if(type =='W' && !PCB)
 {
    // Robojax IR White Remote decoder
    // if type is set to 'W' (white remote) and PCB=0 then check White remote code
      for(int i=0; i< sizeof(whiteRemote)/sizeof(int); i++)
      {
        if(whiteRemote[i] ==cd)
        {

          Serial.print("Key pressed:");
          Serial.println(whiteRemoteKey[i]);
          servoAction(whiteRemoteKey[i]);// take action
          found=1;
        }// if matched
      }// for
 }else if(type =='W' && PCB){
    // Robojax IR White Remote decoder
    // if type is set to 'W' (white remote) and PCB=1 then check White remote code
      for(int i=0; i< sizeof(whiteRemotePCB)/sizeof(int); i++)
      {
        if(whiteRemotePCB[i] ==cd)
        {

          Serial.print("Key pressed:");
          Serial.println(whiteRemoteKey[i]);
          servoAction(whiteRemoteKey[i]);// take action
          found=1;
        }// if matched
      }// for
 }else if(type =='B' && PCB){
    // Robojax IR Black Remote decoder
       // if type is set to 'B' (black remote) and PCB=1 then check Black remote code
       for(int i=0; i< sizeof(blackRemotePCB)/sizeof(int); i++)
      {
        // Robojax IR black Remote decoder
        if(blackRemotePCB[i] ==cd)
        {

          Serial.print("Key pressed:");
          Serial.println(blackRemoteKey[i]);
         servoAction(blackRemoteKey[i]);// take action
          found=1;
        }// if matched
      }// for
 }else{

      // if type is set to 'B' (black remote) and PCB =0 then check Black remote code
       for(int i=0; i< sizeof(blackRemote)/sizeof(int); i++)
      {
        // Robojax IR black Remote decoder
        if(blackRemote[i] ==cd)
        {

          Serial.print("Key pressed:");
          Serial.println(blackRemoteKey[i]);
          servoAction(blackRemoteKey[i]);// take action

          found=1;
        }// if matched
      }// for
 }// else
  if(!found){
    if(cd !=0xFFFFFFFF)
      {
    Serial.println("Key unknown");
      }
  }// found
}// robojaxValidateCode end

/*
 *
 * servoAction()
 * receives string "value" as input and based on the settings,
 * sends translates it to servo value and controls servo, either by:
 * rotating servo to the right
 * rotating servo to the left
 * moving the servo to the middle
 *
 */
void servoAction(String value)
{
  // Servo button demo with IR remote by Robojax.com
  while(value == RIGHT){

    if (angle > 0 && angle <= 180) {
      angle = angle - angleStep;
       if(angle < 0){
        angle = 0;
       }else{
      RJservo.write(angle); // move the servo to desired angle
      Serial.print("Moved to: ");
      Serial.print(angle);   // print the angle
      Serial.println(" degree");
       }
    }// if
    value =".";
    delay(100);
  }// while for RIGHT
  while(value == LEFT){

    // Servo button demo with IR remote by Robojax.com
    if (angle >= 0 && angle <= 180) {
      angle = angle + angleStep;
      if(angle >180){
        angle =180;
       }else{
      RJservo.write(angle); // move the servo to desired angle
      Serial.print("Moved to: ");
      Serial.print(angle);   // print the angle
      Serial.println(" degree");
       }
    }
    value =".";
    delay(100);
  }// while for LEFT

  if(value == CENTRE)
  {
    angle = ANGLE_CENTRE;
    RJservo.write(angle); // move the servo to centre at 90 degree angle
  }
    // Robojax IR Servo control
}//servoAction end
مواردی که ممکن است به آنها نیاز داشته باشید
-
آمازون
-
ایبی
منابع و مراجع
هنوز هیچ منبعی موجود نیست.
فایلها📁
هیچ فایلی موجود نیست.