Este tutorial es parte de: Servomotores
Todos los videos relacionados con servomotores se listan aquí. Los enlaces a otros videos se encuentran debajo de este artículo.

Controlando motores servo utilizando un control remoto por infrarrojos con Arduino
```html
Controlando Servomotores con un Control Remoto Infrarrojo y Arduino
Este proyecto demuestra cómo controlar un servomotor utilizando un control remoto por infrarrojos (IR) y un Arduino. Esta configuración permite el control inalámbrico de la posición del servomotor, lo que la hace ideal para diversas aplicaciones.


Aquí hay algunas ideas de proyectos utilizando esta configuración:
- Ajustar de forma remota el paneo y la inclinación de una cámara.
- Controlando los movimientos de un brazo robótico.
- Automatizando persianas o cortinas.
- Creando instalaciones de arte interactivas.
- Construir un coche o vehículo teledirigido.
Hardware/Componentes
- Placa Arduino (por ejemplo, Uno, Nano)
- Motor servo
- Control remoto IR (cualquier control remoto estándar funcionará, pero el código está configurado para controles específicos)
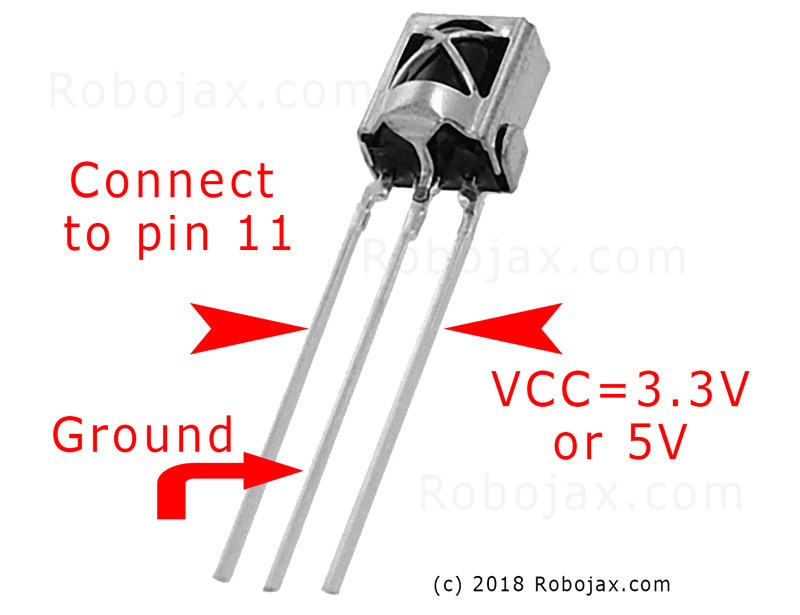
- Módulo receptor IR (por ejemplo, TSOP1838)
- Cables de conexión
- Protoboard (opcional)
Guía de cableado
El servomotor tiene tres cables: tierra (generalmente marrón o negro), alimentación (típicamente rojo) y señal (a menudo naranja o blanco). El receptor IR también tiene tres cables: tierra, alimentación (VCC) y señal.
(in video at 01:46)

- Tierra del servo a tierra de Arduino
- Potencia del servo a Arduino 5V
- Señal del servo al pin 8 del Arduino (en el video a las 02:23)
- Tierra del receptor IR a tierra de Arduino
- Receptor IR VCC a Arduino 5V
- Señal del receptor IR al pin 11 de Arduino (en el video en 02:38)
Explicación del código
El código comienza incluyendo las bibliotecas necesarias para la comunicación IR y el control del servo. (en el video a las 03:16)
#include <IRremote.h>
#include <Servo.h>
A continuación, se definen las variables esenciales. Necesitarás configurarlas según tu configuración específica. (en el video a las 03:44)
const char type = 'B'; // 'W' for white remote, 'B' for black remote
const boolean PCB = 0;   // 1 if the IR receiver has a PCB, 0 if it's a bare module
const int SERVO_PIN = 8; // The pin connected to the servo's signal wire
int angleStep = 10;      // How many degrees the servo moves per button press
const int ANGLE_CENTRE = 90; // The center/reset position of the servo
(en video a las 05:06)
El paso de configuración más crucial es hacer coincidir los botones del control remoto con acciones específicas. El código incluye matrices para diferentes tipos de control remoto (blanco/negro, PCB/no PCB) y sus códigos de botón correspondientes. Necesitarás identificar los códigos correctos para tu control remoto y asignarlos a las acciones deseadas (derecha, izquierda, centro). (en el video a las 05:16)
const String RIGHT = ">"; // Replace with the code for your "right" button
const String LEFT = "<";  // Replace with the code for your "left" button
const String CENTRE = "OK"; // Replace with the code for your "center" button
(en video a las 08:12)
ElservoAction()La función maneja el movimiento del servo en función de la señal IR recibida. Verifica el comando recibido y ajusta el ángulo del servo en consecuencia. ElangleStepla variable controla el incremento o decremento de la posición del servo. (en el video a las 08:06)
Proyecto en vivo/Demostración
(in video at 09:56)
El video demuestra cómo controlar el servo utilizando diferentes controles remotos. Muestra cómo ajustar el código para varios tipos de controles remotos y módulos receptores. La demostración también cubre cómo capturar códigos IR de tus propios controles remotos e integrarlos en el código. (en video a las 12:48)
Capítulos
- [00:00] Introducción y panorama del proyecto
- [00:36] Componentes y Materiales
- Instrucciones de cableado
- [03:16] Explicación del código
- [09:56] Demostración del Proyecto
- [12:48] Usando tu propio control remoto
```
Imágenes
Este tutorial es parte de: Servomotores
- Controlar un servomotor con pulsadores usando Arduino
- Control a Servo Motor with a Push Button: Move Servo and Return SPB-1
- Control a Servo Motor with a Push Button: Move Servo in One Direction SPB-2
- Controlling a Servo Motor with a Push Button: Move Servo While Button Is Pressed (SPB-3)
- Controlar un servomotor con un potenciómetro usando Arduino
- Controlar un servomotor con potenciómetro y LCD1602 usando Arduino
- Control de motor servo Arduino usando un potenciómetro
- Controlando la posición del servo con gestos de la mano para Arduino
- Controlling Two or More Servos with Potentiometers Using an Arduino
- How to Control a 360° Servo with Three Push-Button Switches
- How to Use Continuous 360° Servo with Arduino
- Código y vídeo de Arduino para el controlador de servos PCA9685 de 16 canales y 12 bits V1
- Build an Arduino Servo Toggle Switch with a Push Button
/*
 * Original library from - http://arcfn.com
 *
 * This Arduino code controls a servo motor with an IR remote controller or any TV remote.
 *
 * You have to select the type of your remote as Black or White in the code below
 * and also select your receiver 1838 as either a PCB or bare module. See video for details.
 *
 * You have to watch this video: https://youtu.be/muAkBQb24NI
 * before proceeding with this code.
 *
 * Modified/Written by Ahmad Shamshiri
 * on August 02, 2018 at 20:35 in Ajax, Ontario, Canada
 * for Robojax.com
 * Watch video instructions for this code: https://youtu.be/Wp7hX9UErSQ
 * Get other Arduino codes from Robojax.com
 *
 */

#include <IRremote.h>

int RECV_PIN = 11;
const char type ='B';// W for white, B for black. Must keep single quotes like 'B' or 'W'
const boolean PCB = 0;// if receiver is PCB set to 1, if not set to 0. See video for details
boolean displayCode = true;// to display remote code. if not, set to false

//***** Servo settings begins
#include <Servo.h>
Servo RJservo;  // create servo object to control a servo
const int SERVO_PIN = 8;  // analog pin used to connect the potentiometer
int angle =90;    // initial angle  for servo
int angleStep =10;
const int ANGLE_CENTRE =90;// the centre/reset angle of your servo
//**** Servo settings ends

// remote settings
const String RIGHT=">";// move servo to the right with this key on remote
const String LEFT ="<";// move servo to the left with this key on remote
const String CENTRE ="OK";// move servo to centre with this key on remote
// remote settings end

IRrecv irrecv(RECV_PIN);

// this is array holding codes for White Remote when used with PCB version of receiver
unsigned int whiteRemotePCB[] ={
            0xE318261B, // CH-
            0x511DBB,   // CH
            0xEE886D7F,  // CH+

            0x52A3D41F, // |<<
            0xD7E84B1B, // >>|
            0x20FE4DBB, // >||

            0xF076C13B, // -
            0xA3C8EDDB, // +
            0x12CEA6E6, // EQ

            0xC101E57B, // 0
            0x97483BFB, // 100+
            0xF0C41643, // 200+

            0x9716BE3F, // 1
            0x3D9AE3F7, // 2
            0x6182021B, // 3

            0x8C22657B, // 4
            0x488F3CBB, // 5
            0x449E79F,  // 6

            0x32C6FDF7, // 7
            0x1BC0157B, // 8
            0x3EC3FC1B  // 9
            };

// this is array holding codes for White Remote when used with non-PCB version of receiver
unsigned int whiteRemote[] ={
            0xFFA25D, // CH-
            0xFF629D,   // CH
            0xFFE21D,  // CH+

            0xFF22DD, // |<<
            0xFF02FD, // >>|
            0xFFC23D, // >||

            0xFFE01F, // -
            0xFFA857, // +
            0xFF906F, // EQ

            0xFF6897, // 0
            0xFF9867, // 100+
            0xFFB04F, // 200+

            0xFF30CF, // 1
            0xFF18E7, // 2
            0xFF7A85, // 3

            0xFF10EF, // 4
            0xFF38C7, // 5
            0xFF5AA5,  // 6

            0xFF42BD, // 7
            0xFF4AB5, // 8
            0xFF52AD  // 9
            };
// key lables of white remote
 String whiteRemoteKey[] ={
            "CH-",
            "CH",
            "CH+",

            "|<<",
            ">>|",
            ">||",

            "-",
            "+",
            "EQ",

            "0",
            "100+",
            "200+",

            "1",
            "2",
            "3",

            "4",
            "5",
            "6",

            "7",
            "8",
            "9"
            };

// this is array holding codes for Black Remote when used with non-PCB version of receiver
 unsigned int blackRemote[] ={
            0xFF629D, // ^
            0xFF22DD,   // <
            0xFF02FD,  // OK
            0xFFC23D, // >
            0xFFA857, // v

            0xFF6897, // 1
            0xFF9867, // 2
            0xF0C41643, // 3

            0xFF30CF, // 4
            0xFF18E7, // 5
            0xFF7A85,  // 6

            0xFF10EF, // 7
            0xFF38C7, // 8
            0xFF5AA5,  // 9

            0xFF42BD, // *
            0xFF4AB5, // 0
            0xFF52AD  // #
            };

// this is array holding codes for Black Remote when used with PCB version of receiver
 unsigned int blackRemotePCB[] ={
            0x511DBB, // ^
            0x52A3D41F,   // <
            0xD7E84B1B,  // OK
            0x20FE4DBB, // >
            0xA3C8EDDB, // v


            0xC101E57B, // 1
            0x97483BFB, // 2
            0xF0C41643, // 3

            0x9716BE3F, // 4
            0x3D9AE3F7, // 5
            0x6182021B,  // 6

            0x8C22657B, // 7
            0x488F3CBB, // 8
            0x449E79F,  // 9

            0x32C6FDF7, // *
            0x1BC0157B, // 0
            0x3EC3FC1B  // #
            };

// Black remote key names
 String blackRemoteKey[] ={
            "^",
            "<",
            "OK",
            ">",
            "v",

            "1",
            "2",
            "3",

            "4",
            "5",
            "6",

            "7",
            "8",
            "9",

            "*",
            "0",
            "#"
            };

decode_results results;


void setup()
{
  Serial.begin(9600);
  // In case the interrupt driver crashes on setup, give a clue
  // to the user what's going on.
  Serial.println("Robojax IR Decode");
  Serial.println("Servo Control with Remote");
  irrecv.enableIRIn(); // Start the receiver

   RJservo.attach(SERVO_PIN);  // attaches the servo on pin servoPin to the servo object

}

void loop() {

  if (irrecv.decode(&results)) {
    if(displayCode)Serial.println(results.value, HEX);
    robojaxValidateCode(results.value);// used the "robojaxValidateCode" bellow
    irrecv.resume(); // Receive the next value
  }
  delay(50);// 50 millisecond delay
}

/*
 * function: robojaxValidateCode
 * validates the remote code and prints the correct key name.
 * cd is the code passed from the loop.
 * Written by A. S. for Robojax
 */
void robojaxValidateCode(int cd)
{

  // Robojax IR Remote decoder
  int found=0;

 if(type =='W' && !PCB)
 {
    // Robojax IR White Remote decoder
    // if type is set to 'W' (white remote) and PCB=0 then check White remote code
      for(int i=0; i< sizeof(whiteRemote)/sizeof(int); i++)
      {
        if(whiteRemote[i] ==cd)
        {

          Serial.print("Key pressed:");
          Serial.println(whiteRemoteKey[i]);
          servoAction(whiteRemoteKey[i]);// take action
          found=1;
        }// if matched
      }// for
 }else if(type =='W' && PCB){
    // Robojax IR White Remote decoder
    // if type is set to 'W' (white remote) and PCB=1 then check White remote code
      for(int i=0; i< sizeof(whiteRemotePCB)/sizeof(int); i++)
      {
        if(whiteRemotePCB[i] ==cd)
        {

          Serial.print("Key pressed:");
          Serial.println(whiteRemoteKey[i]);
          servoAction(whiteRemoteKey[i]);// take action
          found=1;
        }// if matched
      }// for
 }else if(type =='B' && PCB){
    // Robojax IR Black Remote decoder
       // if type is set to 'B' (black remote) and PCB=1 then check Black remote code
       for(int i=0; i< sizeof(blackRemotePCB)/sizeof(int); i++)
      {
        // Robojax IR black Remote decoder
        if(blackRemotePCB[i] ==cd)
        {

          Serial.print("Key pressed:");
          Serial.println(blackRemoteKey[i]);
         servoAction(blackRemoteKey[i]);// take action
          found=1;
        }// if matched
      }// for
 }else{

      // if type is set to 'B' (black remote) and PCB =0 then check Black remote code
       for(int i=0; i< sizeof(blackRemote)/sizeof(int); i++)
      {
        // Robojax IR black Remote decoder
        if(blackRemote[i] ==cd)
        {

          Serial.print("Key pressed:");
          Serial.println(blackRemoteKey[i]);
          servoAction(blackRemoteKey[i]);// take action

          found=1;
        }// if matched
      }// for
 }// else
  if(!found){
    if(cd !=0xFFFFFFFF)
      {
    Serial.println("Key unknown");
      }
  }// found
}// robojaxValidateCode end

/*
 *
 * servoAction()
 * receives string "value" as input and based on the settings,
 * sends translates it to servo value and controls servo, either by:
 * rotating servo to the right
 * rotating servo to the left
 * moving the servo to the middle
 *
 */
void servoAction(String value)
{
  // Servo button demo with IR remote by Robojax.com
  while(value == RIGHT){

    if (angle > 0 && angle <= 180) {
      angle = angle - angleStep;
       if(angle < 0){
        angle = 0;
       }else{
      RJservo.write(angle); // move the servo to desired angle
      Serial.print("Moved to: ");
      Serial.print(angle);   // print the angle
      Serial.println(" degree");
       }
    }// if
    value =".";
    delay(100);
  }// while for RIGHT
  while(value == LEFT){

    // Servo button demo with IR remote by Robojax.com
    if (angle >= 0 && angle <= 180) {
      angle = angle + angleStep;
      if(angle >180){
        angle =180;
       }else{
      RJservo.write(angle); // move the servo to desired angle
      Serial.print("Moved to: ");
      Serial.print(angle);   // print the angle
      Serial.println(" degree");
       }
    }
    value =".";
    delay(100);
  }// while for LEFT

  if(value == CENTRE)
  {
    angle = ANGLE_CENTRE;
    RJservo.write(angle); // move the servo to centre at 90 degree angle
  }
    // Robojax IR Servo control
}//servoAction end
Cosas que podrías necesitar
-
Amazonas
-
eBay
Recursos y referencias
Aún no hay recursos.
Archivos📁
No hay archivos disponibles.