Dieses Tutorial ist Teil von: Servomotoren
Hier finden Sie alle relevanten Videos zum Thema Servomotoren. Links zu weiteren Videos finden Sie unter diesem Artikel.

Steuerung von Servomotoren mit einer Infrarotfernbedienung und Arduino
```html
Steuerung von Servomotoren mit einer Infrarotfernbedienung und Arduino
Dieses Projekt demonstriert, wie man einen Servomotor mit einer Infrarot (IR) Fernbedienung und einem Arduino steuern kann. Diese Einrichtung ermöglicht eine drahtlose Steuerung der Position des Servos, was sie ideal für verschiedene Anwendungen macht.


Hier sind einige Projektideen mit diesem Setup:
- Die Fernverstellung von Schwenk- und Neigewinkel einer Kamera.
- Die Steuerung der Bewegungen eines Roboterarms.
- Automatisierung von Fensterjalousien oder Vorhängen.
- Interaktive Kunstinstallationen schaffen.
- Bau eines ferngesteuerten Autos oder Fahrzeugs.
Hardware/Komponenten
- Arduino-Board (z. B. Uno, Nano)
- Servomotor
- IR-Fernbedienung (jede Standardfernbedienung funktioniert, aber der Code ist für spezifische Fernbedienungen konfiguriert)
- IR-Empfängermodul (z. B. TSOP1838)
- Jumperdrähte
- Breadboard (optional)
Verdrahtungsanleitung
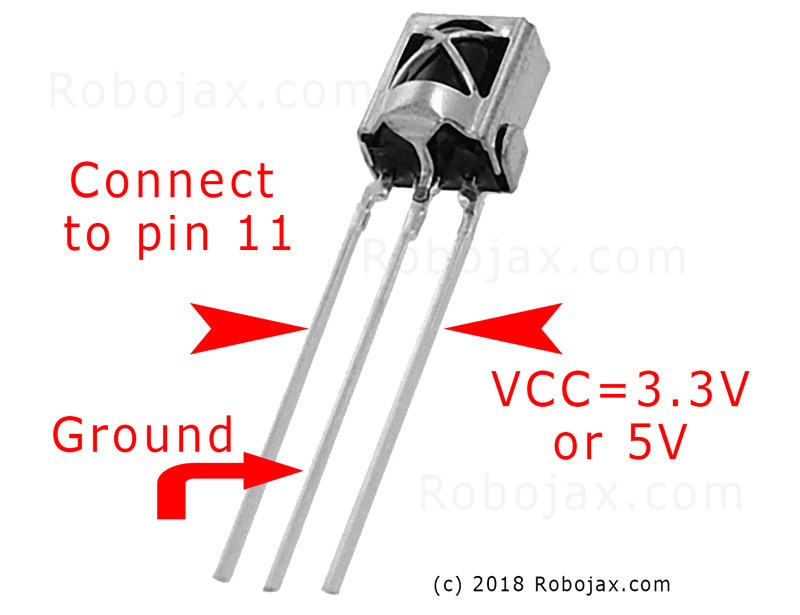
Der Servomotor hat drei Drähte: Masse (normalerweise braun oder schwarz), Stromversorgung (typischerweise rot) und Signal (häufig orange oder weiß). Der IR-Empfänger hat ebenfalls drei Drähte: Masse, Stromversorgung (VCC) und Signal.
(in Video bei 01:46)

- Servo-Masse zu Arduino-Masse
- Servostrom zu Arduino 5V
- Servo-Signal an Arduino Pin 8 (im Video bei 02:23)
- IR-Empfänger-Masse zu Arduino-Masse
- IR-Empfänger VCC zu Arduino 5V
- IR-Empfänger-Signal zu Arduino Pin 11 (im Video bei 02:38)
Code-Erklärung
Der Code beginnt mit dem Einfügen der notwendigen Bibliotheken für die IR-Kommunikation und die Servosteuerung. (im Video bei 03:16)
#include <IRremote.h>
#include <Servo.h>
Als Nächstes werden wichtige Variablen definiert. Sie müssen diese basierend auf Ihrer spezifischen Konfiguration anpassen. (im Video bei 03:44)
const char type = 'B'; // 'W' for white remote, 'B' for black remote
const boolean PCB = 0;   // 1 if the IR receiver has a PCB, 0 if it's a bare module
const int SERVO_PIN = 8; // The pin connected to the servo's signal wire
int angleStep = 10;      // How many degrees the servo moves per button press
const int ANGLE_CENTRE = 90; // The center/reset position of the servo
(im Video um 05:06)
Der wichtigste Konfigurationsschritt besteht darin, die Tasten der Fernbedienung bestimmten Aktionen zuzuordnen. Der Code umfasst Arrays für verschiedene Fernbedienungstypen (weiß/schwarz, PCB/nicht-PCB) und deren entsprechende Tasten-Codes. Sie müssen die richtigen Codes für Ihre Fernbedienung identifizieren und ihnen die gewünschten Aktionen (rechts, links, Mitte) zuweisen. (im Video bei 05:16)
const String RIGHT = ">"; // Replace with the code for your "right" button
const String LEFT = "<";  // Replace with the code for your "left" button
const String CENTRE = "OK"; // Replace with the code for your "center" button
(im Video um 08:12)
DerservoAction()Die Funktion steuert die Servobewegung basierend auf dem empfangenen IR-Signal. Sie überprüft den empfangenen Befehl und passt den Servo-Winkel entsprechend an. DerangleStepDie Variable steuert die Erhöhung oder Verringerung der Position des Servos. (im Video um 08:06)
Live-Projekt/Demonstration
(in Video um 09:56)
Das Video zeigt, wie man den Servomotor mit verschiedenen Fernbedienungen steuert. Es wird demonstriert, wie man den Code für verschiedene Fernbedienungstypen und Empfängermodule anpasst. Die Demonstration behandelt auch, wie man IR-Codes von eigenen Fernbedienungen aufnimmt und in den Code integriert. (im Video um 12:48)
Kapitel
- [00:00] Einführung und Projektübersicht
- [00:36] Komponenten und Materialien
- [01:46] Verkabelungsanweisungen
- [03:16] Code-Erklärung
- [09:56] Projektvorführung
- [12:48] Verwenden Ihres eigenen Fernbedienung
```
Bilder
Dieses Tutorial ist Teil von: Servomotoren
- Einen Servo mit Drucktastern mit einem Arduino steuern
- Control a Servo Motor with a Push Button: Move Servo and Return SPB-1
- Control a Servo Motor with a Push Button: Move Servo in One Direction SPB-2
- Controlling a Servo Motor with a Push Button: Move Servo While Button Is Pressed (SPB-3)
- Einen Servo mit einem Potentiometer und einem Arduino steuern
- Einen Servo mit Potentiometer und LCD1602 mit Arduino steuern
- Arduino Servomotorsteuerung mit einem Potentiometer
- Steuerung der Servoposition mit Handgesten für Arduino
- Controlling Two or More Servos with Potentiometers Using an Arduino
- How to Control a 360° Servo with Three Push-Button Switches
- How to Use Continuous 360° Servo with Arduino
- Arduino-Code und Video für PCA9685 16-Kanal 12-Bit Servo-Controller V1
- Build an Arduino Servo Toggle Switch with a Push Button
/*
 * Original library from - http://arcfn.com
 *
 * This Arduino code controls a servo motor with an IR remote controller or any TV remote.
 *
 * You have to select the type of your remote as Black or White in the code below
 * and also select your receiver 1838 as either a PCB or bare module. See video for details.
 *
 * You have to watch this video: https://youtu.be/muAkBQb24NI
 * before proceeding with this code.
 *
 * Modified/Written by Ahmad Shamshiri
 * on August 02, 2018 at 20:35 in Ajax, Ontario, Canada
 * for Robojax.com
 * Watch video instructions for this code: https://youtu.be/Wp7hX9UErSQ
 * Get other Arduino codes from Robojax.com
 *
 */

#include <IRremote.h>

int RECV_PIN = 11;
const char type ='B';// W for white, B for black. Must keep single quotes like 'B' or 'W'
const boolean PCB = 0;// if receiver is PCB set to 1, if not set to 0. See video for details
boolean displayCode = true;// to display remote code. if not, set to false

//***** Servo settings begins
#include <Servo.h>
Servo RJservo;  // create servo object to control a servo
const int SERVO_PIN = 8;  // analog pin used to connect the potentiometer
int angle =90;    // initial angle  for servo
int angleStep =10;
const int ANGLE_CENTRE =90;// the centre/reset angle of your servo
//**** Servo settings ends

// remote settings
const String RIGHT=">";// move servo to the right with this key on remote
const String LEFT ="<";// move servo to the left with this key on remote
const String CENTRE ="OK";// move servo to centre with this key on remote
// remote settings end

IRrecv irrecv(RECV_PIN);

// this is array holding codes for White Remote when used with PCB version of receiver
unsigned int whiteRemotePCB[] ={
            0xE318261B, // CH-
            0x511DBB,   // CH
            0xEE886D7F,  // CH+

            0x52A3D41F, // |<<
            0xD7E84B1B, // >>|
            0x20FE4DBB, // >||

            0xF076C13B, // -
            0xA3C8EDDB, // +
            0x12CEA6E6, // EQ

            0xC101E57B, // 0
            0x97483BFB, // 100+
            0xF0C41643, // 200+

            0x9716BE3F, // 1
            0x3D9AE3F7, // 2
            0x6182021B, // 3

            0x8C22657B, // 4
            0x488F3CBB, // 5
            0x449E79F,  // 6

            0x32C6FDF7, // 7
            0x1BC0157B, // 8
            0x3EC3FC1B  // 9
            };

// this is array holding codes for White Remote when used with non-PCB version of receiver
unsigned int whiteRemote[] ={
            0xFFA25D, // CH-
            0xFF629D,   // CH
            0xFFE21D,  // CH+

            0xFF22DD, // |<<
            0xFF02FD, // >>|
            0xFFC23D, // >||

            0xFFE01F, // -
            0xFFA857, // +
            0xFF906F, // EQ

            0xFF6897, // 0
            0xFF9867, // 100+
            0xFFB04F, // 200+

            0xFF30CF, // 1
            0xFF18E7, // 2
            0xFF7A85, // 3

            0xFF10EF, // 4
            0xFF38C7, // 5
            0xFF5AA5,  // 6

            0xFF42BD, // 7
            0xFF4AB5, // 8
            0xFF52AD  // 9
            };
// key lables of white remote
 String whiteRemoteKey[] ={
            "CH-",
            "CH",
            "CH+",

            "|<<",
            ">>|",
            ">||",

            "-",
            "+",
            "EQ",

            "0",
            "100+",
            "200+",

            "1",
            "2",
            "3",

            "4",
            "5",
            "6",

            "7",
            "8",
            "9"
            };

// this is array holding codes for Black Remote when used with non-PCB version of receiver
 unsigned int blackRemote[] ={
            0xFF629D, // ^
            0xFF22DD,   // <
            0xFF02FD,  // OK
            0xFFC23D, // >
            0xFFA857, // v

            0xFF6897, // 1
            0xFF9867, // 2
            0xF0C41643, // 3

            0xFF30CF, // 4
            0xFF18E7, // 5
            0xFF7A85,  // 6

            0xFF10EF, // 7
            0xFF38C7, // 8
            0xFF5AA5,  // 9

            0xFF42BD, // *
            0xFF4AB5, // 0
            0xFF52AD  // #
            };

// this is array holding codes for Black Remote when used with PCB version of receiver
 unsigned int blackRemotePCB[] ={
            0x511DBB, // ^
            0x52A3D41F,   // <
            0xD7E84B1B,  // OK
            0x20FE4DBB, // >
            0xA3C8EDDB, // v


            0xC101E57B, // 1
            0x97483BFB, // 2
            0xF0C41643, // 3

            0x9716BE3F, // 4
            0x3D9AE3F7, // 5
            0x6182021B,  // 6

            0x8C22657B, // 7
            0x488F3CBB, // 8
            0x449E79F,  // 9

            0x32C6FDF7, // *
            0x1BC0157B, // 0
            0x3EC3FC1B  // #
            };

// Black remote key names
 String blackRemoteKey[] ={
            "^",
            "<",
            "OK",
            ">",
            "v",

            "1",
            "2",
            "3",

            "4",
            "5",
            "6",

            "7",
            "8",
            "9",

            "*",
            "0",
            "#"
            };

decode_results results;


void setup()
{
  Serial.begin(9600);
  // In case the interrupt driver crashes on setup, give a clue
  // to the user what's going on.
  Serial.println("Robojax IR Decode");
  Serial.println("Servo Control with Remote");
  irrecv.enableIRIn(); // Start the receiver

   RJservo.attach(SERVO_PIN);  // attaches the servo on pin servoPin to the servo object

}

void loop() {

  if (irrecv.decode(&results)) {
    if(displayCode)Serial.println(results.value, HEX);
    robojaxValidateCode(results.value);// used the "robojaxValidateCode" bellow
    irrecv.resume(); // Receive the next value
  }
  delay(50);// 50 millisecond delay
}

/*
 * function: robojaxValidateCode
 * validates the remote code and prints the correct key name.
 * cd is the code passed from the loop.
 * Written by A. S. for Robojax
 */
void robojaxValidateCode(int cd)
{

  // Robojax IR Remote decoder
  int found=0;

 if(type =='W' && !PCB)
 {
    // Robojax IR White Remote decoder
    // if type is set to 'W' (white remote) and PCB=0 then check White remote code
      for(int i=0; i< sizeof(whiteRemote)/sizeof(int); i++)
      {
        if(whiteRemote[i] ==cd)
        {

          Serial.print("Key pressed:");
          Serial.println(whiteRemoteKey[i]);
          servoAction(whiteRemoteKey[i]);// take action
          found=1;
        }// if matched
      }// for
 }else if(type =='W' && PCB){
    // Robojax IR White Remote decoder
    // if type is set to 'W' (white remote) and PCB=1 then check White remote code
      for(int i=0; i< sizeof(whiteRemotePCB)/sizeof(int); i++)
      {
        if(whiteRemotePCB[i] ==cd)
        {

          Serial.print("Key pressed:");
          Serial.println(whiteRemoteKey[i]);
          servoAction(whiteRemoteKey[i]);// take action
          found=1;
        }// if matched
      }// for
 }else if(type =='B' && PCB){
    // Robojax IR Black Remote decoder
       // if type is set to 'B' (black remote) and PCB=1 then check Black remote code
       for(int i=0; i< sizeof(blackRemotePCB)/sizeof(int); i++)
      {
        // Robojax IR black Remote decoder
        if(blackRemotePCB[i] ==cd)
        {

          Serial.print("Key pressed:");
          Serial.println(blackRemoteKey[i]);
         servoAction(blackRemoteKey[i]);// take action
          found=1;
        }// if matched
      }// for
 }else{

      // if type is set to 'B' (black remote) and PCB =0 then check Black remote code
       for(int i=0; i< sizeof(blackRemote)/sizeof(int); i++)
      {
        // Robojax IR black Remote decoder
        if(blackRemote[i] ==cd)
        {

          Serial.print("Key pressed:");
          Serial.println(blackRemoteKey[i]);
          servoAction(blackRemoteKey[i]);// take action

          found=1;
        }// if matched
      }// for
 }// else
  if(!found){
    if(cd !=0xFFFFFFFF)
      {
    Serial.println("Key unknown");
      }
  }// found
}// robojaxValidateCode end

/*
 *
 * servoAction()
 * receives string "value" as input and based on the settings,
 * sends translates it to servo value and controls servo, either by:
 * rotating servo to the right
 * rotating servo to the left
 * moving the servo to the middle
 *
 */
void servoAction(String value)
{
  // Servo button demo with IR remote by Robojax.com
  while(value == RIGHT){

    if (angle > 0 && angle <= 180) {
      angle = angle - angleStep;
       if(angle < 0){
        angle = 0;
       }else{
      RJservo.write(angle); // move the servo to desired angle
      Serial.print("Moved to: ");
      Serial.print(angle);   // print the angle
      Serial.println(" degree");
       }
    }// if
    value =".";
    delay(100);
  }// while for RIGHT
  while(value == LEFT){

    // Servo button demo with IR remote by Robojax.com
    if (angle >= 0 && angle <= 180) {
      angle = angle + angleStep;
      if(angle >180){
        angle =180;
       }else{
      RJservo.write(angle); // move the servo to desired angle
      Serial.print("Moved to: ");
      Serial.print(angle);   // print the angle
      Serial.println(" degree");
       }
    }
    value =".";
    delay(100);
  }// while for LEFT

  if(value == CENTRE)
  {
    angle = ANGLE_CENTRE;
    RJservo.write(angle); // move the servo to centre at 90 degree angle
  }
    // Robojax IR Servo control
}//servoAction end
Dinge, die Sie vielleicht brauchen
-
Amazon
-
eBay
Ressourcen & Referenzen
Noch keine Ressourcen vorhanden.
Dateien📁
Keine Dateien verfügbar.