ይህ ትምህርት አካል ነው: ሰርቮ ሞተርስ
ከሰርቮ ሞተሮች ጋር የተያያዙ ሁሉም ቪዲዮዎች እዚህ ተዘርዝረዋል። ወደ ሌሎች ቪዲዮዎች የሚወስዱ አገናኞች ከዚህ ጽሑፍ በታች ይገኛሉ።
አርዱኖን በመጠቀም የኢንፍራሬድ ሪሞት ኮንትሮል በመጠቀም የሰርቮ ሞተሮችን መቆጣጠር
```htmlየሰርቮ ሞተሮችን በኢንፍራሬድ ሪሞት እና አርዱኢኖ መቆጣጠር
ይህ ፕሮጀክት የሰርቮ ሞተርን በኢንፍራሬድ (IR) ሪሞት እና አርዱኢኖ እንዴት መቆጣጠር እንደሚቻል ያሳያል። ይህ ዝግጅት የሰርቮውን አቀማመጥ በገመድ አልባ ለመቆጣጠር ያስችላል፣ ይህም ለተለያዩ አፕሊኬሽኖች ተስማሚ ያደርገዋል።


ይህን ዝግጅት በመጠቀም አንዳንድ የፕሮጀክት ሀሳቦች እነዚህ ናቸው፦
- የካሜራውን ፓን እና ቲልት በርቀት ማስተካከል።
- የሮቦቲክ ክንድ እንቅስቃሴዎችን መቆጣጠር።
- የመስኮት መከላከያዎችን ወይም መጋረጆችን በራስ-ሰር ማድረግ።
- በይነተገናኝ የጥበብ ጭነቶችን መፍጠር።
- በርቀት የሚቆጣጠር መኪና ወይም ተሽከርካሪ መገንባት።
ሃርድዌር/ክፍሎች
- የአርዱኢኖ ቦርድ (ለምሳሌ፣ Uno፣ Nano)
- ሰርቮ ሞተር
- የIR ሪሞት መቆጣጠሪያ (ማንኛውም መደበኛ ሪሞት ይሰራል፣ ነገር ግን ኮዱ ለተወሰኑ ሪሞቶች ተዋቅሯል)
- የIR መቀበያ ሞጁል (ለምሳሌ፣ TSOP1838)
- መዝለያ ሽቦዎች
- ብሬድቦርድ (አማራጭ)
የሽቦ አገናኝ መመሪያ
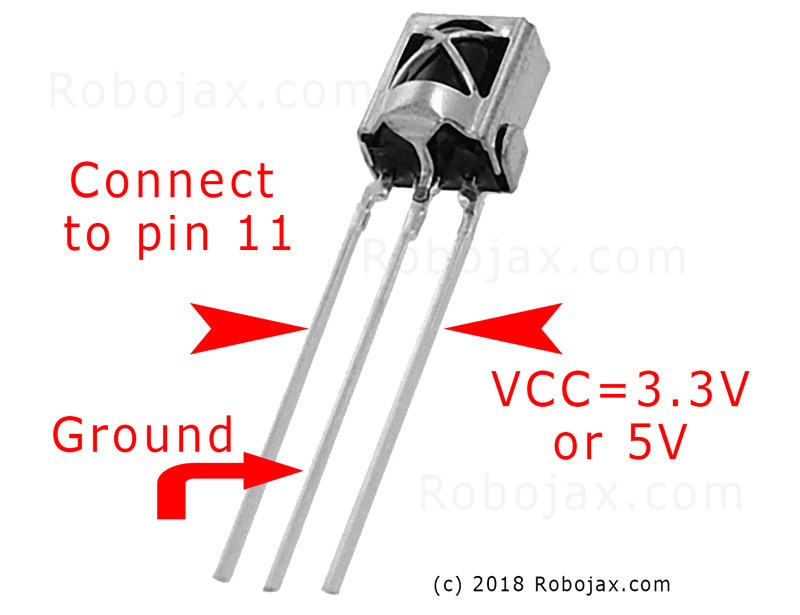
የሰርቮ ሞተሩ ሶስት ሽቦዎች አሉት፦ መሬት (ብዙውን ጊዜ ቡናማ ወይም ጥቁር)፣ ሃይል (በተለምዶ ቀይ) እና ሲግናል (ብዙውን ጊዜ ብርቱካናማ ወይም ነጭ)። የIR መቀበያውም ሶስት ሽቦዎች አሉት፦ መሬት፣ ሃይል (VCC) እና ሲግናል።
(በቪዲዮው በ01:46)

- የሰርቮ መሬት ወደ አርዱኢኖ መሬት
- የሰርቮ ሃይል ወደ አርዱኢኖ 5V
- የሰርቮ ሲግናል ወደ አርዱኢኖ ፒን 8 (በቪዲዮው በ02:23)
- የIR መቀበያ መሬት ወደ አርዱኢኖ መሬት
- የIR መቀበያ VCC ወደ አርዱኢኖ 5V
- የIR መቀበያ ሲግናል ወደ አርዱኢኖ ፒን 11 (በቪዲዮው በ02:38)
የኮድ ማብራሪያ
ኮዱ ለIR ግንኙነት እና ለሰርቮ ቁጥጥር አስፈላጊ የሆኑ ቤተ-መጻሕፍትን በማካተት ይጀምራል። (በቪዲዮው በ03:16)
#include <IRremote.h>
#include <Servo.h>
በመቀጠል፣ አስፈላጊ ተለዋዋጮች ይገለጻሉ። እነዚህን በተወሰነ ዝግጅትዎ መሰረት ማዋቀር ያስፈልግዎታል። (በቪዲዮው በ03:44)
const char type = 'B'; // 'W' ለነጭ ሪሞት፣ 'B' ለጥቁር ሪሞት
const boolean PCB = 0;   // 1 የIR መቀበያው PCB ካለው፣ 0 ባዶ ሞጁል ከሆነ
const int SERVO_PIN = 8; // ከሰርቮው ሲግናል ሽቦ ጋር የተገናኘው ፒን
int angleStep = 10;      // በእያንዳንዱ የአዝራር ግፊት ሰርቮው የሚንቀሳቀስበት ዲግሪ
const int ANGLE_CENTRE = 90; // የሰርቮው መሃል/ዳግም ማስጀመሪያ ቦታ
(በቪዲዮው በ05:06)
በጣም ወሳኙ የማዋቀር ደረጃ የሪሞት መቆጣጠሪያ አዝራሮችን ከተወሰኑ ተግባራት ጋር ማዛመድ ነው። ኮዱ ለተለያዩ የሪሞት ዓይነቶች (ነጭ/ጥቁር፣ PCB/PCB ያልሆነ) እና ተጓዳኝ የአዝራር ኮዶቻቸውን ያካትታል። ለሪሞትዎ ትክክለኛ ኮዶችን ለይተው ለሚፈለጉት ተግባራት (ቀኝ፣ ግራ፣ መሃል) መመደብ ያስፈልግዎታል። (በቪዲዮው በ05:16)
const String RIGHT = ">"; // ለ"ቀኝ" አዝራርዎ ኮድ ይተኩ
const String LEFT = "<";  // ለ"ግራ" አዝራርዎ ኮድ ይተኩ
const String CENTRE = "OK"; // ለ"መሃል" አዝራርዎ ኮድ ይተኩ
(በቪዲዮው በ08:12)
የservoAction() ተግባር በተቀበለው የIR ሲግናል መሰረት የሰርቮውን እንቅስቃሴ ያስተናግዳል። የተቀበለውን ትዕዛዝ ይፈትሻል እና የሰርቮውን አንግል በዚሁ መሰረት ያስተካክላል። የangleStep ተለዋዋጭ የሰርቮውን አቀማመጥ መጨመር ወይም መቀነስ ይቆጣጠራል። (በቪዲዮው በ08:06)
የቀጥታ ፕሮጀክት/ማሳያ
(በቪዲዮው በ09:56)
ቪዲዮው ሰርቮውን በተለያዩ ሪሞቶች እንዴት መቆጣጠር እንደሚቻል ያሳያል። ለተለያዩ የሪሞት ዓይነቶች እና የመቀበያ ሞጁሎች ኮዱን እንዴት ማስተካከል እንደሚቻል ያሳያል። ማሳያው ከራስዎ ሪሞቶች የIR ኮዶችን እንዴት መያዝ እና ወደ ኮዱ ማካተት እንደሚቻልም ይሸፍናል። (በቪዲዮው በ12:48)
ምዕራፎች
- [00:00] መግቢያ እና የፕሮጀክት አጠቃላይ እይታ
- [00:36] ክፍሎች እና ቁሳቁሶች
- [01:46] የሽቦ አገናኝ መመሪያዎች
- [03:16] የኮድ ማብራሪያ
- [09:56] የፕሮጀክት ማሳያ
- [12:48] የራስዎን ሪሞት መጠቀም
```
ምስሎች
ይህ ትምህርት አካል ነው: ሰርቮ ሞተርስ
- አርዱኖን በመጠቀም ሰርቮን በግፊት አዝራሮች መቆጣጠር
- Control a Servo Motor with a Push Button: Move Servo and Return SPB-1
- Control a Servo Motor with a Push Button: Move Servo in One Direction SPB-2
- Controlling a Servo Motor with a Push Button: Move Servo While Button Is Pressed (SPB-3)
- ፖቴንሺዮሜትር በመጠቀም ሰርቮን ከአርዱኖ ጋር መቆጣጠር
- ፖቴንሺዮሜትር እና LCD1602 በመጠቀም ሰርቮን ከአርዱኖ ጋር መቆጣጠር
- የአርዱኖ ሰርቮ ሞተር ቁጥጥር በፖቴንሺዮሜትር በመጠቀም
- የሰርቮ አቀማመጥን በእጅ ምልክቶች መቆጣጠር ለአርዱኖ
- Controlling Two or More Servos with Potentiometers Using an Arduino
- How to Control a 360° Servo with Three Push-Button Switches
- የተከታታይ 360° ሰርቮን ከአርዱኖ ጋር እንዴት መጠቀም እንደሚቻል
- የ Arduino ኮድ እና ቪዲዮ ለ PCA9685 16-ቻናል 12-ቢት ሰርቮ መቆጣጠሪያ V1
- አርዱኖ ሰርቮ ቶግል ስዊች በፑሽ ቁልፍ ይገንቡ
/*
 * Original library from - http://arcfn.com
 *
 * This Arduino code controls a servo motor with an IR remote controller or any TV remote.
 *
 * You have to select the type of your remote as Black or White in the code below
 * and also select your receiver 1838 as either a PCB or bare module. See video for details.
 *
 * You have to watch this video: https://youtu.be/muAkBQb24NI
 * before proceeding with this code.
 *
 * Modified/Written by Ahmad Shamshiri
 * on August 02, 2018 at 20:35 in Ajax, Ontario, Canada
 * for Robojax.com
 * Watch video instructions for this code: https://youtu.be/Wp7hX9UErSQ
 * Get other Arduino codes from Robojax.com
 *
 */

#include <IRremote.h>

int RECV_PIN = 11;
const char type ='B';// W for white, B for black. Must keep single quotes like 'B' or 'W'
const boolean PCB = 0;// if receiver is PCB set to 1, if not set to 0. See video for details
boolean displayCode = true;// to display remote code. if not, set to false

//***** Servo settings begins
#include <Servo.h>
Servo RJservo;  // create servo object to control a servo
const int SERVO_PIN = 8;  // analog pin used to connect the potentiometer
int angle =90;    // initial angle  for servo
int angleStep =10;
const int ANGLE_CENTRE =90;// the centre/reset angle of your servo
//**** Servo settings ends

// remote settings
const String RIGHT=">";// move servo to the right with this key on remote
const String LEFT ="<";// move servo to the left with this key on remote
const String CENTRE ="OK";// move servo to centre with this key on remote
// remote settings end

IRrecv irrecv(RECV_PIN);

// this is array holding codes for White Remote when used with PCB version of receiver
unsigned int whiteRemotePCB[] ={
            0xE318261B, // CH-
            0x511DBB,   // CH
            0xEE886D7F,  // CH+

            0x52A3D41F, // |<<
            0xD7E84B1B, // >>|
            0x20FE4DBB, // >||

            0xF076C13B, // -
            0xA3C8EDDB, // +
            0x12CEA6E6, // EQ

            0xC101E57B, // 0
            0x97483BFB, // 100+
            0xF0C41643, // 200+

            0x9716BE3F, // 1
            0x3D9AE3F7, // 2
            0x6182021B, // 3

            0x8C22657B, // 4
            0x488F3CBB, // 5
            0x449E79F,  // 6

            0x32C6FDF7, // 7
            0x1BC0157B, // 8
            0x3EC3FC1B  // 9
            };

// this is array holding codes for White Remote when used with non-PCB version of receiver
unsigned int whiteRemote[] ={
            0xFFA25D, // CH-
            0xFF629D,   // CH
            0xFFE21D,  // CH+

            0xFF22DD, // |<<
            0xFF02FD, // >>|
            0xFFC23D, // >||

            0xFFE01F, // -
            0xFFA857, // +
            0xFF906F, // EQ

            0xFF6897, // 0
            0xFF9867, // 100+
            0xFFB04F, // 200+

            0xFF30CF, // 1
            0xFF18E7, // 2
            0xFF7A85, // 3

            0xFF10EF, // 4
            0xFF38C7, // 5
            0xFF5AA5,  // 6

            0xFF42BD, // 7
            0xFF4AB5, // 8
            0xFF52AD  // 9
            };
// key lables of white remote
 String whiteRemoteKey[] ={
            "CH-",
            "CH",
            "CH+",

            "|<<",
            ">>|",
            ">||",

            "-",
            "+",
            "EQ",

            "0",
            "100+",
            "200+",

            "1",
            "2",
            "3",

            "4",
            "5",
            "6",

            "7",
            "8",
            "9"
            };

// this is array holding codes for Black Remote when used with non-PCB version of receiver
 unsigned int blackRemote[] ={
            0xFF629D, // ^
            0xFF22DD,   // <
            0xFF02FD,  // OK
            0xFFC23D, // >
            0xFFA857, // v

            0xFF6897, // 1
            0xFF9867, // 2
            0xF0C41643, // 3

            0xFF30CF, // 4
            0xFF18E7, // 5
            0xFF7A85,  // 6

            0xFF10EF, // 7
            0xFF38C7, // 8
            0xFF5AA5,  // 9

            0xFF42BD, // *
            0xFF4AB5, // 0
            0xFF52AD  // #
            };

// this is array holding codes for Black Remote when used with PCB version of receiver
 unsigned int blackRemotePCB[] ={
            0x511DBB, // ^
            0x52A3D41F,   // <
            0xD7E84B1B,  // OK
            0x20FE4DBB, // >
            0xA3C8EDDB, // v


            0xC101E57B, // 1
            0x97483BFB, // 2
            0xF0C41643, // 3

            0x9716BE3F, // 4
            0x3D9AE3F7, // 5
            0x6182021B,  // 6

            0x8C22657B, // 7
            0x488F3CBB, // 8
            0x449E79F,  // 9

            0x32C6FDF7, // *
            0x1BC0157B, // 0
            0x3EC3FC1B  // #
            };

// Black remote key names
 String blackRemoteKey[] ={
            "^",
            "<",
            "OK",
            ">",
            "v",

            "1",
            "2",
            "3",

            "4",
            "5",
            "6",

            "7",
            "8",
            "9",

            "*",
            "0",
            "#"
            };

decode_results results;


void setup()
{
  Serial.begin(9600);
  // In case the interrupt driver crashes on setup, give a clue
  // to the user what's going on.
  Serial.println("Robojax IR Decode");
  Serial.println("Servo Control with Remote");
  irrecv.enableIRIn(); // Start the receiver

   RJservo.attach(SERVO_PIN);  // attaches the servo on pin servoPin to the servo object

}

void loop() {

  if (irrecv.decode(&results)) {
    if(displayCode)Serial.println(results.value, HEX);
    robojaxValidateCode(results.value);// used the "robojaxValidateCode" bellow
    irrecv.resume(); // Receive the next value
  }
  delay(50);// 50 millisecond delay
}

/*
 * function: robojaxValidateCode
 * validates the remote code and prints the correct key name.
 * cd is the code passed from the loop.
 * Written by A. S. for Robojax
 */
void robojaxValidateCode(int cd)
{

  // Robojax IR Remote decoder
  int found=0;

 if(type =='W' && !PCB)
 {
    // Robojax IR White Remote decoder
    // if type is set to 'W' (white remote) and PCB=0 then check White remote code
      for(int i=0; i< sizeof(whiteRemote)/sizeof(int); i++)
      {
        if(whiteRemote[i] ==cd)
        {

          Serial.print("Key pressed:");
          Serial.println(whiteRemoteKey[i]);
          servoAction(whiteRemoteKey[i]);// take action
          found=1;
        }// if matched
      }// for
 }else if(type =='W' && PCB){
    // Robojax IR White Remote decoder
    // if type is set to 'W' (white remote) and PCB=1 then check White remote code
      for(int i=0; i< sizeof(whiteRemotePCB)/sizeof(int); i++)
      {
        if(whiteRemotePCB[i] ==cd)
        {

          Serial.print("Key pressed:");
          Serial.println(whiteRemoteKey[i]);
          servoAction(whiteRemoteKey[i]);// take action
          found=1;
        }// if matched
      }// for
 }else if(type =='B' && PCB){
    // Robojax IR Black Remote decoder
       // if type is set to 'B' (black remote) and PCB=1 then check Black remote code
       for(int i=0; i< sizeof(blackRemotePCB)/sizeof(int); i++)
      {
        // Robojax IR black Remote decoder
        if(blackRemotePCB[i] ==cd)
        {

          Serial.print("Key pressed:");
          Serial.println(blackRemoteKey[i]);
         servoAction(blackRemoteKey[i]);// take action
          found=1;
        }// if matched
      }// for
 }else{

      // if type is set to 'B' (black remote) and PCB =0 then check Black remote code
       for(int i=0; i< sizeof(blackRemote)/sizeof(int); i++)
      {
        // Robojax IR black Remote decoder
        if(blackRemote[i] ==cd)
        {

          Serial.print("Key pressed:");
          Serial.println(blackRemoteKey[i]);
          servoAction(blackRemoteKey[i]);// take action

          found=1;
        }// if matched
      }// for
 }// else
  if(!found){
    if(cd !=0xFFFFFFFF)
      {
    Serial.println("Key unknown");
      }
  }// found
}// robojaxValidateCode end

/*
 *
 * servoAction()
 * receives string "value" as input and based on the settings,
 * sends translates it to servo value and controls servo, either by:
 * rotating servo to the right
 * rotating servo to the left
 * moving the servo to the middle
 *
 */
void servoAction(String value)
{
  // Servo button demo with IR remote by Robojax.com
  while(value == RIGHT){

    if (angle > 0 && angle <= 180) {
      angle = angle - angleStep;
       if(angle < 0){
        angle = 0;
       }else{
      RJservo.write(angle); // move the servo to desired angle
      Serial.print("Moved to: ");
      Serial.print(angle);   // print the angle
      Serial.println(" degree");
       }
    }// if
    value =".";
    delay(100);
  }// while for RIGHT
  while(value == LEFT){

    // Servo button demo with IR remote by Robojax.com
    if (angle >= 0 && angle <= 180) {
      angle = angle + angleStep;
      if(angle >180){
        angle =180;
       }else{
      RJservo.write(angle); // move the servo to desired angle
      Serial.print("Moved to: ");
      Serial.print(angle);   // print the angle
      Serial.println(" degree");
       }
    }
    value =".";
    delay(100);
  }// while for LEFT

  if(value == CENTRE)
  {
    angle = ANGLE_CENTRE;
    RJservo.write(angle); // move the servo to centre at 90 degree angle
  }
    // Robojax IR Servo control
}//servoAction end
እንደሚያስፈልግዎት ይችላል
-
አማዞን
-
ኢቤይ
ምንጮች እና ምንጮች
አሁን ምንም ምንጮች የለም።
ፋይሎች📁
አንድ ፋይል የለም።