Dhibiti balbu ya AC kwa kutumia kidhibiti chochote cha infrared na Arduino na relay
Katika mafunzo haya, tutajifunza jinsi ya kutumia kidhibiti cha infrared kuwasha na kuzima balbu ya AC kupitia Arduino na moduli ya relay. Mradi huu unahusisha kusimbua mawimbi kutoka kwa kidhibiti na kuyatumia kudhibiti relay, ambayo itawasha na kuzima balbu ya AC. Mwishoni mwa mafunzo haya, utaweza kutumia kidhibiti chochote cha infrared kudhibiti taa yako.
Tutatumia kipokezi cha infrared kunasa mawimbi kutoka kwa kidhibiti, na Arduino itatafsiri mawimbi haya kutekeleza vitendo maalum. Msimbo uliotolewa utakuruhusu kuchagua aina ya kidhibiti (cheusi au cheupe) na kama unatumia PCB au moduli tupu kwa kipokezi. Hakikisha umetazama video inayohusiana kwa maelezo zaidi na ufafanuzi (katika video saa 0:00).
Vifaa Vimeelezwa
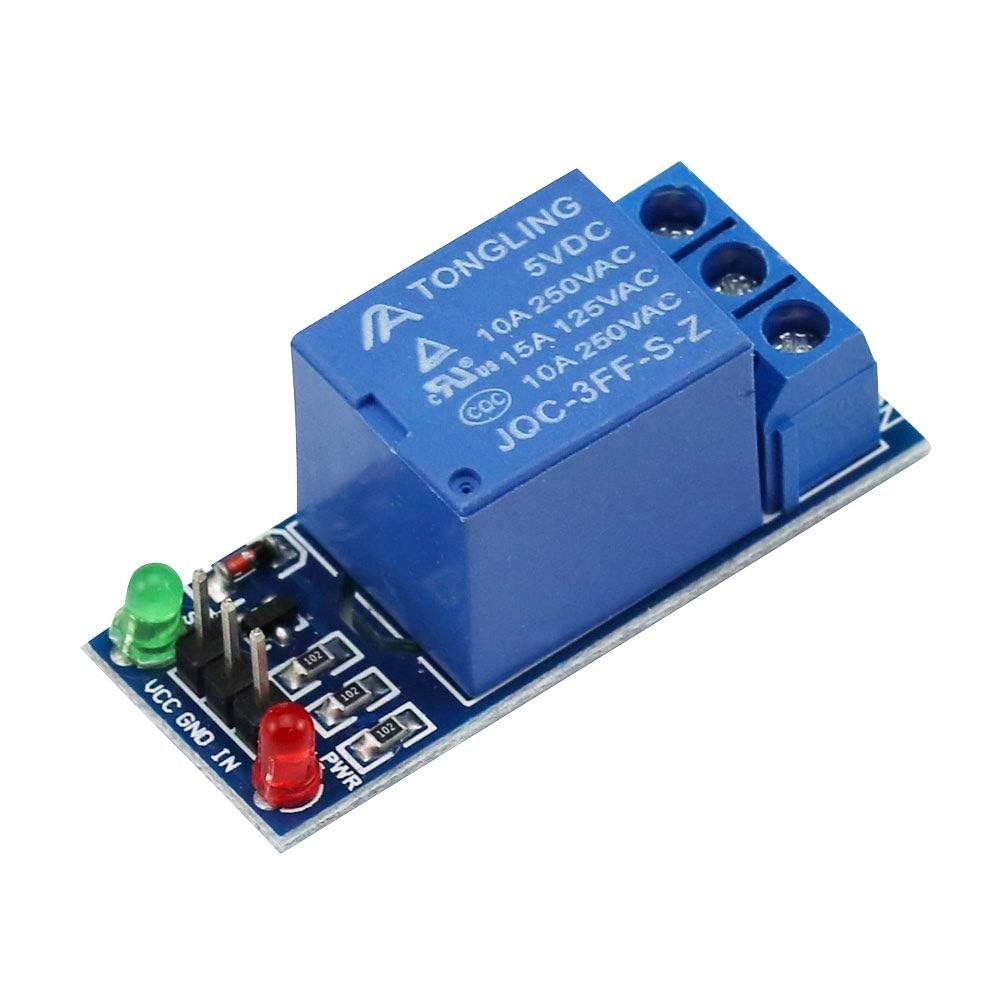
Kwa mradi huu, vifaa kuu vinajumuisha bodi ya Arduino, moduli ya kipokezi cha infrared, na moduli ya relay. Kipokezi cha infrared kinawajibika kunasa mawimbi kutoka kwa kidhibiti na kuyapeleka kwa Arduino. Moduli ya relay hufanya kama swichi kudhibiti balbu ya AC, ikiruhusu kuwasha na kuzima kulingana na mawimbi yaliyopokelewa.

Kipokezi cha infrared kwa kawaida hufanya kazi kwa mzunguko wa 38 kHz na kinaweza kugundua mawimbi kutoka umbali wa takriban mita 10 hadi 15. Mara tu Arduino inapopokea mawimbi, huitafsiri na kutumia relay kudhibiti nguvu ya balbu.
Maagizo ya Uunganishaji
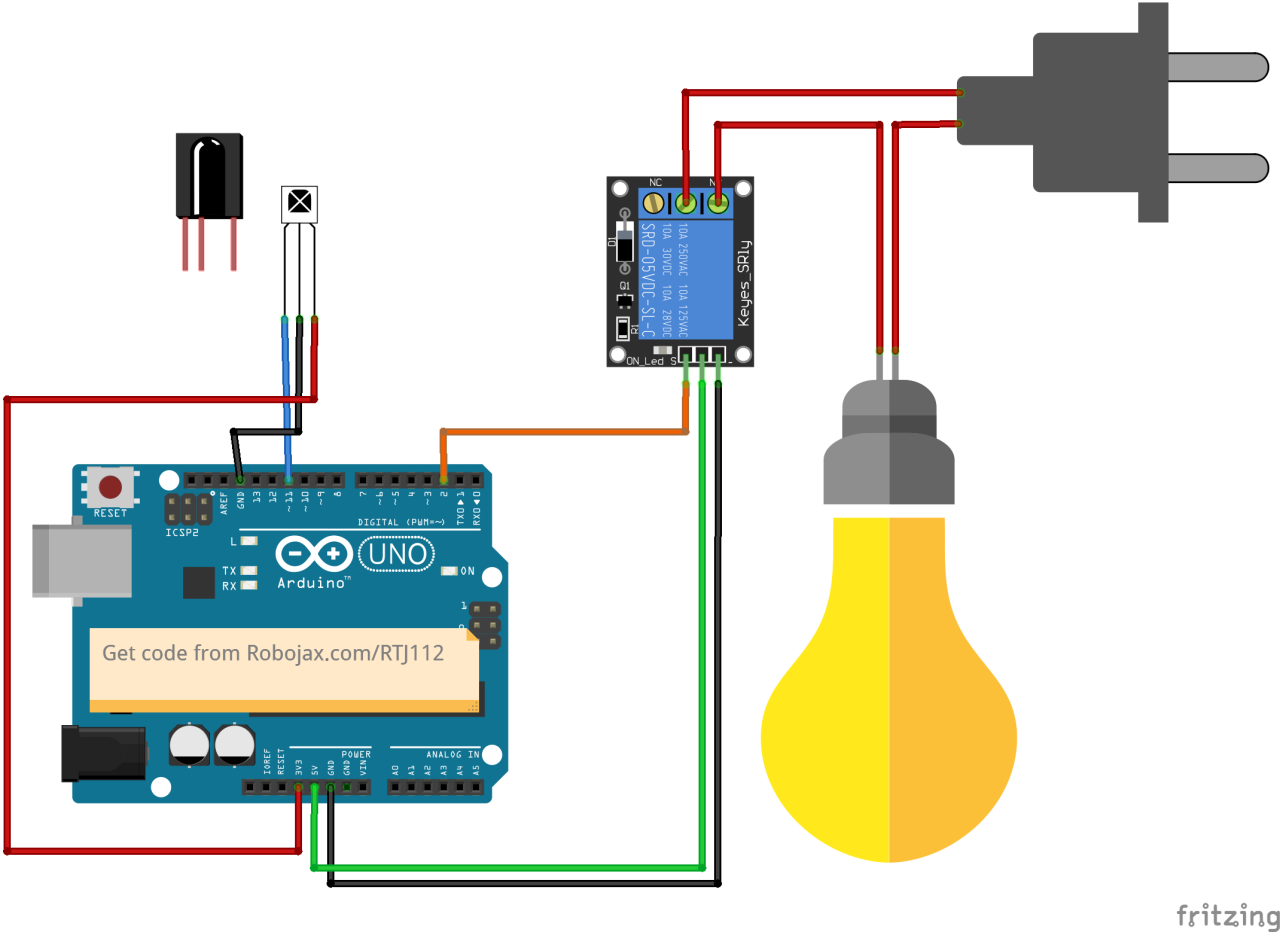
Anza uunganishaji kwa kuunganisha moduli ya kipokezi cha infrared kwenye Arduino. Pini ya VCC ya kipokezi inaunganishwa na pini ya 5V kwenye Arduino, na pini ya ardhi inaunganishwa na pini ya GND. Pini ya mawimbi kutoka kwa kipokezi cha infrared inapaswa kuunganishwa kwenye pini ya dijiti 11 kwenye Arduino.
Ifuatayo, unganisha moduli ya relay. Pini ya udhibiti wa relay inapaswa kuunganishwa kwenye pini ya dijiti 2 kwenye Arduino. Pia, unganisha pini za VCC na GND za relay kwenye 5V na GND za Arduino, mtawalia. Hatimaye, unganisha balbu ya AC kwenye relay kulingana na vipimo vya relay ili kuhakikisha uendeshaji salama.
Mifano ya Msimbo na Maelezo
Katika awamu ya usanidi wa programu, tunaanzisha mawasiliano ya serial na kuweka pini ya relay. Kitambulishi RECV_PIN kimewekwa kuwa 11, ambapo pini ya mawimbi ya kipokezi cha infrared imeunganishwa. Hii inaturuhusu kupokea data kutoka kwa kidhibiti.
void setup() {
  Serial.begin(9600);
  irrecv.enableIRIn(); // Anzisha kipokezi
  pinMode(RELAY_PIN, OUTPUT); // fafanua pini ya relay kama OUTPUT
  digitalWrite(RELAY_PIN, HIGH); // weka relay kuwa OFF mwanzoni
}
Katika kazi ya loop, tunaangalia kila mara mawimbi yanayoingia kutoka kwa kidhibiti. Wakati mawimbi yanapogunduliwa, thamani inasimbuliwa, na hatua inayolingana inachukuliwa kulingana na kitufe kilichobonyezwa.
void loop() {
  if (irrecv.decode(&results)) {
    Serial.println(results.value, HEX); // Chapisha thamani iliyopokelewa
    robojaxValidateCode(results.value); // Thibitisha msimbo
    irrecv.resume(); // Pokea thamani inayofuata
  }
  delay(100);
}
Kazi ya robojaxValidateCode inaangalia msimbo uliopokelewa dhidi ya thamani zinazojulikana za kidhibiti. Kulingana na kitufe gani kilichobonyezwa, itatekeleza hatua inayolingana kwa kutumia relay.
void robojaxValidateCode(int cd) {
  if (type == 'W' && !PCB) {
    // Angalia misimbo ya kidhibiti cheupe
    for (int i = 0; i < sizeof(whiteRemote) / sizeof(int); i++) {
      if (whiteRemote[i] == cd) {
        Serial.print("Kitufe kilichobonyezwa: ");
        Serial.println(whiteRemoteKey[i]);
        relayAction(whiteRemoteKey[i]); // Chukua hatua
      }
    }
  }
}
Katika kazi hii, msimbo unaangalia kama kitufe kilichobonyezwa kinalingana na thamani za safu zilizofafanuliwa. Ikiwa mlinganisho unapatikana, inaita kazi ya relayAction kuwasha au kuzima relay, kulingana na kitufe kilichobonyezwa.
Maonyesho / Nini cha Kutarajia
Baada ya kukamilisha uunganishaji na kupakia msimbo, unaweza kutumia kidhibiti chako cha infrared kudhibiti balbu ya AC. Bonyeza vitufe vilivyoteuliwa kwenye kidhibiti, na relay inapaswa kuwasha au kuzima balbu ipasavyo. Hakikisha umejaribu kila kitufe kuona majibu yake (katika video saa 5:00).
Vidokezo vya Muda wa Video
- 00:00 Mwanzo
- 00:49 Utangulizi
- 02:00 Uunganishaji na muunganisho
- 05:27 Msimbo wa Arduino umeelezwa
- 09:51 Maonyesho ya kudhibiti balbu ya AC na kidhibiti tofauti
- 13:13 Kutumia kidhibiti cha TV yako kudhibiti balbu ya AC
Bilder

/*
 * Original library from - http://arcfn.com
 *
 * This Arduino code decodes any remote code and then you can control an AC load using a relay
 * sold on eBay for Arduino.
 * You have to select the type of your remote as Black or White in the code below
 * and also select your receiver 1838 as either a PCB or bare module. See video for details
 *
 * You have to watch this video: https://youtu.be/muAkBQb24NI
 * before proceeding with this code.
 *
 * Modified/Written by Ahmad Shamshiri
 * on July 31, 2018 at 20:33 in Ajax, Ontario, Canada
 * for Robojax.com
 * Watch video instructions for this code: https://youtu.be/j5kb0WBpD30
 * Get other Arduino codes from Robojax.com
 *
 */

#include <IRremote.h>

int RECV_PIN = 11;
const char type ='W';// W for white, B for black. Must keep single quotes like 'B' or 'W'
const boolean PCB = 1;// if receiver is PCB set to 1, if not set to 0. See video for details
boolean displayCode = true;// to display remote code. if not, set to false

//***** Relay settings begins
const int RELAY_PIN = 2;//
const String ON="3";// turn relay ON with + key on remote
const String OFF="1";// turn relay OFF with - key on remote
//**** Relay settings ends

IRrecv irrecv(RECV_PIN);


// this is array holding codes for White Remote when used with PCB version of receiver
unsigned int whiteRemotePCB[] ={
            0xE318261B, // CH-
            0x511DBB,   // CH
            0xEE886D7F,  // CH+

            0x52A3D41F, // |<<
            0xD7E84B1B, // >>|
            0x20FE4DBB, // >||

            0xF076C13B, // -
            0xA3C8EDDB, // +
            0x12CEA6E6, // EQ

            0xC101E57B, // 0
            0x97483BFB, // 100+
            0xF0C41643, // 200+

            0x9716BE3F, // 1
            0x3D9AE3F7, // 2
            0x6182021B, // 3

            0x8C22657B, // 4
            0x488F3CBB, // 5
            0x449E79F,  // 6

            0x32C6FDF7, // 7
            0x1BC0157B, // 8
            0x3EC3FC1B  // 9
            };

// this is array holding codes for White Remote when used with non-PCB version of receiver
unsigned int whiteRemote[] ={
            0xFFA25D, // CH-
            0xFF629D,   // CH
            0xFFE21D,  // CH+

            0xFF22DD, // |<<
            0xFF02FD, // >>|
            0xFFC23D, // >||

            0xFFE01F, // -
            0xFFA857, // +
            0xFF906F, // EQ

            0xFF6897, // 0
            0xFF9867, // 100+
            0xFFB04F, // 200+

            0xFF30CF, // 1
            0xFF18E7, // 2
            0xFF7A85, // 3

            0xFF10EF, // 4
            0xFF38C7, // 5
            0xFF5AA5,  // 6

            0xFF42BD, // 7
            0xFF4AB5, // 8
            0xFF52AD  // 9
            };
// key lables of white remote
 String whiteRemoteKey[] ={
            "CH-",
            "CH",
            "CH+",

            "|<<",
            ">>|",
            ">||",

            "-",
            "+",
            "EQ",

            "0",
            "100+",
            "200+",

            "1",
            "2",
            "3",

            "4",
            "5",
            "6",

            "7",
            "8",
            "9"
            };

// this is array holding codes for Black Remote when used with non-PCB version of receiver
 unsigned int blackRemote[] ={
            0xFF629D, // ^
            0xFF22DD,   // <
            0xFF02FD,  // OK
            0xFFC23D, // >
            0xFFA857, // v

            0xFF6897, // 1
            0xFF9867, // 2
            0xF0C41643, // 3

            0xFF30CF, // 4
            0xFF18E7, // 5
            0xFF7A85,  // 6

            0xFF10EF, // 7
            0xFF38C7, // 8
            0xFF5AA5,  // 9

            0xFF42BD, // *
            0xFF4AB5, // 0
            0xFF52AD  // #
            };

// this is array holding codes for Black Remote when used with PCB version of receiver
 unsigned int blackRemotePCB[] ={
            0x511DBB, // ^
            0x52A3D41F,   // <
            0xD7E84B1B,  // OK
            0x20FE4DBB, // >
            0xA3C8EDDB, // v


            0xC101E57B, // 1
            0x97483BFB, // 2
            0xF0C41643, // 3

            0x9716BE3F, // 4
            0x3D9AE3F7, // 5
            0x6182021B,  // 6

            0x8C22657B, // 7
            0x488F3CBB, // 8
            0x449E79F,  // 9

            0x32C6FDF7, // *
            0x1BC0157B, // 0
            0x3EC3FC1B  // #
            };

// Black remote key names
 String blackRemoteKey[] ={
            "^",
            "<",
            "OK",
            ">",
            "v",

            "1",
            "2",
            "3",

            "4",
            "5",
            "6",

            "7",
            "8",
            "9",

            "*",
            "0",
            "#"
            };

decode_results results;


void setup()
{
  Serial.begin(9600);
  // In case the interrupt driver crashes on setup, give a clue
  // to the user what's going on.
  Serial.println("Robojax IR Decode");
  Serial.println("Control Relay with Remote");
  irrecv.enableIRIn(); // Start the receiver

  pinMode(RELAY_PIN,OUTPUT);// define a pin for relay as OUTPUT
  digitalWrite(RELAY_PIN, HIGH);// set relay to OFF at the begining
}

void loop() {

  if (irrecv.decode(&results)) {
    if(displayCode)Serial.println(results.value, HEX);
    robojaxValidateCode(results.value);// used the "robojaxValidateCode" bellow
    irrecv.resume(); // Receive the next value
  }
  delay(100);
}

/*
 * function: robojaxValidateCode
 * validates the remote code and prints the correct key name
 * cd is code passed from the loop
 * Written by A. S. for Robojax
 */
void robojaxValidateCode(int cd)
{

  // Robojax IR Remote decoder
  int found=0;

 if(type =='W' && !PCB)
 {
    // Robojax IR White Remote decoder
    // if type is set to 'W' (white remote) and PCB=0 then check White remote code
      for(int i=0; i< sizeof(whiteRemote)/sizeof(int); i++)
      {
        if(whiteRemote[i] ==cd)
        {

          Serial.print("Key pressed:");
          Serial.println(whiteRemoteKey[i]);
          relayAction(whiteRemoteKey[i]);// take action
          found=1;
        }// if matched
      }// for
 }else if(type =='W' && PCB){
    // Robojax IR White Remote decoder
    // if type is set to 'W' (white remote) and PCB=1 then check White remote code
      for(int i=0; i< sizeof(whiteRemotePCB)/sizeof(int); i++)
      {
        if(whiteRemotePCB[i] ==cd)
        {

          Serial.print("Key pressed:");
          Serial.println(whiteRemoteKey[i]);
          relayAction(whiteRemoteKey[i]);// take action
          found=1;
        }// if matched
      }// for
 }else if(type =='B' && PCB){
    // Robojax IR Black Remote decoder
       // if type is set to 'B' (black remote) and PCB=1 then check Black remote code
       for(int i=0; i< sizeof(blackRemotePCB)/sizeof(int); i++)
      {
        // Robojax IR black Remote decoder
        if(blackRemotePCB[i] ==cd)
        {

          Serial.print("Key pressed:");
          Serial.println(blackRemoteKey[i]);
         relayAction(blackRemoteKey[i]);// take action
          found=1;
        }// if matched
      }// for
 }else{

      // if type is set to 'B' (black remote) and PCB =0 then check Black remote code
       for(int i=0; i< sizeof(blackRemote)/sizeof(int); i++)
      {
        // Robojax IR black Remote decoder
        if(blackRemote[i] ==cd)
        {

          Serial.print("Key pressed:");
          Serial.println(blackRemoteKey[i]);
          relayAction(blackRemoteKey[i]);// take action

          found=1;
        }// if matched
      }// for
 }// else
  if(!found){
    if(cd !=0xFFFFFFFF)
      {
    Serial.println("Key unknown");
      }
  }// found
}// robojaxValidateCode end

/*
 *
 * relayAction()
 * receives string "value" as input and based on the settings,
 * turns relay pin HIGH or LOW
 */
void relayAction(String value)
{
  // Robojax IR Relay control
   if(value == ON)
   {
    digitalWrite(RELAY_PIN, LOW);// Turn relay ON
    Serial.println("Relay Turned ON");
   }

   if(value == OFF)
   {
    digitalWrite(RELAY_PIN, HIGH);// Turn relay OFF
    Serial.println("Relay Turned OFF");
   }
}//relayAction end
Tänker att du kanske behöver
-
Amazon
-
eBay
Resurser och referenser
Inga resurser än.
Filer📁
Fritzing-fil
-
VS1838B Infrared receiver
VS1838B_part.fzpz