아두이노와 릴레이를 사용하여 적외선 리모컨으로 AC 전구를 제어하기
이 튜토리얼에서는 Arduino와 릴레이 모듈을 이용해 적외선 리모컨으로 AC 전구를 작동하는 방법을 배웁니다. 이 프로젝트는 리모컨의 신호를 디코딩하고 이를 사용하여 릴레이를 제어하며, 릴레이는 AC 전구를 켜고 끄는 역할을 합니다. 이 튜토리얼이 끝나면 어떤 적외선 리모컨으로도 조명 기구를 제어할 수 있게 됩니다.
적외선 수신기를 사용하여 리모컨의 신호를 캡처하고, Arduino가 이 신호를 해석하여 특정 작업을 수행합니다. 제공된 코드를 통해 리모컨 유형(검은색 또는 흰색)과 수신기에 PCB 또는 베어 모듈을 사용하는지 여부를 선택할 수 있습니다. 자세한 내용과 설명은 관련 비디오를 시청하세요(비디오 0:00).
하드웨어 설명
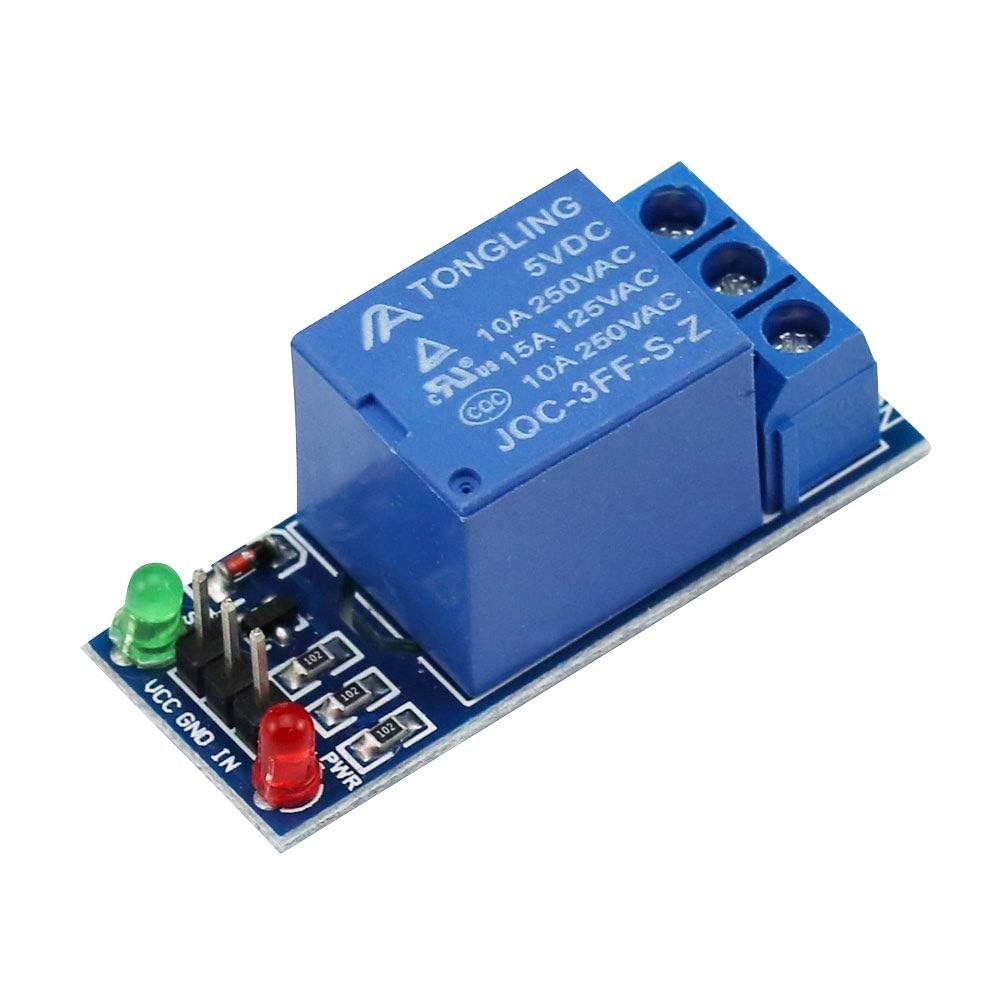
이 프로젝트의 주요 구성 요소는 Arduino 보드, 적외선 수신기 모듈 및 릴레이 모듈입니다. 적외선 수신기는 리모컨의 신호를 캡처하여 Arduino로 보내는 역할을 합니다. 릴레이 모듈은 AC 전구를 제어하는 스위치 역할을 하여 수신된 신호에 따라 전구를 켜고 끌 수 있습니다.

적외선 수신기는 일반적으로 38kHz 주파수에서 작동하며 약 10~15미터 거리에서 신호를 감지할 수 있습니다. Arduino가 신호를 수신하면 이를 디코딩하고 릴레이를 사용하여 전구의 전원을 제어합니다.
배선 지침
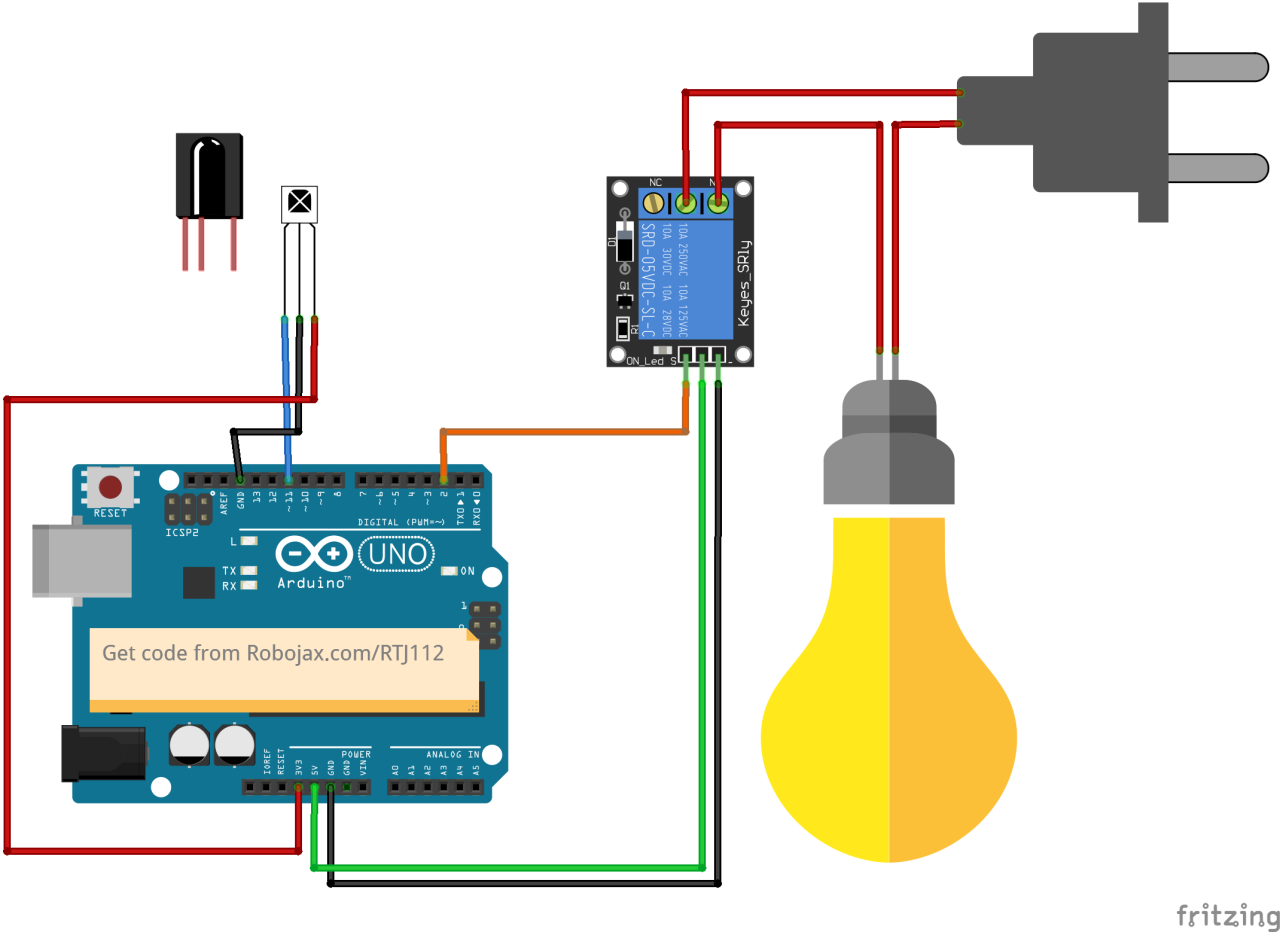
먼저 적외선 수신기 모듈을 Arduino에 연결합니다. 수신기의 VCC 핀은 Arduino의 5V 핀에 연결하고, 접지 핀은 GND 핀에 연결합니다. 적외선 수신기의 신호 핀은 Arduino의 디지털 핀 11에 연결해야 합니다.
다음으로 릴레이 모듈을 연결합니다. 릴레이의 제어 핀은 Arduino의 디지털 핀 2에 연결해야 합니다. 또한 릴레이의 VCC 및 GND 핀을 각각 Arduino의 5V 및 GND에 연결합니다. 마지막으로 안전한 작동을 위해 릴레이 사양에 따라 AC 전구를 릴레이에 연결합니다.
코드 예제 및 설명
프로그램의 설정 단계에서 직렬 통신을 초기화하고 릴레이 핀을 설정합니다. 식별자 RECV_PIN은 11로 설정되며, 이는 적외선 수신기의 신호 핀이 연결된 곳입니다. 이를 통해 리모컨에서 데이터를 수신할 수 있습니다.
void setup() {
  Serial.begin(9600);
  irrecv.enableIRIn(); // 수신기 시작
  pinMode(RELAY_PIN, OUTPUT); // 릴레이 핀을 OUTPUT으로 정의
  digitalWrite(RELAY_PIN, HIGH); // 처음에 릴레이를 OFF로 설정
}
루프 함수에서는 리모컨에서 들어오는 신호를 지속적으로 확인합니다. 신호가 감지되면 값을 디코딩하고 누른 키에 따라 해당 작업을 수행합니다.
void loop() {
  if (irrecv.decode(&results)) {
    Serial.println(results.value, HEX); // 수신된 값 출력
    robojaxValidateCode(results.value); // 코드 검증
    irrecv.resume(); // 다음 값 수신
  }
  delay(100);
}
robojaxValidateCode 함수는 수신된 코드를 리모컨의 알려진 값과 비교합니다. 어떤 키가 눌렸는지에 따라 릴레이를 사용하여 해당 작업을 실행합니다.
void robojaxValidateCode(int cd) {
  if (type == 'W' && !PCB) {
    // 흰색 리모컨 코드 확인
    for (int i = 0; i < sizeof(whiteRemote) / sizeof(int); i++) {
      if (whiteRemote[i] == cd) {
        Serial.print("Key pressed: ");
        Serial.println(whiteRemoteKey[i]);
        relayAction(whiteRemoteKey[i]); // 작업 수행
      }
    }
  }
}
이 함수에서는 눌린 키가 정의된 배열 값과 일치하는지 확인합니다. 일치하는 항목이 발견되면 relayAction 함수를 호출하여 눌린 키에 따라 릴레이를 켜거나 끕니다.
시연 / 예상 결과
배선을 완료하고 코드를 업로드한 후 적외선 리모컨을 사용하여 AC 전구를 제어할 수 있습니다. 리모컨에서 지정된 키를 누르면 릴레이가 전구를 켜거나 끕니다. 각 키의 응답을 확인하려면 모든 키를 테스트하세요(비디오 5:00).
비디오 타임스탬프
- 00:00 시작
- 00:49 소개
- 02:00 배선 및 연결
- 05:27 Arduino 코드 설명
- 09:51 다른 리모컨으로 AC 전구 제어 시연
- 13:13 TV 리모컨으로 AC 전구 제어
이미지

/*
 * Original library from - http://arcfn.com
 *
 * This Arduino code decodes any remote code and then you can control an AC load using a relay
 * sold on eBay for Arduino.
 * You have to select the type of your remote as Black or White in the code below
 * and also select your receiver 1838 as either a PCB or bare module. See video for details
 *
 * You have to watch this video: https://youtu.be/muAkBQb24NI
 * before proceeding with this code.
 *
 * Modified/Written by Ahmad Shamshiri
 * on July 31, 2018 at 20:33 in Ajax, Ontario, Canada
 * for Robojax.com
 * Watch video instructions for this code: https://youtu.be/j5kb0WBpD30
 * Get other Arduino codes from Robojax.com
 *
 */

#include <IRremote.h>

int RECV_PIN = 11;
const char type ='W';// W for white, B for black. Must keep single quotes like 'B' or 'W'
const boolean PCB = 1;// if receiver is PCB set to 1, if not set to 0. See video for details
boolean displayCode = true;// to display remote code. if not, set to false

//***** Relay settings begins
const int RELAY_PIN = 2;//
const String ON="3";// turn relay ON with + key on remote
const String OFF="1";// turn relay OFF with - key on remote
//**** Relay settings ends

IRrecv irrecv(RECV_PIN);


// this is array holding codes for White Remote when used with PCB version of receiver
unsigned int whiteRemotePCB[] ={
            0xE318261B, // CH-
            0x511DBB,   // CH
            0xEE886D7F,  // CH+

            0x52A3D41F, // |<<
            0xD7E84B1B, // >>|
            0x20FE4DBB, // >||

            0xF076C13B, // -
            0xA3C8EDDB, // +
            0x12CEA6E6, // EQ

            0xC101E57B, // 0
            0x97483BFB, // 100+
            0xF0C41643, // 200+

            0x9716BE3F, // 1
            0x3D9AE3F7, // 2
            0x6182021B, // 3

            0x8C22657B, // 4
            0x488F3CBB, // 5
            0x449E79F,  // 6

            0x32C6FDF7, // 7
            0x1BC0157B, // 8
            0x3EC3FC1B  // 9
            };

// this is array holding codes for White Remote when used with non-PCB version of receiver
unsigned int whiteRemote[] ={
            0xFFA25D, // CH-
            0xFF629D,   // CH
            0xFFE21D,  // CH+

            0xFF22DD, // |<<
            0xFF02FD, // >>|
            0xFFC23D, // >||

            0xFFE01F, // -
            0xFFA857, // +
            0xFF906F, // EQ

            0xFF6897, // 0
            0xFF9867, // 100+
            0xFFB04F, // 200+

            0xFF30CF, // 1
            0xFF18E7, // 2
            0xFF7A85, // 3

            0xFF10EF, // 4
            0xFF38C7, // 5
            0xFF5AA5,  // 6

            0xFF42BD, // 7
            0xFF4AB5, // 8
            0xFF52AD  // 9
            };
// key lables of white remote
 String whiteRemoteKey[] ={
            "CH-",
            "CH",
            "CH+",

            "|<<",
            ">>|",
            ">||",

            "-",
            "+",
            "EQ",

            "0",
            "100+",
            "200+",

            "1",
            "2",
            "3",

            "4",
            "5",
            "6",

            "7",
            "8",
            "9"
            };

// this is array holding codes for Black Remote when used with non-PCB version of receiver
 unsigned int blackRemote[] ={
            0xFF629D, // ^
            0xFF22DD,   // <
            0xFF02FD,  // OK
            0xFFC23D, // >
            0xFFA857, // v

            0xFF6897, // 1
            0xFF9867, // 2
            0xF0C41643, // 3

            0xFF30CF, // 4
            0xFF18E7, // 5
            0xFF7A85,  // 6

            0xFF10EF, // 7
            0xFF38C7, // 8
            0xFF5AA5,  // 9

            0xFF42BD, // *
            0xFF4AB5, // 0
            0xFF52AD  // #
            };

// this is array holding codes for Black Remote when used with PCB version of receiver
 unsigned int blackRemotePCB[] ={
            0x511DBB, // ^
            0x52A3D41F,   // <
            0xD7E84B1B,  // OK
            0x20FE4DBB, // >
            0xA3C8EDDB, // v


            0xC101E57B, // 1
            0x97483BFB, // 2
            0xF0C41643, // 3

            0x9716BE3F, // 4
            0x3D9AE3F7, // 5
            0x6182021B,  // 6

            0x8C22657B, // 7
            0x488F3CBB, // 8
            0x449E79F,  // 9

            0x32C6FDF7, // *
            0x1BC0157B, // 0
            0x3EC3FC1B  // #
            };

// Black remote key names
 String blackRemoteKey[] ={
            "^",
            "<",
            "OK",
            ">",
            "v",

            "1",
            "2",
            "3",

            "4",
            "5",
            "6",

            "7",
            "8",
            "9",

            "*",
            "0",
            "#"
            };

decode_results results;


void setup()
{
  Serial.begin(9600);
  // In case the interrupt driver crashes on setup, give a clue
  // to the user what's going on.
  Serial.println("Robojax IR Decode");
  Serial.println("Control Relay with Remote");
  irrecv.enableIRIn(); // Start the receiver

  pinMode(RELAY_PIN,OUTPUT);// define a pin for relay as OUTPUT
  digitalWrite(RELAY_PIN, HIGH);// set relay to OFF at the begining
}

void loop() {

  if (irrecv.decode(&results)) {
    if(displayCode)Serial.println(results.value, HEX);
    robojaxValidateCode(results.value);// used the "robojaxValidateCode" bellow
    irrecv.resume(); // Receive the next value
  }
  delay(100);
}

/*
 * function: robojaxValidateCode
 * validates the remote code and prints the correct key name
 * cd is code passed from the loop
 * Written by A. S. for Robojax
 */
void robojaxValidateCode(int cd)
{

  // Robojax IR Remote decoder
  int found=0;

 if(type =='W' && !PCB)
 {
    // Robojax IR White Remote decoder
    // if type is set to 'W' (white remote) and PCB=0 then check White remote code
      for(int i=0; i< sizeof(whiteRemote)/sizeof(int); i++)
      {
        if(whiteRemote[i] ==cd)
        {

          Serial.print("Key pressed:");
          Serial.println(whiteRemoteKey[i]);
          relayAction(whiteRemoteKey[i]);// take action
          found=1;
        }// if matched
      }// for
 }else if(type =='W' && PCB){
    // Robojax IR White Remote decoder
    // if type is set to 'W' (white remote) and PCB=1 then check White remote code
      for(int i=0; i< sizeof(whiteRemotePCB)/sizeof(int); i++)
      {
        if(whiteRemotePCB[i] ==cd)
        {

          Serial.print("Key pressed:");
          Serial.println(whiteRemoteKey[i]);
          relayAction(whiteRemoteKey[i]);// take action
          found=1;
        }// if matched
      }// for
 }else if(type =='B' && PCB){
    // Robojax IR Black Remote decoder
       // if type is set to 'B' (black remote) and PCB=1 then check Black remote code
       for(int i=0; i< sizeof(blackRemotePCB)/sizeof(int); i++)
      {
        // Robojax IR black Remote decoder
        if(blackRemotePCB[i] ==cd)
        {

          Serial.print("Key pressed:");
          Serial.println(blackRemoteKey[i]);
         relayAction(blackRemoteKey[i]);// take action
          found=1;
        }// if matched
      }// for
 }else{

      // if type is set to 'B' (black remote) and PCB =0 then check Black remote code
       for(int i=0; i< sizeof(blackRemote)/sizeof(int); i++)
      {
        // Robojax IR black Remote decoder
        if(blackRemote[i] ==cd)
        {

          Serial.print("Key pressed:");
          Serial.println(blackRemoteKey[i]);
          relayAction(blackRemoteKey[i]);// take action

          found=1;
        }// if matched
      }// for
 }// else
  if(!found){
    if(cd !=0xFFFFFFFF)
      {
    Serial.println("Key unknown");
      }
  }// found
}// robojaxValidateCode end

/*
 *
 * relayAction()
 * receives string "value" as input and based on the settings,
 * turns relay pin HIGH or LOW
 */
void relayAction(String value)
{
  // Robojax IR Relay control
   if(value == ON)
   {
    digitalWrite(RELAY_PIN, LOW);// Turn relay ON
    Serial.println("Relay Turned ON");
   }

   if(value == OFF)
   {
    digitalWrite(RELAY_PIN, HIGH);// Turn relay OFF
    Serial.println("Relay Turned OFF");
   }
}//relayAction end
필요할 수 있는 것들
-
아마존
-
이베이
자원 및 참고자료
아직 자원이 없습니다.
파일📁
프리징 파일
-
VS1838B Infrared receiver
VS1838B_part.fzpz