Kendalikan bohlam AC menggunakan remote inframerah apa pun dengan Arduino dan relay
Dalam tutorial ini, kita akan mempelajari cara menggunakan remote kontrol inframerah untuk mengoperasikan bohlam AC melalui Arduino dan modul relay. Proyek ini melibatkan penguraian sinyal dari remote dan menggunakannya untuk mengontrol relay, yang selanjutnya akan menyalakan dan mematikan bohlam AC. Di akhir tutorial ini, Anda akan dapat menggunakan remote inframerah apa pun untuk mengontrol perlengkapan lampu Anda.
Kita akan menggunakan penerima inframerah untuk menangkap sinyal dari remote, dan Arduino akan menafsirkan sinyal-sinyal ini untuk melakukan tindakan tertentu. Kode yang disediakan akan memungkinkan Anda untuk memilih jenis remote (hitam atau putih) dan apakah Anda menggunakan PCB atau modul telanjang untuk penerima. Pastikan untuk menonton video terkait untuk detail dan klarifikasi tambahan (di video pada 0:00).
Penjelasan Perangkat Keras
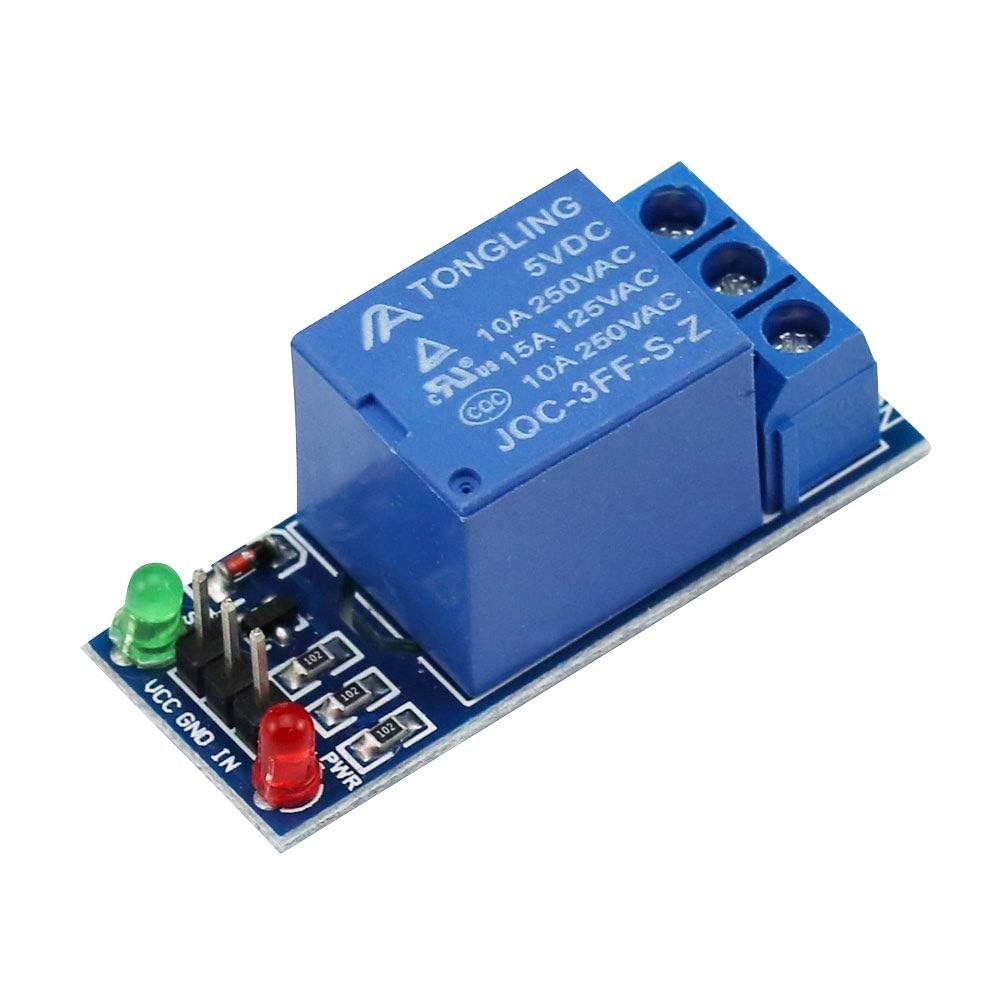
Untuk proyek ini, komponen utama termasuk papan Arduino, modul penerima inframerah, dan modul relay. Penerima inframerah bertanggung jawab untuk menangkap sinyal dari remote kontrol dan mengirimkannya ke Arduino. Modul relay bertindak sebagai sakelar untuk mengontrol bohlam AC, memungkinkannya untuk menyala dan mati berdasarkan sinyal yang diterima.

Penerima inframerah biasanya beroperasi pada frekuensi 38 kHz dan dapat mendeteksi sinyal dari jarak sekitar 10 hingga 15 meter. Setelah Arduino menerima sinyal, ia menguraikannya dan menggunakan relay untuk mengontrol daya ke bohlam.
Instruksi Pengkabelan
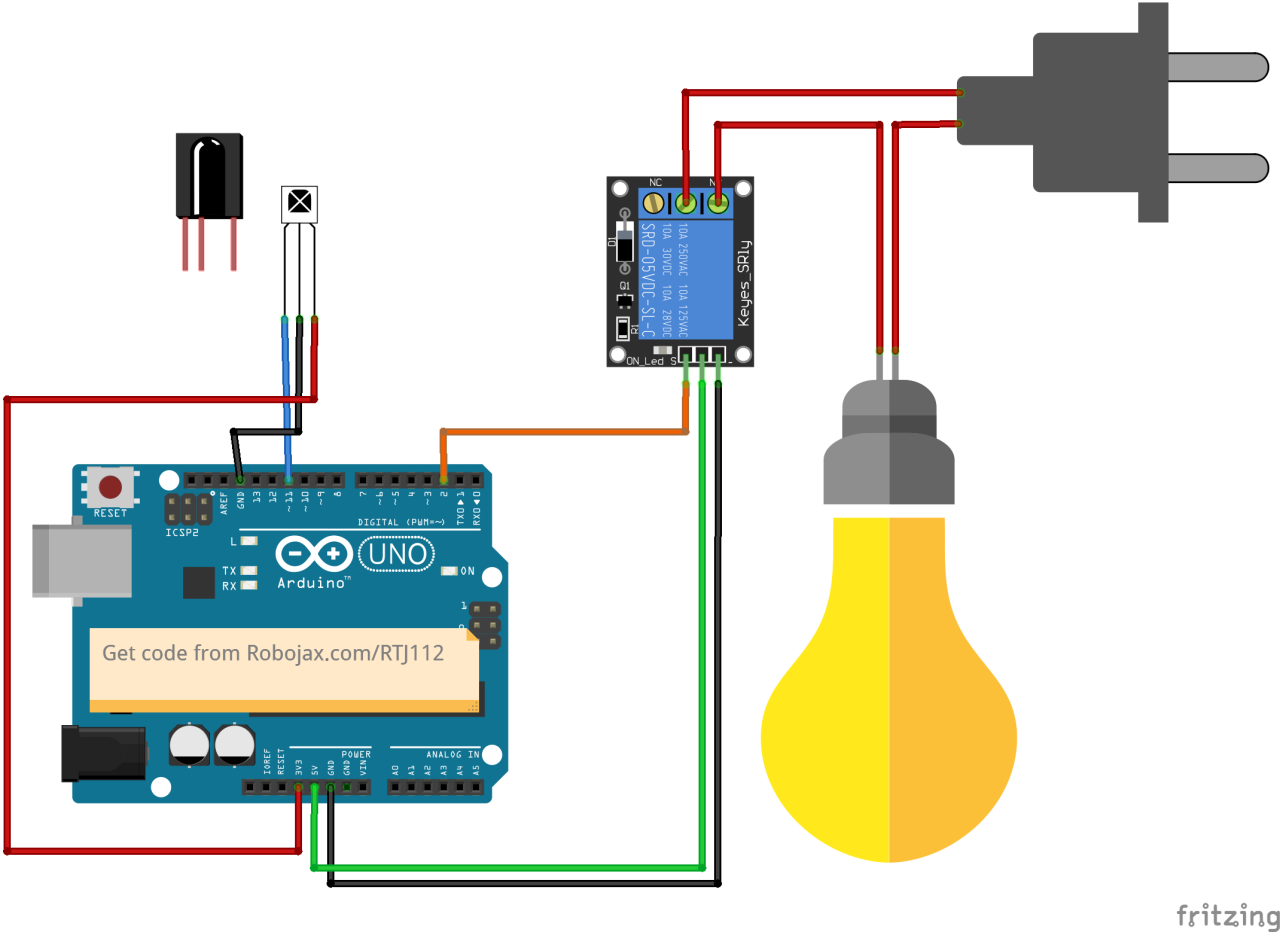
Mulailah pengkabelan dengan menghubungkan modul penerima inframerah ke Arduino. Pin VCC penerima terhubung ke pin 5V di Arduino, dan pin ground terhubung ke pin GND. Pin sinyal dari penerima inframerah harus dihubungkan ke pin digital 11 di Arduino.
Selanjutnya, hubungkan modul relay. Pin kontrol relay harus dihubungkan ke pin digital 2 di Arduino. Juga, hubungkan pin VCC dan GND relay ke 5V dan GND Arduino, masing-masing. Terakhir, sambungkan bohlam AC ke relay sesuai dengan spesifikasi relay untuk memastikan pengoperasian yang aman.
Contoh Kode & Penjelasan
Dalam fase pengaturan program, kita menginisialisasi komunikasi serial dan mengatur pin relay. Pengenal RECV_PIN diatur ke 11, yang merupakan tempat pin sinyal penerima inframerah terhubung. Ini memungkinkan kita untuk menerima data dari remote kontrol.
void setup() {
  Serial.begin(9600);
  irrecv.enableIRIn(); // Mulai penerima
  pinMode(RELAY_PIN, OUTPUT); // tentukan pin untuk relay sebagai OUTPUT
  digitalWrite(RELAY_PIN, HIGH); // atur relay ke OFF pada awalnya
}
Dalam fungsi loop, kita terus-menerus memeriksa sinyal masuk dari remote. Ketika sinyal terdeteksi, nilainya diuraikan, dan tindakan yang sesuai diambil berdasarkan tombol yang ditekan.
void loop() {
  if (irrecv.decode(&results)) {
    Serial.println(results.value, HEX); // Cetak nilai yang diterima
    robojaxValidateCode(results.value); // Validasi kode
    irrecv.resume(); // Terima nilai berikutnya
  }
  delay(100);
}
Fungsi robojaxValidateCode memeriksa kode yang diterima terhadap nilai yang diketahui untuk remote. Tergantung pada tombol mana yang ditekan, ia akan menjalankan tindakan yang sesuai menggunakan relay.
void robojaxValidateCode(int cd) {
  if (type == 'W' && !PCB) {
    // Periksa kode remote Putih
    for (int i = 0; i < sizeof(whiteRemote) / sizeof(int); i++) {
      if (whiteRemote[i] == cd) {
        Serial.print("Tombol ditekan: ");
        Serial.println(whiteRemoteKey[i]);
        relayAction(whiteRemoteKey[i]); // Ambil tindakan
      }
    }
  }
}
Dalam fungsi ini, kode memeriksa apakah tombol yang ditekan sesuai dengan nilai array yang ditentukan. Jika kecocokan ditemukan, ia memanggil fungsi relayAction untuk menyalakan atau mematikan relay, tergantung pada tombol yang ditekan.
Demonstrasi / Apa yang Diharapkan
Setelah menyelesaikan pengkabelan dan mengunggah kode, Anda dapat menggunakan remote inframerah Anda untuk mengontrol bohlam AC. Tekan tombol yang ditentukan pada remote, dan relay harus mengaktifkan atau menonaktifkan bohlam sesuai. Pastikan untuk menguji setiap tombol untuk melihat responsnya (di video pada 5:00).
Stempel Waktu Video
- 00:00 Mulai
- 00:49 Pendahuluan
- 02:00 Pengkabelan dan koneksi
- 05:27 Kode Arduino dijelaskan
- 09:51 Demonstrasi mengontrol bohlam AC dengan remote yang berbeda
- 13:13 Menggunakan remote TV Anda untuk mengontrol bohlam AC
Gambar

/*
 * Original library from - http://arcfn.com
 *
 * This Arduino code decodes any remote code and then you can control an AC load using a relay
 * sold on eBay for Arduino.
 * You have to select the type of your remote as Black or White in the code below
 * and also select your receiver 1838 as either a PCB or bare module. See video for details
 *
 * You have to watch this video: https://youtu.be/muAkBQb24NI
 * before proceeding with this code.
 *
 * Modified/Written by Ahmad Shamshiri
 * on July 31, 2018 at 20:33 in Ajax, Ontario, Canada
 * for Robojax.com
 * Watch video instructions for this code: https://youtu.be/j5kb0WBpD30
 * Get other Arduino codes from Robojax.com
 *
 */

#include <IRremote.h>

int RECV_PIN = 11;
const char type ='W';// W for white, B for black. Must keep single quotes like 'B' or 'W'
const boolean PCB = 1;// if receiver is PCB set to 1, if not set to 0. See video for details
boolean displayCode = true;// to display remote code. if not, set to false

//***** Relay settings begins
const int RELAY_PIN = 2;//
const String ON="3";// turn relay ON with + key on remote
const String OFF="1";// turn relay OFF with - key on remote
//**** Relay settings ends

IRrecv irrecv(RECV_PIN);


// this is array holding codes for White Remote when used with PCB version of receiver
unsigned int whiteRemotePCB[] ={
            0xE318261B, // CH-
            0x511DBB,   // CH
            0xEE886D7F,  // CH+

            0x52A3D41F, // |<<
            0xD7E84B1B, // >>|
            0x20FE4DBB, // >||

            0xF076C13B, // -
            0xA3C8EDDB, // +
            0x12CEA6E6, // EQ

            0xC101E57B, // 0
            0x97483BFB, // 100+
            0xF0C41643, // 200+

            0x9716BE3F, // 1
            0x3D9AE3F7, // 2
            0x6182021B, // 3

            0x8C22657B, // 4
            0x488F3CBB, // 5
            0x449E79F,  // 6

            0x32C6FDF7, // 7
            0x1BC0157B, // 8
            0x3EC3FC1B  // 9
            };

// this is array holding codes for White Remote when used with non-PCB version of receiver
unsigned int whiteRemote[] ={
            0xFFA25D, // CH-
            0xFF629D,   // CH
            0xFFE21D,  // CH+

            0xFF22DD, // |<<
            0xFF02FD, // >>|
            0xFFC23D, // >||

            0xFFE01F, // -
            0xFFA857, // +
            0xFF906F, // EQ

            0xFF6897, // 0
            0xFF9867, // 100+
            0xFFB04F, // 200+

            0xFF30CF, // 1
            0xFF18E7, // 2
            0xFF7A85, // 3

            0xFF10EF, // 4
            0xFF38C7, // 5
            0xFF5AA5,  // 6

            0xFF42BD, // 7
            0xFF4AB5, // 8
            0xFF52AD  // 9
            };
// key lables of white remote
 String whiteRemoteKey[] ={
            "CH-",
            "CH",
            "CH+",

            "|<<",
            ">>|",
            ">||",

            "-",
            "+",
            "EQ",

            "0",
            "100+",
            "200+",

            "1",
            "2",
            "3",

            "4",
            "5",
            "6",

            "7",
            "8",
            "9"
            };

// this is array holding codes for Black Remote when used with non-PCB version of receiver
 unsigned int blackRemote[] ={
            0xFF629D, // ^
            0xFF22DD,   // <
            0xFF02FD,  // OK
            0xFFC23D, // >
            0xFFA857, // v

            0xFF6897, // 1
            0xFF9867, // 2
            0xF0C41643, // 3

            0xFF30CF, // 4
            0xFF18E7, // 5
            0xFF7A85,  // 6

            0xFF10EF, // 7
            0xFF38C7, // 8
            0xFF5AA5,  // 9

            0xFF42BD, // *
            0xFF4AB5, // 0
            0xFF52AD  // #
            };

// this is array holding codes for Black Remote when used with PCB version of receiver
 unsigned int blackRemotePCB[] ={
            0x511DBB, // ^
            0x52A3D41F,   // <
            0xD7E84B1B,  // OK
            0x20FE4DBB, // >
            0xA3C8EDDB, // v


            0xC101E57B, // 1
            0x97483BFB, // 2
            0xF0C41643, // 3

            0x9716BE3F, // 4
            0x3D9AE3F7, // 5
            0x6182021B,  // 6

            0x8C22657B, // 7
            0x488F3CBB, // 8
            0x449E79F,  // 9

            0x32C6FDF7, // *
            0x1BC0157B, // 0
            0x3EC3FC1B  // #
            };

// Black remote key names
 String blackRemoteKey[] ={
            "^",
            "<",
            "OK",
            ">",
            "v",

            "1",
            "2",
            "3",

            "4",
            "5",
            "6",

            "7",
            "8",
            "9",

            "*",
            "0",
            "#"
            };

decode_results results;


void setup()
{
  Serial.begin(9600);
  // In case the interrupt driver crashes on setup, give a clue
  // to the user what's going on.
  Serial.println("Robojax IR Decode");
  Serial.println("Control Relay with Remote");
  irrecv.enableIRIn(); // Start the receiver

  pinMode(RELAY_PIN,OUTPUT);// define a pin for relay as OUTPUT
  digitalWrite(RELAY_PIN, HIGH);// set relay to OFF at the begining
}

void loop() {

  if (irrecv.decode(&results)) {
    if(displayCode)Serial.println(results.value, HEX);
    robojaxValidateCode(results.value);// used the "robojaxValidateCode" bellow
    irrecv.resume(); // Receive the next value
  }
  delay(100);
}

/*
 * function: robojaxValidateCode
 * validates the remote code and prints the correct key name
 * cd is code passed from the loop
 * Written by A. S. for Robojax
 */
void robojaxValidateCode(int cd)
{

  // Robojax IR Remote decoder
  int found=0;

 if(type =='W' && !PCB)
 {
    // Robojax IR White Remote decoder
    // if type is set to 'W' (white remote) and PCB=0 then check White remote code
      for(int i=0; i< sizeof(whiteRemote)/sizeof(int); i++)
      {
        if(whiteRemote[i] ==cd)
        {

          Serial.print("Key pressed:");
          Serial.println(whiteRemoteKey[i]);
          relayAction(whiteRemoteKey[i]);// take action
          found=1;
        }// if matched
      }// for
 }else if(type =='W' && PCB){
    // Robojax IR White Remote decoder
    // if type is set to 'W' (white remote) and PCB=1 then check White remote code
      for(int i=0; i< sizeof(whiteRemotePCB)/sizeof(int); i++)
      {
        if(whiteRemotePCB[i] ==cd)
        {

          Serial.print("Key pressed:");
          Serial.println(whiteRemoteKey[i]);
          relayAction(whiteRemoteKey[i]);// take action
          found=1;
        }// if matched
      }// for
 }else if(type =='B' && PCB){
    // Robojax IR Black Remote decoder
       // if type is set to 'B' (black remote) and PCB=1 then check Black remote code
       for(int i=0; i< sizeof(blackRemotePCB)/sizeof(int); i++)
      {
        // Robojax IR black Remote decoder
        if(blackRemotePCB[i] ==cd)
        {

          Serial.print("Key pressed:");
          Serial.println(blackRemoteKey[i]);
         relayAction(blackRemoteKey[i]);// take action
          found=1;
        }// if matched
      }// for
 }else{

      // if type is set to 'B' (black remote) and PCB =0 then check Black remote code
       for(int i=0; i< sizeof(blackRemote)/sizeof(int); i++)
      {
        // Robojax IR black Remote decoder
        if(blackRemote[i] ==cd)
        {

          Serial.print("Key pressed:");
          Serial.println(blackRemoteKey[i]);
          relayAction(blackRemoteKey[i]);// take action

          found=1;
        }// if matched
      }// for
 }// else
  if(!found){
    if(cd !=0xFFFFFFFF)
      {
    Serial.println("Key unknown");
      }
  }// found
}// robojaxValidateCode end

/*
 *
 * relayAction()
 * receives string "value" as input and based on the settings,
 * turns relay pin HIGH or LOW
 */
void relayAction(String value)
{
  // Robojax IR Relay control
   if(value == ON)
   {
    digitalWrite(RELAY_PIN, LOW);// Turn relay ON
    Serial.println("Relay Turned ON");
   }

   if(value == OFF)
   {
    digitalWrite(RELAY_PIN, HIGH);// Turn relay OFF
    Serial.println("Relay Turned OFF");
   }
}//relayAction end
Hal-hal yang mungkin Anda butuhkan
-
Amazon
-
eBay
Sumber daya & referensi
Belum ada sumber daya.
Berkas📁
File Fritzing
-
VS1838B Infrared receiver
VS1838B_part.fzpz